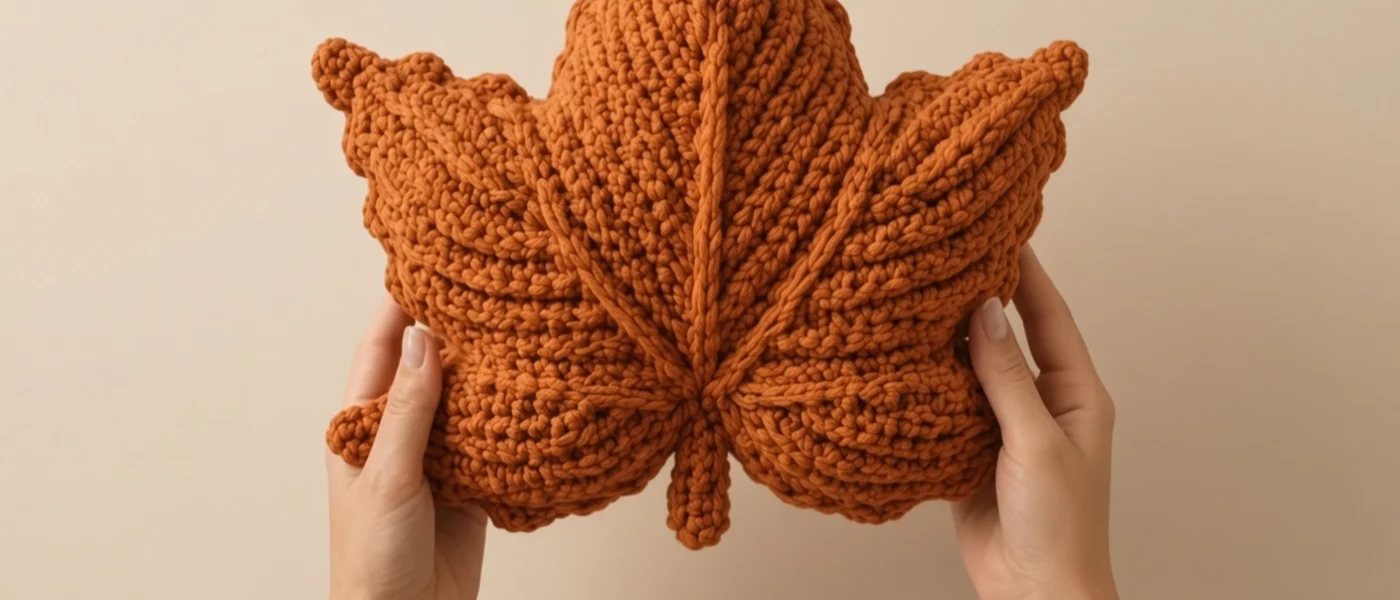
Ember the Maple Leaf Amigurumi Pattern
This maple leaf amigurumi pattern makes Ember, a plump rust-colored leaf that reads as a real leaf from across the room. Five lobes are worked as separate flat pieces, joined into two mirrored panels, stitched together with a picot edge that gives the outline its bumpy, slightly curled look, and then stuffed. Raised veins are added last with surface slip stitch, radiating from a chunky stem to each lobe tip, and a small stuffed nub finishes the center point.
Because it uses bulky yarn and a 5.5 mm hook, the stitches are large and easy to count, but the construction is genuinely advanced: you will manage eleven pieces, join three lobes into one row without losing a stitch, work sc3tog notches through two layers, and control stuffing lobe by lobe while you close the edge. Expect five to seven hours in total. It suits crocheters who are comfortable with flat shaping and want a decorative piece that works as a shelf accent, a small cushion, or a photo prop for an autumn table.
Materials
- Bulky (#5) cotton-blend yarn in rust / burnt orange approx. 220 g (about 200 m)
- 5.5 mm crochet hook or size needed to get a firm, gap-free fabric
- Polyester fiberfill approx. 120 g
- Tapestry needle large eye, for bulky yarn
- Stitch markers at least 6, to mark right sides and lobe tips
- Sewing pins for aligning the two panels before joining
- Scissors
Abbreviations
chchainscsingle crochetinc2 sc in the same stitchdecsc2tog (single crochet 2 stitches together)sc3togsingle crochet 3 stitches togethersl stslip stitchMRmagic ringpicotch 3, sl st in 3rd ch from hooksurface sl stslip stitch worked through the fabric with yarn held behind the workst(s)stitch(es)RS / WSright side / wrong side( )stitch count at end of row/roundCenter Lobe (make 2)
- Row 1: Ch 2, 3 sc in 2nd ch from hook, turn. (3)
- Row 2: Ch 1, inc, sc in next st, inc, turn. (5)
- Row 3: Ch 1, inc, sc in next 3 sts, inc, turn. (7)
- Row 4: Ch 1, inc, sc in next 5 sts, inc, turn. (9)
- Row 5: Ch 1, inc, sc in next 7 sts, inc, turn. (11)
- Row 6: Ch 1, inc, sc in next 9 sts, inc, turn. (13)
- Rows 7-10: Ch 1, sc in each st across, turn. (13)
- Fasten off. Mark the RS. Row 1 is the tip; Row 10 is the base.
Side Lobe (make 4)
- Row 1: Ch 2, 3 sc in 2nd ch from hook, turn. (3)
- Row 2: Ch 1, inc, sc in next st, inc, turn. (5)
- Row 3: Ch 1, inc, sc in next 3 sts, inc, turn. (7)
- Row 4: Ch 1, inc, sc in next 5 sts, inc, turn. (9)
- Row 5: Ch 1, inc, sc in next 7 sts, inc, turn. (11)
- Rows 6-7: Ch 1, sc in each st across, turn. (11)
- Fasten off. Mark the RS. Row 1 is the tip; Row 7 is the base.
Lower Body and Panel Assembly (make 2)
- Setup: Lay one side lobe, one center lobe and one side lobe side by side, all RS up, base rows at the bottom and edges touching. The three bases form one continuous line of 35 sts.
- Row 1: Join yarn with a sl st in the first base st of the right-hand side lobe, ch 1, sc in each of the 11 sts of that lobe, sc in each of the 13 sts of the center lobe, sc in each of the 11 sts of the left-hand lobe, turn. (35)
- Row 2: Ch 1, dec, sc in each st to last 2 sts, dec, turn. (33)
- Row 3: Ch 1, dec, sc in each st to last 2 sts, dec, turn. (31)
- Row 4: Ch 1, dec, sc in each st to last 2 sts, dec, turn. (29)
- Row 5: Ch 1, dec twice, sc in each st to last 4 sts, dec twice, turn. (25)
- Row 6: Ch 1, dec twice, sc in each st to last 4 sts, dec twice, turn. (21)
- Row 7: Ch 1, dec twice, sc in each st to last 4 sts, dec twice, turn. (17)
- Row 8: Ch 1, dec twice, sc in each st to last 4 sts, dec twice, turn. (13)
- Row 9: Ch 1, dec twice, sc in each st to last 4 sts, dec twice, turn. (9)
- Row 10: Ch 1, dec twice, sc in next st, dec twice, turn. (5)
- Fasten off. This is one complete leaf panel. Repeat with the remaining lobes for the second panel.
Stem (make 1)
- Round 1: 6 sc in MR. (6)
- Round 2: (sc in next st, inc) 3 times. (9)
- Rounds 3-6: Sc in each st around. (9)
- Stuff firmly. Fasten off leaving a 40 cm tail for sewing.
Tip Nub (make 1)
- Round 1: 6 sc in MR. (6)
- Round 2: Inc in each st around. (12)
- Round 3: Sc in each st around. (12)
- Round 4: Dec 6 times. (6)
- Stuff lightly. Fasten off leaving a 25 cm tail, thread through the front loops of the last 6 sts and pull closed.
Picot Edge and Joining
- Hold the two panels WS together with RS facing out, lobe tips matched, and pin around the edge. Row-ends and stitches must line up on both layers.
- Join yarn through both layers at the bottom center of the lower body (the middle of the 5-st Row 10). Ch 1. All stitches from here on go through both layers.
- Edge repeat: *sc in next 3 sts or row-ends, picot; repeat from * along every edge. Work 1 sc into each row-end along the sloped sides and 1 sc into each st across the top of Row 1 at the tips.
- At each lobe tip: work (sc, picot, sc) into the center stitch of Row 1 so the point stays sharp.
- At each notch between lobes (where a side lobe meets the center lobe): work sc3tog over the last row-end of one lobe, the join point, and the first row-end of the next lobe. Skip the picot at the notch.
- Stuff as you go. Fill each lobe firmly before you work past its notch; the lobe openings are too narrow to fill later.
- Continue around the second side and down the lower body, stuffing the body evenly through the last open gap, then work the final sts and sl st into the first sc. Fasten off and weave in the tail.
Veins (surface slip stitch, front panel only)
- Hold yarn behind the front panel. Insert the hook from front to back at the bottom center, just above where the stem will sit, pull up a loop, and work surface sl sts by inserting the hook one stitch further along each time. Keep each sl st loose enough that the fabric does not pucker.
- Center vein: work straight up the center of the lower body and center lobe, ending at the tip. Fasten off and pull the tail through to the back.
- Side veins (make 2): start again at the bottom center and work diagonally outward to the tip of each side lobe, passing over the notch on the outer edge of the center lobe.
- Lower veins (make 2): start at the bottom center and work a short line out to the widest point of each bottom curve, ending about 3 sts before the picot edge.
- For the raised, rope-like look, work every vein twice, placing the second row of sl sts immediately beside the first, or hold two strands together for a single pass.
- Pull all five starting tails firmly to the back at the bottom center and knot them together. This cinch is what pulls the base inward and forms the two rounded bottom lobes on either side of the stem.
Finishing
Pin the open end of the stem over the bottom center point where the vein tails were cinched, so it sits in the small notch between the two lower curves. Sew it on with its tail, going through both stem and leaf edge on every stitch, and pass the needle through the leaf a few times before trimming so the stem cannot be pulled off. Place the tip nub over the picot at the center lobe tip and sew it down through its base, catching the picot so it covers the join.
Weave in every remaining end through the stuffing rather than along the surface. Hold the leaf over steam from a kettle for a few seconds, then press the lobes flat with your hands and let it dry on a towel; this settles the picot edge and lets the side lobes lean slightly outward the way a real maple leaf does.
Tips for Success
- Count the 35-st row when you join the three lobes. If you get 34 or 36, you either skipped or doubled a stitch at one of the two join points, and the notch will sit crooked.
- Make both panels before joining and lay them on top of each other. If one lobe is a row taller, the edge will twist; frog and reknit the taller lobe rather than easing it in.
- Stuff the side lobes with several small tufts rather than one lump, pushing each toward the tip with the blunt end of your hook. A tip that is hollow will fold over.
- Work the veins on a firmly stuffed leaf, not a soft one. The stuffing gives the hook something to push against and keeps the surface sl sts even.
- If your picots stand up instead of lying flat, tighten the sl st that closes each picot; a loose closing stitch is what makes them wobble.
Common Mistakes to Avoid
- Counting the ch 1 turning chain as a stitch. The lobes will drift wider by one stitch per row. Only count the sc, and check each row against the count in brackets.
- Joining the panels with RS facing in, then trying to turn the leaf inside out. The picot edge is worked on the outside; if you notice one panel is WS out, unpick to the join and restart.
- Working the picots at the notches. A picot in the notch fills it in and the lobes stop reading as separate; use sc3tog there and nothing else.
- Pulling the surface sl sts too tight. The vein line puckers the fabric and the leaf curls toward the front. Keep the loop on the hook slightly larger than your normal sc loop.
- Sewing the stem to the edge stitches only. Bulky stems are heavy and will tear away; anchor the needle into the stuffed body on every second stitch.
Ways to Customize This Pattern
- Make a three-color leaf by working the center lobe in rust, the side lobes in mustard, and the lower body in deep red, changing yarn on the last stitch before each join.
- Work the veins in a shade one step darker than the leaf for a more defined, graphic look, or one step lighter for a sun-faded effect.
- Scale it down to a hanging ornament by switching to DK yarn and a 3.5 mm hook; the stitch counts stay the same and the finished leaf will be roughly half the size.
- Add a loop for hanging by chaining 12 at the top of the stem before fastening off and sewing the chain back to the stem base.
- Make a set of three or five in graduated autumn shades and stack them for a mantel or shelf display.
Frequently asked questions
Why do the lobes join in a single row instead of being sewn on afterwards?
Working the lower body across all three lobe bases makes each panel one continuous piece, so there are no seams behind the veins and the notches between lobes fall exactly at the join points. Sewing separate lobes on afterwards tends to leave bulk right where the surface slip stitch needs to pass.
Can I skip the tip nub and stem and just use picots?
You can, and the leaf will still read as a maple leaf. The stem is what gives it a place to hang or stand, though, and the nub hides the join at the center tip, which is the most visible point on the piece. If you skip the nub, work a slightly larger picot there instead.
My side lobes point straight up instead of leaning outward. Is something wrong?
No. The lobes are worked symmetrical, and the lean comes from three things done at the end: the heavy decreases at the edges of the lower body, firm stuffing, and cinching the five vein tails together at the base. Steam blocking after that will settle them into the angled position.
What yarn fiber works best for the raised veins?
A smooth cotton or cotton-acrylic blend shows the surface slip stitch crisply. Very fluffy or halo yarns blur the vein line into the surface; if you want to use one, work the veins in a smoother yarn of the same weight.
Leave a Reply