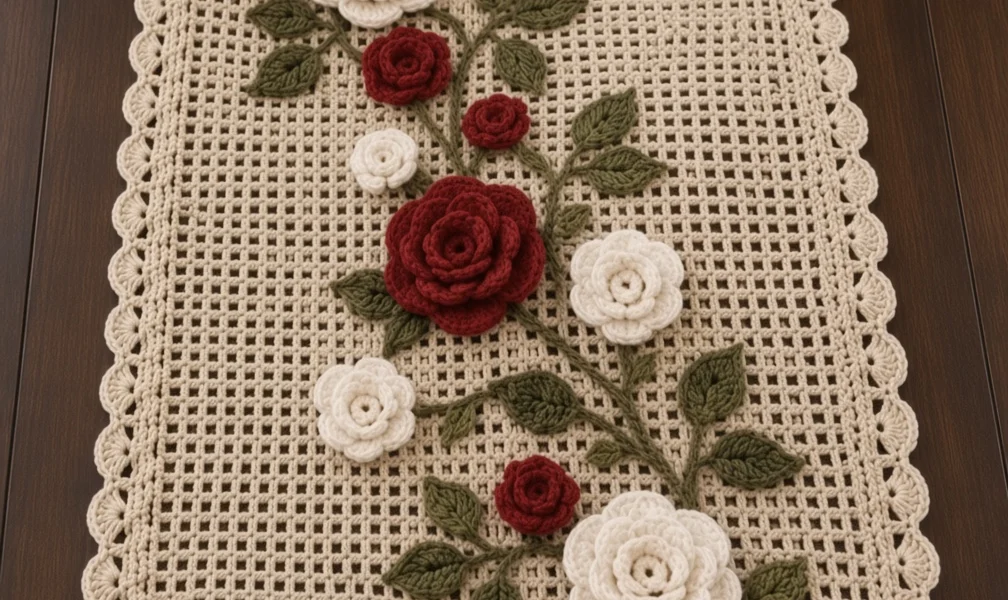
Vintage Roses Table Runner Crochet Pattern
This rose table runner crochet pattern builds a long filet mesh panel in oatmeal cotton, frames it with a scalloped shell edging, and then covers the centre with a winding vine of layered roses, tight buds and veined leaves in deep burgundy, ivory and sage. The roses are worked in tiers from the centre out, with each new ring of petals crocheted behind the last, so they stand up from the mesh with real depth instead of lying flat. The leaves get a surface slip-stitch rib down the middle, and the stems are firm slip-stitch cords that hold their curve once sewn down.
Plan on 30 to 40 hours in total. The mesh base is quick and meditative; the flowers and leaves are where the time goes, since there are around 24 blooms and 40 leaves. This is an advanced pattern in the sense that it asks for clean tension across a lot of small pieces, confident work behind petals, and patience at the layout stage. It is a good project for someone who already makes amigurumi or Irish-style crochet flowers and wants a large, showpiece finish for a dining table, dresser or sideboard. Every component is worked separately, so it also travels well as a long-term project.
Materials
- DK / light worsted mercerised cotton, oatmeal or ecru approx. 300 g for the mesh base and edging
- DK cotton, deep burgundy approx. 90 g
- DK cotton, ivory / off-white approx. 80 g
- DK cotton, sage or olive green approx. 90 g
- 3.0 mm crochet hook go down to 2.75 mm if your mesh looks loose
- Tapestry needle sharp-point sewing needle helps for the roses
- Sewing thread in oatmeal, burgundy, ivory and green for invisible attachment
- Rust-proof blocking pins and a blocking mat or towel-covered board
- Stitch markers for the corners
- Scissors, spray bottle
Abbreviations
chchainch-spchain spacesl stslip stitchscsingle crochet (US)hdchalf double crochet (US)dcdouble crochet (US)trtreble crochet (US)skskipst(s)stitch(es)reprepeat( )work everything in brackets into the same stitch or spaceMesh Base (oatmeal)
- Row 1: Ch 82. Dc in 6th ch from hook (the 5 skipped chs count as dc + ch 1), *ch 1, sk 1 ch, dc in next ch; rep from * across. (40 dc, 39 ch-1 sps = 39 mesh squares)
- Row 2: Ch 4 (counts as dc + ch 1), turn. Sk first dc and ch-sp, dc in next dc, *ch 1, sk ch-sp, dc in next dc; rep from * across, ending with the last dc in the top ch of the previous turning ch. (40 dc, 39 ch-1 sps)
- Rows 3-130: Rep Row 2. The panel should measure about 29 cm wide and 95 cm long before edging. Work more or fewer rows in pairs if you want a different length; keep the total even so the edging count stays symmetrical.
- Do not fasten off; continue straight into the edging. Place a stitch marker in each of the four corners.
Shell Edging (oatmeal)
- Round 1: Ch 1, turn to work along the side edge. Sc evenly around the whole panel: along each long side work 2 sc around each row-end post (260 sc); along each short side work 1 sc in each dc and 1 sc in each ch-1 sp (79 sc); work 3 sc into each corner st. Sl st to first sc. (686 sc, allowing for corners)
- Round 2: Ch 1, sc in same st, *sk 2, 5 dc in next st, sk 2, sc in next st; rep from * around, working a 7-dc shell into the centre sc of each corner so the corners flare. Spacing before a corner may need a skip of 1 or 3 instead of 2; that adjustment is invisible in the finished shell. Sl st to first sc. (approx. 114 shells)
- Fasten off. Weave in ends. Wet block the panel now, pinning each shell point outwards, and let it dry completely before laying out the flowers.
Large Rose (make 4 burgundy, 4 ivory)
- Ch 4, sl st in first ch to form a ring.
- Round 1: Ch 1, 10 sc in ring, sl st to first sc. (10 sc)
- Round 2: *Ch 3, sk 1 sc, sl st in next sc; rep from * 5 times, ending in the base of the first ch. (5 ch-3 loops)
- Round 3: In each ch-3 loop work (sc, hdc, 3 dc, hdc, sc). Sl st to first sc. (5 petals)
- Round 4: Fold the petals forward. Working behind them, *ch 4, sl st around the post of the next Round 2 sl st; rep from * 5 times. (5 ch-4 loops behind the petals)
- Round 5: In each ch-4 loop work (sc, hdc, 5 dc, hdc, sc). Sl st to first sc. (5 petals)
- Round 6: Fold petals forward again. Behind them, *ch 5, sl st around the post of the next Round 4 sl st; rep from * 5 times. (5 ch-5 loops)
- Round 7: In each ch-5 loop work (sc, hdc, 7 dc, hdc, sc). Sl st to first sc. (5 petals)
- Fasten off leaving a 25 cm tail for sewing. Finished rose is about 6 cm across. Gently cup the outer petals upward with your fingers.
Medium Rose (make 3 burgundy, 3 ivory)
- Work Rounds 1-5 of the Large Rose exactly as written. (10 sc centre, two tiers of 5 petals)
- Fasten off leaving a 20 cm tail. Finished rose is about 4.5 cm across.
Rosebud (make 7 burgundy, 3 ivory)
- Ch 26.
- Row 1: Sc in 2nd ch from hook and in each ch across. (25 sc)
- Row 2: Ch 3 (counts as dc), 4 dc in the first sc (first petal), *sk next sc, sl st in next sc, ch 3, 4 dc in the same sc; rep from * to end. (13 petals)
- Fasten off leaving a 20 cm tail. Starting at the beginning end, roll the strip tightly with the petal edge up, keeping the first turns very snug for a closed centre. Sew back and forth through the base with the tail until the bud holds firm. Finished bud is about 2.5 cm across.
Large Leaf (make 24 green)
- Ch 12.
- Row 1: Sc in 2nd ch from hook, hdc in next ch, dc in next 3 chs, tr in next 2 chs, dc in next 2 chs, hdc in next ch, sc in last ch. (11 sts)
- Ch 2 for the leaf tip. Rotate to work along the unworked side of the foundation ch: sc in first ch, hdc in next, dc in next 2, tr in next 2, dc in next 3, hdc in next, sc in last ch. (11 sts)
- Sl st to the first sc. Fasten off leaving a 15 cm tail.
- Vein: With green, insert the hook from the front at the leaf base, pull up a loop, and work surface sl sts along the foundation chain to the tip, keeping them loose so the leaf stays flat. Fasten off on the back and knot the ends together.
Small Leaf (make 16 green)
- Ch 8.
- Row 1: Sc in 2nd ch from hook, hdc in next, dc in next 3, hdc in next, sc in last ch. (7 sts)
- Ch 2 for the tip. Rotate to the other side of the foundation ch: sc, hdc, dc in next 3, hdc, sc. (7 sts)
- Sl st to the first sc. Fasten off leaving a 15 cm tail. Add the surface sl st vein as for the Large Leaf.
Vine and Stems (green)
- Main vine, make 2: Ch 110. Sl st in the back bump of the 2nd ch from hook and in each back bump across. (109 sl sts, a firm cord about 45 cm long)
- Side branches, make 8: Ch 28, sl st in the back bump of each ch across. (27 sl sts, about 11 cm)
- Leaf sprig stems, make 6: Ch 16, sl st in the back bump of each ch across. (15 sl sts, about 6 cm)
- Fasten off each cord leaving a 15 cm tail. Steam lightly and pull gently along the length to even out the twist.
Finishing
Lay the blocked runner flat and place the two main vine cords end to end down the centre, curving them in a gentle S-shape so the line drifts from one side of the mesh to the other and back. Overlap the join by 2 cm and pin. Add the side branches where the curve changes direction, angling them outward at about 45 degrees, and tuck the short sprig stems in at the gaps. Pin everything, step back, and adjust until the vine reads as one continuous plant rather than separate sticks. Sew the cords down with green sewing thread, catching one mesh bar every 2 cm.
Place the eight Large Roses first, alternating burgundy and ivory along the vine so no two of the same colour sit side by side, and cluster two of them near each end so the design feels weighted at the corners. Fill between them with the Medium Roses, then tuck the buds close to the stems at the ends of branches. Arrange the leaves in threes and fives along the branches with the tips pointing away from the vine, using Large Leaves near the big roses and Small Leaves at the sprig tips. Pin every piece before sewing anything. Attach roses by stitching through the back of Round 1 and Round 2 only, so the outer petals stay free and lifted. Sew leaves along the vein line with a few small stitches, leaving the edges loose. Weave in all remaining ends on the back, then steam the finished runner from the wrong side, holding the iron above the fabric so the petals keep their shape.
Tips for Success
- When working the behind-petal rounds on the roses, hold the front petals folded firmly toward you with your thumb so you can see the sl st posts you are anchoring into; this keeps the tiers evenly spaced and stops petals from twisting.
- Work all pieces of one colour in one sitting so tension stays consistent; a rose that is slightly tighter than its neighbours looks noticeably smaller once they sit together.
- Block the mesh before layout, not after. Sewing flowers to unblocked mesh and blocking afterward pulls the vine out of line and puckers the base around each rose.
- Take a phone photo of your pinned layout from directly above before sewing. Symmetry problems that are invisible at table height are obvious in a photo.
- Use sewing thread and a sharp needle for attaching, not yarn. Yarn stitches bulk up behind the roses and show through the open mesh from the back.
Common Mistakes to Avoid
- Mesh squares that lean or stretch into diamonds: the ch 1 between dcs is being pulled too tight. Make the chain the same height as the dc, and check that you are dcing into the dc, never into the ch-sp.
- Rose petals of the last tier lying flat on the mesh instead of cupping: Round 7 petals were sewn down along with the centre. Only ever stitch through the first two rounds of a rose.
- Rosebuds unravelling from the centre: the roll was started from the wrong end. Begin rolling at the end where you started the chain, where the petals are smallest, and pull the first three turns very tight before stitching.
- Edging that ruffles along the long sides: 2 sc per row-end post is too many for your tension. Rip back Round 1 and work 2 sc in one row end and 1 sc in the next, repeating, then recount before the shell round.
- Leaves curling into tubes: the surface sl st vein is too tight. Pull each surface loop up higher than feels natural, and steam the leaf flat before sewing it on.
Ways to Customize This Pattern
- Change the palette to blush pink and cream roses with mint leaves on a white base for a wedding table, keeping the exact same pieces.
- Add a picot to the centre dc of every shell in Round 2 (ch 3, sl st in the top of the dc just made) for a lacier, more vintage edge.
- Shorten to a square 40 x 40 cm centrepiece by working 52 rows of mesh and placing a single cluster of three large roses in the middle with leaves radiating outward.
- Work the roses in crochet thread with a 1.5 mm hook for finer, more realistic blooms, and use twice as many; the mesh base stays as written.
- Swap the burgundy for a mustard or dusty rose and use the same layout on a matching set of coasters made from a 7 x 7 square of mesh with one medium rose each.
Frequently asked questions
Can I make the runner longer without redoing the edging math?
Yes. Each pair of extra mesh rows adds 4 sc to each long side in Round 1, and the shell round adjusts itself because you space shells to land on the corners. Just add rows in even numbers and add one more Large Rose and a handful of leaves per 15 cm so the vine does not thin out.
Why crochet the stems as cords instead of embroidering the vine?
A slip-stitch cord sits on top of the mesh with the same weight and texture as the leaves, so the whole vine reads as crocheted rather than stitched. Embroidered chain stitch sinks into the open mesh and disappears between the flowers, and it also distorts the mesh when the runner is washed.
How do I wash it once the roses are sewn on?
Hand wash in cool water with a gentle detergent, press the water out in a towel, and lay flat to dry, reshaping the roses with your fingers while damp. Do not wring or tumble dry; the cotton mesh will hold up but the layered petals will flatten and the buds can loosen.
The roses look smaller than the photo. What went wrong?
Almost always it is tension on the behind-petal chains. If the ch-4 and ch-5 loops in Rounds 4 and 6 are pulled tight, the next tier has no room to open and the petals stack up instead of spreading. Rework those rounds with looser chains, and if you naturally crochet tightly, go up to a 3.5 mm hook for the roses only.
Leave a Reply