Cream Lace Square Crochet Blanket with Dusty Pink Roses
Beginner Friendly
Perfect for those just starting their crochet journey, with clear instructions and simple techniques
Single-Day Project
A satisfying project you can complete in a single afternoon or evening.
Handmade Gift
A beautiful keepsake — free forever. Read online or print at home.
About This Cream Lace Square Crochet Blanket with Dusty Pink Roses
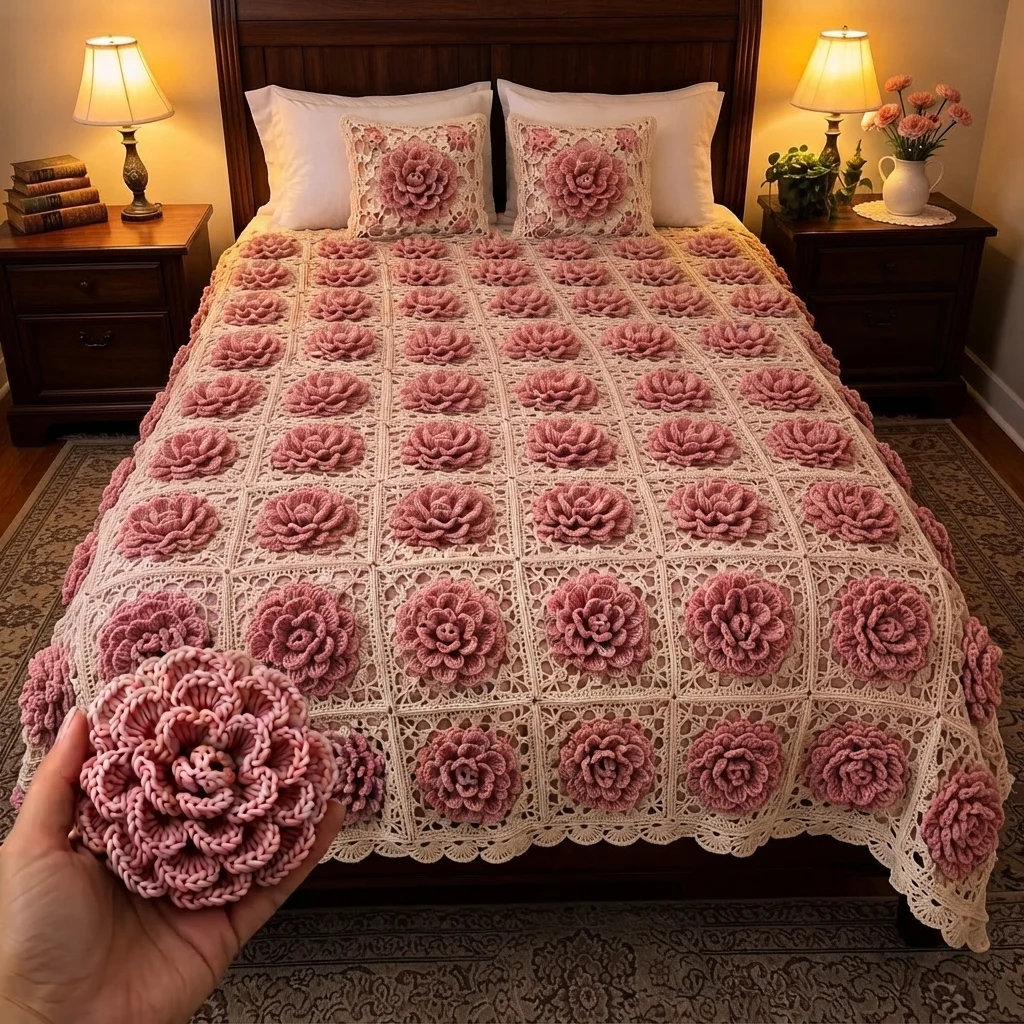
This rose crochet blanket pattern covers a bed in 63 cream lace squares, each topped with a big ruffled dusty pink rose. The squares are open granny-style lace worked in worsted yarn, and each rose is made separately from four tiers of fan-shaped petals and sewn to the center of its square. Joined edge to edge and finished with a cream scalloped border, the blanket looks like a lace tablecloth scattered with full-blown roses.
Every square and every rose is made the same way, so the project is repetitive rather than hard. The lace is a simple granny square, and the rose is a flat disc with ridged rounds, with the petals worked into the loops left free by those ridges. The roses give the blanket its volume, and the open lace underneath keeps it light for how much texture it has.
Plan on about an hour and a half per finished square, so roughly 100 to 120 hours for the full size, or about 45 hours for a throw. It suits crocheters who are comfortable with granny squares, double crochet fans and working in the front and back loops. The pattern also includes matching pillow covers with one large rose on each.
Materials
- Worsted (weight 4) yarn in cream about 1,850 m (2,020 yd) for the full-size blanket with border
- Worsted (weight 4) yarn in dusty pink / old rose about 1,100 m (1,200 yd)
- Extra yarn for two pillow covers about 450 m (490 yd) of cream and 100 m (110 yd) of pink
- 4 mm (US G-6) crochet hook
- 6 mm (US J-10) crochet hook only for the large pillow roses
- Large-eye tapestry needle for joining and sewing on the roses
- 4 stitch markers
- Blocking mats and rustproof pins
- Two 45 cm (18 in) pillow inserts optional, for the pillow covers
Abbreviations
MRmagic ringchchainscsingle crochetdcdouble crochetsl stslip stitchst(s)stitch(es)skskipspspaceincincrease: 2 sc in the same stclcluster: 3 dc in the same spcorner3 dc, ch 2, 3 dc in the same corner spBLOback loop onlyFLOfront loop onlyLace Square (make 63 for the full size)
The square is worked in cream from the center out, in joined rounds, with the right side facing you throughout. Each round starts with a sl st into the first 2 dc and the next corner sp, then ch 3 (counts as the first dc). The dc count in brackets is the total number of dc in the round, not counting the ch-3 starts as separate. Every corner has 6 dc.
- Rd 1: Ch 3 (counts as 1 dc), 2 dc in MR, ch 2, [3 dc in MR, ch 2] 3 times. Pull the MR tail to close the ring. Join with a sl st to the top of the ch 3. (4 cl, 4 ch-2 corners, 12 dc)
- Rd 2: Sl st in each of the next 2 dc and in the corner sp. Ch 3, 2 dc, ch 2, 3 dc in the same sp (corner). *Ch 1, corner in the next corner sp.* Repeat from * to * 3 times, ending with ch 1. Join with a sl st to the top of the ch 3. (24 dc)
- Rd 3: Sl st to the next corner sp. Corner, [ch 1, cl in the next ch-1 sp] 1 time, ch 1. Repeat for the other 3 corners. Join. (36 dc)
- Rd 4: Sl st to the next corner sp. Corner, [ch 1, cl in the next ch-1 sp] 2 times, ch 1. Repeat for the other 3 corners. Join. (48 dc)
- Rd 5: Sl st to the next corner sp. Corner, [ch 1, cl in the next ch-1 sp] 3 times, ch 1. Repeat for the other 3 corners. Join. (60 dc)
- Rd 6: Sl st to the next corner sp. Corner, [ch 1, cl in the next ch-1 sp] 4 times, ch 1. Repeat for the other 3 corners. Join. (72 dc)
- Rd 7: Sl st to the next corner sp. Corner, [ch 1, cl in the next ch-1 sp] 5 times, ch 1. Repeat for the other 3 corners. Join. (84 dc)
- Rd 8: Sl st to the next corner sp. Corner, [ch 1, cl in the next ch-1 sp] 6 times, ch 1. Repeat for the other 3 corners. Join with a sl st, fasten off and weave in the ends. (96 dc) The square measures about 23 cm (9 in) after blocking, with 24 dc along each side.
Layered Rose (make 63 for the full size)
The rose is worked from the center out, in a spiral without joining, with the right side facing you. Use a marker to track the start of each round. The ridged rounds (3, 4 and 5) leave rings of unworked front loops, and the petal tiers are worked into those rings, from the outside in. Work every petal fan loosely so the petals ruffle. Leave a 25 cm tail at the end.
- Rd 1: With pink, 6 sc in MR. (6)
- Rd 2: inc in each st around. (12)
- Rd 3 (BLO): inc in each st around. The front loops of Rd 2 are left free. (24)
- Rd 4 (BLO): [2 sc, inc] 8 times. The front loops of Rd 3 are left free. (32)
- Rd 5 (BLO): [3 sc, inc] 8 times. The front loops of Rd 4 are left free. (40)
- Rd 6 (outer petals): Work in both loops of Rd 5. [Sk 1 st, 9 dc in the next st, sk 1 st, sl st in the next st] 10 times. Fasten off. (10 petals)
- Rd 7 (second tier): Join pink in any free front loop of Rd 4. [Sk 1 st, 9 dc in the next st, sk 1 st, sl st in the next st] 8 times, working into the free front loops. Fasten off. (8 petals)
- Rd 8 (third tier): Join pink in any free front loop of Rd 3. [Sk 1 st, 7 dc in the next st, sk 1 st, sl st in the next st] 6 times, working into the free front loops. Fasten off. (6 petals)
- Rd 9 (inner petals): Join pink in any free front loop of Rd 2. [5 dc in the next st, sl st in the next st] 6 times, working into the free front loops. Fasten off, leaving a 25 cm tail. (6 petals)
Assembling the Rose on the Square
- Block the square before you sew anything. Pin it flat and let it dry. Do not pin the rose.
- Find the center of the square (the MR) and place the rose over it, centered, with one petal of the outer tier pointing toward a corner.
- Thread the tail on a tapestry needle and sew through the center of the rose into the square. Then work 6 to 8 small tacking stitches around the rose base (Rd 3 and Rd 4), catching the dc of Round 1 and 2 of the square.
- Leave the petal tiers free. Gently push the petals up with your fingers so they ruffle and stand away from the lace.
Layout and Sizing
- All squares are laid out the same way, in a straight grid, with the roses lined up in neat rows.
- Sizes: throw, 5 squares across by 6 down (30 squares), about 115 x 138 cm. Twin, 6 across by 8 down (48 squares), about 138 x 184 cm. Full or double, 7 across by 9 down (63 squares), about 161 x 207 cm. The border adds about 8 cm in each direction. The yarn amounts in this pattern are for the full size.
- Lay out all the squares on the floor and take a photo before you join anything.
Joining the Squares
- Join the squares into rows first, then join the rows to each other. Sew the roses on after blocking but before joining, as written above.
- Place two squares with right sides up and edges touching. Using cream yarn and a tapestry needle, whip stitch through the back loops of the outer dc and the ch-1 spaces of both edges, matching corner to corner first. Each side has 24 dc and 7 ch sps, which should match one for one.
- Where four squares meet, stitch across the join in a plus shape so there is no gap at the center.
Scalloped Border
The border shells are worked in repeats of 6 sts. Before you start Rd 2, count the sts along each side of the blanket and adjust by skipping or adding 1 or 2 sc evenly on Rd 1 so each side is a multiple of 6. This keeps the scallops evenly spaced.
- Rd 1: Join cream at any outer corner. Work 3 sc in the corner, then 1 sc in each dc and each ch-1 sp along the edge and 1 sc in each seam, with 3 sc in every remaining outer corner. Join with a sl st to the first sc.
- Rd 2: Ch 1. Along each side, [sk 2 sts, 5 dc in the next st, sk 2 sts, sl st in the next st] repeated to the corner. Work 7 dc in each corner st. Join with a sl st.
- Rd 3: Sl st to the first dc of a shell. Along each shell, [sc in the first dc, (ch 2, sc in the next dc) 4 times, sl st in the sl st between shells] repeated around. Join with a sl st, fasten off and weave in the end.
Matching Pillow Cover (make 2)
- Make 8 lace squares for each cover: 4 for the front and 4 for the back.
- Join the 4 front squares into a 2 x 2 panel using the cream whip stitch seam. Join the 4 back squares into the back panel the same way. Each panel measures about 46 cm (18 in) square.
- For the large front rose, make the layered rose with a 6 mm hook and two strands of pink held together. The rose measures about 20 cm (8 in) across. Sew it to the center of the front panel, over the seam crossing, as in the assembly steps.
- With wrong sides together, seam the panels along three sides using cream whip stitch.
- Insert the 45 cm pillow and close the fourth side with whip stitch, or sew on snaps if you want to remove the insert for washing.
Finishing
Weave in every end before blocking, as each square and rose has a few and they are easiest to hide while the pieces are small. Block the finished blanket flat according to your yarn’s care label: wet-block cotton or wool, and steam acrylic by holding the iron above the fabric without pressing. Be careful not to flatten the roses. Wash gently and dry flat so the lace and petals keep their shape.
Tips for Success
- Make the squares and roses in batches of ten, block them together, and sew the roses on in front of the television. It keeps the project from feeling endless.
- Work the petal fans loosely. Tight dc fans stand up stiffly instead of ruffling.
- Mark the first stitch of each ridged round on the rose with a stitch marker so you do not lose your place when you go back to the free front loops.
- Check the dc count at the end of every square round, at least on your first few squares. The totals go up by 12 each round.
- Weigh your first finished square and rose, then multiply by your square count to check you have enough yarn before you begin the rest.
Common Mistakes to Avoid
- Working Rd 3, 4 or 5 of the rose in both loops buries the free front loops, and the petal tiers have nowhere to go. Always work these three rounds in BLO.
- Pulling the dc fans tight makes the petals stand straight up. Work them loosely so they ruffle.
- Sewing the whole rose down flat kills the 3D effect. Tack only the base and let every petal tier stand free.
- Missing a corner on the lace square makes the square curve. Always work the full corner (3 dc, ch 2, 3 dc) in every corner sp.
- Joining the squares before blocking leaves the grid uneven. Always block first.
Ways to Customize This Pattern
- Change the rose color. Butter yellow, deep red or pale peach on the same cream lace gives a very different look.
- Work the outer two tiers of petals in a lighter pink and the inner tiers in a deeper shade for a two-tone rose.
- Skip the roses on alternate squares for a lighter, quicker blanket that shows off more lace.
- Make a throw or baby blanket using the smaller sizes in the Layout and Sizing section.
- Use bulky yarn and a 6 mm hook for larger squares. Work only 6 rounds per square, and make the rose with the same pattern for a bolder, bigger bloom.
Frequently asked questions
Yes. Every lace square and every rose is made exactly the same way. Only the pillow backs differ, because they are left plain.
Yes. Cotton gives crisp lace and holds its shape well, but the roses will be a little stiffer and the blanket heavier. Use a mercerized or lightweight cotton for the best drape.
The petals are firmly worked and fairly sturdy, but wash the blanket on a gentle cycle inside a pillowcase or by hand, and dry it flat. Avoid the dryer, which can flatten the ruffles and fray the lace.
About an hour and a half including the rose and sewing, a little longer for the first few. The lace square takes about 45 minutes, the rose about 35 minutes and the sewing about 10 minutes.
The finished Cream Lace Square Crochet Blanket with Dusty Pink Roses