Advanced
For experienced crocheters who enjoy complex shaping, fine detail, and ambitious construction
Single-Day Project
A satisfying project you can complete in a single afternoon or evening.
Handmade Gift
A beautiful keepsake — free forever. Read online or print at home.
About This Ocean Tile Granny Square Blanket
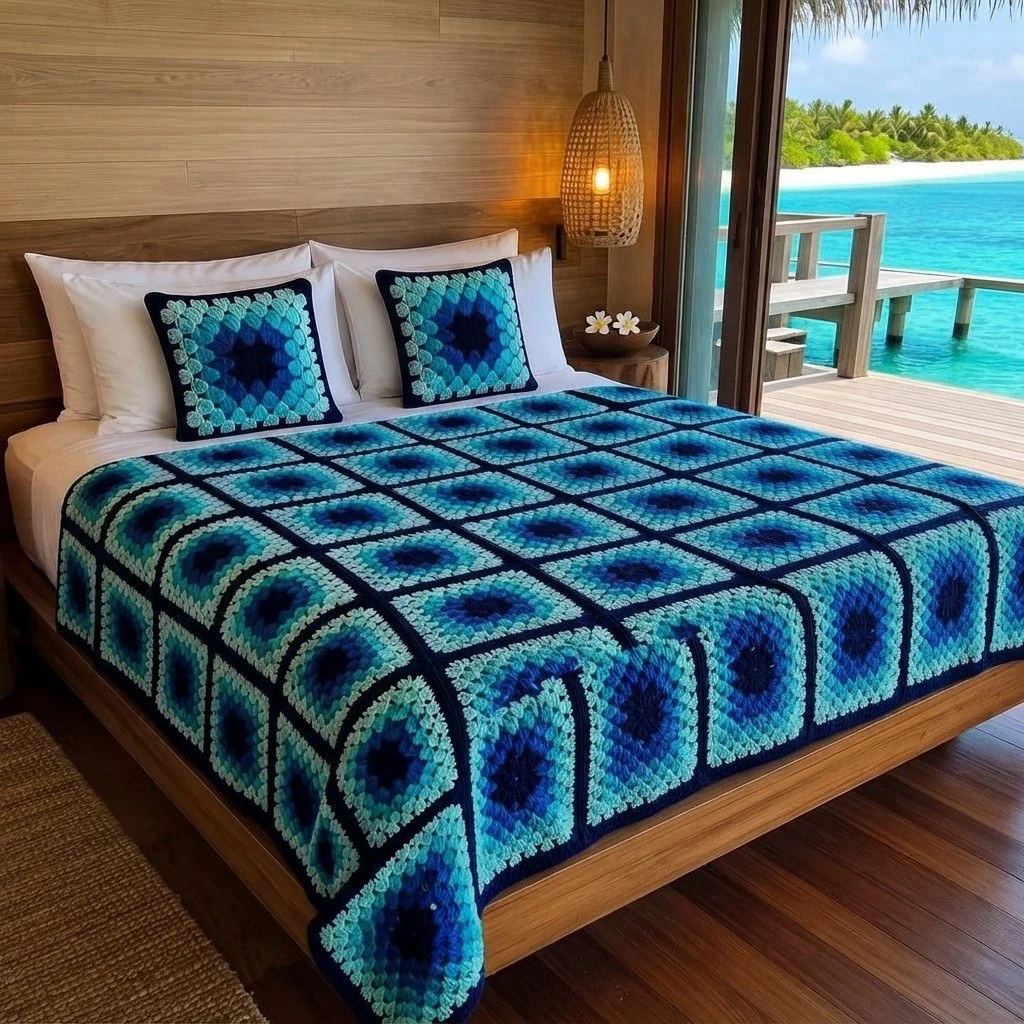
This ocean granny square blanket pattern turns one simple motif into something that reads like water: a deep navy centre, then ocean blue, teal, turquoise, aqua and pale seafoam rippling outward, and a navy frame round that snaps every square back into a crisp tile. Worked in forty-two squares and joined with a raised navy seam, the finished blanket has the graphic grid you see in the photo — dark lines, glowing blue middles — rather than the soft, blurry look most multicoloured granny blankets end up with.
The construction is advanced not because any single stitch is hard, but because the result depends on control. Ten rounds per square, two colourways alternated across the grid, a colour change at almost every round, a surface-ridge join worked in a specific order, and a four-round border with real stitch counts. If you have made granny squares before and want a project where the finishing is as considered as the stitching, this is that project.
Plan on 30 to 40 hours spread over a few weeks — each square takes around 35 to 45 minutes once you settle into the colour sequence, and joining plus the border takes an evening or two. It is excellent television crochet: the squares are portable and repetitive, and the interesting decisions all happen at layout time, when you arrange the two colourways on the floor before sewing anything together.
Materials
- Worsted / aran weight yarn in deep navy approx. 900 g — centres, frame round, join and border
- Worsted / aran weight yarn in ocean blue approx. 350 g
- Worsted / aran weight yarn in teal approx. 320 g
- Worsted / aran weight yarn in turquoise approx. 340 g
- Worsted / aran weight yarn in aqua approx. 320 g
- Worsted / aran weight yarn in pale seafoam approx. 350 g
- 5 mm crochet hook or size needed to match gauge
- Blunt tapestry needle for the many, many ends
- Stitch markers at least 8, for corners and layout
- Sharp scissors
- Blocking mats and rustproof pins or a steam iron and a towel
- Tape measure for checking square size as you go
Abbreviations
MRmagic ringchchainsl stslip stitchscsingle crochetdcdouble crochetrev screverse single crochet (crab stitch)BLOback loop onlyspspacest(s)stitch(es)reprepeatRSright sideWSwrong side[ ]repeat the instructions inside the bracketsGauge, Layout and How the Colours Work
- Gauge: one finished square (10 rounds) measures 22 cm along each side, blocked. Rounds 1-4 alone should measure 11 cm across.
- The blanket is 6 squares wide by 7 squares long: 42 squares total.
- Make 21 squares in Colourway A and 21 squares in Colourway B, then alternate them across the grid like a checkerboard so no two matching squares sit side by side.
- Every square starts with a navy centre (Rounds 1-2) and ends with a navy frame (Round 9) plus a navy sc edge (Round 10). Only the middle rounds change between the two colourways.
- Work every round with the RS facing; each round is joined and the next colour is started fresh in a corner space. Do not turn.
- Join each new colour by pulling a loop through a corner ch-2 sp and working ch 3 as the first dc of that round, leaving a 15 cm tail to weave in later.
- The square uses solid granny groups: 3 dc worked directly into the space between the 3-dc groups of the round below, with no ch-1 between groups. This is what gives the dense, tile-like look in the photo.
Granny Square — Colourway A (make 21)
- Round 1 (navy): MR, ch 3 (counts as first dc), 2 dc in ring, ch 2, [3 dc in ring, ch 2] 3 times, sl st to top of beginning ch-3. (12 dc, 4 corner ch-2 sps / 4 groups)
- Round 2 (navy): sl st across the next 2 dc and into the corner ch-2 sp, ch 3, 2 dc in same sp, ch 2, 3 dc in same sp, [(3 dc, ch 2, 3 dc) in next corner sp] 3 times, sl st to top of ch-3. Fasten off navy. (24 dc, 8 groups)
- Round 3 (ocean blue): join in any corner sp, ch 3, 2 dc in same sp, ch 2, 3 dc in same sp, [3 dc in next space between groups, (3 dc, ch 2, 3 dc) in next corner sp] 3 times, 3 dc in last space between groups, sl st to top of ch-3. (36 dc, 12 groups — 1 side group per side)
- Round 4 (ocean blue): join in any corner sp, ch 3, 2 dc in same sp, ch 2, 3 dc in same sp, [3 dc in each of the next 2 spaces between groups, (3 dc, ch 2, 3 dc) in next corner sp] 3 times, 3 dc in each of the last 2 spaces, sl st to top of ch-3. Fasten off. (48 dc, 16 groups — 2 side groups per side)
- Round 5 (teal): as Round 4, working 3 side groups along each side. (60 dc, 20 groups)
- Round 6 (turquoise): as Round 4, working 4 side groups along each side. (72 dc, 24 groups)
- Round 7 (aqua): as Round 4, working 5 side groups along each side. (84 dc, 28 groups)
- Round 8 (pale seafoam): as Round 4, working 6 side groups along each side. (96 dc, 32 groups)
- Round 9 (navy): as Round 4, working 7 side groups along each side. Fasten off. (108 dc, 36 groups — 9 groups along each side)
- Round 10 (navy): join in any corner ch-2 sp, ch 1, 3 sc in same sp, 1 sc in each of the next 27 dc, [3 sc in corner sp, 1 sc in each of the next 27 dc] 3 times, sl st to first sc. Fasten off, leaving a 10 cm tail. (120 sc — 30 sts per side, counting from one corner centre st to the next)
- Weave in all ends on the WS as you finish each square. Do not leave them for the end; forty-two squares is around 340 ends.
Granny Square — Colourway B (make 21)
- Work exactly the same rounds, stitch counts and construction as Colourway A. Only the colours of Rounds 4-8 change, which shifts the pale ring inward and puts a brighter blue near the frame.
- Round 1 (navy): 12 dc, 4 groups.
- Round 2 (navy): 24 dc, 8 groups.
- Round 3 (ocean blue): 36 dc, 12 groups.
- Round 4 (teal): 48 dc, 16 groups.
- Round 5 (turquoise): 60 dc, 20 groups.
- Round 6 (aqua): 72 dc, 24 groups.
- Round 7 (pale seafoam): 84 dc, 28 groups.
- Round 8 (turquoise): 96 dc, 32 groups.
- Round 9 (navy): 108 dc, 36 groups.
- Round 10 (navy): 120 sc, 30 sts per side.
- Stack the two colourways face up side by side when you have one of each. Colourway A should read as “pale edge”, Colourway B as “bright edge”. If they look too similar, swap Round 8 of B to aqua instead of turquoise.
Blocking the Squares
- Pin each square face down on a blocking mat, pulling gently until all four sides measure 22 cm and the corners sit at true right angles.
- Spray with cool water until damp through, or hover a steam iron 2 cm above the surface without touching the yarn. Acrylic will hold its shape permanently once steamed; keep the iron moving and never press.
- Let the squares dry completely flat, at least 4 hours. Stack blocked squares in two piles, A and B.
- Measure five random squares after drying. If any differ by more than 5 mm from 22 cm, re-block them rather than easing them in during the join.
- Lay all 42 squares on the floor in a 6 x 7 grid, alternating A and B in both directions so every square touches only its opposite. Photograph the layout with your phone before you pick anything up.
Joining the Squares
- The join is worked in navy with WS of two squares held together, through BLO of both edges, so the seam forms a raised navy ridge on the RS. That ridge is what makes the grid in the photo so sharp.
- Row joins first: take the 6 squares of row 1 in layout order. Hold squares 1 and 2 WS together, join navy in the corner st at the top, ch 1, then sc through BLO of both squares across all 30 edge sts. Fasten off. (30 sc per seam)
- Rep for squares 2-3, 3-4, 4-5 and 5-6, giving 5 seams in row 1. Rep for all 7 rows. (35 short seams total)
- Column joins next: hold row 1 and row 2 WS together, matching seams exactly. Join navy at the right-hand corner st, ch 1, sc through BLO of both rows across the first 30 sts, work 1 sc over the pair of row-seam ridges where they meet, then continue 30 sc across the next square. Rep across. (185 sc per long seam: 6 x 30 edge sts + 5 intersection sts)
- Rep for rows 2-3, 3-4, 4-5, 5-6 and 6-7. (6 long seams total)
- At every intersection, pinch the four corners together before working the linking sc. A loose intersection shows as a small hole once the blanket is spread out.
- Weave in all join ends, running them along the inside of the ridge rather than across the back of a square.
- Lay the joined blanket flat and check that the outer edge is straight. Steam any seam that pulls in before starting the border.
Border
- Round 1 (navy): join in the corner st of any corner square, ch 1, 3 sc in that st, then sc in each st along the edge, working 1 sc over each seam ridge as you pass it. Short edges: 185 sts each. Long edges: 216 sts each (7 x 30 edge sts + 6 intersection sts). Work 3 sc in the centre st of each of the 4 outer corners. Sl st to first sc. (810 sc)
- Round 2 (navy): ch 3 (counts as dc), dc in each st around, working 3 dc in the centre st of each corner group. Sl st to top of ch-3. (818 dc)
- Round 3 (navy): ch 1, sc in each st around, working 3 sc in the centre st of each corner group. Sl st to first sc. (826 sc)
- Round 4 (navy): ch 1, work rev sc in each st around, no increases at the corners. Sl st to first st and fasten off. (826 rev sc)
- The border should measure about 3 cm deep. If it flutters, your corner increases are too generous — rip back and use 3 sts only in the single centre corner st.
- If the border pulls the edge in, add an extra sc in every 15th st on Round 1 only, keeping the corners as written.
Finishing
Weave in the last border ends along the inside of the final navy round, splitting the yarn once or twice so nothing works loose in the wash. Then block the whole blanket: spread it on a bed or a clean floor, square up the corners, mist it evenly with cool water and smooth each seam line straight with your palms. Let it dry fully before you fold it. One full blocking at the end does more for the finished look than any amount of fussing with individual squares.
Check the back while it is flat — this is the easiest moment to spot a tail you missed or an intersection that needs one extra stitch. Both are two-minute fixes now and annoying later. The finished blanket measures roughly 140 x 163 cm, which covers the top of a double bed and drapes over a king without reaching the floor, exactly as in the photo. Wash it on a cool gentle cycle in a mesh bag and dry it flat; acrylic will keep its blocked shape for years.
Tips for Success
- Make all 42 navy centres first, in one sitting. Doing Rounds 1-2 as a batch gets the fiddliest part out of the way and means the rest of the project is pure colour work.
- Keep a written colour card for each colourway taped to your yarn basket. Ten rounds with six colours is exactly the kind of sequence you will misremember at round 6 on a tired evening.
- Start every round in a different corner. Always joining at the same corner builds a visible column of join bumps up one side of the square.
- Count groups, not stitches. Each round should have exactly 4 more groups than the one before it: 4, 8, 12, 16, 20, 24, 28, 32, 36. If a side has one group too many, you doubled into a corner space.
- Weave ends in as you go and keep finished squares in a flat stack, not a bag. Squares that live crumpled in a tote need blocking twice.
Common Mistakes to Avoid
- Working the corner as (3 dc, ch 2, 3 dc) into a side space. The result is a square with five “corners” and a wavy edge. Mark all four corner spaces with stitch markers for the first three rounds until the shape is obvious.
- Letting Round 10 drift off count. If you do not get 30 sc per side, the join will not line up stitch for stitch and the seam ridge will wander. Count each side as you work it and adjust within that side, not at the corner.
- Joining squares with RS together. That hides the navy ridge inside and gives a flat seam, which is not the look in the photo. WS together, BLO of both edges, ridge on the front.
- Changing hand tension partway through the project. Granny squares made in week one and week four can differ by a full centimetre. Measure a square every ten squares and switch to a 4.5 mm or 5.5 mm hook if yours start growing or shrinking.
- Skipping the layout photo before joining. Once the rows are seamed, fixing a misplaced colourway means cutting a seam. Lay the grid out, photograph it, then join from the photo.
Ways to Customize This Pattern
- Make matching cushion covers: work two squares to Round 10, join them WS together with the same navy BLO sc seam around three sides, insert a 45 cm pad and close the fourth side.
- Shift the palette while keeping the structure: charcoal centres with rust, terracotta, amber and sand gives a desert version; black centres with plum, berry and dusty rose gives a sunset one. Keep the dark frame round — it does all the work.
- Go monochrome-ombre: use one blue in six shades from darkest at the centre to palest at the edge, and make all 42 squares identical for a calmer, more modern grid.
- Change the size by changing the grid, not the square: 4 x 5 squares makes a 95 x 117 cm lap blanket, 7 x 8 makes a 163 x 186 cm bedspread. Yarn amounts scale roughly with square count.
- Add a tasselled edge: skip Round 4 of the border and knot a 12 cm navy tassel into every fifth stitch along the two short edges only.
Frequently asked questions
Yes, but you will lose the raised navy ridge that defines the grid. If you want to join as you go, work Rounds 1-9 as written, then join during Round 10 by slip stitching into the corresponding sc of the neighbouring square every third stitch. The seam will be flat and slightly paler, so make one test pair first and decide whether you like the look before committing.
Measure every tenth square against your first one and block in batches rather than all at the end. The usual culprit is tension creeping tighter as you memorise the pattern — if square 20 comes out at 21 cm, move up half a hook size for the remaining squares and block the earlier ones slightly firmer. Differences under 5 mm disappear in the join; anything larger will pull the grid crooked.
Only for the two navy sections, where navy is used in consecutive rounds. For the graduated blues, each colour appears for one or two rounds and then not again, so carrying it would leave long floats across the back. Fasten off and rejoin for every colour change, and weave in that square’s ends before starting the next one.
Navy is the one to buy generously — roughly 900 g, because it appears in every centre, every frame round, every seam and the whole border. Buy it in one dye lot. The five blues use only 320-350 g each and are worked in single rounds, so mixed dye lots and leftovers blend in almost invisibly. Scrappy blues across different squares look intentional; a scrappy navy does not.
It works well in worsted-weight cotton and gives a heavier, cooler blanket with very crisp stitch definition, which suits the tile look. Expect the finished piece to be about 10 percent larger and noticeably heavier, and know that cotton will not hold a steam-block the way acrylic does — block with water and pins, and re-block lightly after each wash.
The finished Ocean Tile Granny Square Blanket