Spiral Bloom Bedspread Crochet Pattern
Advanced
For experienced crocheters who enjoy complex shaping, fine detail, and ambitious construction
Weekend Project
A satisfying weekend make — start Friday, finish Sunday, enjoy forever.
Handmade Gift
A beautiful keepsake — free forever. Read online or print at home.
About This Spiral Bloom Bedspread Crochet Pattern
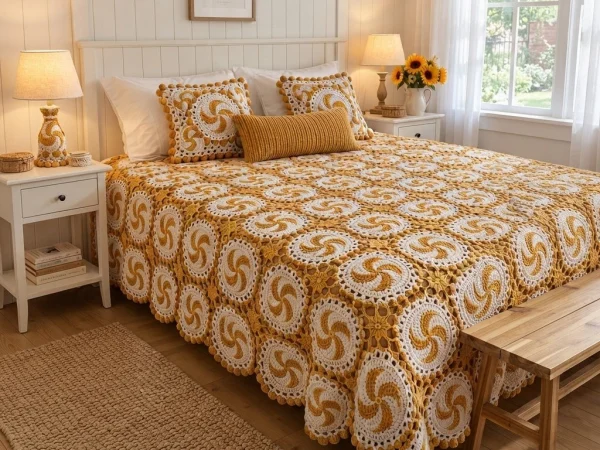
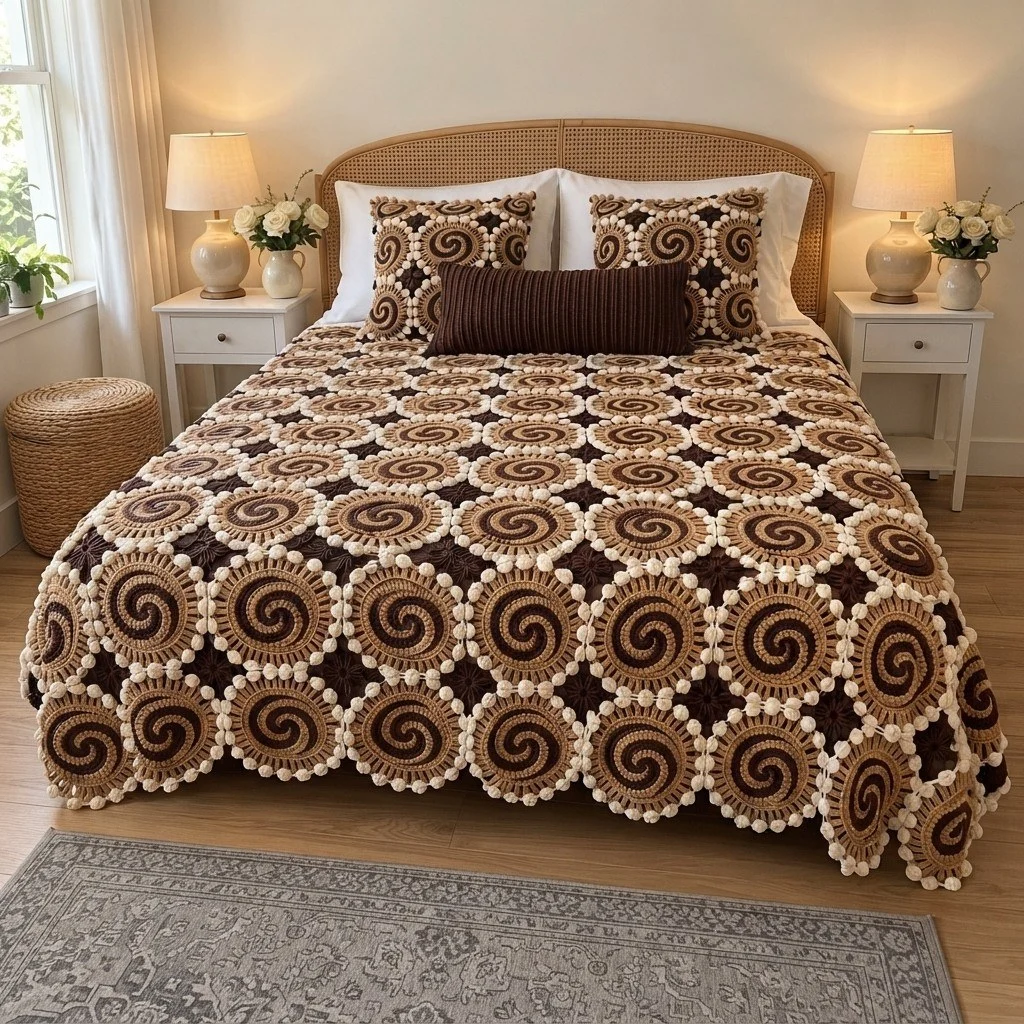
This spiral bedspread crochet pattern turns one repeated round motif into a full queen-size cover, and the trick that makes it work is the two-colour spiral worked at the centre of every circle. Instead of plain concentric rounds, two strands — camel and chocolate — travel around the motif at the same time, each one climbing over the other’s stitches, so the colours wind into a true swirl with no visible colour change anywhere. Around that swirl sits a raised rim of sixteen puff stitches, worked in either soft cream or camel, and those puffs do double duty: they give the bedspread its pebbled texture and they are also the points where every motif is joined to its neighbours.
The gaps between four touching circles are filled with small chocolate star motifs, which is what gives the finished piece its dark background and keeps the whole surface flat instead of gappy. Motifs alternate between cream-rimmed and camel-rimmed in a checkerboard, so the eye reads the bedspread as rows of blooms rather than a grid of circles. The outer edge is left scalloped, following the puffs, with only a light stabilising round so the shape stays soft.
This is a long project, not a weekend one: expect roughly 60 to 80 hours for the full queen size, or about 20 hours for the throw version given in the customization section. Each individual motif takes around 15 to 20 minutes once you have the spiral rhythm, so it travels well and stacks up in batches. It suits a confident crocheter who is comfortable with magic rings, puff stitches and join-as-you-go, and who does not mind weaving a lot of ends. If you have never worked a two-colour spiral before, make three practice motifs first — by the third one your hands will know it.
Materials
- Worsted / aran weight yarn in chocolate brown approx. 2600 g — spiral halves and filler stars
- Worsted / aran weight yarn in camel / caramel approx. 2700 g — spiral halves and half the motif rims
- Worsted / aran weight yarn in soft cream approx. 900 g — the other half of the motif rims and the edge round
- 4.5 mm crochet hook or whatever gives you a 10 cm spiral centre
- Blunt tapestry needle 2 sizes, for ends and for the edge round
- Stitch markers at least 4, to mark join puffs
- Sharp scissors
- Rustproof pins and a blocking mat or towel for flattening motifs
- Measuring tape
- Large project bag or box for storing finished motifs in colour order
Abbreviations
MRmagic ringchchainscsingle crochet (US)sl stslip stitchst(s)stitch(es)rndroundreprepeatskskipyoyarn overpuffpuff stitch (see Special Stitches)( ) x4work the instructions in brackets 4 times[ ]total stitch count at the end of the roundSpecial Stitches
- Puff stitch (puff): [yo, insert hook in st, yo and pull up a loop to the height of the round] 4 times (9 loops on hook), yo and draw through all 9 loops, ch 1 firmly to close. The closing ch 1 does not count as a stitch — the puff counts as one stitch.
- Two-colour spiral: both colours stay attached and are worked alternately. Work the camel section, drop camel to the front of the work, pick up chocolate and work the chocolate section, drop chocolate. Each colour always works into the stitches made by the other colour on the previous pass — that overlap is what creates the swirl.
- Join-as-you-go (JAYG): at a marked puff, complete the puff, then sl st into the top of the matching puff on the finished neighbouring motif, then continue the round on your new motif. Keep the sl st loose enough that the two puffs sit side by side without pulling.
Gauge and Layout
- Gauge: rounds 1–8 of the spiral centre measure 10 cm across. One finished motif measures 14 cm across, measured puff tip to puff tip.
- Queen layout: 13 motifs across by 16 motifs down = 208 motifs, finished approximately 182 x 224 cm before the edge round.
- Make 104 Motif A (cream rim) and 104 Motif B (camel rim), arranged in a checkerboard so no two motifs of the same rim colour touch side by side.
- You will also need 180 full filler stars (one in every gap where four motifs meet) and 54 half filler stars (one in every half-gap along the four outer edges).
- The spiral centre is identical in every single motif — only the rim colour changes. Work all 208 centres first if you like batching, then add rims as you join.
Spiral Centre (make 208, all alike)
- With camel, make a MR and work 3 sc into the ring. Drop camel. Join chocolate into the same ring and work 3 sc into the ring. Do not join the round — this piece is worked in a continuous spiral. [6 sts: 3 camel, 3 chocolate]
- Rnd 2, camel: 2 sc in each of next 3 sts [6 camel]. Drop camel. Chocolate: 2 sc in each of next 3 sts [6 chocolate]. [12]
- Rnd 3, camel: (sc in next st, 2 sc in next st) x3 [9 camel]. Chocolate: (sc in next st, 2 sc in next st) x3 [9 chocolate]. [18]
- Rnd 4, camel: (sc in next 2 sts, 2 sc in next st) x3 [12 camel]. Chocolate: the same [12 chocolate]. [24]
- Rnd 5, camel: (sc in next 3 sts, 2 sc in next st) x3 [15 camel]. Chocolate: the same [15 chocolate]. [30]
- Rnd 6, camel: (sc in next 4 sts, 2 sc in next st) x3 [18 camel]. Chocolate: the same [18 chocolate]. [36]
- Rnd 7, camel: (sc in next 5 sts, 2 sc in next st) x3 [21 camel]. Chocolate: the same [21 chocolate]. [42]
- Rnd 8, camel: (sc in next 6 sts, 2 sc in next st) x3 [24 camel]. Chocolate: the same [24 chocolate]. [48]
- Taper: with camel, sl st loosely in each of the next 2 sts, fasten off and pull the tail through to the back. With chocolate, sl st loosely in each of the next 2 sts, fasten off the same way. Slip stitches add no height, so the outer edge still counts 48 stitches — they only smooth the step where each colour ends.
- Weave in all four tails now, on the back, before the piece leaves your hands. The disc should lie flat; if it ruffles see Common Mistakes.
Motif A — Cream Puff Rim (make 104)
- Rnd 9: join cream with a sl st in any st of the spiral edge, ch 1, sc in each st around, sl st to first sc to join. [48]
- Rnd 10: ch 1, (sc in next 2 sts, 2 sc in next st) x16, sl st to first sc. [64]
- Rnd 11: ch 1, sc in first st, (puff in next st, sc in next 3 sts) x15, puff in next st, sc in next 2 sts, sl st to first sc. [64 sts, 16 puffs]
- Fasten off, leaving a 15 cm tail. Count your puffs — there must be exactly 16, evenly spaced, with 3 sc between each pair.
- Mark puffs 1, 5, 9 and 13 with stitch markers. These four puffs sit at the north, east, south and west points of the motif and are the only places this motif will be joined.
Motif B — Camel Puff Rim (make 104)
- Rnd 9: join camel with a sl st in any st of the spiral edge, ch 1, sc in each st around, sl st to first sc. [48]
- Rnd 10: ch 1, (sc in next 2 sts, 2 sc in next st) x16, sl st to first sc. [64]
- Rnd 11: ch 1, sc in first st, (puff in next st, sc in next 3 sts) x15, puff in next st, sc in next 2 sts, sl st to first sc. [64 sts, 16 puffs]
- Fasten off, leaving a 15 cm tail. Mark puffs 1, 5, 9 and 13 as for Motif A.
- Because the camel rim meets the camel half of the spiral, keep your rim tension slightly firmer here — a loose camel rim blurs the edge of the swirl where the two camels touch.
Chocolate Filler Star (make 180)
- Rnd 1: with chocolate, make a MR, ch 1, work 8 sc into the ring, sl st to first sc, pull the ring closed. [8]
- Rnd 2: ch 1, 2 sc in each st around, sl st to first sc. [16]
- Rnd 3 (joining round, worked directly into the bedspread): ch 1, (sc in next 2 sts, ch 5, sl st into the middle sc of the 3 sc between two puffs on the adjacent motif, ch 5, sk next 2 sts of the filler) x4, sl st to first sc. [16 sts worked, 4 joining arms]
- The four arms anchor to the four motifs that surround the gap. Work them in order around the gap — clockwise — so the arms do not cross.
- Fasten off and weave the tail into the back of the star, not into the motifs, so the join stays elastic.
Chocolate Half Filler Star (make 54)
- Rnd 1: with chocolate, make a MR, ch 1, work 6 sc into the ring, sl st to first sc. [6]
- Rnd 2: ch 1, 2 sc in each st around, sl st to first sc. [12]
- Rnd 3 (joining round): ch 1, (sc in next 2 sts, ch 5, sl st into the middle sc between two puffs on the adjacent edge motif, ch 5, sk next 2 sts) x3, sl st to first sc. [12 sts worked, 3 joining arms]
- Place these in the half-gaps along all four outer edges: 12 across the top, 12 across the bottom, 15 down each side.
- The third arm of each half star points outward into open air — pull it gently to the back and tack it down with the tail so it does not show from the front.
Joining the Motifs
- Lay out the first row on the floor: 13 motifs, alternating Motif A and Motif B, starting with a cream-rimmed Motif A in the corner.
- Join motif by motif using JAYG on Rnd 11. When you reach a marked puff that meets a finished neighbour, complete the puff, sl st into the top of the matching puff on that neighbour, then carry on with the round.
- A motif in the middle of the blanket is joined at all four marked puffs: left, right, above and below. An edge motif is joined at three, and the four corner motifs at two.
- Work in full rows rather than columns — finish all 13 motifs of row 1, then row 2, and so on. This keeps the grid square and stops the piece from drifting out of line.
- Check after every row that the row still measures about 182 cm across. If it is creeping longer, your join sl sts are too loose; if it is pulling in, they are too tight.
- Once two full rows are joined, start adding filler stars behind you — 12 stars go into the 12 gaps between each pair of rows. Do not leave all 180 stars until the end, or the weight of the finished blanket makes them awkward to reach.
Outer Edge
- Rnd 1: join cream with a sl st in the top of any outward-facing puff on a corner motif. Ch 1, sc in the same puff.
- Continue around: sc in the top of each outward-facing puff, and where you cross from one motif to the next, ch 4, sk the join, sc in the first puff of the next motif.
- At the four corners, work ch 4 between the two corner puffs as well, so the corner stays soft and rounded rather than pointed.
- Sl st to the first sc and fasten off. This single round only stabilises the scallops — it should not flatten them or add a visible frame.
- Count as you go: each edge motif contributes the puffs that are not consumed by a join, and the chains should sit level with the puff tops, not sagging below them.
Finishing
Go over the whole back of the bedspread and weave in anything you missed. With 208 motifs there are thousands of ends, so work in a good light and in sections — a quarter of the blanket at a time is plenty for one sitting. Weave each end into stitches of its own colour wherever you can, then split the strand and take the two halves in opposite directions so nothing works loose in the wash.
Block the finished piece flat. Lay it right side up on a clean sheet on the floor, pin the four corners square, then pin the outer scallops out evenly so each puff sits proud. Mist with cool water rather than soaking it — a wet queen bedspread in worsted weight is extremely heavy — and leave it until it is completely dry, which can take two full days. Do not press the puffs with an iron; the texture is the point of the design and heat will flatten it permanently.
Once dry, check that every filler star is anchored at all four arms and that no join puff has slipped. For washing, use a cold gentle cycle in a large machine or a bathtub soak, support the whole weight when you lift it out so the joins do not stretch, and dry it flat. Stored folded with the spirals facing in, it keeps its shape between seasons.
Tips for Success
- Always drop the colour you have just finished to the front of the work and pick up the next colour from underneath it. Doing this the same way every single time keeps the two strands from twisting into a rope as you spiral.
- Make your puff stitches with the loops pulled up to the full height of the round, not short. Short loops make hard little knots instead of the soft pebbles in the photo, and they shrink the motif diameter enough to throw off the whole layout.
- Batch the work: make 20 spiral centres in one sitting, weave their ends, then switch to rims. Stopping to weave ends after every motif is what makes people abandon this project.
- Keep one finished motif as a reference and compare every tenth motif to it. Gauge drifts over 200 pieces, especially the puff rounds, and catching it early is far easier than reworking a whole row.
- Mark the four join puffs with removable markers the moment a motif is finished, before it goes in the storage bag. Counting puffs 1, 5, 9 and 13 again later on a pile of 100 motifs is a miserable job.
Common Mistakes to Avoid
- The spiral centre ruffles or cups. Ruffling means your increases are too generous for your yarn — go down a hook size. Cupping means the opposite: go up a hook size, or add one extra plain sc in each colour section on Rnd 8 only.
- The swirl looks broken instead of continuous. This happens when a colour is worked into its own previous stitches rather than into the other colour’s stitches. Each pass should begin exactly where the other colour’s last pass ended — if you see a straight seam of one colour, undo that round and restart the pass one stitch along.
- Puffs lean or twist. The closing ch 1 is being worked too loosely, so the puff flops. Pull that chain firm, and work the sc immediately after it normally — tightening both makes the rim pucker.
- The blanket puckers at the filler stars. The ch-5 arms are too short for your gauge. Switch to ch 6 for the remaining stars rather than pulling the existing ones tighter, and loosen the sl st that anchors each arm.
- The grid goes out of square. Almost always caused by joining in columns, or by skipping the row-width check. Measure across every completed row and adjust your join sl st tension before starting the next one.
Ways to Customize This Pattern
- Throw size: work 7 motifs across by 9 down for a sofa throw of about 98 x 126 cm. You will need 63 motifs, 48 full filler stars and 28 half stars — roughly a fifth of the yarn and around 20 hours.
- Matching pillow shams: surround a single finished motif with a chocolate square by working 4 corner blocks of dc into the gaps behind the rim, then make a plain back panel and sc the two together around three sides, leaving the fourth open for the pillow.
- Reverse the fillers: work the filler stars in cream instead of chocolate for a much lighter, airier version where the swirls float on pale ground rather than dark.
- Single colourway: make every rim camel and skip Motif A entirely. The checkerboard disappears and the bedspread reads as one continuous field of swirls — simpler to make and very effective in a small room.
- Flatter texture: replace each puff with a 4-dc bobble for a crisper, more defined bump, or with a plain sc and a ch-2 picot if you want the scalloped outline without the raised texture.
Frequently asked questions
Divide your bed’s finished width and length by your own motif diameter and round up. With a 14 cm motif: a single bed needs about 10 across by 15 down (150 motifs), a double about 12 by 16 (192), and the queen shown here 13 by 16 (208). Always add one extra motif to each direction if you want a real overhang at the sides.
Yes, but it changes everything downstream. DK with a 3.5 mm hook gives a motif of about 10 to 11 cm, which means roughly 17 across by 21 down — around 357 motifs for the same bed. Cotton works beautifully for the puff texture but makes a very heavy bedspread; if you use it, consider the throw size instead.
Yes. Cutting and rejoining at each colour section is what produces a stepped, broken swirl instead of a smooth one, and it doubles your ends from four per motif to sixteen. Keep both balls in separate bowls or a yarn guide so they feed without tangling.
Usually the puffs. If the loops of each puff are pulled up short, the rim sits tight and the motif loses a full centimetre or more. Measure a motif across the plain spiral centre first — if that is 10 cm your increases are fine and the puff tension is the culprit.
You can, by finishing all motifs and then whip stitching puff to puff with a tapestry needle, but on a piece this size it is slower and the seams come out less elastic. If you do seam at the end, use the same yarn as the rim and keep the stitches loose enough that the blanket still drapes over the mattress edge.
The finished Spiral Bloom Bedspread Crochet Pattern