Advanced
For experienced crocheters who enjoy complex shaping, fine detail, and ambitious construction
Single-Day Project
A satisfying project you can complete in a single afternoon or evening.
Handmade Gift
A beautiful keepsake — free forever. Read online or print at home.
About This Golden Pinwheel Crochet Bedspread
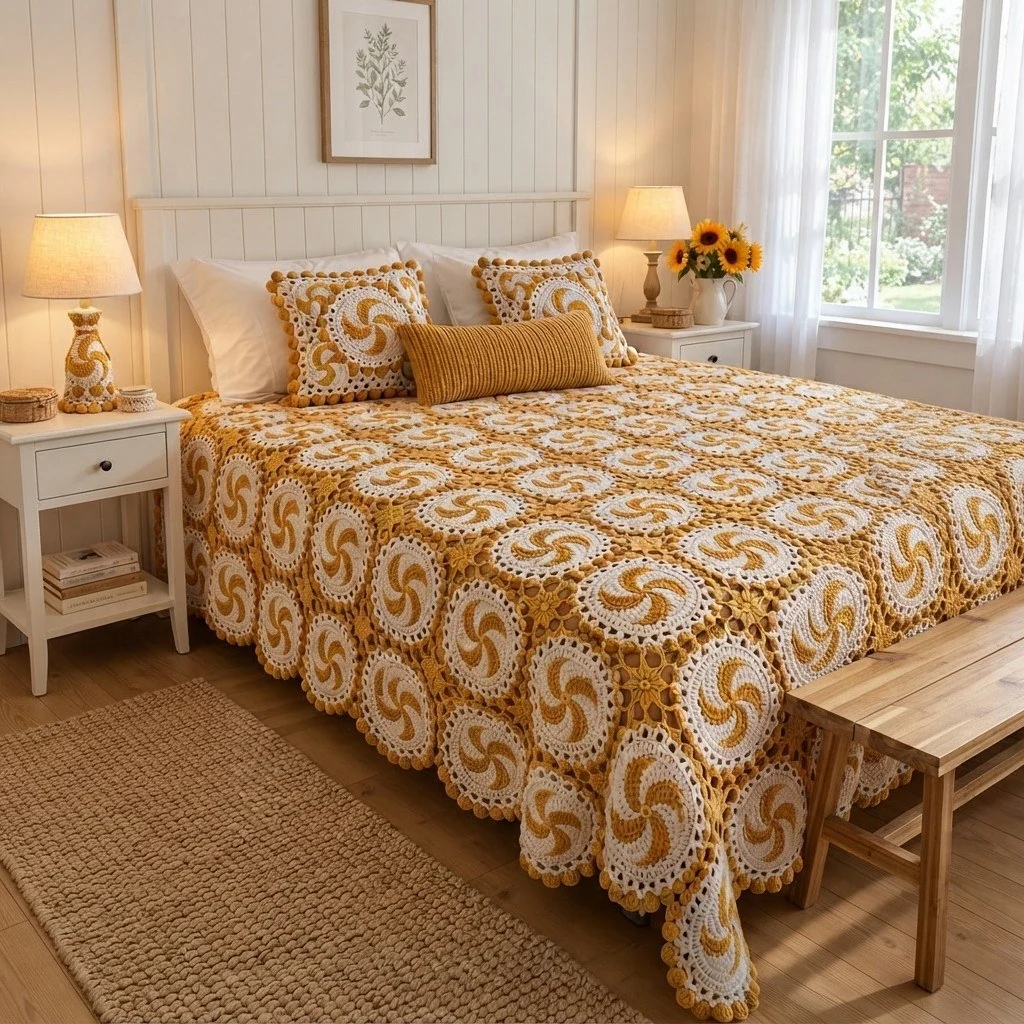
This pinwheel crochet bedspread pattern turns a simple two-colour disc into a field of slow-turning spirals in mustard gold and warm cream. Each motif is worked in tapestry crochet with both yarns carried at once, and the colour change creeps one stitch forward every round, so the six arms curve on their own without any sewing, surface slip stitch or colour-block cheating. The discs are framed with a cream halo and a ring of chain loops, joined to their neighbours as you go, and the small diamond gaps between four discs are filled with an eight-point mustard star.
It is a long project, not a hard one, once the first motif has taught your hands the rhythm. A single disc takes about 20 to 25 minutes after the third or fourth repeat, and the full bedspread of 130 discs, 108 star fillers and a four-round bobble border runs to roughly 55 to 70 hours of hooking. The maths is the same in every round, which makes it good television crochet: once you see that each repeat is one increase, a run of plain stitches, then one stitch in the other colour, you can stop reading and just count.
This one suits a confident crocheter who already knows magic rings and flat circles and wants to practise carrying a second colour cleanly. If you have never done tapestry crochet, make three discs before you commit to a whole bed — by the third one the carried strand stops showing through and your tension settles. You can also stop at any rectangle you like: 4 by 5 discs makes a generous pram blanket from exactly the same instructions.
Materials
- Worsted weight cotton or cotton blend in mustard gold (colour A) approx. 1700 g / 17 x 100 g balls
- Worsted weight cotton or cotton blend in cream (colour B) approx. 1500 g / 15 x 100 g balls
- 4 mm crochet hook or the size that gives you the gauge below
- Stitch markers at least 6 — one for the round, four for the join points, one spare
- Blunt tapestry needle for ends and for closing magic rings
- Blocking mats and rustproof pins or a steam iron held above the work
- Cardboard circle template, 17 cm across for checking motif size as you go
- Small sharp scissors
- Project bag per colour keeps the two carried strands from tangling
Abbreviations
MRmagic ringchchainsl stslip stitchscsingle crochethdchalf double crochetdcdouble crochetinc2 sc in the same stitchMBmake bobble: 5 incomplete dc in the same st, yarn over, pull through all 6 loopsskskipst / stsstitch / stitchesspspacereprepeatAmustard gold yarnBcream yarnJAYGjoin as you go — joining a motif to its neighbour while finishing its last roundGauge, Layout and Motif Count
- Gauge: 16 sc and 18 rounds = 10 cm with 4 mm hook in worsted cotton, worked in tapestry crochet with both strands carried.
- Motif A rounds 1-12 should measure 14 cm across. After the cream frame and the chain-loop round it measures 17 cm across, blocked.
- If your disc is more than 1 cm off, change hook size rather than stitch count — the colour maths only works with 6 repeats per round.
- Layout: 10 discs across by 13 discs down = 130 Motif A discs, set in a straight grid so each disc touches its neighbours at four points (top, bottom, left, right).
- Fillers: 9 across by 12 down = 108 Motif B stars, one in each diamond gap where four discs meet.
- Finished size after border and blocking: approximately 175 cm wide by 225 cm long, which covers a standard double bed with a drop on three sides.
- To resize, add or remove whole discs: each disc adds 17 cm. A 4 by 5 grid makes a 72 x 89 cm blanket, a 12 by 14 grid makes a king-size spread.
- Make all 130 discs first, or join as you go from the start — both routes are written into the Joining section.
Motif A: Pinwheel Disc (make 130)
- Work in continuous rounds, no joining, no turning. Mark the first stitch of each round and move the marker up as you go. Carry the unused colour along the top of the round below and crochet over it.
- Round 1: with A and B both attached in a MR, work 6 sc alternating one stitch at a time: 1 sc in A, 1 sc in B, 1 sc in A, 1 sc in B, 1 sc in A, 1 sc in B. Pull the ring closed. (6 sts: 3 A, 3 B)
- Round 2: inc in each st around, working each inc in the same colour as the stitch below. (12 sts: 6 A, 6 B in pairs)
- Round 3: *inc in next st, then sc in next st in the other colour* rep 6 times. (18 sts)
- Round 4: *inc in next st, sc in next st, then sc in next st in the other colour* rep 6 times. (24 sts)
- Round 5: *inc in next st, sc in next 2 sts, then sc in next st in the other colour* rep 6 times. (30 sts)
- Round 6: *inc in next st, sc in next 3 sts, then sc in next st in the other colour* rep 6 times. (36 sts)
- Round 7: *inc in next st, sc in next 4 sts, then sc in next st in the other colour* rep 6 times. (42 sts)
- Round 8: *inc in next st, sc in next 5 sts, then sc in next st in the other colour* rep 6 times. (48 sts)
- Round 9: *inc in next st, sc in next 6 sts, then sc in next st in the other colour* rep 6 times. (54 sts)
- Round 10: *inc in next st, sc in next 7 sts, then sc in next st in the other colour* rep 6 times. (60 sts)
- Round 11: *inc in next st, sc in next 8 sts, then sc in next st in the other colour* rep 6 times. (66 sts)
- Round 12: *inc in next st, sc in next 9 sts, then sc in next st in the other colour* rep 6 times. (72 sts)
- In every repeat, the inc and all plain sc are worked in one colour; only the final stitch of the repeat uses the other colour. That one stitch is what moves the arm boundary round by round.
- At the end of round 12 you should have six mustard arms and six cream arms, each 12 stitches long at the rim, sweeping clockwise. Fasten off A and cut it, leaving a 10 cm tail. Do not cut B.
Motif A: Cream Frame and Loop Round
- Round 13: with B only, sc in each st around. (72 sts) This round pulls the rim in slightly and gives the arms a clean cream edge.
- Round 14: with B, *sc in next 5 sts, inc in next st* rep 12 times. (84 sts) The 12 increases over two rounds average out to 6 per round, so the disc stays flat.
- Round 15: with B, sl st in next st to even the spiral, then *ch 3, sk 2 sts, sc in next st* rep 28 times, sl st into the first ch of the round to close. (28 ch-3 loops)
- Mark four loops as the join points: loop 1, loop 8, loop 15 and loop 22. These are 7 loops apart and sit at the top, right, bottom and left of the disc.
- For the very first disc of the bedspread, and for any disc you are making ahead of time, fasten off here and weave in the B tail. Leave the A tails until blocking.
- Check the disc against your 17 cm template. A disc that measures 15 cm will leave the grid short by 20 cm over 10 motifs, so correct the hook size now rather than later.
Joining the Discs
- Lay the grid out 10 discs wide and 13 discs long, all arms spiralling the same way. Work the join in rows, left to right, from the top of the bedspread down.
- Join each new disc while working its round 15. Work the round normally until you reach a marked join loop that faces an already-placed neighbour.
- To join a loop: ch 1, sl st into the corresponding marked loop of the neighbouring disc, ch 1, then sc in the next st of your own disc as usual. The ch1-sl st-ch1 replaces the ch 3 and keeps the loop the same width.
- The first disc in a row joins to one neighbour only — the disc above it. Every other disc in a row joins at two marked loops: to the disc on its left and to the disc above.
- The very first disc of the top row joins to nothing and is worked plain. The remaining nine discs of the top row each join at one loop, to the disc on the left.
- Keep the stitch count honest: a joined loop still counts as one of the 28 loops, so you always finish round 15 with 28 loops no matter how many of them were used for joining.
- Work all 130 discs into the grid before adding any star fillers. The grid will look loose and gappy at this stage — that is correct, and the stars and border tighten it.
- If you prefer to make all the discs first, leave a 60 cm tail of B on each and sew the marked loops together in pairs with a flat whip stitch instead. The join sits slightly firmer but looks the same from the front.
Motif B: Eight-Point Star Filler (make 108)
- Round 1: with A, 6 sc in MR, then sc in the first 2 sts again to bring the count to 8 sts. (8 sts) Pull the ring closed firmly — this little centre takes strain from four discs.
- Round 2 sets 8 points, one point from each stitch of round 1. Work points 1, 3, 5 and 7 as joining points and points 2, 4, 6 and 8 as free points.
- Free point: ch 4, sl st in the 2nd ch from hook, sc in next ch, hdc in next ch, sl st in the next st of round 1.
- Joining point: ch 4, sl st into the nearest free ch-3 loop of the disc facing that point, ch 1, sc in the next ch of the ch-4, hdc in next ch, sl st in the next st of round 1.
- Round 2 in full: *joining point, free point* rep 4 times, ending with sl st into the base of the first point. (8 points, 4 of them joined to the 4 discs around the gap)
- Join each star to the ch-3 loop that sits one loop clockwise from the disc-to-disc join on each of the four sides, so the star sits square in the diamond gap.
- Fasten off, leaving a 10 cm tail. Thread the tail through the back of the centre ring and trim after blocking.
- Work the stars row by row across the spread: 9 stars in each of 12 rows, 108 stars in total.
Bobble Scallop Border
- Border round 1: with B, join with a sl st into any outer ch-3 loop at a corner disc. Work (sc, ch 2, sc) in that loop to set the corner.
- Continue along each side: 3 sc in each free ch-3 loop of every disc (18 sc per disc, as 6 loops are free along an outer edge) and 1 sc in each seam between two discs. Work (sc, ch 2, sc) in the corner loop at each of the four corners and mark each corner ch-2 sp.
- Along the two short sides (10 discs): 10 x 18 + 9 seam sts = 189 sc. Work 2 sc instead of 1 in three evenly spaced seams to reach 192 sc per short side, a multiple of 6.
- Along the two long sides (13 discs): 13 x 18 + 12 seam sts = 246 sc per long side, already a multiple of 6. Close the round with a sl st in the first sc.
- Border round 2: change to A. *Sc in next 5 sts, MB in next st* rep across each side — 32 bobbles per short side, 41 bobbles per long side — and work (sc, ch 2, sc) in each corner ch-2 sp. Push every bobble to the front as you close it. (192 sts per short side, 246 sts per long side)
- Border round 3: change to B. Sc in each st and in the top of each bobble around, with (sc, ch 2, sc) in each corner ch-2 sp. (192 sts per short side, 246 sts per long side)
- Border round 4: change to A. *Sl st in next st, sk 2 sts, 5 dc in next st, sk 2 sts* rep around — 32 scallops per short side, 41 scallops per long side. In each corner ch-2 sp work (sl st, 7 dc, sl st).
- Close with a sl st in the first sl st and fasten off, leaving a 15 cm tail to weave along the back of the scallops.
Finishing
Weave in the ends disc by disc rather than saving them all for the end — 130 discs means roughly 300 tails, and they are much faster to deal with in batches of ten while the work is still small enough to hold. Split each tail and run the halves in opposite directions along the back of the cream frame rounds, where the stitches are dense enough to grip. Trim the magic ring tails only after you have given the ring a gentle tug to make sure it is closed.
Block in two stages. Block each disc as it is finished, using the 17 cm template and a steam iron held just above the surface, so the slight wave from round 14 relaxes and every disc ends up the same size. Then block the whole spread once the border is on: lay it out on a clean floor or on joined blocking mats, pin the four corners to the finished measurements, square the grid by eye along the seam lines, and pin each corner scallop. Spray it damp all over, press the bobble border flat with your palms, and leave it to dry fully, which takes a day or more at this size.
Wash the finished bedspread on a cool gentle cycle inside a duvet cover or large laundry bag to stop the scallops catching, and dry it flat rather than hanging — a wet cotton spread of this weight will stretch badly over a line. Give the chain-loop joins a quick look over after the first wash and reinforce any loop that has worked loose with a few stitches of matching yarn.
Tips for Success
- Keep the two balls on opposite sides of your lap and always drop the old colour forward, picking up the new one from underneath. Doing it the same way every single time means the strands never twist around each other, even over 15 rounds.
- Crochet over the carried strand with slightly looser tension than the working strand. If the carried yarn is pulled tight, the disc cups in the middle and no amount of blocking will flatten it.
- Count only at the end of each round, against the target number in brackets. If you are one stitch out, it is almost always a missed colour-change stitch — undo back to the last correct repeat rather than fudging it, because a missing shift stitch breaks the spiral visibly.
- Make your discs in batches of ten, block them together, and lay each finished batch into the grid. A whole-spread layout on the floor every ten motifs catches any disc that drifted a centimetre in size.
- Work the star fillers with a slightly tighter tension than the discs. The star centre is the only point where four motifs pull against each other, and a firm little ring keeps the grid square.
Common Mistakes to Avoid
- Working the increase in the new colour instead of the old. The increase always belongs to the colour block you are in; only the final stitch of each repeat changes colour. Get it backwards and the arms get fat on one side and vanish on the other.
- Letting the spiral drift because the round marker was not moved. In a continuous round there is no join to check against, so a forgotten marker usually means six extra or six missing stitches. Move the marker as the first thing you do in every round.
- Skipping round 13 because it has no increases. It looks pointless but it sets the cream halo and, paired with round 14, keeps the average increase rate at 6 per round. Leaving it out gives a frilly rim that will not sit flat in the grid.
- Joining the discs at loops that are not 7 apart. If the four marked loops are uneven, the grid skews and by the fifth row the edge wanders by several centimetres. Mark loops 1, 8, 15 and 22 with stitch markers before you start joining each disc.
- Closing bobbles on the wrong side. A bobble pops out towards you as you work it, so if you forget to push it through, it sits on the back of the border. Check the first three bobbles of the round, then trust your hands.
Ways to Customize This Pattern
- Swap the two-colour arms for a three-colour version: carry a third shade and change colour at the end of each repeat in sequence A, B, C. The maths is identical and the spiral becomes a tighter, denser pinwheel.
- Reverse the spiral direction on every other disc by working the colour change at the start of each repeat rather than the end. Alternating the two directions across the grid gives the whole spread a woven, rippling look.
- Stop each disc at round 8 for a 10 cm motif and use a 16 by 21 grid instead. Smaller motifs mean more joins and more ends, but a much finer, more antique-looking surface.
- Drop the cream entirely and work the arms in two close tones of the same gold — mustard and honey, for example. The pinwheels become a subtle texture rather than a graphic pattern, which suits a plainer bedroom.
- Leave off the bobble rounds and finish with border rounds 1, 3 and 4 only, for a flatter edge that tucks neatly under a mattress.
Frequently asked questions
Almost always because the final stitch of each repeat was worked in the same colour as the rest of the repeat. That single stitch is what moves the colour boundary one position each round, and without it you get six straight wedges like a pie. Check round 3 of your disc: it should read two gold, three cream, three gold, three cream and so on, not a clean alternation of three and three.
Yes, and it will be lighter and warmer, but worsted acrylic has more stretch than cotton, so a bedspread of this size will grow at the hem over time. If you use acrylic, go down to a 3.5 mm hook to make a firmer fabric, and check your disc against the 17 cm template after blocking rather than before, since acrylic relaxes more under steam.
Each blocked disc is 17 cm wide and the border adds about 2 cm all round. A single bed with a drop needs roughly 7 across by 12 down, which is 84 discs and 66 stars. A king needs about 12 across by 14 down, which is 168 discs and 143 stars. Multiply the disc count by 13 g per disc to estimate yarn, then add 15 percent for the stars and border.
Either works. Joining as you go while finishing round 15 is faster and gives a slightly stretchier seam, which helps the spread drape over the mattress edge. If you prefer to make all 130 discs first, leave a 60 cm cream tail on each one and whip stitch the marked loops together in pairs through the back bumps only, which keeps the seam invisible from the front.
They fill the diamond-shaped hole that appears wherever four round discs meet, and they do structural work as well as decorative — the four joining points pull the grid square and stop the discs from sliding into a diagonal lattice. If you leave them out, the spread still holds together but the gaps open up noticeably once the full weight hangs off the bed.
The finished Golden Pinwheel Crochet Bedspread