Aegean Tile Crochet Bedspread Pattern
Beginner Friendly
Perfect for those just starting their crochet journey, with clear instructions and simple techniques
Single-Day Project
A satisfying project you can complete in a single afternoon or evening.
Handmade Gift
A beautiful keepsake — free forever. Read online or print at home.
About This Aegean Tile Crochet Bedspread Pattern
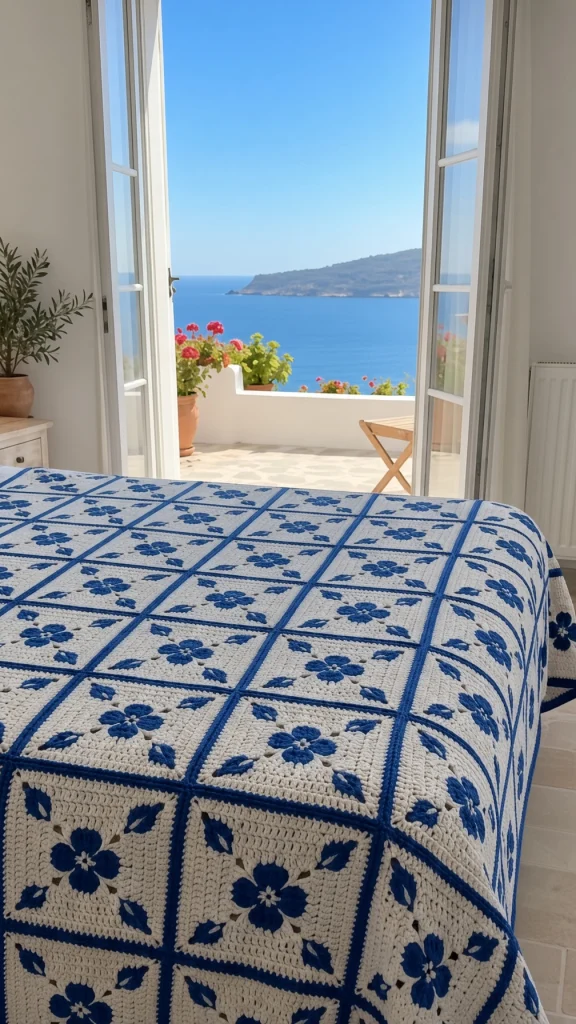
This blue and white crochet blanket pattern is inspired by the painted tiles of the Greek islands. Every cream square carries a raised cobalt flower with four rounded petals, and four small blue leaves point out toward its corners. Each square is framed in blue, and when the squares are joined, those frames form a crisp blue grid. From a distance, the bedspread looks like a tiled floor with a repeating floral motif, and up close it has the depth of real 3D crochet.
The flower petals are worked into the front loops of the center, and the cream background is built from the back loops behind them, so the petals sit raised above the square. The corners of each square are worked with chain spaces, which leave a small line of openwork running toward each corner, just as in the photo. The leaves are crocheted separately and sewn on, which lets you place them exactly on the diagonals. The 99 squares are joined flat and finished with a blue and cream border.
Plan on 115 to 130 hours. Each square, with its leaves, takes a little over an hour. The pattern suits a crocheter who is comfortable with color changes, front and back loop work and appliqué. Cotton or a cotton blend shows the stitches most clearly and gives the bedspread a cool, summery feel.
Materials
- Worsted weight (#4) cotton or cotton blend, color A, cream about 3,150 m / 3,445 yd (roughly 18 skeins of 100 g / 180 m)
- Worsted weight (#4) cotton or cotton blend, color B, cobalt blue about 1,450 m / 1,585 yd (roughly 8 skeins of 100 g / 180 m)
- 4.5 mm (7) crochet hook
- Tapestry needle
- Pins and stitch markers
- Blocking mats and a spray bottle
- A 21 cm (8.25 in) cardboard square as a blocking template
Abbreviations
A / Bcolor A (cream) / color B (blue)MRmagic ringchchainsl stslip stitchscsingle crochethdchalf double crochetdcdouble crochettrtreble crochetFLO / BLOfront loop only / back loop onlyrev screverse single crochet (crab stitch)spspacest(s)stitch(es)Tile Square (make 99)
- Rnd 1: With A, make a MR. Ch 1, 8 sc in ring, sl st to first sc. (8 sc) Fasten off A. This is the cream center of the flower.
- Rnd 2: Join B in any st. Ch 1, 2 sc in each st around, sl st to first sc. (16 sc)
- Rnd 3 (petals): Working in FLO of Rnd 2 only, *sl st in next st, (dc, 2 tr) in next st, (2 tr, dc) in next st, sl st in next st* 4 times. Sl st to first sl st. (4 petals) Fasten off B.
- Rnd 4: Fold the petals toward you. Join A in the unused back loop of a Rnd 2 st that sits directly behind the gap between two petals. Ch 3 (counts as dc), dc in same st, then 2 dc in the BLO of each remaining st of Rnd 2. Sl st to top of ch-3. (32 dc)
- Rnd 5 (squaring): Ch 4 (counts as tr), (tr, ch 2, 2 tr) in same st for the first corner. *Dc in next 7 sts, (2 tr, ch 2, 2 tr) in next st* 3 times, dc in next 7 sts, sl st to top of ch-4. (44 sts: 11 per side between corner sps) Check that each corner sits behind a gap between petals.
- Rnd 6: Sl st in next tr and into corner ch-2 sp. Ch 3 (counts as dc), (dc, ch 2, 2 dc) in same sp. *Dc in each st across, (2 dc, ch 2, 2 dc) in next corner sp* 3 times. Dc in each st across, sl st to top of ch-3. (15 dc per side)
- Rnds 7-10: Sl st in next dc and into corner ch-2 sp, then work as Rnd 6. Each round adds 4 sts per side. (31 dc per side at the end of Rnd 10) Fasten off A.
- Rnd 11 (blue frame): Join B in any corner ch-2 sp. Ch 1, (sc, ch 2, sc) in same sp. Sc in each st across, with (sc, ch 2, sc) in each corner sp. Sl st to first sc. (33 sc per side) Fasten off and weave in ends.
- Block to 21 cm (8.25 in) square. Pin the corners out so the chain-space holes line up neatly along the diagonals.
Leaves (make 396: 4 per square)
- With B, ch 8.
- Sl st in 2nd ch from hook, sc in next ch, hdc in next ch, dc in next 2 ch, hdc in next ch, 3 sc in last ch for the base of the leaf.
- Rotate and work along the other side of the chain: hdc in next ch, dc in next 2 ch, hdc in next ch, sc in next ch, sl st in next ch. Ch 2 for the tip and sl st to the first sl st.
- Fasten off, leaving a 20 cm tail for sewing. Each leaf measures about 4 x 2 cm.
Attaching the Leaves
- On each blocked square, place one leaf on each diagonal, between the flower and a corner. The base should sit about 1.5 cm from the gap between the petals, with the tip pointing toward the corner holes.
- Pin the leaf so its center line follows the diagonal exactly. Lay a ruler from corner to corner to check if needed.
- Using the tail, sew around the whole outline of the leaf with small stitches about 5 mm apart, catching the cream fabric underneath.
- Fasten off on the back and weave the tail under the leaf, so no blue shows through the cream.
Joining the Squares
- Lay out the squares 9 across and 11 down, all turned the same way.
- Hold two neighboring squares with right sides together. With B, join yarn in both corner ch-2 sps. Sl st through the BLO of both layers in each of the 33 sc, then sl st in the next pair of corner sps. (35 sl sts per edge)
- Without fastening off, continue onto the next pair in the same line. Join all 8 lengthwise seams (11 squares each), then all 10 widthwise seams (9 squares each).
- Keep the slip stitches relaxed so the seams lie flat. The blue frames of neighboring squares sit side by side and form the blue grid.
Border
- Rnd 1: With the right side facing, join B in any bedspread corner ch-2 sp. Ch 1, (sc, ch 2, sc) in same sp. Sc in each sc along each square edge, plus 1 sc in each square corner sp on either side of every seam. Work (sc, ch 2, sc) in each bedspread corner. Sl st to first sc. (315 sts on each short side and 385 on each long side, counted between corner sps) Fasten off B.
- Rnd 2: Join A in any corner ch-2 sp. Ch 3 (counts as dc), (dc, ch 2, 2 dc) in same sp. Dc in each st around, with (2 dc, ch 2, 2 dc) in each corner sp. Sl st to top of ch-3.
- Rnd 3: Sl st in next dc and into corner ch-2 sp, then work as Rnd 2. Fasten off A.
- Rnd 4: Join B in any corner ch-2 sp. Ch 1, (sc, ch 2, sc) in same sp. Sc in each st around, with (sc, ch 2, sc) in each corner sp. Sl st to first sc.
- Rnd 5: Ch 1, rev sc in each st around, sl st to first st. Fasten off and weave in ends.
Finishing
Lay the bedspread flat and check the leaves and flowers. Press any petal that has folded back into place with your fingers, and add a tacking stitch from the back to any leaf that has lifted. Mist the cream areas lightly and smooth the blue grid lines straight, then let the bedspread dry flat.
Wash the bedspread in cool water on a gentle cycle and dry it flat. Before you start, wash a scrap of blue and cream together. Cobalt cotton can bleed, and a few loose stitches in a test swatch are much better than a tinted bedspread. Adding a color-catcher sheet to the first few washes is a sensible precaution.
Tips for Success
- Make the leaves in batches of 40 to 50 while watching something. They are small, fast and easy to work without looking at the pattern.
- Work all the centers (Rounds 1-3) for many squares in one sitting, then all the cream rounds. Fewer color changes per session makes your tension more even.
- Block every square before sewing on the leaves. A flat, square base is the only way to get the leaves exactly on the diagonals.
- Use a cream-colored tapestry needle or tie off the blue sewing tail carefully on the back, because blue shows through cream cotton easily.
- Choose a cotton with a firm twist. It gives sharper petals and leaves than a soft, fuzzy blend.
Common Mistakes to Avoid
- Petals that point at the corners: you joined the cream in Round 4 behind a petal instead of behind a gap. Rip back to Round 4 and rejoin behind the gap.
- Flat petals with no lift: Round 3 was worked through both loops. Work the petals in the front loops only, so the back loops stay free for the cream.
- Squares that cup in the middle: the trebles in Round 5 are too short. Pull them to full height, or use a slightly larger hook for that round.
- Leaves at different angles: they were placed by eye. Use a ruler along the diagonal to place the first leaf on each square, and match the others to it.
- A wavy grid: the joining seams are tighter than the square edges. Loosen your slip stitches, or join with a 5 mm hook.
Ways to Customize This Pattern
- Make matching pillow covers from a 2 x 2 block of squares for the front and a plain cream panel for the back.
- Change the motif color to terracotta, olive green or yellow for a different Mediterranean look.
- Make a throw of 6 x 7 squares, about 135 x 155 cm with the border.
- Skip the leaves for a quicker version. The flowers and the corner lace still give a strong tile effect.
- Alternate blue-motif squares with plain cream squares for a lighter checkerboard design.
Frequently asked questions
Worked-in leaves would mean carrying blue yarn across the cream rounds, which shows through cotton and makes the square stiff. Separate leaves stay crisp and raised, and you can place them exactly on the diagonals.
About 40 minutes for the square, around 20 minutes for its four leaves, and about 10 minutes to sew them on. That is a little over an hour per square, and you get noticeably faster after the first ten.
Yes. Acrylic is lighter, warmer and less likely to bleed, but the petals and leaves will look softer and less defined. If you use acrylic, choose one with a smooth, tight twist.
About 7 x 10 squares (70 in total), which is roughly 155 x 218 cm with the border. You will need about 2,250 m of cream and 1,050 m of blue.
The finished Aegean Tile Crochet Bedspread Pattern

