Midnight Daisy Crochet Toilet Roll Holder Pattern
Advanced
For experienced crocheters who enjoy complex shaping, fine detail, and ambitious construction
Single-Day Project
A satisfying project you can complete in a single afternoon or evening.
Handmade Gift
A beautiful keepsake — free forever. Read online or print at home.
About This Midnight Daisy Crochet Toilet Roll Holder Pattern
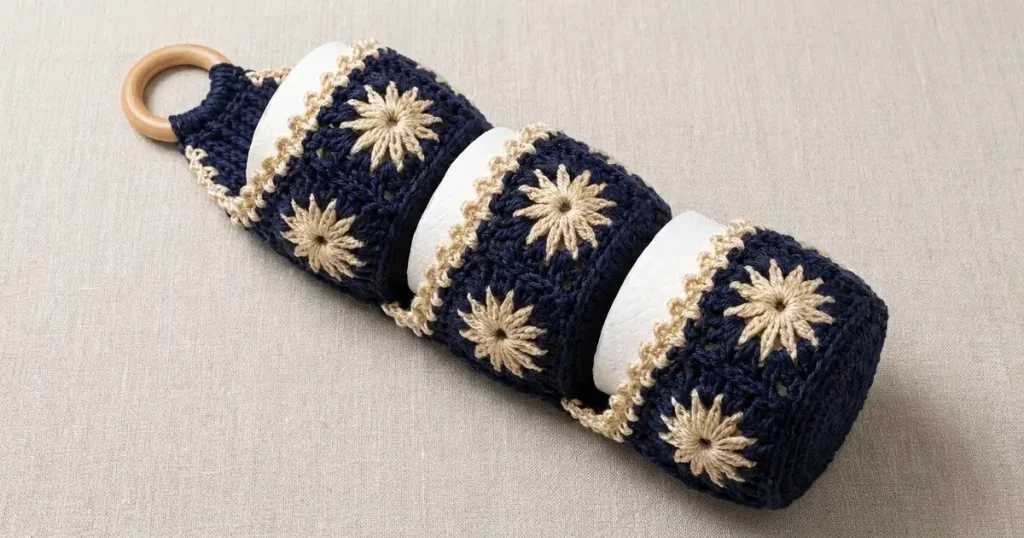
This crochet toilet roll holder pattern pairs deep navy cotton with raised cream daisies, scalloped picot edges, and a smooth wooden hanging ring. Three shaped pockets sit along a firm backing, with two floral squares forming the front of each pocket. The extra width in those fronts curves around the rolls and gives the holder its rounded silhouette.
Allow about 10–14 hours for the six motifs, double backing, pocket shaping, and careful assembly. This advanced household crochet project suits makers who enjoy textured stitches and precise finishing. It is designed around three standard toilet rolls approximately 10 cm in diameter and 9–10 cm wide; checking your own rolls against the first assembled pocket will give you the best fit.
Materials
- DK cotton yarn in deep navy Approximately 200 g / 440 m
- DK cotton yarn in warm cream Approximately 50 g / 110 m
- Crochet hook 3.5 mm, or size needed for gauge
- Solid wooden hanging ring Approximately 7 cm outside diameter, with a 1 cm thick rim
- Stitch markers At least 12, including removable markers for backing rows
- Tapestry needle and scissors For structural seams and weaving in ends
- Measuring tape and blocking equipment For matching the six squares
- Three toilet rolls for fitting Approximately 10 cm diameter × 9–10 cm wide each
Abbreviations
chchainsl stslip stitchscsingle crochetdcdouble crochettrtreble crochetMRmagic ringst / stsstitch / stitchesRSright sideWSwrong side3-tr clusterThree treble stitches closed together in one stitch, as described belowGauge, Size, and Construction
- Use US crochet terminology. Backing gauge after washing and drying flat: 20 sc and 22 rows = 10 × 10 cm. Make a swatch of at least 26 sc and 28 rows and measure its center.
- Motif gauge: one completed five-round square measures approximately 10 × 10 cm after gentle blocking. Its final round has 16 dc along each side, between the corner spaces. If necessary, use a different hook for the motifs so both gauges agree.
- The double backing measures approximately 12 × 42 cm before its narrow joining edge. Each pocket front measures approximately 20 × 10 cm before its upper trim. The finished holder carries three rolls in a vertical column.
- Make six daisy squares, two backing panels, and one ring tab. Join the squares into three pairs, trim their upper edges, and sew the pairs onto the backing with gathered lower edges.
- Turning ch-1 and starting ch-2 do not count as stitches. Where instructed, starting ch-3 counts as one dc. Slip-stitch joins do not count as stitches. Do not stuff any part; this is a storage holder, and it has no facial features or safety eyes.
Cream Daisy Centers — Make Six
- Round 1, cream: work 12 sc in MR. Pull the center closed and sl st to the first sc. Count: 12 sc.
- Cluster method: yarn over twice, insert hook into the specified stitch, yarn over and pull up a loop, then yarn over and draw through two loops twice. Leave the remaining loop on the hook. Repeat this unfinished tr twice more in the same stitch, then yarn over and draw through all four loops on the hook.
- Round 2: ch 3, which does not count as a stitch. Work a 3-tr cluster in the first sc, then ch 3. Repeat a 3-tr cluster in the next sc followed by ch 3 eleven more times. Sl st to the top of the first cluster. Count: 12 clusters and 12 ch-3 spaces. Fasten off cream.
- Push the clusters toward the RS so the cream petals stand above the navy background. Secure the center tail through several stitches on the WS before trimming it.
Navy Square Surrounds — Complete All Six Motifs
- Round 3: join navy in any ch-3 space. Ch 3, work 2 dc, ch 2, and 3 dc in that same space to form the first corner. Work 3 dc in each of the next two ch-3 spaces. Repeat the following three times: work (3 dc, ch 2, 3 dc) in the next space, then 3 dc in each of the next two spaces. Sl st to the top of the starting ch-3. Count: 48 dc and four ch-2 corners; 12 dc between consecutive corner spaces.
- Round 4: sl st across to the next corner space. Ch 3, ch 2, and dc in that space. Repeat the following three times: dc in each of the next 12 dc, then work (dc, ch 2, dc) in the next corner space. Dc in the remaining 12 dc and sl st to the top of the starting ch-3. Count: 56 dc and four ch-2 corners; 14 dc per side.
- Round 5: sl st into the adjacent corner space. Ch 3, ch 2, and dc in that space. Repeat the following three times: dc in each of the next 14 dc, then work (dc, ch 2, dc) in the next corner space. Dc in the remaining 14 dc and sl st to the top of the starting ch-3. Count: 64 dc and four ch-2 corners; 16 dc per side. Fasten off.
- Wet-block all six squares to 10 × 10 cm without flattening the petals. For seaming, treat each side as 18 attachment positions: its starting corner space, its 16 dc, and its ending corner space. A corner space belongs to each of the two edges that meet there.
Double Backing — Make Two Panels
- Foundation, navy: ch 25.
- Row 1: sc in the second chain from the hook and each remaining chain. Turn. Count: 24 sc.
- Rows 2–92: ch 1, sc in each of the 24 sc, turn. Count: 24 sc in every row. Fasten off after Row 92. Each panel should measure approximately 12 × 41.8 cm.
- Place the two panels together with WS facing inward, matching all rows. With navy, join through both layers around the perimeter: work 24 sc across each short edge and 92 sc along each long edge, placing one stitch in each row end. Add ch 1 between edges to turn each corner. Count: 232 sc and four ch-1 corners. Sl st to the first sc and fasten off.
- Designate one short edge as the bottom and count the original panel rows upward from it. Mark Rows 4, 25, 34, 55, 64, and 85 on both long edges. The three pocket zones are Rows 4–25, 34–55, and 64–85, each spanning 22 row ends.
Join the Three Pocket Fronts
- Arrange two squares side by side with their RS facing upward. Match one vertical edge of each square, including both corner spaces. Using navy, mattress-stitch the 18 corresponding edge positions together. Catch the outer loops neatly so the seam remains flexible. Repeat with the other four squares to make three fronts.
- Each front now measures approximately 20 cm wide × 10 cm high. Designate one long edge as the pocket opening and the opposite edge as the bottom. The opening and bottom each have 36 attachment positions: 18 from each square. At the center seam, the two adjacent corner spaces remain separate positions.
- Check that all flowers face outward and that each front has the same height. Weave the seam tails securely through the navy stitches on the WS.
Cream Picot Pocket Openings
- Row 1: with the RS facing you, join cream in the first corner space of a pocket opening. Ch 1 and sc in that space. Sc in each of the next 16 dc, sc in the square’s ending corner space, sc in the next square’s starting corner space, sc in its 16 dc, and sc in its ending corner space. Turn. Count: 36 sc.
- Row 2: ch 1. Repeat the following 12 times: sc in each of the next 3 sc, ch 3, then sl st into the front loop and adjacent vertical bar of the sc just made to form a picot. Count: 36 sc and 12 picots. Fasten off, leaving a 15 cm tail at each end for securing the trim during assembly.
- Repeat Rows 1–2 on the remaining two fronts. The cream trim belongs only on the upper opening of each pocket; leave the lower edge navy.
Shape and Attach the Three Pockets
- Lay the backing front side upward with Row 1 at the bottom. Position the first pocket over Rows 4–25, the second over Rows 34–55, and the third over Rows 64–85. Keep the cream edges at the upper ends of these zones.
- For each pocket, pin the lower left corner to the left edge at the lowest marked row and the upper left corner to the left edge at the highest marked row. Repeat on the right. The 20 cm front must arch away from the 12 cm backing; do not stretch the backing to match it.
- Sew each 18-position pocket side to its corresponding 22 backing row ends. For exact distribution, divide the pocket edge into groups of 4, 5, 4, and 5 positions, and the backing edge into groups of 5, 6, 5, and 6 row ends. Within each group, make one extra anchoring pass into a neighboring backing row end. Keep the stitches even and the backing flat. Catch both backing layers.
- Close the bottom across its lowest marked backing row. There are 36 front positions to attach to 24 backing stitches. Repeat this sequence 12 times: sew the next two front positions to one backing stitch, then sew the next single front position to the next backing stitch. This uses all 36 front positions and all 24 backing stitches.
- Distribute the resulting gathers evenly, keeping the central motif seam near the center of the backing. Make a second sewing pass through the lower seam for strength. Reinforce both upper side corners with four small stitches through the pocket and both backing layers.
- Secure the cream trim tails into the corresponding side seams. Leave the entire cream upper edge open. Insert a roll into the first pocket to check the fit before completing the other two pockets.
Navy Hanging Tab and Wooden Ring
- Foundation, navy: ch 13.
- Row 1: sc in the second chain from the hook and each remaining chain. Turn. Count: 12 sc.
- Rows 2–18: ch 1, sc in each sc, turn. Count: 12 sc in every row. Fasten off, leaving a 60 cm sewing tail. The tab measures approximately 6 × 8.2 cm.
- Pass one short end through the wooden ring and fold the tab around the ring’s lower rim, bringing the two short ends together. The resulting doubled tab is approximately 4 cm long before allowing for the ring rim.
- Center the two aligned short ends over the back of the holder’s top edge, with the ring above the holder. Overlap the tab onto the backing by approximately 2 cm, covering Rows 89–92 and the area immediately below them as needed.
- Sew through both tab layers and both backing layers around the overlap perimeter, then sew two horizontal reinforcing lines across the overlap. Keep the ring free to pivot at the fold. Secure the tail through several separate stitch paths.
Cream Shoulder Edging
- With the holder facing you, identify the six backing-edge stitches to the left of the centered 12-stitch tab and the six to its right.
- Join cream at the outer end of one six-stitch shoulder. Ch 1, then repeat twice: sc in each of the next 3 edge stitches, ch 3, and sl st into the front loop and adjacent vertical bar of the sc just made. Count: 6 sc and 2 picots. Fasten off.
- Repeat on the other six-stitch shoulder. Keep these small cream accents clear of the ring fold and weave their tails into the backing.
Finishing
Weave in every remaining tail, paying particular attention to the daisy centers and the ends of the pocket openings. Smooth the backing flat and gently arrange the gathered lower corners into rounded cups. If the navy borders need tidying, dampen and shape them with your fingers while keeping the raised cream petals lifted.
Place one roll in each pocket with its cardboard tube running across the holder’s width. The roll’s circular ends face the pocket sides, and its curved paper surface shows above the cream opening. Hang the empty holder first, then add the rolls one at a time and check that the ring tab and pocket corners remain firm. Use a securely mounted hook and keep the cotton clear of wet surfaces.
Tips for Success
- Block all six squares together. A small difference in motif height becomes obvious when the three cream openings hang in a column.
- Mark every third backing stitch before gathering a pocket bottom. Each three-stitch backing group receives two repeats of the two-front-positions, then one-front-position sewing sequence.
- Keep the cream opening relaxed. Tight picots can pull a 20 cm pocket front inward and make loading a roll difficult.
- Use small sewing stitches through both backing layers at the upper pocket corners. These points carry much of the load when the holder hangs.
- Check the first pocket with the actual rolls you buy. Roll diameter affects the required pocket fullness more than the printed sheet count does.
Common Mistakes to Avoid
- Adding navy stitches into the cream cluster tops in Round 3 creates too many stitches. Work only into the twelve ch-3 spaces, using every third space as a corner.
- Using three dc on each side of the corners in Rounds 4 and 5 makes the squares grow too quickly. Those rounds use only one dc on each side of each ch-2 corner.
- Sewing the front flat against the backing removes the space needed for a roll. Match the outer edges while allowing the center to bow outward.
- Gathering the entire lower edge into a few large folds can distort the daisies. Follow the repeated 36-to-24 attachment sequence and spread the fullness before reinforcing.
- Attaching the ring tab only to the rear backing layer can stretch that layer away from the front. Pass every structural tab seam through both layers.
Ways to Customize This Pattern
- Keep the cream daisies and change the navy to forest green, charcoal, or deep brown for a different bathroom palette.
- For a two-roll version, make four squares and two backing panels of 62 rows each. Use pocket zones Rows 4–25 and 34–55, and attach the ring tab over the top 2 cm.
- Replace each picot row with a plain row of 36 sc for a smooth cream lip. Keep the opening width unchanged.
- Add a washable woven-cotton reinforcement strip between the backing layers before joining them. Cut it slightly smaller than the backing and stitch its upper end into the ring-tab attachment area.
Frequently asked questions
The stated dimensions target rolls about 10 cm in diameter and 9–10 cm wide. Jumbo rolls need a separate fitting check. Wrap the first 20 cm pocket front around your roll against the 12 cm backing before sewing; if the sides cannot meet comfortably, enlarge the motif gauge and backing dimensions together and recheck the spacing.
The extra 8 cm provides depth. Matching the side edges makes the front curve around the roll, while gathering the lower edge creates a supporting cup. The pocket should look rounded when loaded.
The sewn tab in this pattern makes the ring permanent. For routine cleaning, hand-wash the cotton portion while keeping the ring above the water, then support the holder flat to dry. Follow the yarn label and avoid soaking unfinished wood.
Two layers give the narrow backing more body and distribute the pocket and ring-tab seams across more fabric. They also hide most sewing ends and help the holder hang evenly under the weight of three rolls.
The finished Midnight Daisy Crochet Toilet Roll Holder Pattern