Ivory Rose Filet Crochet Table Runner Pattern
Advanced
For experienced crocheters who enjoy complex shaping, fine detail, and ambitious construction
Single-Day Project
A satisfying project you can complete in a single afternoon or evening.
Handmade Gift
A beautiful keepsake — free forever. Read online or print at home.
About This Ivory Rose Filet Crochet Table Runner Pattern
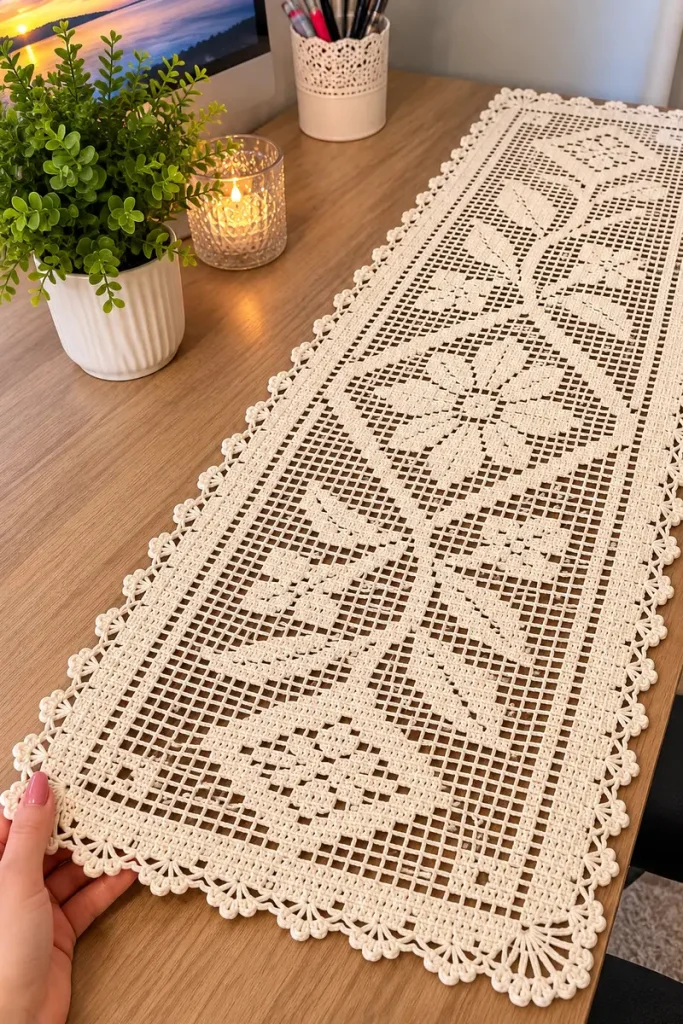
This filet crochet table runner pattern creates an ivory lace panel with three stylized roses, a winding stem, paired leaves, and a scalloped edge. Inspired by the photographed runner, the design keeps its long rectangular shape and quiet, single-color finish. Solid crochet cells form the floral details against an open mesh background.
Allow approximately 35–50 hours for the crochet, plus washing and blocking time. This advanced project suits crocheters who enjoy fine cotton, chart interpretation, and careful finishing. The original construction below combines a counted filet panel with a dense frame and a separately worked decorative edging; its floral layout is an interpretation of the photograph.
Materials
- Size 10 mercerized crochet cotton in ivory Approximately 1,400–1,700 m; buy the full amount in one dye lot
- Steel crochet hook 1.5 mm, or size needed for blocked gauge
- Fine tapestry needle For securing thread ends
- Removable stitch markers For corners and chart checkpoints
- Graph paper and pencil At least 49 squares wide by 121 squares high
- Blocking mat, rustproof pins, and measuring tape Blocking wires are useful for the straight edges
Abbreviations
chchainsl stslip stitchscsingle crochetdcdouble crochetststitchspspaceRSright sideOopen filet cellFfilled filet cellGauge, Size, and Filet Construction
- Use US crochet terminology. Blocked gauge: 12 filet cells and 12 rows measure 10 × 10 cm. Each cell spans three stitch positions horizontally. Adjust hook size and loop height until the cells are approximately square.
- For a gauge sample, ch 40. Work dc in the eighth ch from the hook, then repeat ch 2, skip 2 ch, dc in the next ch eleven times. This makes 12 open cells. Work another 11 rows of open mesh, beginning each with ch 3, then repeating ch 2, skip 2, dc in the next upright dc across. Wash, block, and measure the sample.
- The runner panel has 49 cells across and 121 rows. At gauge it measures approximately 40.8 × 100.8 cm before the border. Allow approximately 3 cm of border on each edge for a finished size near 47 × 107 cm.
- Each row begins with ch 3, counting as its first dc. To work O, ch 2, skip the next two stitch positions, dc in the next upright dc. To work F over O, work 2 dc into the ch-2 sp and 1 dc in the next upright dc. To work F over F, work 1 dc in each of the next 3 dc.
- Adjacent cells share their boundary dc. A row of 49 cells therefore has 148 stitch positions: one initial dc plus three positions per cell. A completely filled row has 148 dc; a completely open row has 50 upright dc and 49 ch-2 spaces.
- Turn after every panel row. Row 1 is an RS row. Read chart columns 49 down to 1 on odd rows and columns 1 through 49 on even rows. Chain spaces count as two positions when checking the row width.
Build the Master Floral Chart
- Draw a grid 49 cells wide and 121 cells high. Number columns 1–49 from left to right and rows 1–121 from bottom to top. Every cell starts as O. All ranges below include both endpoints.
- Shade the frame: fill every cell in rows 1, 2, 120, and 121. On every row from 3 through 119, fill columns 1, 2, 48, and 49. These cells remain filled even when other instructions leave surrounding cells open.
- Shade the winding main stem: rows 10–20, columns 24–25; rows 21–30, columns 25–26; rows 31–40, columns 26–27; rows 41–50, columns 25–26; rows 51–60, columns 24–25; rows 61–70, columns 23–24; rows 71–80, columns 22–23; rows 81–90, columns 23–24; rows 91–100, columns 24–25; rows 101–112, columns 25–26. Each listed pair of columns is filled on every row in its range.
- Add three roses using the rose chart below. Each rose occupies a local grid 21 cells wide and 21 rows high. Place local column 1 at master column 15 for all three roses. Place local row 1 at master row 8 for the lower rose, master row 51 for the middle rose, and master row 94 for the upper rose.
- Add four leaves using the leaf chart below. For each leaf, local row 1 is its base and local row 15 is its tip. Leaf A starts at master column 10, row 30, using the unmirrored chart. Leaf B starts at column 27, row 37, using the mirrored chart. Leaf C starts at column 8, row 75, using the unmirrored chart. Leaf D starts at column 25, row 82, using the mirrored chart.
- For a mirrored leaf, replace each local column number c with 16 minus c. For example, local columns 12–15 become columns 1–4. Keep the local row numbers unchanged.
- Add the leaf stalks: rows 30–32, columns 23–27; rows 37–39, columns 26–29; rows 75–77, columns 21–24; rows 82–84, columns 23–27. These short filled bands connect the leaf bases to the main stem.
- Combine every layer by taking the union of its filled cells: if any instruction fills a cell, that cell is F. An open area inside a rose does not erase a stem cell underneath it. Every cell not filled by these instructions remains O. The chart is now complete for all 121 rows.
Rose Chart — Use Three Times
- Local row 1: fill columns 9–13.
- Local row 2: fill columns 6–16.
- Local row 3: fill columns 4–8 and 14–18.
- Local row 4: fill columns 3–6 and 16–19.
- Local row 5: fill columns 2–5, 9–13, and 17–20.
- Local row 6: fill columns 2–4, 7–15, and 18–20.
- Local row 7: fill columns 1–4, 6–9, 14–16, and 18–21.
- Local row 8: fill columns 1–3, 5–8, 15–17, and 19–21.
- Local row 9: fill columns 1–3, 5–7, 10–13, and 16–21.
- Local row 10: fill columns 1–3, 5–7, 9–14, and 17–21.
- Local row 11: fill columns 1–3, 5–7, 9–11, 14–16, and 19–21.
- Local row 12: fill columns 1–3, 5–7, 10–12, 15–17, and 19–21.
- Local row 13: fill columns 1–4, 6–8, 11–13, 15–17, and 19–21.
- Local row 14: fill columns 2–4, 7–9, 14–17, and 18–20.
- Local row 15: fill columns 2–5, 8–16, and 18–20.
- Local row 16: fill columns 3–6, 10–14, and 17–19.
- Local row 17: fill columns 3–7 and 15–19.
- Local row 18: fill columns 4–9 and 13–18.
- Local row 19: fill columns 5–17.
- Local row 20: fill columns 7–15.
- Local row 21: fill columns 9–13. All other cells within this local chart remain open unless another master-chart layer fills them.
Leaf Chart — Use Four Times
- Local row 1: fill columns 13–15.
- Local row 2: fill columns 12–15.
- Local row 3: fill columns 11–15.
- Local row 4: fill columns 10–14.
- Local row 5: fill columns 9–14.
- Local row 6: fill columns 8–10 and 12–13.
- Local row 7: fill columns 7–9 and 11–13.
- Local row 8: fill columns 6–8 and 10–12.
- Local row 9: fill columns 5–7 and 9–11.
- Local row 10: fill columns 4–6 and 8–10.
- Local row 11: fill columns 3–5 and 7–9.
- Local row 12: fill columns 2–4 and 6–8.
- Local row 13: fill columns 2–7.
- Local row 14: fill columns 2–5.
- Local row 15: fill columns 1–3. The narrow open diagonal inside the leaf forms its vein; surrounding unlisted cells remain open unless another chart layer fills them.
Crochet the Filet Panel
- Foundation: ch 150. Keep this chain relaxed; use a slightly larger hook for the chain if necessary.
- Row 1: dc in the fourth ch from the hook and in each remaining ch. The three skipped chains count as the first dc. Count 148 dc, representing 49 filled cells. Turn.
- Row 2: ch 3, dc in each of the next 147 dc. Count 148 dc, representing 49 filled cells. Turn.
- Rows 3–119: ch 3, then work the 49 cells shown on the corresponding master-chart row. Use the reading direction specified above. Every row retains 148 stitch positions and 49 cells. Turn after each row.
- Row 120: ch 3, then work 49 F cells across. Count 148 dc. Turn.
- Row 121: ch 3, dc in each of the next 147 dc. Count 148 dc. Fasten off.
- Lay the panel flat and check all three roses, four leaves, and stem connections against the chart. Confirm 121 rows on both long edges before adding the frame.
Dense Border Frame
- Work with the RS facing throughout the border. Each short edge contains 49 cell-width intervals; each long edge contains 121 row-end intervals. Mark all four geometric corners. Join ivory thread at a corner.
- Round 1: ch 1, then work sc, ch 2, sc at that corner. Across each short edge, work 3 sc per cell-width interval: 147 sc. Along each long edge, work 3 sc around the edge post of each row: 363 sc. At each remaining corner work sc, ch 2, sc. Join with sl st to the first sc. Count 1,028 sc and four ch-2 corner spaces.
- For the bottom edge, place each group of 3 sc into the underside of the three foundation positions belonging to that cell. For the top edge, work into the three stitch positions after each cell’s initial boundary. The single boundary position at the beginning of each short edge is incorporated into its corner group. This gives exactly 147 non-corner sc on each short edge.
- Before continuing, count the stitches between corner spaces. Each short side has 149 sc, including one sc from each adjacent corner group. Each long side has 365 sc, counted the same way.
- Round 2: ch 3, counting as dc in the first sc. Work dc in each sc around; in every ch-2 corner sp work 2 dc, ch 2, 2 dc. Join with sl st to the top of the beginning ch-3. Count 1,044 dc and four ch-2 corner spaces.
- Check the side counts between corner spaces: 153 dc on each short side and 369 dc on each long side. Fasten off. These counts provide exact nine-stitch repeats for the scalloped edging.
Picot Scalloped Edging
- Make each picot as follows: ch 3, sl st into the front loop and adjacent vertical strand of the dc just made. The picot does not consume any stitch from the border frame.
- Join ivory thread with sl st in any corner ch-2 sp. Work the corner ornament in that same sp: ch 3, 2 dc, picot, 1 dc, picot, 2 dc, ch 3, sl st. The two ch-3 arches frame five dc and two picots.
- Across the next side, repeat: skip 4 dc, work 3 dc in the next dc, picot, work 1 dc in that same dc, picot, work 3 dc in that same dc, skip 3 dc, sl st in the next dc. Each repeat consumes exactly 9 frame stitches and makes one seven-dc scallop.
- Work 17 scallops across a short side or 41 scallops along a long side. After the final sl st of that side, sl st into the next corner ch-2 sp and work the corner ornament there.
- Continue around all four sides, making 116 side scallops and four corner ornaments in total. After the last side, join with sl st to the initial corner joining stitch. Fasten off.
Finishing
Weave each thread end through the dense frame for at least 3 cm, reverse direction, and weave through a second section before trimming. The panel, frame, and edging are joined as you crochet, so there are no seams or separately sewn floral pieces.
Soak the runner in lukewarm water using a cleanser suitable for cotton. Press out water in a towel, then pin the inner rectangle straight and square. Aim for a panel near 40.8 × 100.8 cm and an overall size near 47 × 107 cm. Open each scallop and corner ornament gently, keeping the picots distinct. Let the runner dry completely before removing the pins.
Tips for Success
- Mark chart columns 10, 20, 30, and 40 with removable guides. These checkpoints make it easier to find a missing open cell before it shifts a rose.
- Use two different pencil marks when preparing the chart: one for floral cells and one for the stem. Shade their union clearly before crocheting overlapping areas.
- Make filled cells with the same dc height as the upright posts beside open cells. Shorter filled stitches can pull the roses into puckered patches.
- Count the frame stitches between corner spaces before starting the scallops. The 153- and 369-stitch side counts are essential to the edging.
- Pin the straight frame first during blocking, then spread the scallops. Stretching the scallops first can distort the rectangular center.
Common Mistakes to Avoid
- Reading every chart row in the same direction mirrors alternate rows and breaks the stem. Read odd rows from column 49 to 1 and even rows from 1 to 49.
- Working four new dc for every filled cell makes the panel grow. After the initial boundary dc, each filled cell adds only three dc.
- Leaving a rose’s internal open cells unconditionally open can cut through the main stem. A cell filled by any chart layer must remain filled.
- Adding an extra sc into every short-edge boundary creates too many border stitches. Use exactly 147 non-corner sc across each short edge.
- Forcing an extra scallop into a side causes a ruffle. Check that each scallop uses nine frame stitches and that corner ornaments sit only in corner spaces.
Ways to Customize This Pattern
- Use warm white or pale flax cotton for a subtle variation on the photographed ivory finish.
- Work only the scalloped edging in a slightly deeper cream. Keep the filet panel and dense frame ivory so the floral silhouette stays clear.
- Choose finer cotton for a smaller dresser runner, retaining all chart and border counts. Calculate the new panel dimensions from a washed gauge sample.
- For a firmer display piece, apply a light fabric stiffener after washing, following the product directions, then block the lace with each picot opened.
Frequently asked questions
No. It is an original chart inspired by the photographed ivory runner, with three roses, a leafy winding stem, open filet mesh, and a scalloped border. The photograph does not reveal an exact stitch chart or gauge.
The stem and flower layers overlap deliberately. Keep any cell filled if either layer marks it filled; this maintains a continuous vine through the three flowers.
Shorten the drawn-up loop of each dc and make another washed sample. A smaller hook may also help, but check both dimensions. Rectangular cells lengthen the runner and change the proportions of the roses.
Check the frame count first: each short side needs 153 dc and each long side 369 dc between corner spaces. Then check each scallop repeat: skip four, work the shell in one stitch, skip three, and slip stitch in one stitch.
The finished Ivory Rose Filet Crochet Table Runner Pattern

