Heirloom Daisy Crochet Table Runner Pattern
Advanced
For experienced crocheters who enjoy complex shaping, fine detail, and ambitious construction
Weekend Project
A satisfying weekend make — start Friday, finish Sunday, enjoy forever.
Handmade Gift
A beautiful keepsake — free forever. Read online or print at home.
About This Heirloom Daisy Crochet Table Runner Pattern
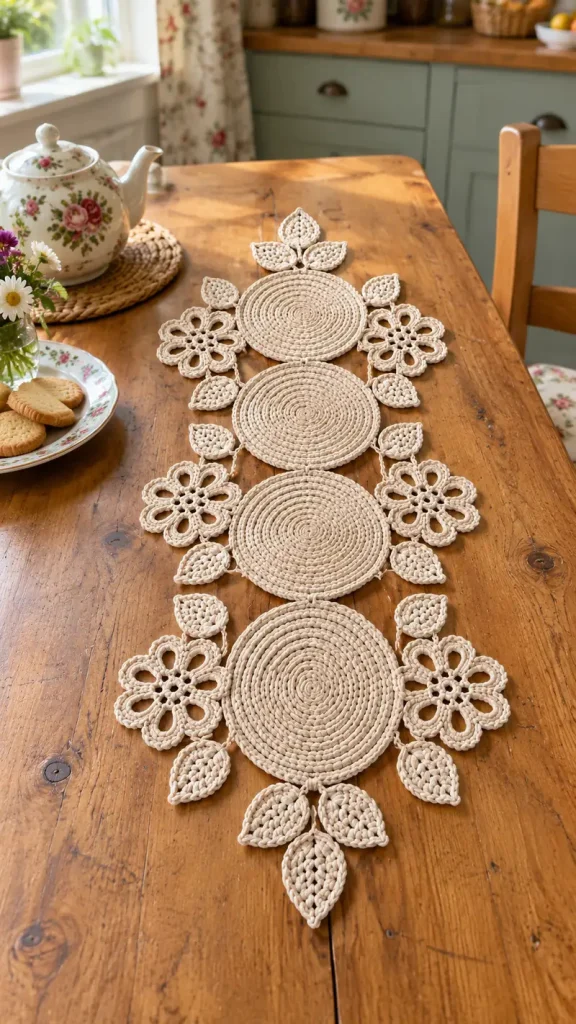
This crochet table runner pattern brings together four cream circles, six open daisies, and fourteen pointed leaves. The raised spiral texture and airy floral edges reflect the photographed runner, while the single cotton color lets the stitchwork stand out against a wooden table.
Allow approximately 18–24 hours for crocheting, blocking, and assembling the separate motifs. This advanced project suits crocheters comfortable with spiral rounds, working around a foundation chain, surface crochet, and carefully positioned seams. The runner stays flat and unstuffed; its structure comes from firm cotton stitches and small reinforced joins.
Materials
- Aran-weight cotton in natural cream Approximately 650–800 m; buy the full amount in one dye lot
- 4.0 mm crochet hook Adjust to obtain gauge
- Tapestry needle For concealed seams and woven ends
- Locking stitch markers At least 8
- Blocking mats, rustproof pins, and measuring tape For matching motif dimensions
- Smooth contrasting waste yarn For marking the assembly centerline
Abbreviations
chchainscsingle crochethdchalf double crochetdcdouble crochetsl stslip stitchst / stsstitch / stitchesMRmagic ringinc2 single crochet in the same stitchBLOback loop onlyRSright sideGauge, Dimensions, and Construction
- Use US crochet terminology throughout. Gauge after washing and drying flat: 16 sc and 18 rows measure 10 × 10 cm in a flat sc swatch worked through both loops. Make a swatch at least 24 stitches wide and 26 rows tall; measure its center.
- The definitive motif check is one completed circle: approximately 21.5 cm across after blocking. Each flower should measure approximately 10 cm across, and each leaf approximately 7.5 × 3.5 cm. These are design targets, so check them with your yarn before making the full set.
- Make 4 circles, 6 flowers, and 14 leaves. All pieces use the same cream yarn. Leave a 30 cm sewing tail on each flower and leaf and a 45 cm tail on each circle.
- Circles use continuous spiral rounds. Do not join or turn; move a marker into the first stitch of each round. Work through both loops unless BLO is specified. Chains and finishing slip stitches do not count as stitches unless stated.
- Arrange circle centers 22.5 cm apart along the runner’s centerline. Four circles span approximately 89 cm including their connecting bridges. End leaves extend this to approximately 106 cm; the side flowers produce a maximum width of approximately 34 cm.
Ridged Circles — Make 4
- Round 1: Work 6 sc in MR. Tighten the ring securely. (6 sts)
- Round 2: Working BLO throughout this and all remaining numbered rounds, inc in each st. (12 sts)
- Round 3: Repeat (sc in next st, inc) 6 times. (18 sts)
- Round 4: Repeat (sc in next 2 sts, inc) 6 times. (24 sts)
- Round 5: Repeat (sc in next 3 sts, inc) 6 times. (30 sts)
- Round 6: Repeat (sc in next 4 sts, inc) 6 times. (36 sts)
- Round 7: Repeat (sc in next 5 sts, inc) 6 times. (42 sts)
- Round 8: Repeat (sc in next 6 sts, inc) 6 times. (48 sts)
- Round 9: Repeat (sc in next 7 sts, inc) 6 times. (54 sts)
- Round 10: Repeat (sc in next 8 sts, inc) 6 times. (60 sts)
- Round 11: Repeat (sc in next 9 sts, inc) 6 times. (66 sts)
- Round 12: Repeat (sc in next 10 sts, inc) 6 times. (72 sts)
- Round 13: Repeat (sc in next 11 sts, inc) 6 times. (78 sts)
- Round 14: Repeat (sc in next 12 sts, inc) 6 times. (84 sts)
- Round 15: Repeat (sc in next 13 sts, inc) 6 times. (90 sts)
- Round 16: Repeat (sc in next 14 sts, inc) 6 times. (96 sts)
- Round 17: Repeat (sc in next 15 sts, inc) 6 times. (102 sts)
- Round 18: Repeat (sc in next 16 sts, inc) 6 times. (108 sts)
- Finish: Sl st loosely in the next 2 sts to taper the spiral edge. Fasten off, retaining the sewing tail. These finishing stitches do not change the 108-stitch placement count. Mark the original 108 stitch tops beneath them.
- Block each circle to approximately 21.5 cm across, smoothing the six increase sectors into a round outline without stretching the raised front-loop ridges flat.
Open Eight-Petal Daisies — Make 6
- Round 1: Ch 6 and sl st in the first ch to form a ring. Ch 1, work 8 sc into the ring, then sl st in the first sc. Leave the center opening visible. (8 sts)
- Round 2: Ch 5, sl st in the next sc; repeat this sequence 7 more times, placing the final sl st in the first sc of Round 1. Each chain arch runs between consecutive sc stitches around the ring. (8 ch-5 arches and 8 anchoring sl sts)
- Round 3: Into each ch-5 arch work (sc, hdc, 5 dc, hdc, sc), then sl st into the anchoring sl st immediately after that arch. Repeat around; the last anchoring sl st completes the round. (8 petals; 72 petal stitches plus 8 anchoring sl sts)
- Fasten off with a sewing tail. Block each flower to approximately 10 cm across, opening the eight petal spaces evenly. Keep the center ring open and the petals flat.
Pointed Leaves — Make 14
- Foundation: Ch 11. The chain nearest the hook is the turning chain and is not worked.
- Round 1, first side: Sc in the second ch from the hook, hdc in the next ch, dc in the next 6 ch, hdc in the next ch, and 3 sc in the final ch. This uses all 10 available foundation chains. (12 sts so far)
- Round 1, second side: Rotate the piece to work into the unused foundation loops. Skip the end chain already holding 3 sc; hdc in the next ch, dc in the next 6 ch, hdc in the next ch, and 2 sc in the same base chain as the first sc. Sl st in the first sc. (22 sts total)
- Round 2: Ch 1. Sc in each of the first 10 sts. In the next st, the middle stitch of the far-end 3-sc group, work (sc, ch 2, sl st in the second ch from hook, sc). Sc in each of the remaining 11 sts. Sl st in the first sc. (23 sc plus one pointed chain picot)
- Fasten off at the rounded base, leaving a sewing tail. The picot is the leaf tip.
- Center vein: With a separate strand held underneath the leaf, surface sl st along the foundation-chain centerline from the base toward the tip, making 1 loose surface sl st at each of the 10 foundation-chain positions. Fasten off and weave both vein ends into the back. The vein is decorative and does not enter the edge stitch count.
- Block to approximately 7.5 × 3.5 cm, drawing the tip outward gently. Make all 14 leaves to the same dimensions.
Join the Four Circles
- Lay the dry circles RS up in a straight line and label them A, B, C, and D from top to bottom. Keep all spiral textures facing upward. Use waste yarn on the blocking mat to mark a straight centerline.
- On each 108-stitch outer edge, mark a top stitch, then count 27 stitches onward for the right marker, another 27 for the bottom marker, and another 27 for the left marker. The final 27 return to the top. Rotate each circle so these markers align with the layout.
- Position the circle centers 22.5 cm apart. At the target diameter, adjacent edges will be approximately 1 cm apart. Pin each circle without stretching it.
- Bridge 1: Join yarn through both loops of A’s marked bottom stitch. Ch 2, then sl st through both loops of B’s marked top stitch. Fasten off with a 30 cm tail.
- With that tail, whipstitch back around both chain links, then make 3 small securing passes into the neighboring edge stitches at each end. Keep the bridge flat and retain the planned spacing.
- Bridges 2 and 3: Repeat the same bridge between B and C, then between C and D. Each bridge contains exactly 2 chain links. Weave the unused circle tails into the backs along several different stitch paths.
Attach the Daisy Pairs
- Place one flower on each side of each circle bridge: 2 flowers at A–B, 2 at B–C, and 2 at C–D. Each flower center should sit level with its bridge and approximately 12 cm away from the runner’s centerline.
- Rotate each flower so 2 neighboring inward-facing petals reach the adjacent circles. On the right side, the upper inward petal joins the upper circle and the lower inward petal joins the lower circle. Mirror this placement on the left.
- At each contact, overlap the petal edge and circle edge by approximately 5 mm. Sew the middle 3 dc stitch tops of that petal to 3 neighboring outer-edge stitches of the circle. Make 2 passes through each corresponding pair, catching full stitch tops without pulling them tight.
- Each flower receives exactly 2 separate three-stitch seams, one to each neighboring circle. Keep all other petals free. Check that all 6 flower centers remain level with their respective bridges before weaving in tails.
Attach the Side and End Leaves
- Side leaves: Use 8 leaves, one at the marked left edge and one at the marked right edge of each circle. Position the rounded base against the circle edge, with the leaf extending outward.
- Angle A’s side-leaf tips toward the top end and D’s toward the bottom end. Angle B’s pair slightly toward A and C’s pair slightly toward D. This places the leaves between the daisy pairs without covering their open petals.
- For each side leaf, sew the 3 edge sc around its rounded base to 3 circle-edge stitches centered on the side marker. Make 2 sewing passes through each stitch pair. Then tack one nearby side-edge stitch of the leaf to the next circle-edge stitch to hold its angle. (4 attachment points per side leaf)
- Top spray: Place 3 remaining leaves beyond A’s top edge. Center one leaf on the runner’s centerline, pointing straight outward, with its base approximately 1 cm beyond the circle. Angle the other 2 leaves outward approximately 40 degrees to form a three-leaf spray.
- Join the 3 leaf bases together with 3 sewing passes through their base-edge stitches. Join yarn at A’s top marker, ch 2, and sl st through the joined leaf bases. Fasten off; wrap and reinforce this two-chain stem as for the circle bridges.
- Sew the inner base corner of each angled leaf to the nearest edge of A with 3 small stitches. These extra anchors keep the spray from swinging. Leave the central leaf’s pointed end free.
- Bottom spray: Repeat with the last 3 leaves at D’s bottom marker, mirroring the top spray. Check that both sprays extend approximately 8.5 cm beyond their circle edges.
Finishing
Lay the assembled runner flat and check the centerline before securing the last tails. The circles should sit in a straight row, the flower pairs should balance each other, and the end sprays should point outward. Weave each tail through several stitches on the underside, reverse direction once, and trim only after the final blocking.
Wet-block the complete runner to approximately 106 × 34 cm. Pin the circles first, then open the daisy petals and shape the leaf tips. Let it dry completely before lifting it. Wash gently according to the yarn label and reshape flat after washing. Use a suitable protective trivet beneath hot cookware; this decorative runner is not a tested heat barrier.
Tips for Success
- Keep BLO stitches close to the hook’s normal diameter. Enlarged loops make the circle ridges loose and uneven.
- Block all four circles to the same diameter before joining. Matching their edges matters more than reaching the target measurement exactly.
- Pin every flower before sewing any flower permanently. Its two inward petals must reach neighboring circles without pulling the bridge sideways.
- Work the leaf veins loosely enough that each leaf lies flat. Check the underside after every few surface stitches.
- Lift the finished runner with support under the circles so its narrow bridges do not carry the whole weight.
Common Mistakes to Avoid
- Missing a circle increase produces cupping. Count at the end of every round; each numbered round must contain 6 more stitches than the previous one.
- Working into both loops on the circles interrupts the spiral ridges. Undo the affected stitches and return to BLO.
- Putting the leaf point into the first stitch of the end group makes an uneven tip. In Round 2, the pointed increase belongs in stitch 11 of Round 1.
- Sewing flowers to only one circle lets them flop. Give every flower both specified three-stitch seams.
- Tight seams buckle the circle edges. Unpick the tight section and resew while the motifs remain pinned at their final spacing.
Ways to Customize This Pattern
- Use oatmeal or pale flax cotton for the same monochrome design with a slightly darker finish.
- For a three-circle runner, make 3 circles, 4 flowers, and 12 leaves; use 2 bridges and retain both three-leaf end sprays. Target length is approximately 83.5 cm.
- For a five-circle runner, make 5 circles, 8 flowers, and 16 leaves; use 4 bridges. Target length is approximately 128.5 cm.
- Use cream for the circles and flowers with muted sage leaves for a botanical variation. Change yarn between separate motifs; no within-round color changes are needed.
Frequently asked questions
The photographed runner recedes into the distance, making the farther circles appear smaller. This interpretation uses four matching circles to create an even runner when viewed from above.
Yes, if it produces flexible fabric at the stated gauge. Make one full circle first. Stiff cord can make the flower seams bulky and the finished runner much heavier; adjust the hook and recheck all motif dimensions before continuing.
Check that the circles measure approximately 21.5 cm, their centers are 22.5 cm apart, and the flowers measure approximately 10 cm. Rotate the flower so neighboring petals face the circles. Move its center slightly inward while keeping the petals flat; do not stretch the flower across the gap.
Use wet blocking first and preserve the raised texture. If the yarn label permits steam, hold the iron above the work and test a swatch. Pressing directly on the circles can flatten the ridges and distort the open flowers.
The finished Heirloom Daisy Crochet Table Runner Pattern

