Sage and Buttercup Star Crochet Toilet Roll Holder
Advanced
For experienced crocheters who enjoy complex shaping, fine detail, and ambitious construction
Multi-Day Project
A rewarding 12+ hour journey — perfect for dedicated crafters who love detailed work.
Handmade Gift
A beautiful keepsake — free forever. Read online or print at home.
About This Sage and Buttercup Star Crochet Toilet Roll Holder
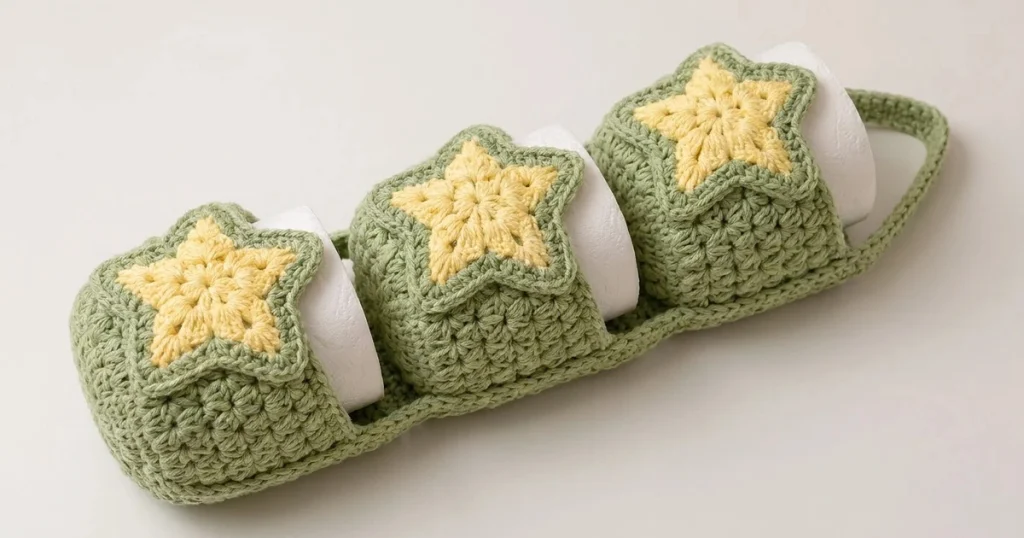
This crochet toilet roll holder pattern pairs three sage green sleeves with raised buttercup yellow stars and a long matching base. Inspired by the reference photograph, each sleeve wraps around the curved surface of a roll while leaving both circular ends open. The stars sit across the upper front of the sleeves, with sage backing and edging that give them a gently padded appearance.
Allow about 12–16 hours for the textured sleeves, double-layer base, six star pieces, and careful assembly. This advanced household project suits crocheters who enjoy precise stitch placement and dimensional appliqué. The finished holder stores three rolls with their axes running across the narrow width of the base; a loop extends from one short end.
Materials
- Sage green worsted cotton yarn Approximately 450 g / 765 m; choose a firmly plied yarn around 170 m per 100 g.
- Buttercup yellow worsted cotton yarn Approximately 40 g / 68 m, in the same yarn range.
- 4 mm crochet hook Adjust if necessary to achieve the stated gauges.
- Tapestry needle, scissors, and stitch markers Include five removable markers for star tips.
- Blocking mat, rustproof pins, and measuring tape For setting the base and star outlines.
- Three toilet rolls Target size: 12–12.5 cm diameter and 10–11 cm wide.
Abbreviations
chchainsl stslip stitchscsingle crochethdchalf double crochetdcdouble crochettrtreble crochetinc2 single crochet in the same stitchMRmagic ringst / stsstitch / stitchesRS / WSright side / wrong sideGauge, Dimensions, and Construction
- Use US crochet terminology throughout. Turning chains and joining slip stitches never count as stitches. Work through both loops unless another placement is specified.
- Plain sc gauge after washing and drying flat: 16 sts and 20 rows = 10 × 10 cm. For a swatch, ch 25, sc in the second ch from the hook and across for 24 sts; work 27 further rows of 24 sc, turning with ch 1. Measure the central 10 cm.
- Sleeve texture gauge after washing: 16 sts and 18 rounds = 10 × 10 cm. The texture alternates sc and dc, with each new sc positioned above a dc and each new dc above a sc. Swatch this fabric separately; adjust your hook if necessary.
- The base consists of two 76-stitch panels, each 24 rows deep, joined with a sc border. Each unbordered panel measures approximately 47.5 × 12 cm; the joined base is approximately 48 × 13 cm.
- Each sleeve contains 64 stitches around and 16 rounds across its width, measuring approximately 40 cm around × 9 cm wide. Filled sleeve diameter is about 12.7 cm. Stars should block to approximately 11–12 cm from tip to opposite tip.
- This is an unstuffed household organizer. No eyes, faces, toy filling, or internal roll-end covers are used. The rolls supply the rounded form.
Double-Layer Base — Make Two Panels
- With sage, ch 77. Row 1: sc in the second ch from the hook and in every remaining ch. Turn. (76 sts)
- Row 2: ch 1, sc in every st. Turn. (76 sts)
- Rows 3–24: repeat Row 2. (76 sts in each row; 24 rows total)
- Fasten off both panels and weave in the ends. Wash or damp-block both panels to matching dimensions of approximately 47.5 × 12 cm. Let them dry completely.
- Place the panels together with WS facing. Starting in the first stitch of one long edge, join sage through both layers. Joining round: 3 sc in the first corner stitch, sc in the next 74 sts, 3 sc in the last corner stitch; work 22 sc evenly along the short side, one in each interior row end; work 3 sc in the first foundation corner, sc in the next 74 unused foundation loops, and 3 sc in the last foundation corner; work 22 sc along the remaining short side. Join to the first sc. (204 sts)
- Fasten off. Keep both layers aligned while edging; the four corner groups belong to the long edges, so do not count their row ends again on the short sides.
Textured Roll Sleeves — Make Three
- With sage, ch 64 loosely. Without twisting, join to the first ch with a sl st. The foundation ring should stretch comfortably over the intended roll.
- Round 1: ch 1, sc in each ch around. Join to the first sc. Do not turn. (64 sts)
- Round 2: ch 1, repeat (sc in the next st, dc in the next st) 32 times. Join to the first sc. Do not turn. (64 sts)
- Round 3: ch 2, repeat (dc in the next st, sc in the next st) 32 times. Join to the first dc. Do not turn. (64 sts)
- Rounds 4–13: repeat Rounds 2 and 3 five more times. Each sc falls above a dc and each dc above a sc. (64 sts in each round)
- Round 14: repeat Round 2. (64 sts)
- Round 15: ch 1, sc in each st around. Join to the first sc. (64 sts)
- Round 16: ch 1, sc in each st around. Join to the first sc. Fasten off. (64 sts)
- Foundation-edge finishing round: join sage in any unused foundation-chain loop, ch 1, and sc once in each unused loop around. Join and fasten off. (64 sts)
- Weave in ends and damp-block without stretching. Fit a roll through the sleeve. Mark the joining seam as the bottom, then mark the opposite point, 32 stitches around from that seam, as the top. Make the remaining two sleeves to match.
Yellow Star Fronts — Make Three
- With yellow, Round 1: work 10 sc in MR. Pull the ring closed and join to the first sc. (10 sts)
- Round 2: ch 1, inc in every st. Join to the first sc. (20 sts)
- Point round: begin with the hook at the first stitch of Round 2. Repeat the following five times: ch 6; working back down this chain, sc in the second ch from the hook, hdc in the next ch, dc in the next ch, tr in each of the final 2 ch; skip the next 3 unworked stitches of Round 2 and sl st in the next stitch. (5 points, each containing 5 return stitches; 5 anchoring sl sts)
- The first anchoring sl st enters stitch 4 of Round 2; subsequent anchors enter stitches 8, 12, 16, and 20. Each repeat uses four center stitches, so all 20 center stitches are accounted for. Fasten off.
- Identify each point’s perimeter before assembly: five unused chain loops up one side, the skipped chain at the tip, five return-stitch tops down the other side, and the anchoring sl st in the valley. This provides 12 edge positions per point, or 60 around the star.
Sage Star Backings and Joining Borders — Make Three
- With sage, make three backing stars by following all instructions for the yellow star fronts, including the same 10-stitch center, 20-stitch second round, and five chain points.
- For each pair, place a yellow front and sage backing together with WS facing. Match all five tips and valleys. Keep the yellow side facing you throughout the joining border.
- Join sage through the matching valley sl sts immediately before any point. Ch 1. Working through corresponding edge positions of both layers, repeat five times: sc in the next 5 unused chain loops ascending the point, 3 sc in the skipped chain at the tip, sc in the next 5 return-stitch tops descending the point, sc in the valley anchoring sl st. Join to the first sc. (70 sts: 14 per point)
- At each tip, place all 3 sc through the same matching tip-chain opening in both layers. At valleys, place the hook through the anchoring slip stitches rather than through an adjacent center stitch.
- Fasten off, leaving a 90 cm sage tail for attaching the star. Do not stuff. Damp-block each star to the same outline, approximately 11–12 cm across, pinning the tips without pulling the valleys apart.
Reinforced End Loop
- With sage, ch 5. Row 1: sc in the second ch from the hook and across. Turn. (4 sts)
- Rows 2–48: ch 1, sc in each st across. Turn. (4 sts in every row)
- Fasten off with a 70 cm tail. The strip measures approximately 2.5 × 24 cm before attachment.
- Lay the base with a short end facing you. Place one strip end 3 cm inward from that short edge, beside one long edge. Place the other strip end at the same distance inward, beside the opposite long edge. Overlap each end onto the base by 3 cm, allowing the free strip to form a broad U beyond the short end.
- Sew around each overlapping rectangle through both base layers, then add two diagonal lines of stitching across each attachment. Keep the loop untwisted. Its free arc is approximately 18 cm long.
Positioning and Attaching the Sleeves
- Lay the base flat. Measure along its long direction from the short end opposite the loop. Mark sleeve centers at 8 cm, 23.5 cm, and 39 cm. Mark the widthwise center line of the base as well.
- Insert the rolls and place each sleeve over its marked center. The roll axes must run across the base width, with the sleeve openings facing the two long edges. Keep every sleeve joining seam underneath.
- Remove one roll while retaining the sleeve’s position with markers. Flatten an approximately 3 cm section of the bottom circumference against the base. This contact section spans about 5 sleeve stitches around the circumference and extends across the sleeve’s full 9 cm width.
- With sage, sew the perimeter of that contact rectangle to the upper base layer: along both sleeve opening edges across the 5-stitch contact section, then along the two sides connecting those edges. Add a line of small running stitches down the middle of the rectangle. Catch sleeve stitch bars securely without sewing through the opposite sleeve wall.
- Repeat for the remaining sleeves. Reinsert the rolls and check that the base lies flat and the sleeves stand in a straight row. Keep approximately 2.5–3 cm between neighboring filled sleeves.
Attaching the Raised Stars
- With the rolls inserted, choose one long side of the base as the display front. Place one star over each sleeve’s upper front curve. Position one point toward the back of the holder and the two lower points toward the display front, matching the reference photograph.
- Center each star between its sleeve openings. The points may overhang the sleeve edges slightly, but must leave the roll ends accessible.
- Pin each star through its sage backing only. Remove the roll carefully. Using the reserved sage tail, sew the backing to the sleeve around the center disk and along the lower half of each point, stopping approximately 1.5 cm before each tip.
- Catch the sage backing and sleeve stitch bars without piercing the yellow front. Keep the yellow surface and sage border visibly raised. Add two small stitches beneath any tip that curls upward excessively.
- Secure and weave in the tails inside each sleeve. Replace the rolls and check that all three stars face the same direction.
Finishing
Check every attachment with the rolls in place. The base should sit level, the sleeve openings should remain round, and the stars should follow the upper curves without pulling the sleeves inward. If a seam puckers, loosen and resew that section with the roll inserted as a shaping guide, taking care not to catch the paper.
Remove the rolls before washing. Shape the base flat and dry the sleeves around clean, washable forms close to the intended roll diameter. Let the holder dry completely before refilling it. The end loop is useful for moving the empty organizer; support the base underneath when carrying it filled.
Tips for Success
- Check sleeve circumference after Round 4. A roll should slide through with light resistance; a tight foundation chain is much easier to correct at this stage.
- Mark the first stitch of every sleeve round. The initial ch 2 on dc-first rounds is a lifting chain and must remain outside the stitch count.
- Count all five unused chain loops on each star point before joining the layers. A removable marker in the skipped tip chain makes the 3-sc corner easy to identify.
- Pin all three filled sleeves before sewing any of them. This lets you balance the gaps and keep the loop end clear.
- Use the roll as a temporary form when positioning the stars, then remove it for sewing so the needle cannot catch the paper.
Common Mistakes to Avoid
- Working sc above sc throughout the sleeve changes the texture. Alternate the starting stitch each round so sc sits above dc and dc above sc.
- Counting joining slip stitches creates an expanding sleeve. Each round has exactly 64 working stitches; skip the join and lifting chain.
- Skipping four center stitches between star anchors leaves too few stitches for five points. Skip three and anchor in the fourth.
- Overtightening the star border cups the points. Keep the chain-side stitches relaxed and place all three tip stitches into the marked tip opening.
- Sewing a sleeve through both opposing walls closes its opening. Keep one hand inside the empty sleeve while sewing to separate the layers.
Ways to Customize This Pattern
- Use cream stars on olive sleeves for a quieter version, keeping the backing and joining border the same color as the sleeves.
- For a two-roll holder, work each base panel with ch 52 and 51 sc per row for 24 rows. Its joining border has 154 sts; position the two sleeve centers approximately 8 cm and 24 cm from one short end.
- For wider rolls, add sleeve rounds in pairs before the final two sc rounds. Each pair adds approximately 1.1 cm to sleeve width; widen both base panels by two rows per added pair.
- For a different roll diameter, keep the sleeve count even. At the stated gauge, calculate the desired circumference in centimeters × 1.6 and round to the nearest even number; divide that number by two for each texture repeat count. Recheck sleeve spacing before sewing.
Frequently asked questions
The 64-stitch sleeves suit rolls approximately 12–12.5 cm in diameter. For a larger roll, measure its circumference and calculate an even stitch count at 1.6 stitches per centimeter. Make one complete sleeve first. Larger filled sleeves may also require a longer base and wider spacing.
No. They are double-layer appliqués sewn onto the sleeve surfaces. Slide each roll sideways through an open circular end to replace it; the stars remain attached.
This construction is intended to rest horizontally on a shelf or counter. The loop extends from the end like the reference, but the base has no rigid support for hanging three filled sleeves. Move the filled holder with a hand under the base.
A little overhang is intentional. Aim for stars about 11–12 cm across on sleeves about 9 cm wide. If a star hides too much of the roll ends, make both its front and backing with a smaller hook, then check that the joined border remains flat.
The finished Sage and Buttercup Star Crochet Toilet Roll Holder