Sage Dove Crochet Toilet Paper Holder Pattern
Advanced
For experienced crocheters who enjoy complex shaping, fine detail, and ambitious construction
Weekend Project
A satisfying weekend make — start Friday, finish Sunday, enjoy forever.
Handmade Gift
A beautiful keepsake — free forever. Read online or print at home.
About This Sage Dove Crochet Toilet Paper Holder Pattern
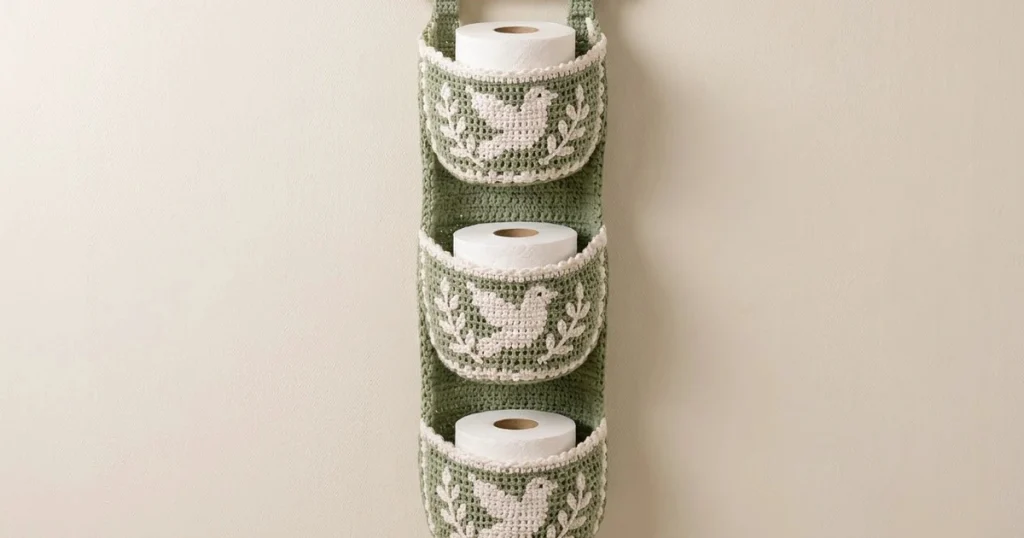
This crochet toilet paper holder pattern creates a sage green wall organizer with three open pockets, ivory doves, and embroidered leafy branches. The tall backing, softly rounded pocket corners, and small ivory picots follow the character of the reference, while separately constructed bases and side panels give each pocket room to hold a roll upright.
Allow about 16–22 hours for the crochet, counted embroidery, and assembly. This advanced household project suits crocheters comfortable with precise seaming, surface embroidery, and reinforcing a hanging piece. The birds are decorative stitched silhouettes; this organizer has no stuffing or toy components.
Materials
- Sage green DK cotton yarn Approximately 900–1,050 m; choose firmly spun, washable cotton
- Ivory DK cotton yarn Approximately 140–180 m for motifs and edging
- Dark sage embroidery thread A short length for three tiny bird eyes
- Crochet hook 3.0 mm, or size needed for gauge
- Tapestry needle, embroidery needle, scissors, and locking markers For counted decoration and assembly
- Washable cotton webbing, 20 mm wide Approximately 2 m for two rear reinforcement strips and strap supports
- Matching sewing thread and sewing needle For attaching webbing securely
- Smooth wooden dowel 24 cm long, approximately 8–10 mm diameter, for the top sleeve
- Two secure wall hooks Positioned approximately 18 cm apart and suitable for the wall and loaded organizer
Abbreviations
chchainscsingle crochet, US terminologysl stslip stitchst / stsstitch / stitchesRS / WSright side / wrong sidepicotCh 3, sl st into the first of those 3 chainsGauge, Dimensions, and Working Notes
- Gauge after washing and drying flat: 20 sc and 24 rows = 10 × 10 cm. Make a swatch of at least 28 sc and 34 rows; measure its center without stretching.
- Backing: 44 sts × 174 rows, approximately 22 × 72.5 cm. Each pocket front: 40 sts × 30 rows, approximately 20 × 12.5 cm. Each base: 40 sts × 26 rows, approximately 20 × 10.8 cm. Each side: 22 sts × 30 rows, approximately 11 × 12.5 cm.
- All main pieces are worked flat in sage. Ch 1 and turn after each row unless instructed otherwise. Turning chains never count as stitches. Work under both loops.
- For counting and embroidery, designate one face of each piece as its RS. With the RS facing and the starting edge at the bottom, number columns from left to right and rows from bottom to top.
- Make one backing, three fronts, three bases, six sides, two hanging straps, and one dowel sleeve. No increases or decreases are needed: the separate base and gussets create the pocket volume.
Long Backing — Make One
- Foundation: ch 45 in sage.
- Row 1: sc in second ch from hook and each remaining ch. 44 sts.
- Rows 2–174: sc in every st. 44 sts in each row. Fasten off after Row 174.
- Wash and block to 22 × 72.5 cm without stretching. Mark horizontal pocket base attachment lines at the lower edge, the boundary between Rows 56 and 57, and the boundary between Rows 112 and 113.
- On each attachment line, mark the span corresponding to backing columns 3–42. These 40 columns form the rear width of each pocket; columns 1–2 and 43–44 remain as narrow side margins.
Pocket Fronts — Make Three
- Foundation: ch 41 in sage.
- Row 1: sc in second ch from hook and each remaining ch. 40 sts.
- Rows 2–30: sc in every st. 40 sts in each row. Fasten off after Row 30.
- Block each front to 20 × 12.5 cm. Mark its RS, center between columns 20 and 21, and both lower corners. Complete the dove and branch embroidery before joining.
Pocket Bases — Make Three
- Foundation: ch 41 in sage.
- Row 1: sc in second ch from hook and each remaining ch. 40 sts.
- Rows 2–26: sc in every st. 40 sts in each row. Fasten off after Row 26.
- Block each base to 20 × 10.8 cm. The starting edge joins the backing; Row 26 joins the front. Each 26-row side edge joins the 22-stitch lower edge of a side panel.
Side Gussets — Make Six
- Foundation: ch 23 in sage.
- Row 1: sc in second ch from hook and each remaining ch. 22 sts.
- Rows 2–30: sc in every st. 22 sts in each row. Fasten off after Row 30.
- Block to approximately 11 × 12.5 cm. The starting edge is the bottom, Row 30 is the opening edge, and the two 30-row edges join the front and backing.
Counted Ivory Dove Motifs — Work Three
- Use ivory yarn and a tapestry needle to cross-stitch one dove onto each front. Each listed cell receives one small cross centered over one sc. Keep all upper diagonals facing the same direction and avoid tightening the fabric. The bird faces right.
- The following coordinates refer directly to the front’s numbered columns and rows. All ranges are inclusive; leave every unlisted cell sage. Row 8: columns 17–24, 8 crosses.
- Row 9: columns 15–25, 11 crosses.
- Row 10: columns 14–26, 13 crosses.
- Row 11: columns 15–27, 13 crosses.
- Row 12: columns 17–28, 12 crosses.
- Row 13: columns 18–28, 11 crosses.
- Row 14: columns 17–28, 12 crosses.
- Row 15: columns 16–28, 13 crosses.
- Row 16: columns 15–28, 14 crosses.
- Row 17: columns 14–28, 15 crosses.
- Row 18: columns 13–19 and 25–28, 11 crosses total.
- Row 19: columns 13–18 and 25–29, 11 crosses total.
- Row 20: columns 13–17 and 25–30, 11 crosses total. Column 30 forms the beak tip.
- Row 21: columns 13–16 and 25–28, 8 crosses total.
- Row 22: columns 13–15 and 26–28, 6 crosses total.
- Row 23: columns 13–14, 2 crosses.
- Row 24: column 13, 1 cross. The rising left section is the lifted wing, the lower left projection is the tail, and the right section is the neck and head.
- Make a tiny dark sage straight stitch centered on column 27, Row 21, for the eye. Use embroidery only; no safety eyes are needed. Secure and weave in all ends on the WS without pulling the motif tight.
Embroidered Leafy Branches — Work on Each Front
- Use ivory yarn to backstitch a curved left stem through these grid points in order: column 19, Row 4; column 12, Row 5; column 8, Row 9; column 6, Row 15; column 7, Row 23. Place short stitches between the points to form a smooth curve.
- Backstitch the right stem through these points: column 22, Row 4; column 29, Row 5; column 33, Row 9; column 35, Row 15; column 34, Row 23.
- On the left stem, place leaves at columns/rows 10/7, 8/10, 7/13, 6/16, 7/19, and 7/22. On the right stem, use 31/7, 33/10, 34/13, 35/16, 34/19, and 34/22. These are leaf bases.
- At each base, embroider a pair of detached-chain leaves: one points two columns outward and two rows upward, and one points two columns inward and two rows upward. A detached-chain leaf is a loose loop brought up at its base, caught at its pointed tip, and secured with a tiny stitch over the loop. Keep each leaf approximately 1 cm long.
- Add three small detached-chain leaves along the lower curve at columns/rows 15/5, 20/4, and 26/5, pointing upward. Check that the branches frame the dove without crossing its body.
Ivory Front Borders
- With a front RS facing, attach ivory at its upper-left corner. Work down the left edge with 1 sc into each of its 30 row ends, work 40 sc across the starting edge, then work 30 sc up the right edge. 100 sc total. Ch 1 to turn each lower corner; these two chains are additional corner spaces. Fasten off.
- Repeat on the other two fronts. The upper edges remain unworked until the pockets are assembled. Keep the border relaxed so the lower corners curve gently around the seams.
Assemble the Three Pockets
- Use sage yarn and small mattress stitches. Keep seam allowances toward the pocket interior. Join the 40 stitches of base Row 26 to the 40 stitches of the front’s starting edge, taking stitches just behind the ivory border. Match stitch for stitch.
- Join one side panel’s 22-stitch starting edge to one 26-row side edge of the base. Divide both edges into two equal halves: match each group of 11 side stitches to 13 base row ends, distributing the extra row ends evenly. Repeat with the opposite side panel.
- Join the front edge of each side panel to the corresponding front edge, matching all 30 row ends one for one. Sew behind the ivory border. This makes a front, two sides, and a base with an open rear.
- Pin the first base’s rear starting edge across backing columns 3–42 at the backing’s lower edge. Sew its 40 stitches to those 40 backing stitches. For the second and third pockets, sew the base starting edges across the same columns at the marked boundaries after backing Rows 56 and 112.
- For the bottom pocket, pin each side panel’s rear lower corner to its base attachment line and its rear upper corner to the top of backing Row 30. Join its 30 rear row ends to backing Rows 1–30, along the outer boundaries of columns 3 and 42.
- Attach the middle pocket sides in the same way across backing Rows 57–86. Attach the top pocket sides across backing Rows 113–142. Match one side row end to one backing row. Reinforce the upper 2 cm of every rear side seam with a second pass.
- Insert one intended roll into each pocket. Check that the bases sit level and the openings remain accessible. Remove the rolls before adding the opening trim.
Picot Opening Edges and Backing Border
- For each pocket, with RS facing, attach ivory at the left rear upper corner. Work 22 sc along the left side’s top, 40 sc across the front top, and 22 sc along the right side’s top. 84 sc total. Work one picot immediately after sc numbers 5, 10, 15, 20, 27, 32, 37, 42, 47, 52, 57, 62, 67, 72, 77, and 82. There are 16 picots; each picot adds no stitches to the 84-sc foundation.
- Do not bridge the rear opening: fasten off at the right rear corner. Secure the two trim ends firmly into the rear seams. Repeat for all three pockets.
- In sage, edge the backing once, working 1 sc per stitch across its upper and lower edges and 1 sc into every row end along each long edge. Work ch 1 at each corner. Total: 436 sc and four corner chain spaces. Sl st to the first sc and fasten off. Keep this border relaxed.
Hanging Straps — Make Two
- Foundation: ch 7 in sage.
- Row 1: sc in second ch from hook and each remaining ch. 6 sts.
- Rows 2–60: sc in every st. 6 sts in each row. Fasten off. Each strap measures approximately 3 × 25 cm.
- Cut two 25 cm lengths of webbing. Turn under 1 cm at each end and sew one length along the WS center of each strap. Stitch down both long webbing edges and across its folded ends.
- Fold each strap into a loop. Overlap its two crochet ends by 2.5 cm and pin them to the rear of the backing, one centered over backing column 5 and one over column 40. Align the raw strap ends approximately 2.5 cm below the backing’s upper edge. Each finished loop rises about 10 cm above the backing.
Rear Reinforcement and Dowel Sleeve
- Cut two 74 cm webbing strips. Turn under 1 cm at each end for finished lengths of 72 cm. Position them vertically on the backing WS, centered over columns 5 and 40, with their upper ends just below the backing’s upper edge.
- Use small backstitches along both long edges of each strip, catching the crochet without carrying visible thread across its RS. At all six pocket rear upper corners, add several stitches through the crochet and nearby webbing to transfer the load into the reinforcement.
- Sew the overlapped strap ends through the backing and vertical webbing. Make a stitched rectangle approximately 2 × 2.5 cm with an X inside each rectangle. Secure both strap layers and the webbing together.
- For the sleeve, ch 45 in sage. Row 1: sc in second ch from hook and each remaining ch. 44 sts. Rows 2–10: sc in every st. 44 sts per row. Fasten off.
- Fold the sleeve lengthwise so its starting edge meets Row 10. Place the folded sleeve across the backing WS with its joined long edges aligned about 1 cm below the backing’s upper edge. Sew both long edges together to the backing along this line, leaving both short ends open.
- Slide the 24 cm dowel through the sleeve and center it. It should project about 1 cm at each side of the backing and support the upper width. The hanging loops carry the weight; the dowel spreads the top edge.
Finishing
Weave in every yarn end through several stitches, then reverse direction before trimming. Smooth the embroidery with your fingertips and check that the ivory borders sit evenly around all three fronts. Remove the dowel for washing; reshape the empty pockets and dry the organizer flat.
Replace the dowel when everything is completely dry. Hang both loops on securely installed hooks, then add the rolls one at a time. Check the strap stitching and pocket corners under the actual load. The finished organizer is intended for three toilet paper rolls; keep heavier bathroom supplies elsewhere.
Tips for Success
- Block every sage component before embroidery and joining. Matching the front and side heights prevents a twisted opening.
- Mark the halfway points when joining 22 side stitches to 26 base row ends. Distributing the difference in two equal sections keeps the base flat.
- Lay each front flat after every few rows of cross-stitch. Loosen any stitch that draws neighboring crochet stitches together.
- Pin all three rear base seams before sewing. Their 56-row spacing leaves approximately 10.8 cm of visible backing above each lower pocket front.
- Keep the opening trim loose enough to admit a roll without stretching the bird embroidery.
Common Mistakes to Avoid
- Joining the base sideways: its 40-stitch edges belong against the front and backing; its 26-row edges belong against the gussets.
- Counting the turning chain as a stitch: this widens the panels. Check for 44, 40, or 22 sc as appropriate at the end of each row.
- Pulling the ivory border tight around the lower corners: remove that section and rework with relaxed stitches and the specified corner chains.
- Attaching the straps only to crochet: sew through the reinforcing webbing too, so the upper fabric does not carry the load alone.
- Measuring rolls by their cardboard core: measure the full outside diameter and the roll’s height to check pocket fit.
Ways to Customize This Pattern
- Keep the ivory birds and replace sage with dusty blue, warm gray, or muted olive.
- Reverse the dove direction on the middle pocket by replacing every listed column number with 41 minus that number. Mirror its eye position too.
- For a two-pocket version, work the backing for 118 rows, place bases at its lower edge and after Row 56, and shorten the vertical reinforcement strips to fit.
- For a quieter border, omit the picots and retain the same 84-sc opening edging on each pocket.
Frequently asked questions
The stated pocket depth suits rolls up to approximately 10.5 cm in diameter. Larger rolls need deeper bases and wider side panels, followed by a fit check; changing only the hook size also changes the backing and motif proportions.
They are counted cross-stitch motifs worked directly over the sage crochet. This keeps the fronts relatively flat and reproduces the pale bird silhouettes without adding bulky appliqués.
The bases support upright rolls while the gussets provide depth. Their seams give the pockets defined corners, and the relaxed ivory front edging softens those corners visually.
The specified construction uses two hooks to keep the long backing upright and distribute the load. Bringing both loops onto one central hook can make the top fold inward and the pockets tilt.
The finished Sage Dove Crochet Toilet Paper Holder Pattern

