Alternating Filet and Textured Square Bedspread Pattern
Beginner Friendly
Perfect for those just starting their crochet journey, with clear instructions and simple techniques
Single-Day Project
A satisfying project you can complete in a single afternoon or evening.
Handmade Gift
A beautiful keepsake — free forever. Read online or print at home.
About This Alternating Filet and Textured Square Bedspread Pattern
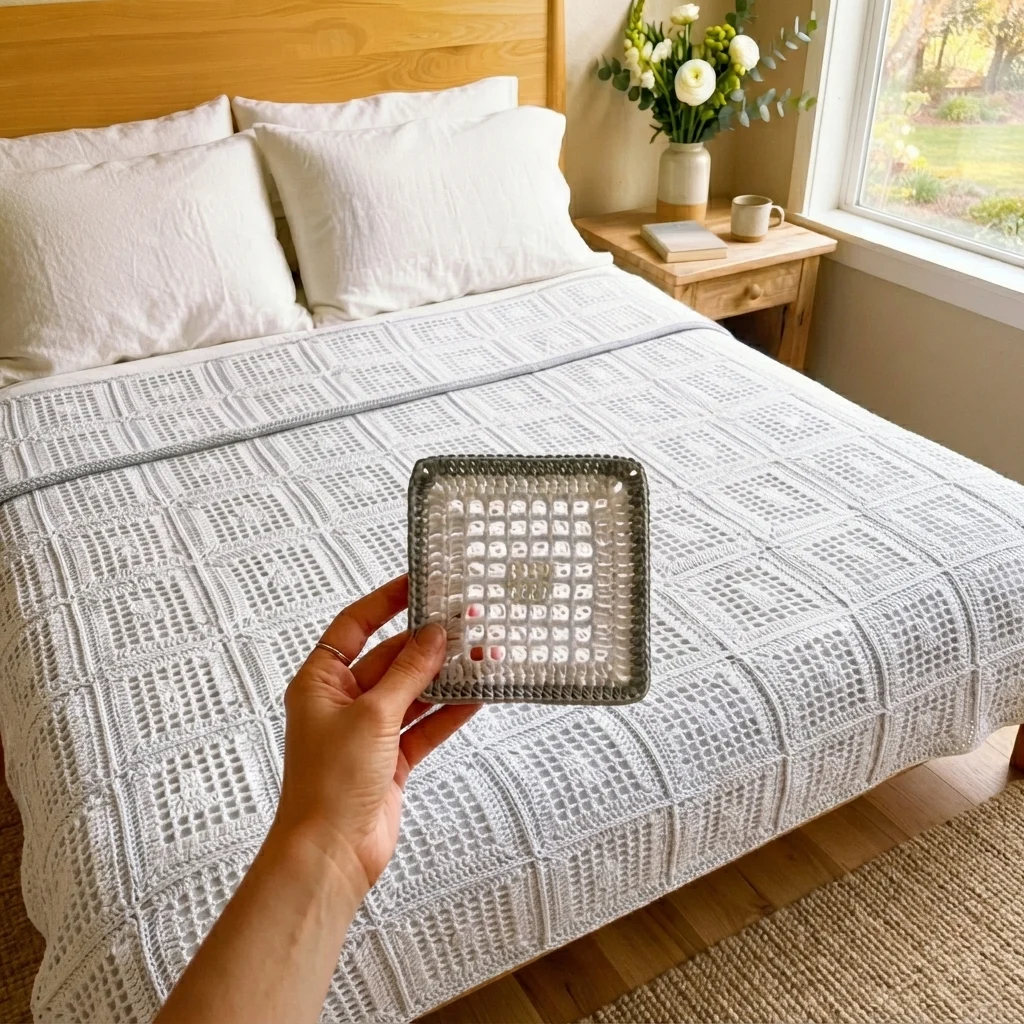
This crochet filet texture bedspread pattern alternates two kinds of square in a quiet, tonal palette: an open filet mesh square and a solid, densely textured square, both framed by the same thin grey border, joined into a large grid where the contrast between open and solid reads as a subtle diamond pattern across the bed rather than a bold color statement. White and soft grey are the only two colors used throughout.
What makes this design distinctive is how much visual interest comes from stitch texture alone rather than color: with no contrasting color blocks, the entire pattern depends on the clean alternation between airy, open mesh and dense, solid fabric, so every square’s construction needs to be worked with real consistency for the diamond effect to read clearly from across the room. That reliance on stitch contrast instead of color, at full bedspread scale, is what makes this a genuinely demanding monochrome project. Expect to spend 42-50 hours total for the full bedspread.
This is an advanced pattern, best suited to someone comfortable maintaining two distinctly different stitch textures consistently across a very large alternating grid, and confident that subtle tonal work will still read clearly once assembled, rather than someone wanting a bold color-based project.
Materials
- Worsted weight cotton yarn, white ~750g, mesh and textured squares
- Worsted weight yarn, soft grey ~450g, borders and edging
- Crochet hook 4.5 mm (US 7)
- Tapestry/yarn needle
- Steam iron and pressing cloth, or a large blocking mat and pins
- Sharp scissors
Abbreviations
chchainsl stslip stitchscsingle crochethdchalf double crochetdcdouble crochetFPdcfront post double crochetch-spchain spacest(s)stitch(es)reprepeatFOfasten offOpen Filet Mesh Square (make approximately 98, for alternating placement)
- With white, ch 21. Row 1: dc in 6th ch from hook, *ch 1, skip 1 ch, dc in next ch; rep from * across. 6 mesh squares.
- Row 2: ch 4, turn, dc in next dc, *ch 1, dc in next dc; rep from * across, ending dc in top of turning ch. 6 squares maintained.
- Rep Row 2 until the piece is a true square matching your textured square’s finished size.
- With grey, work a round of sc around the entire square to frame it, working 3 sc in each corner. Sl st to join, FO leaving a long tail for joining.
- Repeat for approximately 98 mesh squares total.
Solid Textured Square (make approximately 97, for alternating placement)
- With white, ch a number matching the mesh square’s width. Row 1: dc in 4th ch from hook and in each ch across.
- Row 2: ch 3, turn, alternate FPdc and dc across the row to build a ribbed texture.
- Rep Row 2, maintaining the alternating post-stitch columns, until the piece is a true square matching the mesh square’s finished size.
- With grey, work a round of sc around the entire square to frame it, working 3 sc in each corner. Sl st to join, FO leaving a long tail for joining.
- Repeat for approximately 97 textured squares total.
Join-As-You-Go Assembly
- Plan your grid (for example, 13 columns x 15 rows for a queen-size coverlet), alternating mesh and textured squares in both directions so the pattern reads as a consistent checkerboard-style diamond.
- Join squares as you complete each one’s final round, whipstitching or slip-stitch joining through the grey frame to the neighboring square already in place.
- Work row by row, double-checking the texture alternation against both the square beside it and the square above it before each join.
Bedspread Border
- With grey, join at any corner of the assembled bedspread. Round 1: sc evenly around the entire perimeter, working 3 sc at each of the 4 corners to keep them flat.
- Round 2: dc evenly around for a simple, clean finishing band.
- Round 3, with white: work 1 more round of sc for a soft, quiet finishing edge.
- Join with sl st to first st and FO. Weave in all ends.
Finishing
Weave in every square’s starting and ending tail individually across the entire bedspread, since a project this size accumulates a very large number of loose ends. Steam-block the finished bedspread flat, pinning the border evenly and checking that both mesh and textured squares lie at exactly the same height so the overall surface reads as flat and consistent rather than rippled where the two textures meet.
Tips for Success
- Work both square types to the exact same finished dimensions; any size mismatch is immediately visible once the two textures sit side by side with no color to distract from it.
- Keep a written grid chart marking mesh versus textured placement, so you always know which type goes where as you assemble.
- Check your growing grid from a distance periodically, since the diamond pattern created by alternating textures reads most clearly from across the room.
- Work squares in both types in parallel batches rather than finishing all of one type first, so you can track your alternating count accurately.
- Block thoroughly and evenly across the whole piece, since any unevenness between the open mesh and solid texture becomes more visible without color to mask it.
Common Mistakes to Avoid
- Working mesh and textured squares to slightly different sizes creates a visibly uneven, rippled surface once joined. Fix: measure both square types against each other before making a full batch of either.
- Losing track of the alternating placement partway through leads to two same-type squares accidentally sitting adjacent. Fix: keep a written grid chart and mark off each position as you join it.
- Working the FPdc texture at inconsistent tension between squares makes some textured squares noticeably denser than others. Fix: keep post-stitch tension even and consistent across every textured square.
- Underestimating how subtle this monochrome pattern reads up close, and losing motivation partway through. Fix: step back and view the growing piece from across the room periodically to appreciate the diamond effect building up.
- Skipping a size-matching test square before committing to a full batch. Fix: always make and compare one of each type before mass-producing either.
Ways to Customize This Pattern
- Reduce the grid size for a throw blanket instead of a full bedspread.
- Swap the white and grey palette for a different tonal pairing, such as ivory and taupe, for a slightly warmer monochrome look.
- Add a very subtle third texture type into the rotation for a more complex, less strictly alternating pattern.
- Work the grey frame in a slightly bolder accent color for more definition between squares.
- Add a fabric backing to the full bedspread for added warmth and easier care.
Frequently asked questions
The quiet, tonal look is the whole point of this design: the diamond pattern emerges purely from the contrast between open mesh and solid fabric, giving a subtle, textural interest that a color-based pattern wouldn’t offer. It’s a deliberate choice for a calmer, more neutral bedroom look.
Work and block one of each type early on, then measure them against each other precisely. Adjust your starting chain or row count on whichever type runs smaller before committing to a full batch of either.
Yes. A single soft accent color used only in the grey border frames, rather than in the squares themselves, can add a little warmth while keeping the overall quiet, tonal feel intact.
This usually means the two square types weren’t worked to exactly the same finished dimensions. Recheck your gauge on both, and block firmly and evenly across the whole surface to help minimize any remaining height difference.
The finished Alternating Filet and Textured Square Bedspread Pattern

