Amish Center Diamond Crochet Bedspread Pattern
Beginner Friendly
Perfect for those just starting their crochet journey, with clear instructions and simple techniques
Single-Day Project
A satisfying project you can complete in a single afternoon or evening.
Handmade Gift
A beautiful keepsake — free forever. Read online or print at home.
About This Amish Center Diamond Crochet Bedspread Pattern
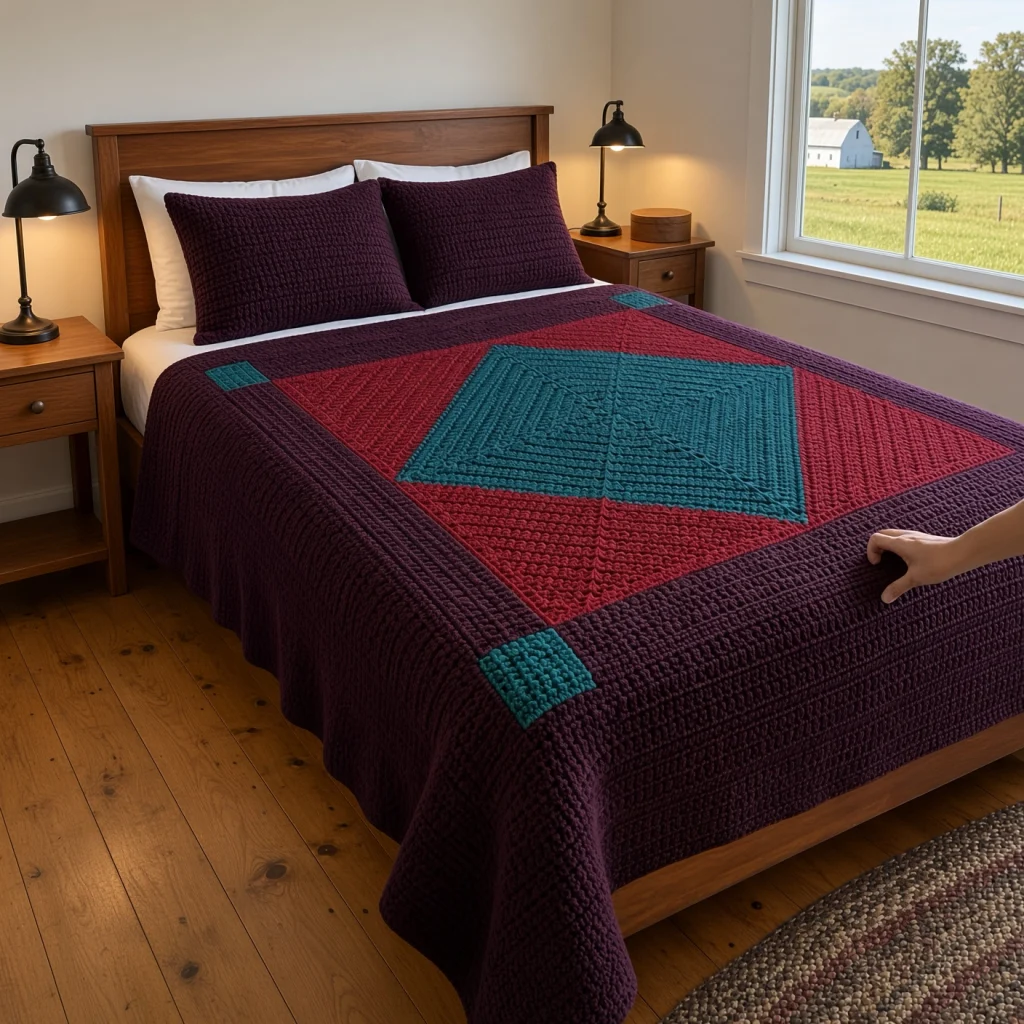
This center diamond crochet bedspread pattern takes one of the most recognizable Amish quilt layouts and builds it entirely in crochet. A teal diamond sits inside a red square, the square is framed by a deep plum border, and four teal cornerstones mark the corners just like the pieced quilts it is based on. The result reads as a quilt from across the room and as a thick, warm crochet throw up close.
The construction is what makes it interesting to work. The diamond is a solid double crochet square worked in rounds from the center, so its diagonal corner lines show as fine seams radiating outward. Four red triangles are then worked directly off its edges in shaped rows, which turns the diamond into a square without any sewing. The plum border strips and the outer border are worked in back-loop single crochet, which gives the parallel ridges you see running along every edge.
Expect around 70 to 90 hours in chunky yarn. It is a big project, but each stage is a clear, self-contained piece, so it is a good choice for a confident crocheter who wants a long, steady project with a striking finish. If you are comfortable reading stitch counts and working decreases at both ends of a row, you have every skill this needs.
Materials
- Chunky (#5) acrylic or acrylic-wool yarn in deep plum / aubergine approx. 34 skeins of 100 g / 120 m (about 4,000 m)
- Chunky (#5) yarn in cranberry red approx. 8 skeins (about 950 m)
- Chunky (#5) yarn in deep teal approx. 8 skeins (about 950 m)
- 6.5 mm crochet hook adjust to meet gauge
- Locking stitch markers at least 8, for corners
- Large-eye tapestry needle for seaming and weaving in ends
- Measuring tape for checking triangle height and border width
- Spray bottle and blocking mats or a clean carpet for blocking
- Gauge dc: 11 sts and 5.5 rounds = 10 cm; sc: 11 sts and 12 rows = 10 cm
Abbreviations
MRmagic ringchchainsl stslip stitchscsingle crochetdcdouble crochetsc2togsingle crochet 2 together (decrease)sc3togsingle crochet 3 togetherBLOback loop onlyrev screverse single crochet (crab stitch)spspacest(s)stitch(es)RSright sideCenter Diamond (teal)
- Round 1: With teal, make a MR, ch 3 (counts as dc throughout), 2 dc in ring, ch 2, [3 dc, ch 2] 3 times, sl st to top of ch-3. Pull the ring closed tightly. (12 dc, 3 per side, 4 ch-2 corner sps)
- Round 2: Sl st in next 2 dc and into ch-2 sp, ch 3, (dc, ch 2, 2 dc) in same sp, *dc in each of next 3 dc, (2 dc, ch 2, 2 dc) in next ch-2 sp; repeat from * 2 more times, dc in each of last 3 dc, sl st to top of ch-3. (28 dc, 7 per side)
- Rounds 3-25: Sl st in next dc and into ch-2 sp, ch 3, (dc, ch 2, 2 dc) in same sp, *dc in each dc to next corner, (2 dc, ch 2, 2 dc) in corner sp; repeat from * 2 more times, dc in each dc to end, sl st to top of ch-3. Each round adds 4 dc per side (16 per round).
- Checkpoint counts per side: Round 5 = 19, Round 10 = 39, Round 15 = 59, Round 20 = 79, Round 25 = 99. (Round 25 total: 396 dc)
- Fasten off. The square should measure about 90 cm per side. Place a marker in each ch-2 corner sp. This square is turned on point to become the diamond.
Red Corner Triangles (make 4, worked directly onto the diamond)
- Row 1 (RS): Join red in any ch-2 corner sp, ch 1, sc in same sp, sc in each of next 99 dc, sc in next ch-2 corner sp. (101 sc)
- Rows 2-11: Ch 1, turn, sc2tog, sc in each st to last 2 sts, sc2tog. (Row 11: 81 sc)
- Row 12: Ch 1, turn, sc in each st across. (81 sc)
- Rows 13-22: Repeat Row 2. (Row 22: 61 sc)
- Row 23: Repeat Row 12. (61 sc)
- Rows 24-33: Repeat Row 2. (Row 33: 41 sc)
- Row 34: Repeat Row 12. (41 sc)
- Rows 35-44: Repeat Row 2. (Row 44: 21 sc)
- Row 45: Repeat Row 12. (21 sc)
- Rows 46-54: Repeat Row 2. (Row 54: 3 sc)
- Row 55: Ch 1, turn, sc3tog. (1 st) Fasten off. The triangle should stand about 45 cm from base to point.
- Repeat on the remaining 3 sides of the diamond. Neighboring triangles share each corner sp, so each corner sp ends up holding 2 sc. You now have a red square of about 130 cm per side with the teal diamond in the middle.
Red Square Edging
- Each side of the red square is made of the slanted edges of two triangles (55 row-ends each), meeting at a teal corner point in the middle.
- Round 1: Join red in the point st of any triangle, ch 1, 3 sc in same st. *Work 71 sc evenly down the triangle edge (1 sc in each row-end, with 2 sc in row-ends 3, 6, 9 and so on through 48), 1 sc at the teal corner point, 71 sc evenly up the next triangle edge in the same way, 3 sc in next point st; repeat from * around, omitting the final 3 sc. Sl st to first sc.
- Count: 143 sc along each side between corner groups, plus 3 sc at each corner. (584 sc) Fasten off. Mark the center sc of each 3-sc corner group.
Inner Border Strips (plum, make 4)
- Row 1 (RS): Join plum in the 3rd sc of any corner group, ch 1, sc in same st, sc in each of next 143 sts, sc in 1st sc of next corner group. (145 sc) Leave the marked center corner st unworked.
- Rows 2-24: Ch 1, turn, sc BLO in each st across. (145 sc) The back-loop rows form ridges that run parallel to the red square.
- Fasten off, leaving a 40 cm tail. The strip should be about 20 cm wide.
- Repeat on the remaining 3 sides. You now have a square gap of about 20 x 20 cm at each corner.
Cornerstones (teal, make 4)
- Foundation: With teal, ch 23.
- Row 1: Sc in 2nd ch from hook and in each ch across. (22 sc)
- Rows 2-24: Ch 1, turn, sc in each st across. (22 sc)
- Fasten off, leaving a 60 cm tail for seaming. Each cornerstone should measure about 20 x 20 cm.
Setting the Cornerstones
- Lay the bedspread flat, RS up. Place a cornerstone in one corner gap so its stitch rows run the same direction as one of the neighboring strips.
- Using the teal tail, whipstitch one side of the cornerstone to the row-ends of the first strip, matching top and bottom corners and easing evenly along the length.
- Whipstitch the adjacent side of the cornerstone to the row-ends of the second strip in the same way.
- Tack the inner corner of the cornerstone to the unworked center sc of the red corner group so there is no hole.
- Repeat for all 4 corners. Steam or lightly mist the seams so they lie flat.
Outer Border (plum)
- Round 1 (RS): Join plum at the outer corner of any cornerstone, ch 1, (sc, ch 2, sc) in corner. *Work 22 sc evenly across the cornerstone edge, sc in each of the 145 sts across the strip, 22 sc evenly across the next cornerstone edge (finishing before the corner), (sc, ch 2, sc) in outer corner; repeat from * around, omitting the last corner. Sl st to first sc. (189 sc per side counting both corner sc, 756 sc total)
- Round 2: Sl st into ch-2 corner sp, ch 1, (sc, ch 2, sc) in same sp, *sc BLO in each st to next corner sp, (sc, ch 2, sc) in corner sp; repeat from * around, omitting the last corner. Sl st to first sc. (191 sc per side)
- Rounds 3-42: Repeat Round 2. Each round adds 2 sc per side. (Round 42: 271 sc per side, 1,084 sc total)
- To keep the join line from drifting into a visible diagonal, move your joining point a few stitches along the side every 5 rounds by sl st across before starting the corner.
- Round 43: Do not turn. Ch 1, work rev sc in each st around, with 3 rev sc in each ch-2 corner sp. Sl st to first st and fasten off.
Matching Pillow Sham (optional, plum)
- Each sham needs about 6 extra skeins of plum and fits a standard 50 x 70 cm pillow.
- Panel (make 2): Ch 78. Row 1: Sc in 2nd ch from hook and each ch across. (77 sc) Rows 2-60: Ch 1, turn, sc BLO in each st across. (77 sc) Fasten off.
- Place the panels wrong sides together. Join plum at one corner and sc through both layers along three sides, working 3 sc in each corner.
- Insert the pillow, then continue sc through both layers along the last side to close. Finish with 1 round of rev sc to echo the bedspread edge.
- For a removable cover, instead work 5 evenly spaced ch-3 button loops along the open edge of one panel and sew matching buttons to the other.
Finishing
Weave in every end along a seam or into a same-color section, running each tail in at least three directions. A bedspread this heavy gets pulled and tugged, and short tails will work loose over time.
Lay the finished piece flat on blocking mats or a clean carpet, RS up. Mist it evenly, then square it up with a measuring tape. The teal diamond points should touch the midpoints of the red square’s sides, and all four outer sides should measure the same, about 245 cm. Pin the corners and let it dry completely before moving it. Blocking flattens the diagonal seams in the diamond and sharpens the ridges in the border.
Tips for Success
- Count every round of the center diamond against the checkpoint numbers. A missed dc in Round 6 becomes a crooked diamond point by Round 25.
- Measure the first red triangle when it is done. If it is noticeably shorter than 45 cm, add one extra even row in each of the remaining triangles rather than trying to stretch it in blocking.
- Buy all the plum yarn from the same dye lot. The outer border is one continuous field of color, and a lot change there shows as a visible stripe.
- Work the outer border with the whole piece supported on a table or across your lap. Letting the weight hang from the hook stretches the stitches and makes your gauge drift.
- Use a locking marker in every corner sp of the outer border. With 271 stitches per side, it is easy to miss a corner when you are tired.
Common Mistakes to Avoid
- Twisting seam in the center diamond: if the join line starts spiraling, you are probably starting the round in the wrong place. Always sl st into the corner sp and begin there, as written.
- Wavy red edges: this usually comes from skipping the even rows between decrease sections. Those rows are what make the triangle tall enough. Leave them in.
- Ruffled border strips: if the strips flare, you have worked into both loops on some rows. Every row after Row 1 is BLO.
- Holes at the cornerstones: skipping the tack-down at the red corner leaves a small gap. Stitch the inner corner of each cornerstone to the unworked center sc.
- Cupping outer border: if the border curls up at the corners, your corners are too tight. Loosen your tension on the ch-2, or work (sc, ch 3, sc) on every 6th round.
Ways to Customize This Pattern
- Change the size: stop the outer border at Round 20 for a throw of about 205 cm, or add rounds for a deeper drop on a king bed. Every round adds roughly 1.7 cm to each side.
- Swap the palette: navy, mustard and rust; sage, cream and terracotta; or black, red and royal blue (a classic Amish combination) all suit this layout.
- Add the Amish double border: work 3 rounds of red after Round 20 of the outer border, then return to plum.
- Change the diamond texture: replace the teal dc rounds with sc rounds that use (sc, ch 2, sc) corners for a denser, flatter center. You will need about twice as many rounds.
- Go lighter: use worsted weight held double with the same 6.5 mm hook for a softer, slightly lighter bedspread.
Frequently asked questions
Double crochet rounds with (2 dc, ch 2, 2 dc) corners lie flat when worked as a square, and they work up quickly over the biggest single piece. The triangles and borders need the shorter, denser single crochet rows for precise shaping and the ridged texture that echoes quilt stitching.
With about 5.9 kg of chunky yarn, it is heavy, close to a weighted blanket. If that is too much, use the worsted-held-double option or stop the outer border early to make it smaller.
Yes. Add rounds to the center, then start each red triangle with 2 more sc than the new per-side count, and keep decreasing until 1 st remains. Add 1 even row after every 10 decrease rows. Recalculate the red edging and the strip stitch counts to match the new side length.
Acrylic versions can go in a large-capacity machine on a gentle cycle in a mesh or pillowcase bag. Dry it flat, never hanging, since the wet weight will stretch it. Wool blends should be hand washed in cool water and dried flat.
The finished Amish Center Diamond Crochet Bedspread Pattern

