Art Deco Fan Bedspread and Pillow Shams Crochet Pattern
Beginner Friendly
Perfect for those just starting their crochet journey, with clear instructions and simple techniques
Single-Day Project
A satisfying project you can complete in a single afternoon or evening.
Handmade Gift
A beautiful keepsake — free forever. Read online or print at home.
About This Art Deco Fan Bedspread and Pillow Shams Crochet Pattern
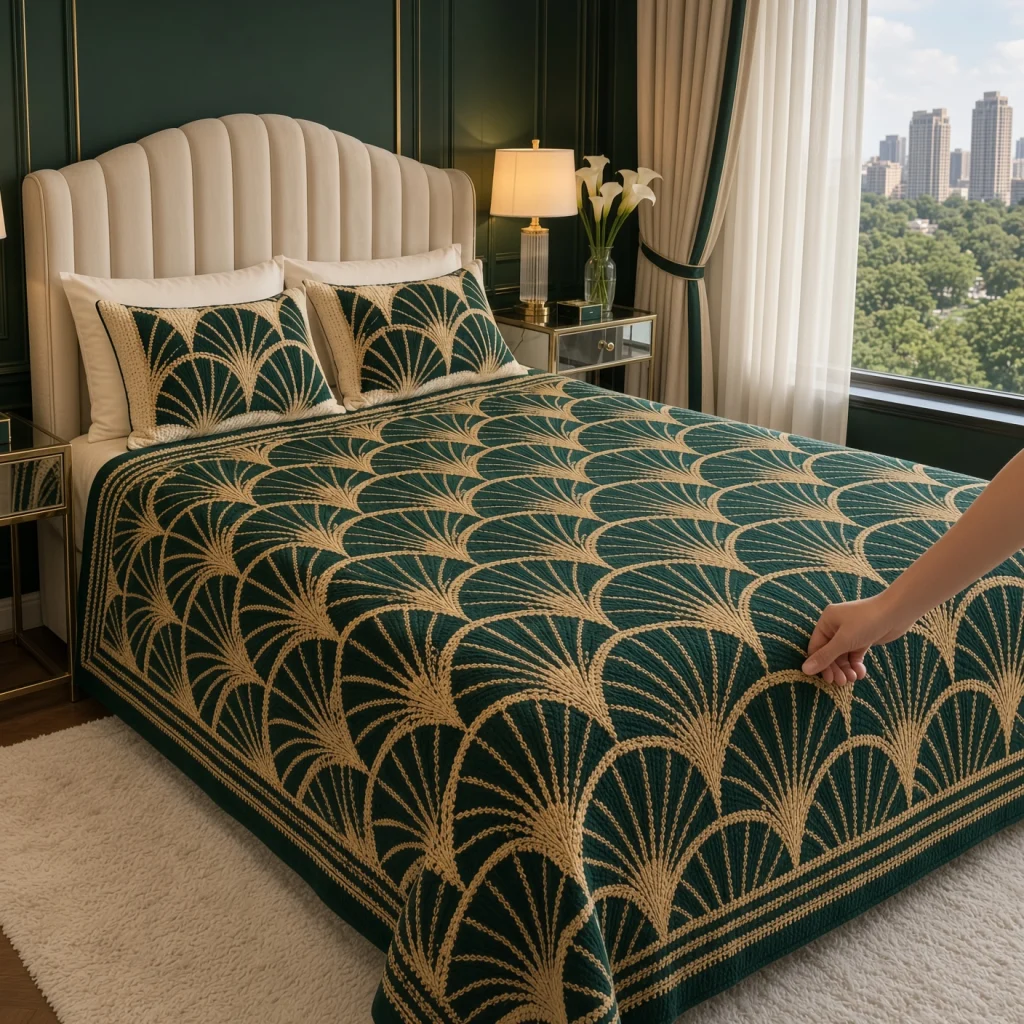
This art deco crochet bedspread covers a deep emerald base with rows of gold fans, each one a sweeping arc with fine rays spreading up from a single point. The fans nest into each other like scales, so the whole surface reads as one continuous pattern, the way it would on a 1920s textile or a gilded wall panel. Three gold lines frame the edge, and two pillow shams carry the same fans.
The base is worked in linen stitch in three long panels, which gives a dense, slightly woven texture. All the gold is added afterward with surface slip stitch, using a simple cardboard template to mark each fan. The arcs are worked with a doubled strand so they stand out, while the rays use a single strand for a finer line. Because the lines are drawn on rather than crocheted in, they can follow true curves.
The set takes about 220 to 250 hours: roughly two thirds for the base and one third for the gold work. It suits a crocheter who is comfortable with long projects and enjoys precise, careful finishing work.
Materials
- Worsted weight yarn, emerald green about 6,400 m (32 skeins of 100 g / 200 m), for the base and shams
- Worsted weight yarn, antique gold about 1,800 m (9 skeins of 100 g / 200 m), for all the lines
- 5 mm crochet hook for the base, seams and edging
- 6 mm crochet hook for the surface slip stitch lines
- Stiff cardboard at least 45 x 25 cm, for the fan template
- Protractor, ruler, a pencil tied to a 21 cm string for drawing the template
- Tailor’s chalk or water-soluble fabric marker, and contrasting scrap yarn
- Locking stitch markers about 80
- Tapestry needle and scissors
- Two pillows 50 x 75 cm, for the shams
Abbreviations
chchainscsingle crochetsl stslip stitchsurf sl stsurface slip stitch: yarn held behind the work, insert hook from the front, pull up a loop and draw it through the loop on hookrev screverse single crochet (crab stitch), worked left to rightskskipspspacest(s)stitch(es)rndroundreprepeatRS / WSright side / wrong sideLinen Stitch Panels (make 3)
- With emerald, ch 118.
- Row 1 (RS): sc in 2nd ch from hook, *ch 1, sk next ch, sc in next ch; rep from * across. (117 sts: 59 sc, 58 ch-1 sps)
- Row 2: ch 1, turn, sc in first sc, sc in next ch-1 sp, *ch 1, sk next sc, sc in next ch-1 sp; rep from * to last sc, sc in last sc. (117 sts: 60 sc, 57 ch-1 sps)
- Row 3: ch 1, turn, sc in first sc, *ch 1, sk next sc, sc in next ch-1 sp; rep from * to last 2 sc, ch 1, sk next sc, sc in last sc. (117 sts: 59 sc, 58 ch-1 sps)
- Rows 4-500: rep Rows 2 and 3 alternately, ending with a Row 2. (117 sts in every row)
- Place a marker at the end of every 24th row. These help when seaming and marking the fans.
- Fasten off. Each panel measures about 73 x 250 cm. Block all three to the same length.
Joining the Panels
- Lay the panels side by side, RS up, with all foundation edges at the same end. This end is the foot of the bedspread.
- Hold two panels RS together and, with emerald, sl st through both layers in each row end, matching the markers. (500 sl st)
- Join the third panel the same way. The bedspread is now 351 sts wide and 500 rows long.
- Grid: lay the bedspread RS up with the foot toward you. Number the columns 1-351 from left to right, counting every sc and every ch-1 sp, and the rows 1-500 from the foot.
Fan Template
- Near the bottom edge of the cardboard, mark a point P. This is the point every fan’s rays spread from.
- With the pencil on its string, draw a circle arc with radius 20.2 cm centered on P, covering the upper half.
- Mark the two ends of the fan on that arc: one 16.2 cm to the left of P and 12 cm above it, and one 16.2 cm to the right and 12 cm above. Mark the top of the arc 20.2 cm straight above P.
- Cut along the arc between the two end marks, then cut straight from each end mark down to P. The template is a wedge with a curved top.
- With the protractor, mark 7 rays from P at 60, 70, 80, 90, 100, 110 and 120 degrees, measured from a horizontal line through P. Cut a small notch in the arc where each ray ends.
- On the bedspread, 16.2 cm across is 26 sts and 12 cm up is 24 rows, so each fan’s arc ends exactly on the points of the next row of fans. That’s what makes them nest.
Border Lines
- The border is three straight gold rectangles around the bedspread, all worked with gold held double and the 6 mm hook.
- Outer line: column 6 and column 346, row 8 and row 493.
- Middle line: column 10 and column 342, row 13 and row 488.
- Inner line: column 14 and column 338, row 18 and row 483.
- For each rectangle, mark the four corners, run scrap yarn between them as a guide, and work surf sl st all the way around: one per row on the side lines and one per st on the foot and head lines. Join to the first st and fasten off.
- The fans fill everything inside the inner line. Any part of a fan that would cross the inner line is left out.
Marking the Fan Points
- The fan points sit in offset rows, 24 rows apart, with each row shifted by 26 sts. Some points fall outside the field or even off the bedspread; you still use them to draw the parts of their fans that fall inside the field.
- Rows 22, 70, 118, 166, 214, 262, 310, 358, 406 and 454: points at columns 20, 72, 124, 176, 228, 280 and 332.
- Rows 46, 94, 142, 190, 238, 286, 334, 382, 430 and 478: points at columns 46, 98, 150, 202, 254 and 306, plus imaginary points just beyond the field at columns -6 and 358.
- Also use an imaginary row of points at row -2 (below the foot edge), at the same columns as row 46. The tops of these fans fill the bottom of the field.
- Mark every real point with a locking marker. For imaginary points, measure from the nearest real point when placing the template.
Working the Fans
- Place the template with its point on a fan point. Check that the two arc ends land on the neighboring points of the row above. Chalk along the arc and make a dot at each ray notch. Remove the template and chalk each ray from the point to its dot.
- Arc: with gold held double and the 6 mm hook, RS facing, work surf sl st along the chalked arc from one end to the other, about one stitch every 6 mm. Fasten off and pull the tails to the WS.
- Rays: with a single strand of gold, work surf sl st along each ray from the point out to the arc. Fasten off after each ray.
- For fans cut off by the inner border line, work only the parts inside the field and stop each line where it meets the inner line.
- Work the fans row by row, starting from the foot. The lower edges of each fan are formed by the arcs of the fans below it, so the pattern builds up as you go.
- Brush off the chalk when each row of fans is finished, so you don’t confuse old marks with new ones.
Edging
- Rnd 1: with emerald and 5 mm hook, RS facing, join in a foot corner. 3 sc in corner st, sc in next 349 sts, 3 sc in corner st; 398 sc evenly along the side (about 4 sc for every 5 rows); 3 sc in corner st, sc in next 349 sts, 3 sc in corner st; 398 sc evenly along the other side. Join. (1,506 sts)
- Rnd 2: ch 1, rev sc in each st around. Join and fasten off. (1,506 sts)
Pillow Sham Fronts (make 2)
- With emerald, ch 122.
- Rows 1-100: work in linen stitch as for the panels, ending with a Row 2. Fasten off. (121 sts, about 76 x 50 cm)
- Border lines: outer line at columns 6 and 116, rows 8 and 93; middle line at columns 10 and 112, rows 13 and 88; inner line at columns 14 and 108, rows 18 and 83.
- Fan points: rows 22 and 70 at columns 35 and 87; rows -2, 46 and 94 at columns 9, 61 and 113.
- Work the fans as for the bedspread, inside the inner line only.
Pillow Sham Backs (make 2 sets)
- Upper back: with emerald, ch 122. Work Rows 1-60 in linen stitch, ending with a Row 2. (121 sts)
- Edge row: ch 1, turn, sc in each sc and ch-1 sp across. Fasten off. (121 sc)
- Lower back: with emerald, ch 122. Work Rows 1-54 in linen stitch, ending with a Row 2. (121 sts)
- Edge row: ch 1, turn, sc in each sc and ch-1 sp across. Fasten off. (121 sc)
- The sc rows are the open edges of the envelope. Together the two pieces give about 7 cm of overlap.
Sham Assembly
- Lay a sham front WS up. Place the lower back on top, RS up, with its foundation edge along the bottom. Place the upper back on top, RS up, with its foundation edge along the top, overlapping the lower back. Pin all edges.
- Rnd 1: turn so the front faces you. With emerald, join in a corner through all layers. 3 sc in corner st, sc in next 119 sts, 3 sc in corner st; 78 sc evenly along the side; 3 sc in corner st, sc in next 119 sts, 3 sc in corner st; 78 sc evenly along the other side. Join. Fasten off emerald. (406 sts)
- Rnd 2: join gold, ch 1, rev sc in each st around. Join and fasten off. (406 sts)
- Rep with the second sham.
Finishing
Weave in all ends on the WS. With so many short gold lines, it helps to weave each pair of tails in as soon as a ray is finished, running them along the back of their own line so no gold shows through the emerald.
Remove any remaining chalk or marker following its instructions, then wet block the bedspread on a large flat surface. Ease the arcs into smooth curves and the border lines into straight lines while it is damp, and let it dry completely. Block the shams the same way, then put the pillows in through the back opening.
Tips for Success
- Test the template on your swatch first. If the arc ends don’t land on the next row’s points, adjust the template to your real gauge before marking the bedspread.
- Keep the surf sl st relaxed and even. Tight lines pull the linen stitch in and make the fans pucker.
- Work the bedspread flat on a large table or the floor, rolling up the parts you’re not working on.
- Choose a matte gold yarn rather than a metallic one. Metallic threads are stiff for surface crochet and can scratch.
- Work all the arcs of one row of fans first, then all the rays. Having the arcs in place makes it easy to see where each ray should end.
Common Mistakes to Avoid
- Fans that don’t nest. If an arc doesn’t meet the next row’s points, either the gauge is off or a point is in the wrong place. Recount the point from the nearest marker before moving on.
- Arcs that wobble. Working by eye without a chalk line gives uneven curves. Always mark the arc with the template first.
- Rays crossing the arcs below. The lowest rays should start at the point and go up. If a ray dips under a lower fan’s arc, the angle is wrong: rays only go from 60 to 120 degrees.
- Working sc into sc in the base. This turns linen stitch into plain sc and one panel grows taller. Each sc goes into a ch-1 sp, except the first and last of Rows 2 and 3.
- Border lines drifting. Long straight lines wander easily. Run scrap yarn between the corners as a guide before working each side.
Ways to Customize This Pattern
- Change the colors: navy and silver, black and gold, or blush and copper all suit the art deco style.
- Use fewer rays (3 or 5 per fan) for a quicker, more open version, or add a second arc 2 cm inside the first for extra detail.
- Make a throw from one panel with the fans and a single gold border line, about 73 x 150 cm.
- Alternate the ray color between gold and cream in every other row of fans for a striped effect.
- Leave the fan field plain and keep only the triple-line border for a simple, elegant bedspread.
Frequently asked questions
The fans are made of curves and diagonal rays, which are very hard to crochet in with color changes. Surface slip stitch lets you draw them on the finished base with smooth curves and keeps the emerald background clean.
For the fans to nest properly, yes. The template makes every arc the same size and lands its ends on the next row’s points. Drawing by eye leads to uneven fans that drift out of line across the bed.
Surface slip stitch pulls out easily. Undo the line back to where it went wrong, rechalk the guide, and work it again. The base fabric isn’t affected.
Wash it on a gentle cold cycle inside a large laundry bag, or by hand, and dry it flat. Wash a gold and emerald test swatch first to make sure neither color bleeds.
The finished Art Deco Fan Bedspread and Pillow Shams Crochet Pattern

