Atomic Starburst Bedspread and Shams Crochet Pattern
Beginner Friendly
Perfect for those just starting their crochet journey, with clear instructions and simple techniques
Single-Day Project
A satisfying project you can complete in a single afternoon or evening.
Handmade Gift
A beautiful keepsake — free forever. Read online or print at home.
About This Atomic Starburst Bedspread and Shams Crochet Pattern
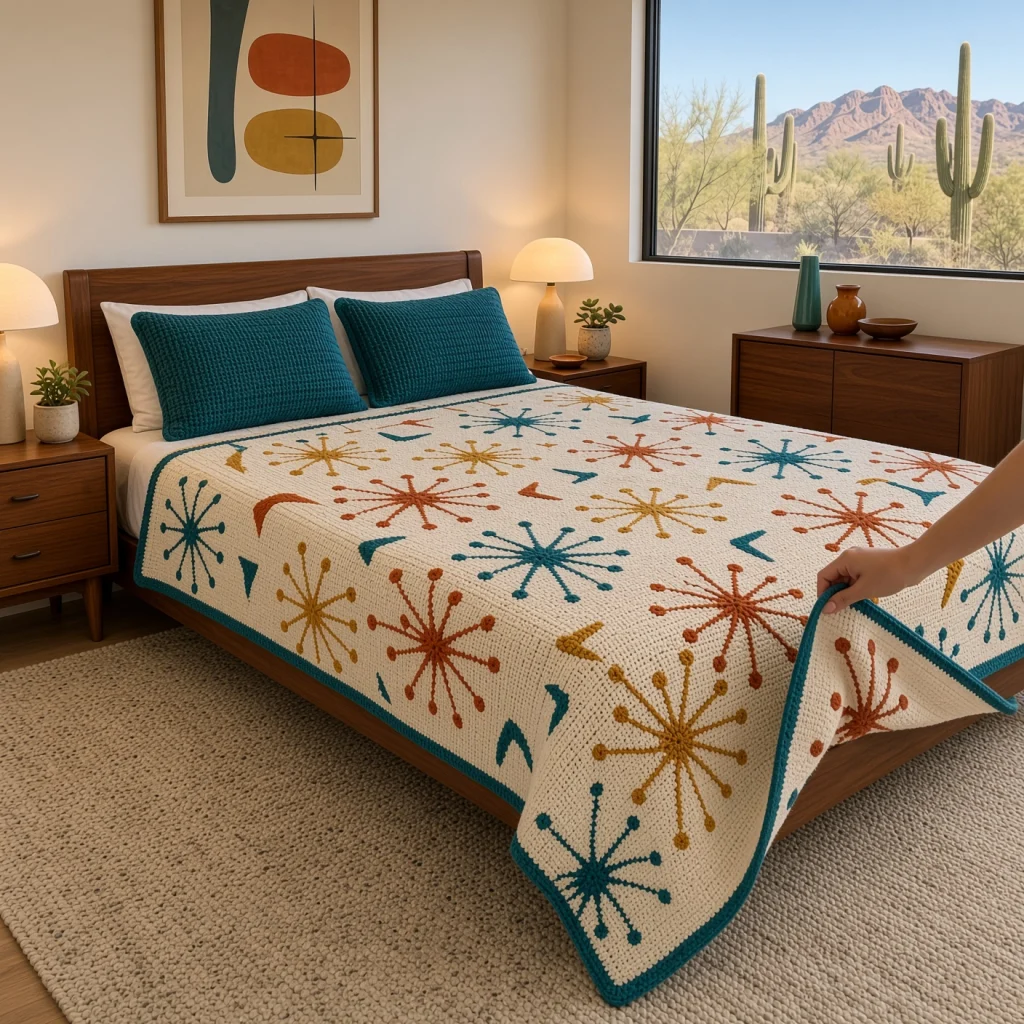
This mid century modern crochet bedspread takes its look straight from 1950s design: atomic starbursts with dotted rays and little boomerangs scattered across a cream background, in rust, mustard and teal. A teal border frames the edge, and two ribbed teal shams complete the retro set.
The base is worked in linen stitch in three long panels, which gives a dense, woven surface that’s perfect for decorating. Each starburst is built on top of it: a small disc in the center, twelve rays of surface slip stitch worked with a doubled strand, and a puffy bobble dot at the end of every ray. The boomerangs are small mitered pieces sewn on between the stars. Because everything is added after the base is finished, you can place the motifs exactly where you want them.
The set takes about 200 to 230 hours, most of it for the base. The motifs are quick and fun to make. It suits a crocheter who is comfortable with long projects and surface crochet.
Materials
- Worsted weight yarn, cream about 4,850 m (25 skeins of 100 g / 200 m)
- Worsted weight yarn, teal about 1,400 m (7 skeins), for motifs, border and shams
- Worsted weight yarn, rust orange about 200 m (1 skein)
- Worsted weight yarn, mustard about 200 m (1 skein)
- 5 mm crochet hook for the base, motifs and border
- 6 mm crochet hook for the surface slip stitch rays
- Stiff cardboard about 30 cm square, for the starburst template
- Tailor’s chalk or water-soluble marker, and a protractor
- Locking stitch markers about 50
- Tapestry needle and scissors
- Two pillows 50 x 75 cm, for the shams
Abbreviations
MRmagic ringchchainscsingle crochetsc2togsingle crochet 2 together (decrease)hdchalf double crochetdcdouble crochetsl stslip stitchsurf sl stsurface slip stitch: yarn held behind the work, insert hook from the front, pull up a loop and draw it through the loop on hookrev screverse single crochet (crab stitch), worked left to rightBLOback loop onlyskskipspspacest(s)stitch(es)rndroundreprepeatRS / WSright side / wrong sideLinen Stitch Panels (make 3)
- With cream, ch 118.
- Row 1 (RS): sc in 2nd ch from hook, *ch 1, sk next ch, sc in next ch; rep from * across. (117 sts: 59 sc, 58 ch-1 sps)
- Row 2: ch 1, turn, sc in first sc, sc in next ch-1 sp, *ch 1, sk next sc, sc in next ch-1 sp; rep from * to last sc, sc in last sc. (117 sts: 60 sc, 57 ch-1 sps)
- Row 3: ch 1, turn, sc in first sc, *ch 1, sk next sc, sc in next ch-1 sp; rep from * to last 2 sc, ch 1, sk next sc, sc in last sc. (117 sts: 59 sc, 58 ch-1 sps)
- Rows 4-500: rep Rows 2 and 3 alternately, ending with a Row 2. (117 sts in every row)
- Place a marker at the end of every 50th row. Fasten off. Each panel measures about 73 x 250 cm.
Joining the Panels
- Lay the panels side by side, RS up, with all foundation edges at the same end. This end is the foot of the bedspread.
- Hold two panels RS together and, with cream, sl st through both layers in each row end, matching the markers. (500 sl st)
- Join the third panel the same way. The base is now 351 sts wide and 500 rows long.
- Grid: lay the base RS up with the foot toward you. Number the columns 1-351 from left to right, counting every sc and every ch-1 sp, and the rows 1-500 from the foot.
Starburst Template
- Draw a circle with a 14 cm radius on the cardboard and cut it out. Mark the center.
- With the protractor, draw 12 lines from the center to the edge, one every 30 degrees. Cut a small notch where each line meets the edge. These are the long rays.
- On every second line, mark a point 10 cm from the center and punch a small hole there. These are the short rays.
- Large starbursts use the notches and holes as they are (rays of 14 and 10 cm). Small starbursts use marks at 9 cm and 6 cm along the same lines; add those marks and holes too.
Starburst Centers and Dots
- Large center (make 18): MR, ch 1, 6 sc in ring, join. Rnd 2: ch 1, 2 sc in each st around, join. Fasten off leaving a 30 cm tail. (12 sc, about 3 cm across)
- Small center (make 12): MR, ch 1, 6 sc in ring, join. Fasten off leaving a 30 cm tail. (6 sc, about 2 cm across)
- Dots (make 360, 12 for each starburst): MR, ch 2, 4 dc in ring, pull the ring tight so the dc puff up into a ball, sl st to top of ch 2. Fasten off leaving a 20 cm tail.
- Make each starburst’s center and 12 dots in the same color: rust, mustard or teal.
Working a Starburst
- Place the template with its center on the starburst position. Chalk a dot through each notch and hole you need, then chalk straight lines from the center to each dot.
- Sew the center disc over the center point.
- Rays: with the starburst color held double and the 6 mm hook, RS facing, work surf sl st from the edge of the disc out to the end of each ray. Alternate long and short rays all the way around. Fasten off each ray and pull the tails to the WS. (12 rays)
- Sew a dot at the end of every ray, centered on the last stitch.
- Large starbursts have rays of 14 and 10 cm and are about 31 cm across including the dots. Small starbursts have rays of 9 and 6 cm and are about 21 cm across.
Boomerangs (make 16)
- Make 6 teal, 5 rust and 5 mustard.
- Row 1: ch 18, sc in 2nd ch from hook and in next 7 ch, 3 sc in next ch, sc in last 8 ch. (19 sts)
- Row 2: ch 1, turn, sc2tog, sc in next 6 sts, 3 sc in center st, sc in next 6 sts, sc2tog. (17 sts)
- Row 3: ch 1, turn, sc2tog, sc in next 5 sts, 3 sc in center st, sc in next 5 sts, sc2tog. (15 sts)
- Row 4: ch 1, turn, sc2tog, sc in next 4 sts, 3 sc in center st, sc in next 4 sts, sc2tog. Fasten off leaving a 40 cm tail. (13 sts)
- The piece forms a V about 12 cm wide, with tapered arms like a boomerang.
Motif Layout
- Positions are given as (column, row) for the center of each motif. Mark them all with locking markers before you start.
- Large starbursts on rows 50, 250 and 450: columns 58, 138, 218 and 298. (12)
- Large starbursts on rows 150 and 350: columns 98, 178 and 258. (6)
- Small starbursts on rows 100, 200, 300 and 400: columns 98 and 258. (8)
- Small starbursts on rows 150 and 350: columns 22 and 330. (4)
- Boomerangs on rows 100, 200, 300 and 400: columns 18, 178 and 334 (12); and on rows 25 and 475: columns 98 and 258 (4). Turn each boomerang at a different angle.
- Mix the colors so no two motifs of the same color sit side by side. Lay out all the centers and boomerangs on the base first and check the balance from a distance.
Teal Border
- Rnd 1: with teal, RS facing, join in a foot corner. 3 sc in corner st, sc in next 349 sts, 3 sc in corner st; 398 sc evenly along the side (about 4 sc for every 5 rows); 3 sc in corner st, sc in next 349 sts, 3 sc in corner st; 398 sc evenly along the other side. Join. (1,506 sts)
- Rnd 2: ch 2 (does not count as a st), hdc in each st around, working 3 hdc in the center st of each corner. Join. (1,514 sts)
- Rnd 3: rep Rnd 2. (1,522 sts)
- Rnd 4: ch 1, rev sc in each st around. Join and fasten off. (1,522 sts)
Ribbed Sham Fronts and Backs (make 2 sets)
- Gauge for the shams: 14 hdc and 9 rows = 10 cm in hdc BLO.
- Front: with teal, ch 72. Row 1: hdc in 3rd ch from hook and in each ch across. (70 hdc) Rows 2-68: ch 2 (does not count as a st), turn, hdc in BLO of each st across. Fasten off. (about 50 x 75 cm)
- Back pieces (make 2 per sham): ch 72. Work Row 1 as for the front. Rows 2-38: ch 2, turn, hdc in BLO of each st across. Fasten off. (about 50 x 42 cm)
Sham Assembly
- Lay a front WS up. Place one back piece on top, RS up, lined up with the left edge, and the other lined up with the right edge, overlapping in the middle. Pin all edges.
- Rnd 1: turn so the front faces you. With teal, join in a corner through all layers. 3 sc in each corner, 104 sc evenly along each long side and 68 sc evenly along each short side. Join. (356 sts)
- Rnd 2: ch 1, rev sc in each st around. Join and fasten off. (356 sts)
- Rep with the second sham.
Finishing
Weave in all ends on the WS of the base, running the colored tails under the backs of their own rays so they don’t show through the cream. Make sure every dot is sewn on firmly so it can’t catch.
Remove any chalk marks, then lay the bedspread flat and steam it lightly from above. Smooth the rays straight with your fingers and plump each dot. Let it dry flat before putting it on the bed.
Tips for Success
- Make the dots in front of the TV in batches of 50. With 360 dots, it’s the part that takes longest if you leave it to the end.
- Keep the doubled ray yarn on two separate balls so the strands don’t twist together.
- Work the rays loosely. Tight surface slip stitch pulls the linen stitch in and the starburst puckers.
- Use the template for every starburst. Rays drawn by eye end up uneven and the starbursts look messy rather than retro.
- Pick slightly muted versions of rust, mustard and teal. They give the authentic mid-century look better than bright primary colors.
Common Mistakes to Avoid
- Rays that wander. If a ray curves, it’s because the chalk line wasn’t straight. Rechalk with a ruler before working each ray.
- Flat dots. If the dots don’t puff up, the magic ring wasn’t pulled tight enough. Pull the ring closed until the dc bunch into a ball.
- Boomerangs that curl. The 3 sc at the center can make the V cup. Block the boomerangs flat before sewing them on.
- Working sc into sc in the base. This turns linen stitch into plain sc and one panel grows longer. Each sc goes into a ch-1 sp, except the first and last of Rows 2 and 3.
- A ruffled border. Too many sts in Rnd 1 make the border wave. Stick to about 4 sc for every 5 rows along the sides.
Ways to Customize This Pattern
- Use the classic atomic palette of black, turquoise and coral on white for a different mid-century look.
- Make a throw from one panel with 4 large starbursts and a few boomerangs, about 73 x 120 cm.
- Add a few starbursts with 8 rays instead of 12 for variety.
- Work the shams in cream and add one small starburst in the center of each.
- Use a charcoal base with cream, mustard and teal motifs for a moody evening version.
Frequently asked questions
The rays are thin diagonal lines in many directions, which would be very hard to crochet into the base with color changes. Surface slip stitch lets you draw them on with clean, straight lines.
Yes. The layout is a guide for an even spread. Many mid-century designs look best slightly irregular, so feel free to move motifs around, as long as you check the balance before stitching.
Not if each one is sewn with several stitches through the center of the dot and the base. Tie off the tail on the WS and weave it in well.
Wash it on a gentle cold cycle inside a large laundry bag, or by hand, and dry it flat. Wash a test swatch with all four colors first, since rust and teal can bleed onto cream.
The finished Atomic Starburst Bedspread and Shams Crochet Pattern

