Autumn Filet Duster: Cozy Crochet Fall Cardigan
Beginner Friendly
Perfect for those just starting their crochet journey, with clear instructions and simple techniques
Single-Day Project
A satisfying project you can complete in a single afternoon or evening.
Handmade Gift
A beautiful keepsake — free forever. Read online or print at home.
About This Autumn Filet Duster: Cozy Crochet Fall Cardigan
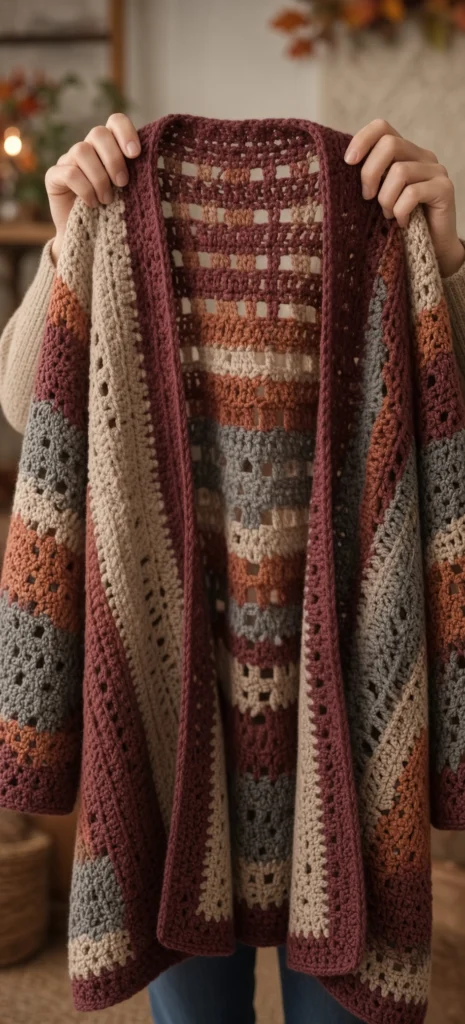
This crochet fall cardigan pattern is a long open duster worked from the neck down in one piece, with no seams anywhere except the underarms. The whole body is filet crochet, built from squares that are either open or filled, which is what produces the grid running through the fabric and the scattered blocks of colour sitting inside it. Because every square uses the same two stitches whether it is open or filled, the stitch count never changes from row to row, and that is what makes a garment this size manageable.
Expect 30 to 40 hours depending on size. The yoke is the technical part, nineteen to twenty-five increase rows with four raglan corners to track, and it takes an evening or two of real attention. After the divide the work turns meditative: thirty-eight rows of filet in a repeating twelve-row colour sequence, then two sleeves in the round, then the wide burgundy band that frames the whole front opening and pulls the garment into shape. The pattern is written in four sizes with full stitch counts at every stage.
The fit is deliberately oversized, with a deep raglan armhole and roughly 15 cm of ease, meant to be worn open over a jumper rather than fastened. A worsted weight wool blend gives the drape this shape needs, and the five autumn colours can be worked from partial balls, since no single colour carries more than a few rows at a time apart from the burgundy in the band. Written in US terms throughout.
Materials
- Worsted / Aran wool blend in burgundy (colour A) 400 (430, 470, 510) g
- Worsted / Aran wool blend in cream (colour B) 250 (270, 300, 330) g
- Worsted / Aran wool blend in rust (colour C) 200 (215, 240, 265) g
- Worsted / Aran wool blend in sage grey (colour D) 150 (160, 180, 200) g
- Worsted / Aran wool blend in terracotta (colour E) 150 (160, 180, 200) g
- 5.5 mm crochet hook main fabric
- 5.0 mm crochet hook bands and cuffs only
- Stitch markers at least 6, four of them a different colour for the raglan corners
- Tapestry needle blunt, large eye
- Tape measure
- Blocking mats or a spare bed, and rust-proof pins
- Spray bottle or a steam iron with a pressing cloth
Abbreviations
chchainscsingle crochetdcdouble crochetdc2togdouble crochet 2 stitches togethersl stslip stitchsp / spsspace / spacesst / stsstitch / stitchesRF / LFright front / left frontreprepeatRSright sideFOfasten offSizing and Gauge
- Sizes are written as S (M, L, XL). Where only one number appears it applies to all sizes.
- To fit bust 86-96 (96-106, 106-119, 119-132) cm.
- Finished bust, measured with the fronts meeting: 98 (104, 115, 125) cm. The cardigan is designed to hang open with about 15 cm of ease.
- Finished length from shoulder to hem: approximately 85 cm in all sizes, made up of the yoke, 38 body rows and the hem edging.
- Finished sleeve: 46 cm from underarm, tapering from 37 (40, 45, 49) cm at the top to 28 (31, 35, 40) cm at the cuff.
- Gauge with the 5.5 mm hook, blocked: 13 dc and 7 rows to 10 cm in plain double crochet, and 6.5 filet squares to 10 cm.
- If your gauge gives more stitches to 10 cm, go up a hook size. Row gauge matters here as much as stitch gauge, because the yoke depth is set by a row count rather than a measurement.
- Choose your size by upper bust rather than full bust. The raglan depth is generous and sizing up for a looser fit will drop the armhole below where it should sit.
The Filet Square, and the Colour Sequence
- The body and sleeves are worked in filet squares. Every square is 2 stitches wide and both kinds use exactly 2 stitches, so the total count never changes.
- Open square: ch 1, skip the next st, dc in the following st.
- Filled square: dc in each of the next 2 sts.
- Every filet row begins with ch 3, which counts as the first dc and sits outside the squares. A row of n stitches therefore contains (n minus 1) divided by 2 squares.
- When working the next row over an open square, the ch-1 space counts as a stitch: work into the ch-1 space itself, not around it.
- The Autumn Sequence is a 12-row repeat. Rows 1 to 2: all squares filled, colour A. Rows 3 to 4: all open, colour B. Row 5: all open except every 5th square filled, colour C. Row 6: all open, colour C. Rows 7 to 8: all filled, colour D. Rows 9 to 10: all open, colour A. Row 11: all open except every 4th square filled, colour E. Row 12: all open, colour E.
- Change colour on the final yarn over of the last stitch of the preceding row, so the new colour makes the turning chain. Cut the old colour and leave a 15 cm tail rather than carrying it up the edge, where it will show under the front band.
- The yoke is worked in plain double crochet, not filet. The filet sequence begins at the first body row after the divide.
Yoke Setup
- With the 5.5 mm hook and colour A, ch 57 (57, 63, 69).
- Row 1 (RS): dc in the 4th ch from hook and in each ch across, turn: 55 (55, 61, 67) dc.
- Row 2 (corner setup): ch 3 (counts as first dc), dc in the next 7 (7, 8, 9) sts for the right front, ch 1, dc in the next 6 (6, 7, 8) sts for the sleeve, ch 1, dc in the next 27 (27, 29, 31) sts for the back, ch 1, dc in the next 6 (6, 7, 8) sts for the sleeve, ch 1, dc in the last 8 (8, 9, 10) sts for the left front, turn.
- Check: 8 (8, 9, 10) plus 6 (6, 7, 8) plus 27 (27, 29, 31) plus 6 (6, 7, 8) plus 8 (8, 9, 10) equals 55 (55, 61, 67) dc, plus 4 ch-1 corner spaces.
- Place a coloured marker in each of the 4 ch-1 spaces and move them up as you work. Every increase in the whole yoke happens in these four spaces and nowhere else.
- Do not change colour during the yoke setup. Keep colour A until the first stripe change noted in the raglan section.
Raglan Increase Rows
- Increase row: ch 3 (counts as first dc), dc in each dc to the first ch-1 sp, *work (dc, ch 1, dc) into the ch-1 sp, dc in each dc to the next ch-1 sp*; rep from * across all 4 corner spaces, dc in each dc to the end, turn.
- Each increase row adds 8 dc, 2 at each corner, and keeps the 4 ch-1 spaces intact.
- Work the increase row a total of 17 (19, 21, 23) times.
- After the final increase row you have 191 (207, 229, 251) dc: 25 (27, 30, 33) on each front, 40 (44, 49, 54) on each sleeve and 61 (65, 71, 77) across the back, plus the 4 ch-1 spaces. Check the total before you go any further, since an error here cannot be corrected later.
- Stripe the yoke as you go for the look in the photograph: 4 rows A, 2 rows C, 4 rows B, 2 rows E, 4 rows D, then A to the end of the yoke. Adjust freely, since the yoke count does not depend on colour.
- The yoke measures about 27 (30, 33, 36) cm deep. This is a deliberately deep, relaxed raglan. If you want a closer armhole, work 2 fewer increase rows and add 8 sts to the underarm chain in the next section.
Dividing for the Sleeves
- Divide row: ch 3 (counts as first dc), dc in each dc across the right front to the first ch-1 sp; ch 8 (8, 9, 10) for the underarm; skip the ch-1 sp, all 40 (44, 49, 54) sleeve sts and the next ch-1 sp; dc in each dc across the back to the third ch-1 sp; ch 8 (8, 9, 10); skip the ch-1 sp, all sleeve sts and the next ch-1 sp; dc in each dc across the left front, turn.
- Body count: 127 (135, 149, 163) sts, made up of 25 (27, 30, 33) on each front, 61 (65, 71, 77) across the back and 8 (8, 9, 10) at each underarm.
- The count is odd in every size on purpose. One stitch sits outside the squares as the turning chain, leaving 63 (67, 74, 81) whole filet squares across the body.
- Slip the sleeve stitches onto a length of scrap yarn, or simply leave them. They are held on the fabric and will not unravel.
- Count the body stitches twice before continuing. Every row from here is worked over this number, so one miscount propagates through 38 rows.
Body
- Row 1: begin the Autumn Sequence at Row 1 with colour A. Ch 3 (counts as first dc), then work 63 (67, 74, 81) filled squares across, turn: 127 (135, 149, 163) sts.
- Row 2: as Row 1, all squares filled, colour A.
- Row 3: change to colour B. Ch 3, work 63 (67, 74, 81) open squares across, turn: 127 (135, 149, 163) sts.
- Row 4: as Row 3, all open, colour B.
- Row 5: change to colour C. Ch 3, *4 open squares, 1 filled square*; rep from * across, working whatever partial group remains as open squares, turn.
- Row 6: all open squares, colour C.
- Rows 7 and 8: change to colour D, all squares filled.
- Rows 9 and 10: change to colour A, all open.
- Row 11: change to colour E. Ch 3, *3 open squares, 1 filled square*; rep from * across, ending with any partial group as open squares, turn.
- Row 12: all open squares, colour E.
- Rep Rows 1 to 12 twice more, then work Rows 1 and 2 once more: 38 rows in total, measuring about 54 cm. FO.
- For a shorter cardigan, stop at the end of any Row 12 and note that the hem edging adds a further 3 cm. For a longer one, continue the sequence in full 12-row blocks.
Sleeves (make 2)
- With the RS facing, join colour A at the centre of one underarm chain. Work dc evenly around: dc in each of the held sleeve sts and in each underarm ch, sl st into the top of the first dc to join: 48 (52, 58, 64) sts.
- The sleeve count is even in every size, which gives 24 (26, 29, 32) whole filet squares worked in a continuous round with no turning chain sitting outside them.
- Round 1: ch 3 (counts as first dc), work squares around, ending with a dc in the last st, sl st into the top of the ch-3.
- Work 30 rounds in total, following the same Autumn Sequence used on the body so the stripes line up at the underarm.
- Decrease round (worked on rounds 6, 11, 16, 21, 26 and 30): work one square fewer by replacing the two stitches of a single square with a dc2tog at each side of the sleeve: 46 (50, 56, 62), then 44 (48, 54, 60), 42 (46, 52, 58), 40 (44, 50, 56), 38 (42, 48, 54) and finally 36 (40, 46, 52) sts.
- Place a marker at each side of the sleeve on round 1 and always decrease at those two points, so the taper falls on the underarm line rather than wandering around the sleeve.
- The sleeve now measures about 43 cm from the underarm. Change to the 5.0 mm hook and colour A for the cuff.
- Cuff rounds 1 to 3: ch 3, dc in each st around, sl st to join: 36 (40, 46, 52) sts. FO after round 3.
- Repeat for the second sleeve, starting the colour sequence at the same point so both sleeves match.
Front Band
- With the 5.0 mm hook and colour A, join at the bottom right front corner with the RS facing.
- Row 1: work sc up the right front edge, around the back neck and down the left front edge. Along the vertical front edges work 2 sc into each dc row-end. Across the neck edge work 1 sc into each of the 55 (55, 61, 67) foundation stitches.
- This gives roughly 275 (295, 325, 355) sc in total. The exact number does not matter, but the edge must lie flat. Hold the work up as you go: if it ripples you have put in too many sc, and if it pulls in you have put in too few.
- Rows 2 to 6: ch 3 (counts as first dc), dc in each st across, turn. Work 5 dc rows, giving a band about 5 cm wide.
- Row 7: ch 1, sc in each st across. FO and weave in the ends.
- Work the band in one continuous piece all the way round, never breaking and rejoining at the shoulders. The unbroken burgundy line is what frames the whole garment and it is the first thing the eye follows.
- Keep the band tension slightly firmer than the body. The band carries the weight of a long cardigan, and a loose band lets the fronts stretch downward until they hang unevenly.
Hem Edging
- With the 5.0 mm hook and colour A, join at one bottom front corner with the RS facing.
- Row 1: ch 1, sc in each st across the hem, including across the ends of the front band: 127 (135, 149, 163) sc plus the band stitches at each end, turn.
- Row 2: ch 3 (counts as first dc), dc in each st across, turn.
- Row 3: ch 1, sc in each st across. FO.
- The hem edging adds about 3 cm and brings the total length to approximately 85 cm. It also stops the final filet row from stretching, which matters more on an open filet fabric than on a solid one.
Finishing
Close the small gaps at each underarm where the sleeve joins the body. Use the tail from joining the sleeve and work four or five stitches across the corner on the wrong side, pulling just enough to close the hole without gathering it. Then weave in every end along the back of a filled row rather than an open one, since an open filet square gives a tail nothing to hold onto and it will work loose. There are around 60 ends on this garment if you cut at every colour change, so do them in batches as you finish each 12-row repeat instead of facing them all at once.
Block the finished cardigan flat and in one piece. Soak it in cool water with a wool wash, press the water out in a towel without wringing, and lay it out with the fronts meeting. Pin the shoulders and the two front band edges first so the band runs dead straight, then pin the hem to 98 (104, 115, 125) cm across, then open out the sleeves flat and pin them to length. Filet fabric grows noticeably when blocked, and the difference between a blocked and unblocked version of this cardigan is roughly a full size, so do not skip it and do not stretch it beyond the finished measurements.
Leave it flat until fully dry, which takes a day or more in a wool blend. Once dry, try it on and check the front bands hang level. If one side sits lower, it is almost always because that band was worked at a looser tension rather than because anything is wrong with the body, and redoing the five dc rows on that side alone will fix it.
Tips for Success
- Use four markers of a different colour from all your others for the raglan corner spaces. Over 17 to 23 increase rows you will look at those markers several hundred times, and any ambiguity about which marker means what leads to an increase in the wrong place.
- Count the body stitches at the end of every 12-row repeat, not every row. The filet square keeps the count stable by design, so a count that has drifted tells you exactly which repeat to check rather than sending you back through 38 rows.
- Work into the ch-1 space itself when the row below has an open square, never around it. Working around the chain twists the square and makes the grid look wobbly in a way that blocking will not straighten.
- Start both sleeves at the same point in the colour sequence and write down where that is. Sleeves whose stripes are one row out are obvious the moment the cardigan is on.
- Try the yoke on before you divide. Slip it over your shoulders and check the armhole depth against your own arm, since this is the one point where you can still change the fit without undoing anything else.
Common Mistakes to Avoid
- Measuring gauge on an unblocked swatch. Filet opens up when blocked, so an unblocked measurement will push you toward a smaller size and the finished cardigan will be tight across the back. Block the swatch, every time.
- Increasing in the wrong place in the yoke. Every increase belongs in a ch-1 corner space and nowhere else. If a raglan line starts to curve rather than running straight, you have worked an increase into a plain dc and it needs undoing back to that row.
- Carrying colours up the front edge between stripes. The carried strands sit right where the front band is later attached and show through the band as ridges. Cut at every change and weave in.
- A front band worked at body tension. The band is structural on a garment this long, and worked loosely it stretches under the weight until the fronts hang 5 cm lower than the back hem. Use the smaller hook and keep it firm.
- Decreasing the sleeves wherever the round happens to end. Marked side decreases keep the taper on the underarm line. Decreases worked at the join wander around the sleeve and produce a visible spiral seam.
- Working the underarm chain too short to save time. Those 8 to 10 chains set the armhole width, and shortening them pulls the whole yoke tight under the arm no matter how deep the raglan is.
Ways to Customize This Pattern
- Work it in one colour with the same filet sequence. The grid, the block bands and the scattered squares still read clearly, and it turns a busy autumn piece into something you can wear to work.
- Change the length in 12-row blocks. Two repeats plus rows 1 and 2 gives a hip-length cardigan at about 66 cm, and four repeats gives a full-length duster at around 103 cm.
- Add pockets. Work two 15 cm squares in the filet pattern, all squares filled so nothing falls through, and sew them to the fronts after blocking, positioned by holding the cardigan up against yourself.
- Make it sleeveless as a long waistcoat by working 3 rounds of sc around each armhole instead of a sleeve, which also saves roughly 250 g of yarn.
- Widen the front band to 10 rows for a shawl collar effect that folds back on itself, which suits the deeper raglan and needs about 80 g more of colour A.
- Swap the filled squares in rows 5 and 11 for a deliberate pattern rather than a scatter: chevrons, a diamond lattice, or your initials worked as filet charting across the back.
Frequently asked questions
Take the smaller one. This cardigan already carries about 15 cm of ease and is meant to hang open, so the between-size instinct to go up produces a garment that slides off the shoulders. If you want it looser across the back specifically, keep your size and add two increase rows to the yoke instead, which widens the back without widening the fronts.
You can, and the stitch counts are unaffected, but the drape will be different and acrylic will not hold a block. On a long open filet garment that matters, because the squares stay half closed and the front edges never quite settle straight. If acrylic is what you have, go up half a hook size to compensate for the lost blocking and expect a slightly stiffer fabric.
An increase has gone into a plain double crochet rather than into the ch-1 corner space, usually one or two rows before the curve becomes visible. Find the row where the line stops being straight and undo back to it. It is worth doing, because the raglan lines are the most visible structural feature on the fronts and a curved one reads as a mistake from across a room.
Only colour A needs to be bought properly, since it carries the yoke, the front band, the hem and the cuffs, which is around 400 g. The other four colours each appear in short bands and none needs more than about 250 g, so partial balls work well. Weigh what you have first and assign the colour you have most of to rows 3, 4, 9 and 10, which are the most frequent in the sequence.
Yes, with one change at the setup. Work the two fronts as a single section by casting on 8 (8, 9, 10) fewer stitches and joining the yoke into a round after Row 2, then omit the front band and work the neckline edging in the round. Everything else, including the divide counts and the body sequence, works exactly as written apart from being joined rather than turned.
The finished Autumn Filet Duster: Cozy Crochet Fall Cardigan

