Autumn Floral Table Runner Crochet Pattern
Beginner Friendly
Perfect for those just starting their crochet journey, with clear instructions and simple techniques
Single-Day Project
A satisfying project you can complete in a single afternoon or evening.
Handmade Gift
A beautiful keepsake — free forever. Read online or print at home.
About This Autumn Floral Table Runner Crochet Pattern
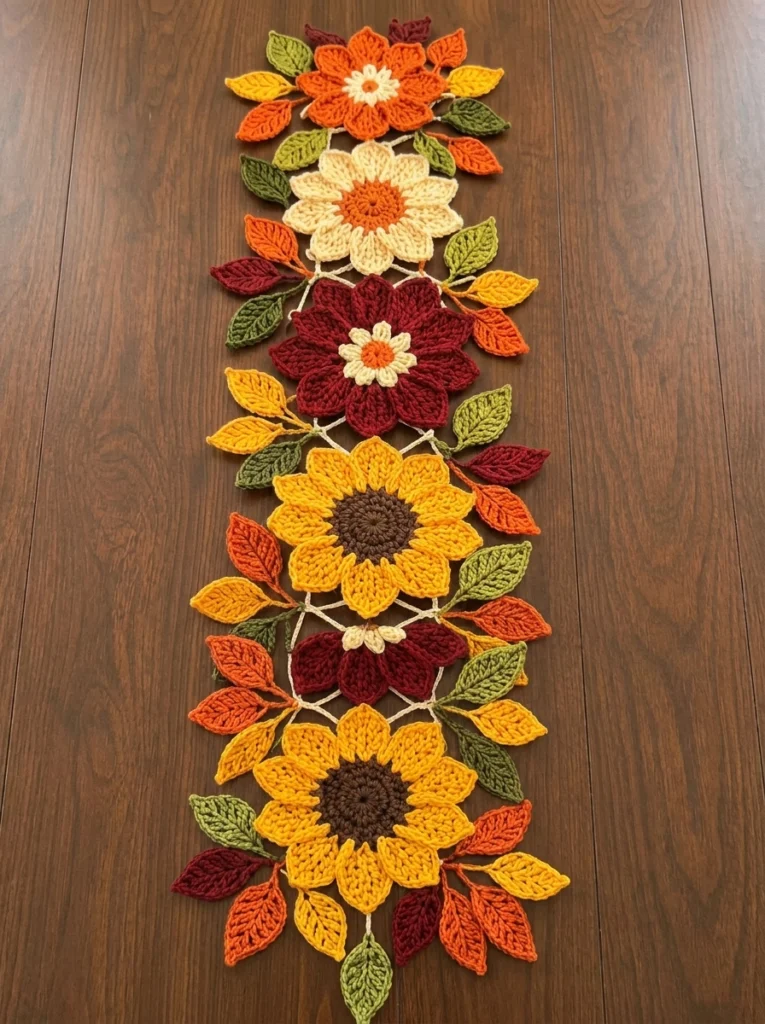
This autumn floral table runner crochet pattern builds a harvest centerpiece out of six separate blooms, thirty leaves and a fine ecru net that links everything together. Nothing here is worked in one long strip. Every sunflower, dahlia and daisy is a finished motif on its own, with a raised center disc and two staggered layers of petals, and the leaves are worked around a foundation chain so they have a proper point at both ends and a slip stitch vein down the middle. The result sits flat on the table but still reads as three dimensional, because the petal layers lift away from the center instead of lying in one plane.
Plan on 14 to 18 hours. The blooms go quickly once you have the petal rhythm memorized, but the leaves are where the time goes: thirty of them in five colors, each with its own vein. The joining net at the end takes about an hour and is the part that decides whether the finished runner looks crisp or crooked, so it is worth doing slowly with everything pinned down first.
This is an advanced pattern. You need to be comfortable working into free front loops, turning rows off a round, decreasing to a single stitch, and slip stitching down a side edge to travel between petals without cutting yarn. If you have made a few amigurumi and want to use the same skills on something for the table instead of a shelf, this is a good next project. It is also easy to pause: each motif is independent, so you can make one flower an evening and assemble at the end.
Materials
- DK cotton yarn, golden yellow approx. 70 g
- DK cotton yarn, deep burgundy approx. 45 g
- DK cotton yarn, pumpkin orange approx. 45 g
- DK cotton yarn, cream / ecru approx. 45 g, includes the joining net
- DK cotton yarn, olive green approx. 30 g
- DK cotton yarn, sage green approx. 30 g
- DK cotton yarn, dark chocolate brown approx. 15 g, sunflower centers only
- 3.0 mm crochet hook tighter than the ball band suggests, on purpose
- Tapestry needle blunt tip, large eye
- Stitch markers at least 6, one per motif in progress
- Rust-free pins and a blocking mat the mat needs to fit a 92 cm length, or block in two halves
- Polyester fiberfill a pinch only, for the three buds
- Scissors
Abbreviations
MRmagic ringchchainsl stslip stitchst(s)stitch(es)scsingle crochethdchalf double crochetdcdouble crochetinc2 sc in the same stitchsc2togsingle crochet 2 stitches togethersc3togsingle crochet 3 stitches togetherBLOback loops onlyFLOfront loops onlyrnd(s)round(s)reprepeatRS / WSright side / wrong sideFOfasten offGauge and Motif Map
- Gauge: the first 4 rounds of a sunflower center (24 sts) should measure about 4 cm across, and a finished blocked sunflower should measure about 14 cm from petal tip to petal tip. If yours is larger, drop to a 2.75 mm hook.
- All discs are worked in continuous spirals with the RS facing. Mark the first stitch of every round and move the marker up as you go.
- Motif order from the top of the runner down: Orange Bloom, Cream Bloom, Large Burgundy Dahlia, Sunflower A, Small Burgundy Dahlia, Sunflower B.
- Leave a gap of about 4 cm between the petal tips of neighboring motifs. That gap is where the ecru net shows.
- The two Mini Daisy Centers sit on top of the Orange Bloom and the Large Burgundy Dahlia. The Cream Bud Cluster sits on the Small Burgundy Dahlia.
- Leaves are added last, in overlapping sprays that fill the side gaps and hide the outer ends of the net.
Sunflower Center (Make 2)
- With dark brown, 6 sc in MR (6).
- Rnd 2: inc in each st around (12).
- Rnd 3: [sc in next st, inc in next st] rep 6 times (18).
- Rnd 4: [sc in next 2 sts, inc in next st] rep 6 times (24).
- Rnd 5: [sc in next 3 sts, inc in next st] rep 6 times (30).
- Rnd 6: [sc in next 4 sts, inc in next st] rep 6 times (36).
- Rnd 7: BLO sc in each st around (36). Do not work into the front loops of Rnd 6, they are used later for the front petal layer.
- Sl st in next st and FO, leaving a short tail. Weave in on the back. The disc should measure about 6 cm across and sit flat with a visible ridge on the front.
Sunflower Petals (Make 2 sets)
- Back layer: with golden yellow, join with sl st in any st of Rnd 7 of a sunflower center. You will make 9 petals over 4 sts each, using all 36 sts.
- Petal Row 1: ch 1, sc in the joining st and next 3 sts (4). Turn.
- Row 2: ch 1, inc, sc in next 2 sts, inc (6). Turn.
- Row 3: ch 1, sc in each st (6). Turn.
- Row 4: ch 1, sc in each st (6). Turn.
- Row 5: ch 1, sc2tog, sc in next 2 sts, sc2tog (4). Turn.
- Row 6: ch 1, sc2tog twice (2). Turn.
- Row 7: ch 1, sc2tog (1).
- Ch 1, then work 6 sl sts evenly down the side edge of the petal back to the base round, then sl st in the next unworked st of Rnd 7. Do not cut the yarn.
- Rep steps 2 to 9 eight more times for 9 petals total. Sl st into the base of the first petal and FO.
- Front layer: turn the flower so the free front loops of Rnd 6 face you. They form a ridge that sits in front of the back petals. Join golden yellow in a front loop 2 sts along from the start of any back petal, so the front petals fall between the back ones.
- Petal Row 1: ch 1, sc in the joining loop and next 3 front loops (4). Turn.
- Row 2: ch 1, inc, sc in next 2 sts, inc (6). Turn.
- Row 3: ch 1, sc in each st (6). Turn.
- Row 4: ch 1, sc2tog, sc in next 2 sts, sc2tog (4). Turn.
- Row 5: ch 1, sc2tog twice (2). Turn.
- Row 6: ch 1, sc2tog (1).
- Ch 1, work 5 sl sts down the side edge to the base, then sl st in the next free front loop.
- Rep steps 12 to 18 eight more times for 9 shorter front petals, using all 36 front loops. FO and weave in.
- Make a second sunflower the same way. Blocked, each should be about 14 cm across.
Large Burgundy Dahlia (Make 1)
- With burgundy, 6 sc in MR (6).
- Rnd 2: inc in each st around (12).
- Rnd 3: [sc in next st, inc in next st] rep 6 times (18).
- Rnd 4: [sc in next 2 sts, inc in next st] rep 6 times (24).
- Rnd 5: BLO sc in each st around (24). Leave the front loops of Rnd 4 free.
- Back petal layer: continuing in burgundy, you will make 8 pointed petals over 3 sts each from Rnd 5.
- Petal Row 1: ch 1, sc in next 3 sts (3). Turn.
- Row 2: ch 1, inc, sc in next st, inc (5). Turn.
- Row 3: ch 1, sc in each st (5). Turn.
- Row 4: ch 1, sc in each st (5). Turn.
- Row 5: ch 1, sc2tog, sc in next st, sc2tog (3). Turn.
- Row 6: ch 1, sc3tog (1).
- Ch 1, work 5 sl sts down the side edge to the base, then sl st in the next unworked st of Rnd 5.
- Rep steps 7 to 13 seven more times for 8 petals, using all 24 sts. Sl st to the base of the first petal and FO.
- Front petal layer: turn the piece so the free front loops of Rnd 4 face you. Join burgundy in a front loop 1 st along from the start of any back petal.
- Work as steps 7 to 13 but omit Row 4, so each front petal is 5 rows and sits shorter than the back layer. After the last row, ch 1, work 4 sl sts down the side edge and sl st in the next free front loop.
- Rep for 8 front petals, using all 24 front loops. FO and weave in. Blocked, the dahlia should be about 13 cm across.
Small Burgundy Dahlia (Make 1)
- With burgundy, 6 sc in MR (6).
- Rnd 2: inc in each st around (12).
- Rnd 3: [sc in next st, inc in next st] rep 6 times (18).
- Single petal layer: 6 pointed petals over 3 sts each, using all 18 sts.
- Petal Row 1: ch 1, sc in next 3 sts (3). Turn.
- Row 2: ch 1, inc, sc in next st, inc (5). Turn.
- Row 3: ch 1, sc in each st (5). Turn.
- Row 4: ch 1, sc2tog, sc in next st, sc2tog (3). Turn.
- Row 5: ch 1, sc3tog (1).
- Ch 1, work 4 sl sts down the side edge to the base, then sl st in the next unworked st of Rnd 3.
- Rep steps 5 to 10 five more times for 6 petals. Sl st to the base of the first petal and FO. This motif is meant to sit partly tucked under its neighbors, so it stays smaller at about 9 cm across.
Cream Bloom (Make 1)
- With pumpkin orange, 6 sc in MR (6).
- Rnd 2: inc in each st around (12).
- Rnd 3: [sc in next st, inc in next st] rep 6 times (18).
- Rnd 4: [sc in next 2 sts, inc in next st] rep 6 times (24).
- Rnd 5: BLO sc in each st around (24). FO orange, leaving the front loops of Rnd 4 free.
- Petals: join cream in any st of Rnd 5. Make 8 rounded petals over 3 sts each.
- Petal Row 1: ch 1, sc in next 3 sts (3). Turn.
- Row 2: ch 1, inc, sc in next st, inc (5). Turn.
- Row 3: ch 1, sc in each st (5). Turn.
- Row 4: ch 1, sc in each st (5). Turn.
- Row 5: ch 1, sc2tog, sc in next st, sc2tog (3). Turn.
- Row 6: ch 1, sc2tog, sc in next st (2). Turn.
- Row 7: ch 1, sc2tog (1).
- Ch 1, work 6 sl sts down the side edge to the base, then sl st in the next unworked st of Rnd 5.
- Rep steps 7 to 14 seven more times for 8 petals, using all 24 sts. FO.
- Center ring: join orange in any free front loop of Rnd 4 and sl st in each of the 24 front loops around. FO. This raises a clean orange rim where the petals meet the center.
Orange Bloom (Make 1)
- Work exactly as the Cream Bloom, with two color swaps: use cream for the center disc (Rnds 1 to 5) and pumpkin orange for the 8 petals.
- For the center ring in step 16, use cream instead of orange so the rim disappears under the Mini Daisy that will sit on top.
- Set this bloom aside for the top of the runner. It carries a Mini Daisy Center, added during finishing.
Mini Daisy Centers (Make 2)
- With pumpkin orange, 8 sc in MR (8).
- Rnd 2: inc in each st around (16). Sl st in next st and FO orange.
- Join cream in any st of Rnd 2.
- Petal round: work (sl st, ch 3, 2 dc, ch 3, sl st) all in the next st, then sl st in the following st. Rep 8 times in total, using all 16 sts (8 slim petals).
- Sl st to the base of the first petal and FO, leaving a 30 cm tail for sewing.
- One daisy goes on the Orange Bloom, one on the Large Burgundy Dahlia. Each finished daisy is about 4 cm across.
Cream Bud Cluster (Make 3 buds)
- With cream, 6 sc in MR (6).
- Rnd 2: sc in each st around (6).
- Rnd 3: sc in each st around (6).
- Push a pinch of fiberfill into the bud, no more than a pea.
- Rnd 4: sc2tog 3 times (3). FO, thread the tail through the remaining 3 sts, pull closed.
- Stem: with olive, ch 6 and sl st in the 2nd ch from hook and each ch across (5 sl sts). FO leaving a tail. Make 3.
- Sew one bud to the tip of each stem. The three stems are stitched together at the base during finishing so they fan out over the Small Burgundy Dahlia.
Large Leaf (Make 16)
- Colors: make 4 in pumpkin orange, 3 in golden yellow, 3 in burgundy, 3 in olive green, 3 in sage green.
- Ch 12.
- Rnd 1, first side: sc in 2nd ch from hook, hdc in next ch, dc in next 3 ch, hdc in next 3 ch, sc in next 2 ch (10 sts). One chain remains unworked at the end, this is the base.
- In the last (base) ch work (sc, ch 1, sc).
- Second side: working along the free loops on the opposite side of the foundation chain, sc in next 2, hdc in next 3, dc in next 3, hdc in next 1, sc in next 1 (10 sts).
- In the first ch (the tip) work (sc, ch 1, sc). Sl st to the first sc to join (24 sts and 2 ch-1 spaces).
- Rnd 2: ch 1, sc in next 4 sts, 2 sc in next st, sc in next 5 sts, (sc, ch 1, sc) in ch-1 space, sc in next 5 sts, 2 sc in next st, sc in next 4 sts, (sc, ch 1, sc) in ch-1 space, sl st to first sc (26 sts and 2 ch-1 spaces). FO leaving a 25 cm tail.
- Vein: with the same color and a tapestry needle or hook, work a line of surface sl sts along the foundation chain from base to tip, one sl st per chain. FO and pull the tail to the back.
- Each large leaf should measure about 8 cm long after blocking.
Small Leaf (Make 14)
- Colors: make 3 in pumpkin orange, 3 in golden yellow, 2 in burgundy, 3 in olive green, 3 in sage green.
- Ch 9.
- Rnd 1, first side: sc in 2nd ch from hook, hdc in next ch, dc in next 2 ch, hdc in next 2 ch, sc in next ch (7 sts). One chain remains at the end, this is the base.
- In the base ch work (sc, ch 1, sc).
- Second side: working along the free loops of the foundation chain, sc in next 1, hdc in next 2, dc in next 2, hdc in next 1, sc in next 1 (7 sts).
- In the first ch (the tip) work (sc, ch 1, sc). Sl st to the first sc to join (18 sts and 2 ch-1 spaces). FO leaving a 20 cm tail.
- Vein: work surface sl sts along the foundation chain from base to tip in the same color. FO.
- Each small leaf should measure about 5.5 cm long after blocking.
Leaf Sprays and Stems (Make 8)
- With olive green for 4 sprays and sage green for 4 sprays, ch 16.
- Sl st in the 2nd ch from hook and in each ch across (15 sl sts). FO leaving a 30 cm tail.
- Each spray carries 3 or 4 leaves, mixing one large and two small, or two large and one small.
- Sew the base of each leaf to the stem, spacing them 3 to 4 cm apart and alternating sides so the spray looks natural rather than symmetrical.
- Leave the remaining leaves loose. Those are sewn directly to the flower edges during finishing, without a stem.
Joining Net
- Lay all six motifs face up on the blocking mat in this order from top to bottom: Orange Bloom, Cream Bloom, Large Burgundy Dahlia, Sunflower A, Small Burgundy Dahlia, Sunflower B. Center them on a straight line and pin every motif down.
- Leave a gap of about 4 cm between neighboring petal tips. Check the total length before you crochet anything, it should be close to 92 cm.
- Join cream at the base of the lowest petal on the top motif, working through the petal base only, not through a petal tip.
- Ch 7, sl st into the base of the nearest petal on the motif below.
- Ch 7, sl st into the base of the next petal along on the upper motif.
- Rep steps 4 and 5 until you have worked 6 chain bars, forming a zigzag web across the gap. End with a sl st on the lower motif.
- FO and weave the tail into the back of the petal base, not into the net itself.
- Rep steps 3 to 7 for all five gaps. Keep the chain tension identical every time. Loose bars sag and tight bars pull the motifs into a curve.
- Unpin and lift the runner by one end. It should hang straight. If one gap pulls shorter than the others, undo that net and rework it before adding leaves.
Finishing
Sew the two Mini Daisy Centers on first, one to the middle of the Orange Bloom and one to the middle of the Large Burgundy Dahlia. Stitch through the orange disc only, catching each cream petal base once so the petals stay lifted instead of flattening. Stitch the three cream buds together at the base of their stems, then sew that little cluster to the upper edge of the Small Burgundy Dahlia so the buds fan out over the joining net.
Now add the leaves. Pin the eight sprays first, tucking their stem ends under the petal edges of the nearest flower so the raw ends never show, and angling them outward from the center line. Fill the remaining gaps with the loose leaves, overlapping their bases under neighboring petals. Work in color pairs rather than singles, an orange next to a gold, an olive next to a sage, so no color clumps at one end of the runner. Sew each leaf down with three or four small stitches at the base only. Leaving the tips free is what gives the runner its layered look, and it also lets you nudge leaves into place later.
Weave in every remaining tail on the back, then block the whole runner. Pin it face up to the mat at the outer petal tips and the leaf points, spray it evenly with cool water until damp through, and square the edges with a ruler before you leave it to dry overnight. Cotton holds this shape well. Once dry, the runner should lie flat with no rippling and measure roughly 92 cm long by 28 cm at its widest.
Tips for Success
- Make all six center discs first, before any petals. If two sunflower centers come out different sizes, you will find out in twenty minutes instead of after four hours of petal work.
- When you slip stitch down the side edge of a petal to travel to the next one, work into the whole edge stitch rather than a single loop. Working into one loop leaves a visible thread across the petal side.
- Count the base stitches before starting each petal layer. The sunflower back layer needs exactly 36 stitches divided into 9 groups of 4, and being one stitch off at the start means the last petal will not fit.
- Do the leaf veins with the leaf lying flat on the table, not held in your hand. Surface slip stitching pulls the leaf into a curl if you crochet it under tension.
- Photograph your layout before you crochet the joining net. It is easy to shift a motif while working and much easier to put it back if you have a reference.
Common Mistakes to Avoid
- Working Rnd 7 of the sunflower center through both loops. This kills the front ridge entirely and leaves nowhere to attach the front petal layer. If you catch it after a round or two, pull back to Rnd 6 and redo it in back loops only.
- Starting the front petal layer directly above a back petal. The two layers then stack instead of alternating and the flower looks sparse. Count 2 stitches along for the sunflowers and 1 stitch along for the dahlia before joining.
- Chaining the joining net too tightly. Cream cotton has no stretch, so tight bars pull the runner into a banana shape that blocking cannot fix. If a gap measures shorter than its neighbors after joining, undo it and redo it with a looser hand.
- Sewing leaves down along their whole length. Stitched flat, they read as a printed border rather than foliage. Anchor the base only and leave the tip loose.
- Skipping the blocking step because cotton “looks fine.” Unblocked petals cup slightly toward the center, and six cupped motifs make the runner ripple down the middle of your table.
Ways to Customize This Pattern
- Make it longer by repeating the sunflower and small dahlia pair. Each extra motif plus its gap adds about 16 cm, so two more blooms bring the runner to roughly 124 cm for a long dining table.
- Turn a single motif into a coaster or trivet set. Work a sunflower with the center only through Rnd 5 (30 sts), use 10 petals of 3 stitches each, and skip the joining net entirely.
- Swap the palette for spring: pale pink and lilac blooms, buttercup and mint leaves, with the same brown centers replaced by soft gold. The construction does not change at all.
- Add a chain-loop hanging edge along one long side and use the runner as a wall or mantel garland instead. Work ch 10 loops evenly spaced across the top leaf tips.
- Back the finished runner with a strip of felt or quilting cotton cut to shape and hand stitched around the petal outlines. This stops it slipping on a polished table and makes it noticeably sturdier.
Frequently asked questions
Almost always the petal decrease rows are too tight. Rows 5 to 7 pull in quickly, and if your tension increases as the petal narrows, the top edge becomes shorter than the base and the petal cups. Try going up half a hook size for the decrease rows only, or block each flower individually by pinning every petal tip outward before you assemble the runner.
You can, but the runner will not hold its shape the same way. Acrylic has more stretch, so the ecru joining net sags under the weight of the motifs and the runner grows longer over time. If acrylic is what you have, go down to a 2.5 mm hook, work the net with ch 6 instead of ch 7, and steam block rather than wet block. Cotton is genuinely the better choice here.
No, but do not drop below about twenty. The leaves are what hide the outer ends of the joining net and give the runner its width. If you want to make fewer, cut the small leaves rather than the large ones and keep at least two leaves at every gap between motifs, since those are the ones doing the covering work.
Hand wash in cool water with a little mild detergent, press the water out between towels, and never wring or hang it. Lay it back on the blocking mat, pin the petal and leaf tips out again, and let it dry flat. Treat every wash as a re-block and the runner will keep its shape for years.
If the difference is under a centimeter, add an extra leaf spray across that gap and it will disappear visually. If it is wider than that, undo the net for that gap only and rework it with ch 6 bars instead of ch 7. Each chain you remove pulls the motifs roughly 0.5 cm closer.
The finished Autumn Floral Table Runner Crochet Pattern

