Autumn Flower Lace Table Runner Crochet Pattern
Advanced
For experienced crocheters who enjoy complex shaping, fine detail, and ambitious construction
Single-Day Project
A satisfying project you can complete in a single afternoon or evening.
Handmade Gift
A beautiful keepsake — free forever. Read online or print at home.
About This Autumn Flower Lace Table Runner Crochet Pattern
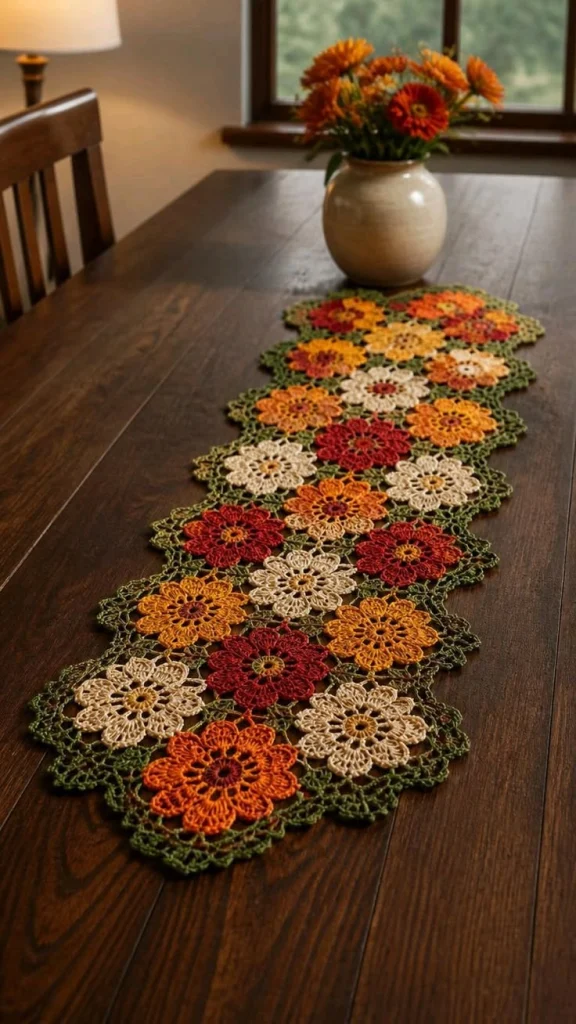
This floral crochet table runner pattern brings together cream, golden yellow, burnt orange and deep red flowers in an open olive-green lace setting. Inspired by the photographed runner, its separate flower motifs form a long, staggered arrangement with softly scalloped edges.
The flowers have contrasting centers, tall stitch petals and two rounds of green mesh beneath a small scalloped border. Allow approximately 25–35 hours for the 23 motifs, connecting bridges and careful blocking. This advanced project suits crocheters comfortable working with fine cotton, reading lace repeats and assembling motifs with consistent tension.
Materials
- Size 10 crochet cotton in olive green Approximately 450 m
- Size 10 crochet cotton in cream, golden yellow and burnt orange Approximately 180 m of each color
- Size 10 crochet cotton in deep red Approximately 160 m
- 1.75 mm steel crochet hook Adjust as needed to achieve blocked motif gauge
- Fine tapestry needle and small scissors For securing cotton ends
- Removable stitch markers Eight per motif while identifying joining points
- Blocking mat, rustproof pins and measuring tape A surface at least 35 × 80 cm is useful
Abbreviations
MRMagic ringchChainsl stSlip stitchscSingle crochethdcHalf double crochetdcDouble crochettrTreble crochet: yarn over twice, insert hook and draw up a loop, then yarn over and draw through two loops three timesspSpacestStitchGauge, Construction and Color Plan
- Gauge: one complete six-round motif measures 9 cm across opposite marked tips after wet blocking. Its center through Round 2 should measure approximately 2 cm across. The complete motif measurement controls the final size.
- Work all rounds with the right side facing; do not turn. Starting chains do not count as stitches unless explicitly stated. Work into both top loops of stitches unless a space is specified.
- Make 23 separate motifs: six cream flowers with golden centers, six golden flowers with deep red centers, six burnt-orange flowers with deep red centers, and five deep red flowers with golden centers. The center color is used for Rounds 1–2, the petal color for Round 3, and olive for Rounds 4–6.
- Arrange nine rows across the runner: rows 1, 3, 5, 7 and 9 contain three flowers; rows 2, 4, 6 and 8 contain two flowers centered between the flowers above and below. These are placement rows, not crochet rows.
- Finished size target: approximately 29 cm wide and 73 cm long. Three 9 cm motifs with two 1 cm horizontal gaps give 29 cm width. Nine placement rows with centers 8 cm apart give approximately 73 cm length, including the two end radii.
Flower Centers — Make 23
- Round 1, center color: work 16 sc in MR. Pull the ring closed and sl st to the first sc. Count: 16 sc. Leave a 12 cm starting tail for securing the ring.
- Round 2: ch 3, counting as the first dc. Ch 1, then work (dc in the next sc, ch 1) 15 times. Sl st to the top of the beginning ch 3. Count: 16 dc and 16 ch-1 spaces. Fasten off.
Eight-Petal Flower Round
- Round 3, petal color: join with sc in any Round 2 ch-1 space. Ch 2; in the next ch-1 space work (3 tr, ch 2, 3 tr); ch 2. Repeat the following seven times: sc in the next ch-1 space, ch 2, work (3 tr, ch 2, 3 tr) in the next ch-1 space, ch 2. Sl st to the first sc and fasten off. Count: eight petals, eight valley sc, 48 tr and 24 ch-2 spaces. Each petal uses two consecutive Round 2 spaces.
Olive Mesh and Scalloped Flower Setting
- Round 4: join olive with sc in any Round 3 valley sc. Ch 5, sc in the central ch-2 space between the two groups of 3 tr on the next petal, ch 5. Repeat the following seven times: sc in the next valley sc, ch 5, sc in the next petal’s central ch-2 space, ch 5. Sl st to the first sc. Count: 16 sc and 16 ch-5 arches. Leave the two side ch-2 spaces of every petal unworked.
- Round 5: sl st into the first Round 4 ch-5 arch; ch 1 and sc in that arch. Repeat (ch 5, sc in the next arch) 15 times; ch 5 and sl st to the first sc. Count: 16 sc and 16 ch-5 arches. The first, third, fifth and subsequent alternate new arches cross a petal tip; the other eight cross valleys.
- Round 6: sl st into the first Round 5 arch. Ch 1; work (sc, hdc, 3 dc, hdc, sc) in that arch and in each of the remaining 15 arches. Sl st to the first sc and fasten off. Count: 16 scallops; 32 sc, 32 hdc and 48 dc, totaling 112 stitches.
- Mark the middle dc of each scallop worked over a petal-tip arch identified in Round 5. There are eight marked stitches, one aligned with each flower petal. These are the joining anchors; the eight valley scallops remain free.
- Secure the center tail through the Round 1 stitches twice in opposite directions. Weave the other tails through matching-color stitch backs without tightening the lace.
Block the Separate Motifs
- Soak completed motifs in cool water, press gently in a towel and lay them right side up. Pin each to 9 cm across opposite marked tips, keeping the eight petals evenly spaced. Let dry fully.
- Check that the cream and colored flowers have the same diameter. Reblock a small discrepancy; change hook size and remake a motif if the difference exceeds approximately 5 mm.
- Make a bridge sample using the instructions below between two scrap loops held approximately 2 cm apart. The two chain lengths should lie comfortably without pulling the loops inward. If the bridge is too short at your tension, use a slightly larger hook for every bridge while keeping the specified chain count.
Lay Out the Autumn Flowers
- Lay all motifs right side up. Rotate each so its eight marked anchors face north, northeast, east, southeast, south, southwest, west and northwest. Read each placement row from left to right.
- Row 1: cream, burnt orange, cream.
- Row 2: deep red, golden yellow.
- Row 3: golden yellow, cream, burnt orange.
- Row 4: burnt orange, deep red.
- Row 5: deep red, golden yellow, cream.
- Row 6: cream, burnt orange.
- Row 7: burnt orange, deep red, golden yellow.
- Row 8: golden yellow, cream.
- Row 9: deep red, golden yellow, burnt orange.
- For a measured layout, place the centers of three-flower rows at 4.5, 14.5 and 24.5 cm across the blocking mat. Place the centers of two-flower rows at 9.5 and 19.5 cm. Put successive row centers 8 cm apart, starting 4.5 cm from the top. Minor easing of the flexible lace around joining points is expected.
Olive Connecting Bridges — Make 46
- Work each bridge separately with olive and with both motifs right side up. Join with sc through both top loops of the marked anchor on motif A. Ch 5, sc through both top loops of the corresponding anchor on motif B, ch 5, then sl st into the first sc on motif A. Fasten off with a 12 cm tail. Each bridge contains two sc and two ch-5 lengths forming a narrow oval; the closing sl st is not included in the stitch count.
- Join horizontal neighbors in every placement row: the east anchor of the left motif to the west anchor of the right motif. Make two bridges in each three-flower row and one in each two-flower row. Total: 14 horizontal bridges.
- Between each pair of adjacent placement rows, connect every flower in the two-flower row to the two nearest flowers in the three-flower row. Make four diagonal bridges per row boundary. There are eight boundaries, giving 32 diagonal bridges.
- For a neighbor below and to the right, connect the upper motif’s southeast anchor to the lower motif’s northwest anchor. For a neighbor below and to the left, connect the upper motif’s southwest anchor to the lower motif’s northeast anchor.
- Check the complete network before trimming tails: 14 horizontal bridges plus 32 diagonal bridges equals 46. Each individual marked anchor receives at most one bridge. North and south anchors remain free.
- Weave each bridge tail back through its sc and then through the green stitches of its own motif in two directions. Keep the bridge chains free of woven tails so they retain their flexibility.
Finishing
Wet-block the assembled runner with its right side up. Set the motif centers back onto the layout measurements, then ease the petals and bridges into place. Pin the outer scallops gently to produce a flowing outline. The separate motif borders already finish the perimeter; no additional edging is needed.
Allow the cotton to dry completely before removing the pins. Check every bridge and center closure, then trim secured tails. Lay the runner on a plain wooden table so the open green mesh and warm flower colors remain easy to see.
Tips for Success
- Mark the eight petal-tip arches during Round 5. Identifying them before adding the scallops prevents joining through a valley by mistake.
- Keep the Round 3 treble stitches tall and even. Tight trebles shrink the petals and make the surrounding green mesh look oversized.
- Block all flowers before joining. This makes it much easier to spot an unusually small center or a tight green round.
- Pin the whole arrangement before making bridges. Leave completed joins relaxed while working nearby connections.
Common Mistakes to Avoid
- Using one Round 2 space for every petal produces too many petals. Each petal repeat uses one space for its valley sc and the next for its treble fan.
- Working into all three ch-2 spaces of a petal creates excess green mesh. Round 4 uses only the central tip space and the valley sc.
- Joining through a valley scallop twists the flower. Remove that bridge and attach it to the marked middle dc of a petal-tip scallop.
- Pulling bridge tails tight cups the motifs. Release the tail, reshape the connection flat and weave it in without shortening the bridge.
- Stretching the runner to the stated size despite a different motif gauge distorts the lace. Use your blocked motif measurements to scale the layout instead.
Ways to Customize This Pattern
- For a longer runner, insert one two-flower placement row and one three-flower placement row. Each added pair uses five motifs, adds approximately 16 cm and requires 11 additional bridges.
- Use cream for all petals, golden centers and the same olive setting for a quieter version with the original floral silhouette.
- Replace golden yellow with ochre and burnt orange with copper for a deeper autumn palette. Keep the center color distinct from the petals.
- Make the same construction in size 20 cotton with a matching smaller hook for finer lace. Measure a blocked motif and scale all center spacing proportionally.
Frequently asked questions
The staggered layout and narrow olive bridges intentionally leave openings between the individual lace settings. Do not fill these gaps with extra stitches; they help the runner remain light and flexible.
Yes, but the runner will be thicker and considerably larger. Make one complete motif first. If its diameter is D cm, approximate finished width is 3.22 × D and length is 8.11 × D; scale the placement measurements by D divided by 9.
No. Every flower already has a complete scalloped olive border. A continuous outer round would change the separated floral outline shown in the reference.
Hand-wash according to the thread label in cool water after checking the red and orange threads for color bleeding. Press out moisture in a towel and dry flat, gently restoring the flower spacing and scallops.
The finished Autumn Flower Lace Table Runner Crochet Pattern

