Autumn Garden Crochet Table Runner Pattern
Advanced
For experienced crocheters who enjoy complex shaping, fine detail, and ambitious construction
Weekend Project
A satisfying weekend make — start Friday, finish Sunday, enjoy forever.
Handmade Gift
A beautiful keepsake — free forever. Read online or print at home.
About This Autumn Garden Crochet Table Runner Pattern
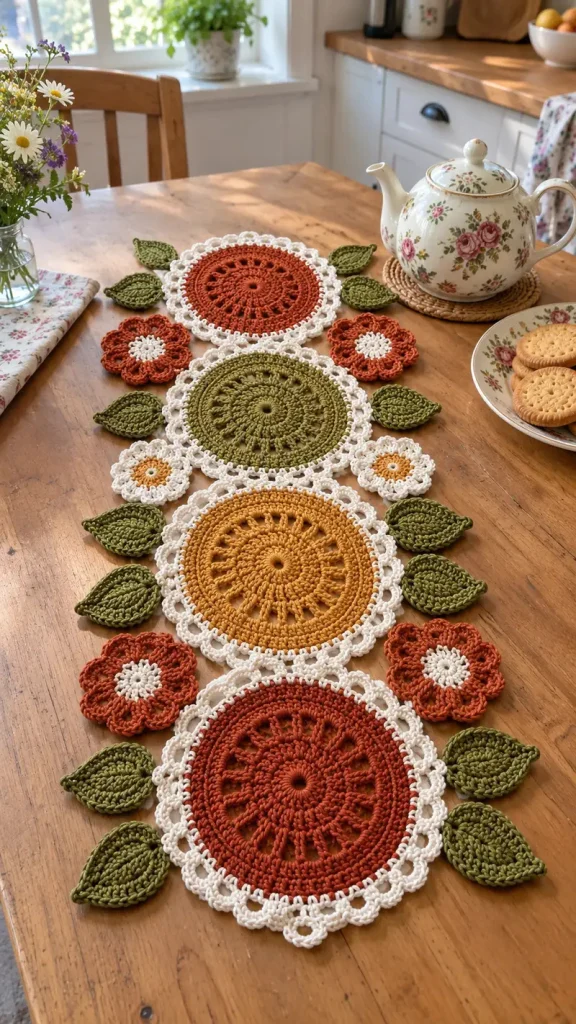
This crochet table runner pattern brings together four round lace medallions, cream scalloped borders, small flowers, and pointed olive leaves. Rust, moss green, and mustard centers follow the warm palette of the reference, while the separate motifs give the runner its open, garden-like outline.
Allow approximately 18–24 hours for crocheting, joining, embroidery, and finishing, plus drying time. This advanced project suits crocheters comfortable with joined rounds, working around foundation chains, reading lace spaces, and assembling many small pieces. The construction stays flat and unstuffed, with embroidered leaf veins and carefully placed joins supporting the decorative edges.
Materials
- Smooth sport-weight cotton Approximately 125 m per 50 g; use the same yarn range for every color
- Rust cotton 100 g for two medallions and four flowers
- Cream cotton 100 g for borders, flower centers, and two flowers
- Olive cotton 100 g for fourteen leaves and embroidered veins
- Moss-green cotton 50 g for one medallion
- Mustard cotton 50 g for one medallion and two flower centers
- Crochet hook 3.0 mm, or the size needed for gauge
- Tapestry needle, scissors, and stitch markers Use removable markers to identify the scallops
- Blocking mats, rustproof pins, and measuring tape A paper layout is helpful for assembly
Abbreviations
chchainsl stslip stitchscsingle crochethdchalf double crochetdcdouble crochettrtreble crochetincwork two stitches of the stated type into one stitchMRmagic ringRSright sideGauge, Dimensions, and Working Notes
- Use US crochet terminology. Target blocked gauge in a separate sc swatch is 24 stitches and 26 rows per 10 cm. Make a swatch at least 14 cm square and measure its center.
- The complete blocked medallion is the controlling gauge: approximately 17 cm across, including cream edging. The center through Round 10 should measure approximately 14 cm across.
- Each flower measures approximately 5–5.5 cm across. Each leaf measures approximately 6 × 3 cm. These are target blocked measurements, not guaranteed measurements for every cotton yarn.
- Make four medallions: rust, moss green, mustard, and rust, in that order along the runner. Make four rust flowers with cream centers, two cream flowers with mustard centers, and fourteen olive leaves.
- Work medallions and flower centers in joined rounds with the RS facing throughout. Beginning chains never count as stitches. Join each round to its first actual stitch with a sl st; do not work into the joining sl st.
- Unless a stitch is explicitly placed into a chain space, work under both top loops. Numbers following instructions give completed stitch counts. Fasten off means cut the yarn and draw the tail through the last loop.
- The finished runner is approximately 68 cm long and up to 29 cm wide. Assembly spacing and leaf angles affect the width; establish the final outline on the blocking mat before sewing.
Medallion Centers — Make Four
- Round 1: With the chosen center color, make an MR, ch 2, and work 12 dc into the ring. Join. Draw the ring closed enough to leave a neat opening approximately 4 mm wide. Secure the ring tail later by weaving it in several directions. (12 dc)
- Round 2: Ch 2, work 2 dc in every stitch. Join. (24 dc)
- Round 3: Ch 2, repeat (dc in next stitch, dc inc in next stitch) 12 times. Join. (36 dc)
- Round 4: Ch 2, repeat (dc in each of next 2 stitches, ch 2, skip next stitch) 12 times. Join to first dc. Each repeat consumes 3 stitches. (24 dc and twelve ch-2 spaces; 48 stitches when chains are counted individually)
- Round 5: Ch 2, repeat (dc in each of next 2 dc, 3 dc in next ch-2 space) 12 times. Join. (60 dc)
- Round 6: Ch 2, repeat (dc in each of next 4 stitches, dc inc in next stitch) 12 times. Join. (72 dc)
- Round 7: Ch 1, repeat (sc in each of next 11 stitches, sc inc in next stitch) 6 times. Join. (78 sc)
- Round 8: Ch 1, repeat (sc in each of next 12 stitches, sc inc in next stitch) 6 times. Join. (84 sc)
- Round 9: Ch 1, repeat (sc in each of next 13 stitches, sc inc in next stitch) 6 times. Join. (90 sc)
- Round 10: Ch 1, repeat (sc in each of next 14 stitches, sc inc in next stitch) 6 times. Join and fasten off. (96 sc)
Cream Scalloped Borders — Work on All Four Medallions
- Round 11: Join cream with a sl st in any Round 10 stitch. Ch 1, repeat (sc in next available stitch, ch 3, skip next 3 stitches) 24 times, beginning the first sc in the joining stitch. Join to first sc. (24 sc and twenty-four ch-3 spaces)
- Round 12: Sl st into the first ch-3 space. Ch 1, work 5 sc into that space and 5 sc into each remaining ch-3 space. Do not work into the Round 11 sc. Join to first sc. (120 sc, arranged in 24 groups of 5)
- Round 13: Ch 1, repeat (sl st in first sc of next group, sc in second sc, 3 dc in third sc, sc in fourth sc, sl st in fifth sc) 24 times. Join to the first sl st and fasten off. Each repeat consumes 5 stitches and makes 7 stitches. (24 scallops; 168 stitches)
- Mark the center dc of any scallop as scallop 1. Count clockwise and mark scallops 7, 13, and 19. These four marked scallops divide the circle into quarters. Retain the markers until assembly is complete.
Flowers — Make Six
- Round 1: With cream for four flowers or mustard for two flowers, work 6 sc into an MR. Join. Pull the ring closed. (6 sc)
- Round 2: Ch 1, sc inc in every stitch. Join. (12 sc)
- Round 3: Ch 1, repeat (sc in next stitch, sc inc in next stitch) 6 times. Join and fasten off the center color. (18 sc)
- Round 4: Join rust to a cream center, or cream to a mustard center. Ch 1, repeat (sc in next stitch, ch 2, work 3 dc in next stitch, ch 2, sc in next stitch) 6 times. Join to first sc. Each petal consumes 3 center stitches. (6 petals; 12 sc, 18 dc, and twelve ch-2 spaces)
- Round 5: Ch 1, repeat (sl st in next sc, 2 sc in next ch-2 space, sc in each of next 3 dc, 2 sc in next ch-2 space, sl st in next sc) 6 times. Join to first sl st. (6 outlined petals; 42 sc and 12 sl st)
- Fasten off, leaving a 40 cm tail in the petal color for assembly. Weave in the center tails now. Flatten the petals with your fingers; do not fold the paired sc between neighboring petals into an extra petal.
Pointed Olive Leaves — Make Fourteen
- Foundation: With olive, ch 13. The 12 chains below the hook form the leaf axis; the chain nearest the hook is the turning chain.
- Round 1, first side: Starting in the second chain from the hook, sc in next chain, hdc in next chain, dc in each of next 2 chains, tr in each of next 3 chains, dc in each of next 2 chains, hdc in next chain, sc in next chain. There is one unworked foundation chain at the far end. (11 stitches)
- Round 1, tip: Work 3 sc in the last foundation chain. Place a marker in the middle of these 3 sc; this is the pointed end. (14 stitches worked so far)
- Round 1, second side: Rotate the work and crochet into the unused loops on the opposite side of the foundation. Sc in next chain, hdc in next chain, dc in each of next 2 chains, tr in each of next 3 chains, dc in each of next 2 chains, hdc in next chain, sc in next chain. (25 stitches worked so far)
- Round 1, base: Work 2 additional sc into the same foundation chain as the final sc. Join to the first sc. This chain also holds the first sc on the first side, creating a rounded attachment base. (27 stitches total)
- Round 2: Ch 1, loosely sl st in each of the 27 stitches, keeping the working loop above the edge so it does not contract. Join to the first sl st and fasten off, leaving a 50 cm tail. (27 sl st)
- Shape: Gently pull the marked tip outward while flattening the broad middle. Wet-block to approximately 6 × 3 cm. Remove the tip marker when dry.
Embroidered Leaf Veins
- Thread the olive leaf tail onto a tapestry needle. With the RS facing, bring the needle up at the rounded base and work a line of backstitches along the foundation-chain axis to the pointed tip. Make each stitch approximately 4–5 mm long.
- Return toward the base on the wrong side, passing under existing stitches. Add three diagonal straight-stitch veins on each side of the center line, placing them through the lower, middle, and upper thirds of the leaf.
- Keep every embroidered stitch relaxed enough for the leaf to lie flat. Secure the embroidery under several stitches on the wrong side, then leave the remaining tail attached for sewing.
Blocking and Layout
- Soak the separate motifs according to the yarn label, support them while lifting, and press excess water out in a towel. Do not wring. Test rust and mustard scraps for color bleeding before wetting them with cream motifs.
- Pin each medallion to a 17 cm circle. Space all 24 scallops evenly, opening the lace without stretching individual chain spaces into long loops. Block flowers flat and leaves to their target dimensions. Let every piece dry fully.
- On a paper or blocking-mat layout, draw a vertical center line 68 cm long. Measured from its top, place medallion centers at 8.5, 25.5, 42.5, and 59.5 cm. Arrange the colors rust, moss green, mustard, and rust.
- Orient scallop 1 toward the top of each medallion, scallop 7 to the right, scallop 13 to the bottom, and scallop 19 to the left. Adjacent medallions should meet at their top and bottom scallops.
- Place one flower on each side of every medallion junction, with flower centers approximately 10 cm to either side of the center line. Use rust flowers at the first and third junctions and cream flowers at the middle junction.
- Place seven leaves on each side. Measured from the top of the runner, position their bases at approximately 4, 11, 25.5, 39, 46, 56, and 63 cm. Set each base on a medallion edge, approximately 7.5–8.5 cm from the center line, and angle its tip outward. Keep the farthest tips within an overall width of approximately 29 cm.
- Allow leaf bases to overlap the cream edge by approximately 8 mm. At each junction, rotate the flower so two neighboring petals overlap the upper and lower medallion borders. Keep all pieces RS up and pin the full arrangement before sewing.
Joining the Motifs
- With cream yarn, sew scallop 13 of the upper medallion to scallop 1 of the medallion below it. Place their tips together and whipstitch through both loops of the three central dc on each scallop, matching the stitches one to one. Repeat at all three medallion junctions.
- Secure each flower to both adjoining medallions. Sew a 1 cm section of one upper petal edge to the nearest cream scallop on the upper medallion, then a 1 cm section of a lower petal edge to the nearest cream scallop on the lower medallion. Make 4–6 small stitches at each attachment. These flowers form supporting bridges beside the center joins.
- Use the petal-color tail for flower attachments, passing the needle through the underside of the cream edging wherever possible. Secure each attachment separately before traveling to the next one beneath existing stitches.
- Attach each leaf with its olive tail. Sew across approximately 8 mm of the rounded base, taking 5–6 small stitches through the leaf and the cream border underneath. Add one small anchoring stitch farther along each side of the base, approximately 5 mm from the central seam, so the leaf cannot swivel freely.
- Lay the runner flat after every pair of attachments. If an edge lifts, undo that join and resew with more relaxed tension. Do not pull a flower across a gap wider than its natural span.
Finishing
Weave every remaining end through several stitches on the wrong side, reverse direction, and trim only after checking the joins. Give the assembled runner a final gentle blocking, keeping its center line straight and its flowers flat. Let it dry completely before lifting it from the mat.
The finished piece should rest easily on the table, with open lace, softly rounded scallops, and leaves pointing away from the center. Lift the runner with support beneath the medallions so its decorative joins keep their shape.
Tips for Success
- Count twelve lace spaces after medallion Round 4. A missing space changes every later round and distorts the cream border.
- Mark every sixth scallop before joining. These quarter points keep the four circles aligned along one straight axis.
- Keep the leaf slip-stitch edging loose. Try a hook 0.5 mm larger for that round if the leaf curls lengthwise.
- Block all four medallions together and compare their diameters before sewing. Consistent motif size matters more than pulling the finished runner to a precise length.
- Use the flowers as two-point bridges at each junction. Their upper and lower attachments help the runner retain its arrangement when moved.
Common Mistakes to Avoid
- Working into joining slip stitches adds unwanted stitches. Mark the first actual stitch and stop before the join on every round.
- Making only two dc in each Round 4 chain space gives the wrong Round 5 count. Each space receives three dc, producing 60 dc in total.
- Skipping the extra two sc at the leaf base leaves the perimeter short. Round 1 must finish with 27 stitches before the slip-stitch edging.
- Sewing flowers to only one medallion leaves loose side decorations at the junctions. Attach each flower to both the upper and lower circle.
- Pulling embroidery tight puckers the leaves. Remove the tight vein stitches, flatten the leaf, and replace them with relaxed stitches.
Ways to Customize This Pattern
- Use sage, dusty rose, and pale gold centers while retaining the cream borders and olive leaves for a softer garden palette.
- Make a three-medallion runner approximately 51 cm long. Use four flowers at its two junctions and arrange ten leaves around the remaining edges.
- Replace the two cream flowers with mustard petals and cream centers for a stronger golden accent beside the green and mustard medallions.
- Embroider the leaf veins in a slightly lighter olive to make their branching structure more visible.
Frequently asked questions
Measure after wet-blocking and drying. If the center through Round 10 is smaller than approximately 14 cm, try a larger hook or a slightly fuller sport cotton. If all motifs are proportionally smaller and lie flat, you can keep them and scale the assembly layout to their actual diameter.
This version uses sewn joins so you can block the circles separately and adjust flower placement first. Complete all borders as written, then sew the three central dc of the matching top and bottom scallops together.
Loosen the slip-stitch edging, keep the embroidered veins relaxed, and block each leaf before assembly. Sew the base across an 8 mm section and add the two side anchors described in the joining instructions.
Use a separate heat-resistant trivet under a hot teapot. The runner’s open lace and decorative joins are designed for table decoration and do not provide reliable heat protection.
The finished Autumn Garden Crochet Table Runner Pattern

