Beginner Friendly
Perfect for those just starting their crochet journey, with clear instructions and simple techniques
Single-Day Project
A satisfying project you can complete in a single afternoon or evening.
Handmade Gift
A beautiful keepsake — free forever. Read online or print at home.
About This Autumn Leaf Coaster Set
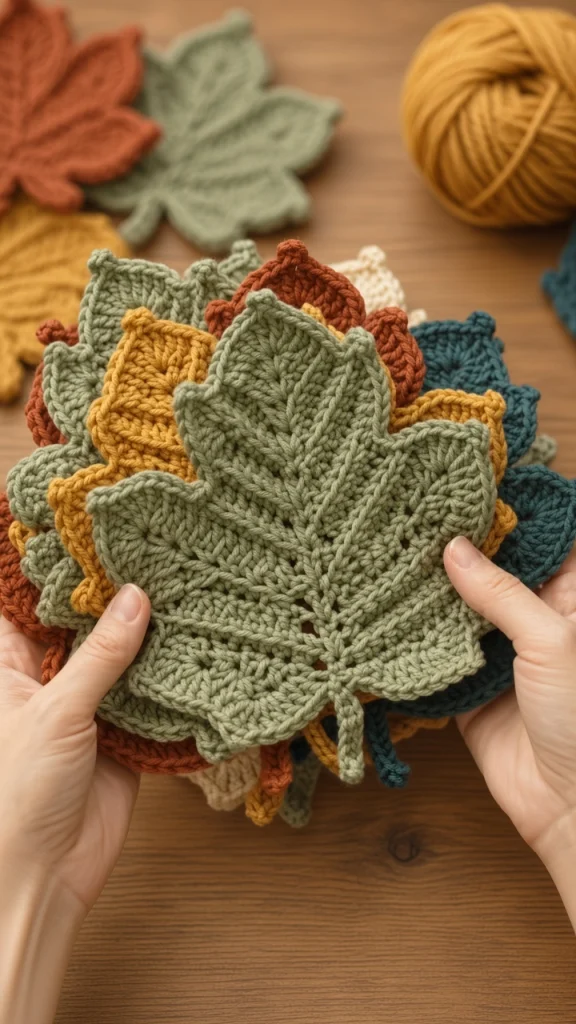
This crochet leaf coaster pattern makes a set of six textured maple leaves, each worked flat from the stem outward into five pointed lobes with raised veins running up the middle of every one. They are dense enough to actually work as coasters — a mug of tea will not push through them — and the sawtooth edging gives each leaf the serrated maple silhouette rather than the soft rounded shape that most leaf patterns settle for.
The veins are what take these past ordinary. Each lobe gets a center spine worked as a raised ridge during the shaping rows, then a set of angled side veins added afterward in surface slip stitch. That second step adds about eight minutes per leaf and it is the difference between a five-pointed star and something that reads as a leaf from across the room. The colors in the set run sage, mustard, rust, teal and cream, deliberately mixing warm autumn shades with a cool teal so the stack does not look like a single seasonal theme.
Each leaf takes about an hour including its veins, so a full set of six is a weekend project. It is an advanced pattern because the five lobes are shaped simultaneously across a single row and keeping track of which lobe you are on takes attention, not because any individual stitch is hard. They also make a good use for small amounts of leftover cotton, since each leaf needs only about 30 metres.
Materials
- Worsted weight cotton in sage green approx. 60 m — 2 leaves
- Worsted weight cotton in mustard gold approx. 30 m — 1 leaf
- Worsted weight cotton in rust approx. 30 m — 1 leaf
- Worsted weight cotton in deep teal approx. 30 m — 1 leaf
- Worsted weight cotton in cream approx. 30 m — 1 leaf
- 4 mm crochet hook US G-6
- Tapestry needle blunt tip, large enough for worsted cotton
- Stitch markers 5 minimum, one per lobe — these are not optional
- Rustproof pins about 12 per leaf
- Blocking mat or towel-covered board
- Spray starch optional, for a firmer coaster
- Measuring tape and small sharp scissors
Abbreviations
begbeginningBLOback loop onlychchaindcdouble crochethdchalf double crochetreprepeatrnd(s)round(s)RSright sidescsingle crochetskskipsl stslip stitchsp(s)space(s)st(s)stitch(es)Gauge and sizing
- Gauge: 15 sc and 17 rows = 10 cm x 10 cm, blocked.
- One finished leaf measures approximately 14 cm across at its widest and 15 cm from stem tip to top lobe tip.
- Each leaf uses approximately 30 m of cotton.
- All instructions use US crochet terminology.
- For a smaller coaster set, use DK cotton with a 3 mm hook — the leaf comes out around 11 cm with no change to the stitch counts.
- Work all six leaves to the same gauge. A set with one visibly larger leaf looks like a mistake rather than a variation.
Leaf base
- Row 1 (RS): Ch 7. Sc in 2nd ch from hook and in each ch across. Turn. (6 sc)
- Row 2: Ch 1, sc in first sc, 2 sc in next sc, sc in next 2 sc, 2 sc in next sc, sc in last sc. Turn. (8 sc)
- Row 3 (lobe division): Ch 1, sc in first sc, *ch 2, sk next sc, sc in next sc; rep from * 3 more times, sc in last sc. Turn. (5 sc positions, 4 ch-2 sps) The 5 sc are the base of the 5 lobes. Place a stitch marker in each one now.
- Row 4: Ch 1, working across: 2 sc in the first marked sc, *2 sc in next ch-2 sp, 3 sc in next marked sc; rep from * to the last ch-2 sp, 2 sc in that sp, 2 sc in the last marked sc. Turn. (23 sc) Move each marker into the center sc of its increase group.
- Row 5: Ch 1, *sc in each sc up to the marked st, 3 sc in the marked st, sc in each remaining sc of the lobe, ch 2, sk next sc; rep from * for each of the 5 lobes, omitting the final ch 2. Turn. (33 sc, 4 ch-2 sps) Move all 5 markers up into the new center stitches.
- Rows 6-10: Rep Row 5, working ch 2 and skipping 1 sc between lobes each time. Each row adds 10 sc. (Row 6: 43 sc. Row 7: 53 sc. Row 8: 63 sc. Row 9: 73 sc. Row 10: 83 sc)
- Row 11 (begin the points): Ch 1, *sc in each sc of the lobe to 2 sts before the marker, sk 1 sc, 3 sc in the marked st, sk 1 sc, sc in each remaining sc of the lobe, ch 2, sk next sc; rep from * for each lobe, omitting the final ch 2. Turn. (83 sc)
- Row 12: Rep Row 11. (83 sc) The lobes now hold their width while the tips begin to taper.
- Row 13: Ch 1, *sc in each sc of the lobe to 3 sts before the marker, sk 2 sc, 3 sc in the marked st, sk 2 sc, sc in each remaining sc of the lobe, ch 2, sk next sc; rep from * for each lobe, omitting the final ch 2. Turn. (63 sc)
- Do not fasten off. The leaf body should measure about 13 cm across. Continue directly into the edging.
Edging
- Rnd 1: Ch 1, work sc evenly around the entire leaf: sc in each sc along the top edge of each lobe, 3 sc in each lobe point, 2 sc into each ch-2 sp between lobes, 2 sc into the end of each row down both side edges, and 3 sc at each bottom corner. Sl st to first sc. (approximately 152 sc; row-end tension varies slightly and small differences will not show)
- Rnd 2 (sawtooth): Ch 1, sc in first sc, *sc in next sc, (sl st, ch 2, sc) in next sc; rep from * around, working 3 sc into the center st of each lobe point so the point stays sharp, sl st to first sc. The repeating spikes give the serrated maple edge.
- Fasten off and weave in the tail.
Veins
- Center veins: with the same color as the leaf, work a line of surface slip stitch up the middle of each lobe, starting at the leaf base and running to the lobe point. Insert the hook from the front through the fabric, pull a loop through, move to the next stitch position and pull a new loop through both fabric and loop. Five center veins per leaf, one per lobe.
- Side veins: work 2 short surface slip stitch lines on each side of the center vein of the three largest lobes only, angling outward and upward toward the lobe edge and stopping 2 stitches short of it. That is 12 side veins per leaf.
- Keep every surface slip stitch loose. Tight veins gather the lobe into a ridge and the coaster will rock rather than sit flat under a mug.
- Fasten off each vein on the wrong side and weave the tail into the back of the leaf.
- For extra definition, work the veins one shade darker than the leaf. On the sage and cream leaves this reads clearly; on the teal and rust it is subtle, so matching yarn works better there.
Stem
- Join the leaf color at the center bottom of the leaf base.
- Ch 9, sl st in the 2nd ch from hook and in each ch across, sl st into the leaf base. (8 sl st)
- Fasten off and weave the tail into the back of the leaf base.
- The stem should measure about 2 cm. Keep it short — a long stem catches under a mug base and makes the coaster tip.
Finishing and blocking
Block each leaf individually. Wet the leaf thoroughly, squeeze out the water in a towel without wringing, then lay it on the blocking mat right side up. Pin the five lobe points first, pulling each one gently outward so the tip stays sharp, then pin the two inner notches between lobes so the valleys stay deep. About twelve pins per leaf.
Press the veins flat with your fingertips while the leaf is damp. They should sit level with the fabric rather than standing proud, because a coaster with a raised ridge across it will not hold a mug steady.
Let each leaf dry completely, at least six hours, before unpinning. If you want a firmer coaster that holds its points through regular use, mist with spray starch while still pinned and let it dry a second time. Cotton at this gauge softens at the tips over a season of handling otherwise.
Wash by hand in cool water with a mild detergent, squeeze out in a towel, and re-block flat while damp. These will go through the washing machine without falling apart, but the points come out limp and you will be re-blocking anyway, so hand washing saves no effort either way.
Tips for Success
- Use all five stitch markers from Row 3 and move every one of them on every single row. Five simultaneous increase points is more than anyone tracks reliably by eye, and there is no way to find a lost lobe center after the fact.
- Count 83 sc at the end of Row 10 on every leaf. That is the widest point, and if one leaf lands at 81 or 85 it will be visibly a different size from the other five in the stack.
- Work the ch-2 spaces between lobes directly above the previous row’s ch-2. If they drift sideways the lobes merge and the leaf becomes a fan.
- Make all six leaves before blocking any of them. Blocking them together on one mat is the only way to guarantee they come out the same size.
- Work the veins before blocking, not after. Surface slip stitch on a blocked, starched leaf is much harder to get the hook through cleanly.
Common Mistakes to Avoid
- Skipping the decreases in Rows 11 to 13. Without them the lobes keep widening and end up blunt and rounded. The taper in those three rows is what creates the maple point.
- Pulling the surface slip stitch veins tight. Tight veins curl the lobe lengthwise and the coaster will not sit flat. The vein should have visible slack where it sits on the surface.
- Working the edging too tightly. A tight sawtooth round cups the whole leaf upward at the rim, which is exactly what you do not want under a glass. Keep the edging at the same tension as the body.
- Making the stem too long. Anything over about 3 cm sticks out past the mug base, catches on the table, and tips the coaster. Nine chains is deliberate.
- Blocking the leaves one at a time over several days. Small tension differences between sessions compound, and you end up with six leaves that are each fine on their own but obviously mismatched as a set.
Ways to Customize This Pattern
- Make a matching trivet by working the same leaf in two strands of cotton held together with a 6 mm hook. It comes out around 22 cm and is thick enough for a hot dish.
- Work the whole set in a single color with the veins in a contrasting shade. The set reads as a designed collection rather than a scrap-yarn project, and the veins become the focus.
- Add a felt backing circle sewn to the underside of each coaster for extra absorbency and to stop them sliding on a polished table.
- Join six leaves at their lobe edges into a ring for a 40 cm table centerpiece, overlapping each leaf onto the next by about 3 cm.
- Add a ch-30 hanging loop at the stem end to turn them into autumn garland pieces or gift tags rather than coasters.
Frequently asked questions
The ch-2 spaces between lobes are not stacking directly above one another. Each row’s ch-2 must sit in the valley created by the previous row’s ch-2, and if you work it one or two stitches off, the gap closes. Count the stitches on both sides of every ch-2 before working it — the counts should match.
Yes. Worked in single crochet at this gauge the fabric has almost no holes, so a mug will not push through and condensation is absorbed rather than passing straight to the table. The exception is the ch-2 spaces between lobes, which sit at the outer edge where nothing rests, so they cause no problem in use.
You can, and the coaster still works, but the leaves lose most of their character — without veins they read as five-pointed stars. If the surface slip stitch technique feels awkward, embroider straight stitches with a tapestry needle instead. The effect is slightly flatter but far easier to control, and on a small piece like this the difference is minimal.
A set of six in nothing but rust, mustard and sage reads as a single seasonal theme and looks out of place outside October. The teal breaks that, and because it sits opposite the warm shades it makes them look warmer rather than clashing. Swap it for deep plum or charcoal if teal does not suit your table.
Cotton points relax with handling. Spray starch applied during blocking holds them for a couple of months and can be reapplied after each wash. For a more permanent fix, work the edging round with a hook a half size smaller than the body — the denser outer edge resists relaxing and barely changes the finished size.
The finished Autumn Leaf Coaster Set

