Autumn Leaf Crochet Table Runner
Beginner Friendly
Perfect for those just starting their crochet journey, with clear instructions and simple techniques
Single-Day Project
A satisfying project you can complete in a single afternoon or evening.
Handmade Gift
A beautiful keepsake — free forever. Read online or print at home.
About This Autumn Leaf Crochet Table Runner
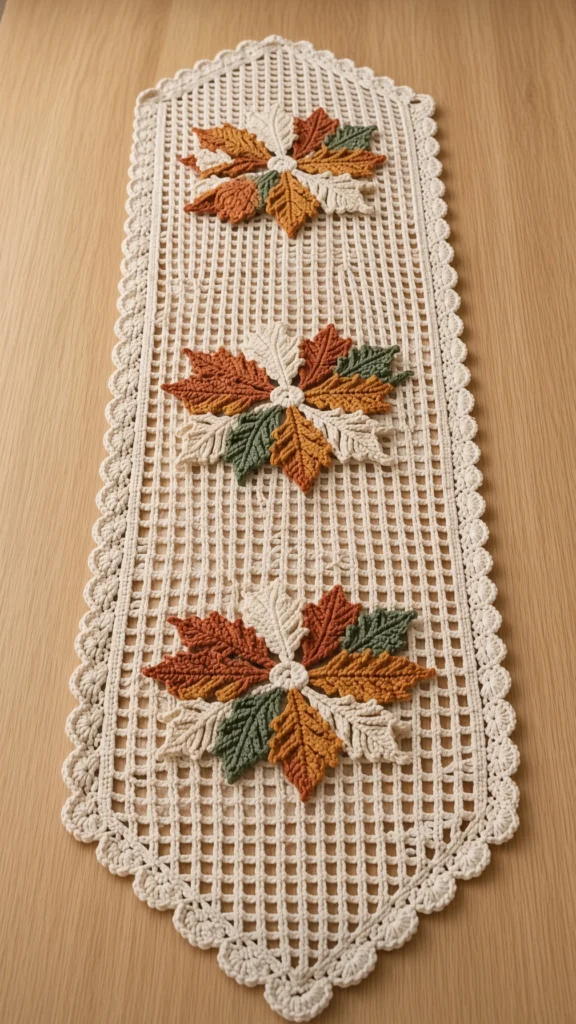
This autumn leaf crochet table runner pattern is built in two completely different techniques, and that contrast is the whole point of the design. The base is plain cream filet mesh, worked as an open grid with pointed ends and framed by a deep scalloped shell border. On top of it sit three maple leaf rosettes, each one eight separate leaves arranged like a pinwheel around a small stuffed cream button, in rust, mustard gold, forest green and cream.
The mesh goes fast once you find the rhythm. It is one row repeated, a double crochet and two chains over and over, and you can work it while half watching something. The pointed ends are made by decreasing one mesh square at each end of the row until you are down to a single square, and the second point is worked back into the free loops of the foundation chain so both ends match exactly. The leaves are the slow part. Each one is five chained points radiating from a single base, with surface slip stitch veins worked up the three main lobes afterward, and there are twenty-four of them.
Expect 14 to 18 hours in total, most of it in the leaves and the sewing. This suits someone who has done filet crochet before, or at least understands how mesh squares are counted, and who is patient enough to block a large piece properly. If you have never decreased in filet, work the first point slowly and count your squares at the end of every row. Once you have done one point the second is the same thing again.
Materials
- Worsted weight cotton, cream 350 g — mesh base, border, 6 leaves and 3 buttons
- Worsted weight cotton, rust / burnt orange 50 g — 6 leaves
- Worsted weight cotton, mustard gold 50 g — 6 leaves
- Worsted weight cotton, forest green 30 g — 3 leaves
- Worsted weight cotton, sage green 30 g — 3 leaves
- 3.5 mm crochet hook
- Tapestry needle blunt tip
- Stitch markers at least 4, for counting mesh squares
- Blocking mat and rustproof pins you need space for the full 100 cm length
- Small amount of yarn scraps or fiberfill for the 3 center buttons only
- Spray starch optional, keeps the mesh crisp
Abbreviations
MRmagic ringchchainsl stslip stitchscsingle crochethdchalf double crochetdcdouble crochetsc2togsingle crochet 2 stitches togetherspspaceskskipst(s)stitch(es)rndroundRSright sidereprepeatFOfasten offmeshone filet square: a ch-2 sp between two dcGauge and Sizing
- Gauge: 7 mesh squares and 7 rows measure 10 x 10 cm. One mesh is roughly 1.4 cm square.
- The runner is 21 meshes wide, which gives a mesh panel about 30 cm across; the border adds roughly 4 cm on each side for a total width of about 38 cm.
- The body is 40 rows, each point adds 10 rows, and the border adds a little at each end, for a finished length of about 100 cm.
- To change the width, add or remove meshes in pairs so the points still decrease down to a single square. The foundation chain is always (3 x number of meshes) + 5.
- To change the length, add or remove body rows only. Do not alter the point rows.
Mesh Body
- With cream, ch 68.
- Row 1: dc in the 8th ch from hook (the skipped chains count as a dc and a ch-2 sp, making the first mesh), *ch 2, sk 2 ch, dc in next ch; rep from * across to the end. (21 meshes, 22 dc) Turn.
- Row 2: ch 5 (counts as dc and ch 2), sk the first ch-2 sp, dc in next dc, *ch 2, dc in next dc; rep from * across, working the last dc into the 3rd ch of the turning chain. (21 meshes) Turn.
- Rows 3 to 40: rep Row 2. (21 meshes at the end of every row)
- Do not fasten off at the end of Row 40. Continue straight into the first point.
- Count your meshes at the end of every fifth row. Filet is very easy to lose a square in, and a body that narrows by one mesh partway up cannot be fixed later without unravelling back to the error.
First Point
- Row 1: sl st in each of the next 2 ch of the first ch-2 sp, sl st in the next dc, ch 5 (counts as dc and ch 2), sk the next ch-2 sp, dc in next dc, *ch 2, dc in next dc; rep from * across, stopping after the dc that sits at the start of the final mesh and leaving that last mesh and the turning chain unworked. (19 meshes) Turn.
- Row 2: rep Row 1. (17 meshes) Turn.
- Row 3: rep Row 1. (15 meshes) Turn.
- Row 4: rep Row 1. (13 meshes) Turn.
- Row 5: rep Row 1. (11 meshes) Turn.
- Row 6: rep Row 1. (9 meshes) Turn.
- Row 7: rep Row 1. (7 meshes) Turn.
- Row 8: rep Row 1. (5 meshes) Turn.
- Row 9: rep Row 1. (3 meshes) Turn.
- Row 10: rep Row 1. (1 mesh, 2 dc) FO and weave in the end.
- Each row loses exactly 2 meshes, one at each end. If a row comes out with an odd number when it should be even, or the point starts leaning to one side, you have decreased twice at the same end.
Second Point
- Turn the runner so the foundation chain edge is at the top and the RS is facing you. You will now work into the free bottom loops of the foundation chain.
- Row 1: join cream with a sl st in the free loop directly beneath the 2nd dc of Row 1, ch 5 (counts as dc and ch 2), sk 2 foundation ch, dc in the free loop beneath the next dc of Row 1; *ch 2, sk 2 ch, dc in the free loop beneath the next dc; rep from * across, ending with a dc beneath the 21st dc of Row 1 and leaving the last dc unworked. (19 meshes) Turn.
- Row 2: sl st in each of the next 2 ch, sl st in the next dc, ch 5, sk the next ch-2 sp, dc in next dc, *ch 2, dc in next dc; rep from * across, leaving the final mesh and turning chain unworked. (17 meshes) Turn.
- Rows 3 to 9: rep Row 2. (15, 13, 11, 9, 7, 5, 3 meshes)
- Row 10: rep Row 2. (1 mesh, 2 dc) FO and weave in the end.
- Lay the runner flat and compare the two points. They should be the same length and the same angle. If one is shorter, you started the second point one mesh in from the wrong position.
Border
- Rnd 1 (foundation for the border): with RS facing, join cream in any ch-2 sp along one long edge. Ch 1, then work sc evenly all the way around the runner: 2 sc in each ch-2 sp, 1 sc in each dc, and 2 sc around the post of each row-end dc along the diagonal edges of the points. Work 3 sc in the single mesh at each tip. Sl st to the first sc.
- Before moving on, count your sc. The total must be a multiple of 6. Add or skip up to 5 sc, spread out along the two long edges where it will not show, to reach the nearest multiple.
- Rnd 2 (open frame): ch 5 (counts as dc and ch 2), sk 2 sc, dc in next sc, *ch 2, sk 2 sc, dc in next sc; rep from * around, sl st to the 3rd ch of the beginning ch-5. (one ch-2 sp for every 3 sc of Rnd 1)
- Rnd 3 (shells): ch 1, sc in the same st, *sk the next ch-2 sp, 7 dc in the next dc, sk the next ch-2 sp, sc in the next dc; rep from * around, sl st to the first sc. FO and weave in the end.
- At the two tips, work an extra shell into the corner dc so the point stays sharp rather than pulling in. At the four widest corners where the body meets the points, ease in one additional shell if the border starts to cup.
Maple Leaf (make 24)
- Make 6 in rust, 6 in mustard gold, 3 in forest green, 3 in sage green and 6 in cream. Each leaf is worked as five chained points radiating from a single base stitch.
- Point 1 (short, left): ch 7. Sl st in 2nd ch from hook, sc in next ch, hdc in next 2 ch, dc in next ch, sc in last ch. (6 sts) You are now back at the base; this last chain is the base stitch and every other point will be joined into it.
- Point 2 (medium, left): ch 9. Sl st in 2nd ch from hook, sc in next ch, hdc in next 2 ch, dc in next 2 ch, hdc in next ch, sc in last ch. (8 sts) Sl st into the base st.
- Point 3 (long, center): ch 11. Sl st in 2nd ch from hook, sc in next ch, hdc in next 2 ch, dc in next 4 ch, hdc in next ch, sc in last ch. (10 sts) Sl st into the base st.
- Point 4 (medium, right): ch 9. Sl st in 2nd ch from hook, sc in next ch, hdc in next 2 ch, dc in next 2 ch, hdc in next ch, sc in last ch. (8 sts) Sl st into the base st.
- Point 5 (short, right): ch 7. Sl st in 2nd ch from hook, sc in next ch, hdc in next 2 ch, dc in next ch, sc in last ch. (6 sts) Sl st into the base st. (38 sts across all five points)
- Stem: ch 6, sl st in 2nd ch from hook and in each ch back to the leaf, sl st into the base st. FO, leaving a 25 cm tail.
- Veins: cut a 40 cm length of the same color. With the leaf RS up, work a line of surface slip stitches from the base up the center of the long point, then repeat up the center of each medium point. Three veins per leaf. Fasten the ends on the back and trim. This is what gives the leaves their raised, ribbed look rather than a flat outline.
- Block each finished leaf with the five points pulled fully open and pinned, or they will curl inward and read as a blob once sewn down.
Center Button (make 3)
- Rnd 1: with cream, 6 sc in MR. (6 sts)
- Rnd 2: 2 sc in each st around. (12 sts)
- Rnd 3: sc in each st around. (12 sts)
- Rnd 4: (sc in next st, sc2tog) x4. (8 sts)
- Stuff very lightly with a few yarn scraps, just enough to make a low dome. Do not overstuff or the button will stand up like a ball instead of sitting flat against the leaves.
- FO leaving a 30 cm tail. Thread the tail through the front loops of the remaining 8 sts and pull closed. Do not cut the tail; you will sew with it.
Finishing
Block the mesh base first and block it hard. Wet the whole runner, squeeze out the water without wringing, then pin it out on a mat with the two long edges perfectly straight, the points pulled to a sharp tip, and every shell of the border stretched into a fan. Filet mesh comes off the hook looking uneven and only settles into a proper grid once it has been pinned and dried. Leave it overnight. Spray starch at this stage if you want the runner to stay crisp on the table.
Lay out one rosette on the dry runner before sewing anything. Place the eight leaves in a pinwheel around an empty center, all pointing outward with their stems meeting in the middle, and space the colors so no two of the same shade sit next to each other. The photo layout alternates rust, cream, mustard and green around the circle, with the two greens opposite each other. Once you like it, mark the position of each leaf base with a pin.
Sew each leaf down through its stem and the base of the three main points only, using its own long tail and small whip stitches into the mesh dc rather than through the open squares. Leave the tips of all five points completely free so they lift off the surface. Work around the circle, then sew the center button over the meeting point of the eight stems, anchoring it with six or eight stitches around its edge so it cannot rock. Repeat for the other two rosettes.
Space the three rosettes evenly along the length: center the middle one on the body, and place the other two about 28 cm above and below it, which puts each one just inside where the points begin. Weave in all remaining ends on the back, then give the finished runner one more light steam under a cloth and a night flat under a weight so the appliqué areas lie level with the mesh.
Tips for Success
- Make all 24 leaves before you touch the mesh. They are the tedious part, and doing them first means the second half of the project is fast, repetitive work you can enjoy. If you leave them until last you will lose momentum with a finished runner sitting bare on the table.
- Mark every tenth row of the mesh body with a removable marker on the edge. Counting 40 rows of identical filet at the end is far harder than tracking them as you go, and the two points must start from a body of the right length or the runner will be off center.
- Keep your chain-2 spaces at a consistent tension. Loose ch-2 spaces make wobbly squares, and because the mesh is the visible background for the whole design, any unevenness shows immediately once the runner is on a wooden table.
- Do the surface slip stitch veins with a slightly smaller hook than the leaf itself, around 3.0 mm. It slides through the fabric more easily and gives a finer, more leaf-like line.
- Sew the leaves down with the runner lying flat on the table, not held in your lap. Appliqué that is stitched while the base is bunched up will pull the mesh out of square, and you will only notice once you lay it flat again.
Common Mistakes to Avoid
- Miscounting the foundation chain. It must be 68 chains for 21 meshes, following the formula of three times the mesh count plus five. One chain too few and Row 1 ends with a partial square that throws off both points later.
- Decreasing at only one end of the point rows. Each row must lose one mesh at the start, by slip stitching across the first square, and one at the end, by leaving the last square unworked. Losing only one gives you a lopsided flag shape instead of a symmetrical point.
- Starting the second point in the wrong foundation loop. It has to begin under the second dc of Row 1, not the first, so that it mirrors the first point exactly. Count from the correct end before you join your yarn.
- Sewing the leaves through the ch-2 spaces. The stitches slip and the leaves rotate over time. Always catch a dc post or the top of a dc, which gives the thread something solid to sit against.
- Skipping the block on the individual leaves. Unblocked maple points curl toward the back, and once a leaf is sewn down you cannot pin it open on its own without pinning the whole runner around it.
Ways to Customize This Pattern
- Make it a square centerpiece. Work 21 meshes wide by 21 rows, skip both points, and sew a single rosette in the middle. The border works around a rectangle without any changes.
- Change the season with the leaf colors. Six shades of fresh green with cream centers gives a spring runner, and deep burgundy with plum and gold turns it into a Christmas piece. The mesh and border stay cream either way.
- Work the mesh in a color and the leaves in cream for a reversed look. A dark walnut or charcoal mesh with cream, oatmeal and pale gold leaves is striking on a light table.
- Add a fourth and fifth rosette and lengthen the body to 70 rows for a runner that fits a long dining table. Space the rosettes 28 cm apart as before.
- Turn a single rosette into a coaster or trivet. Work a small filet square 9 meshes by 9 rows, add the border, and sew on four leaves and one button. A set of six makes a good gift.
Frequently asked questions
No, and this is the one order in the pattern that really matters. Filet mesh grows noticeably when it is wet blocked, sometimes by several centimetres in both directions. If the leaves are already attached, the mesh stretches around them and the appliqué areas end up puckered while the rest of the runner lies flat. Block the base completely, let it dry, then measure and place the rosettes on the finished dimensions.
Almost always the final dc. The last dc of every row has to go into the 3rd chain of the previous row’s turning chain-5, not into the last real dc. If you work it into the last dc instead, you drop one mesh per row and the runner tapers without you noticing until it is several rows too narrow. Put a marker in that turning chain for the first few rows until the placement becomes automatic.
Not necessarily. Cotton blocked properly holds a good shape on its own and stays soft, which most people prefer for something that sits on a dining table. Starch is worth it if you want the shell border to keep a crisp fan shape permanently, or if you plan to hang the runner rather than lay it flat. Bear in mind that starched cotton attracts dust more and has to be re-starched after every wash.
Yes, and it suits this design well. Number 3 light weight cotton with a 2.75 mm hook gives a finer mesh and daintier leaves. Keep the same 21 mesh width and the same 40 body rows and the runner will simply come out smaller, around 75 by 28 cm. If you want to keep the original dimensions in thinner yarn, go up to 27 meshes wide, which means a foundation chain of 86, and work 54 body rows.
Because there are three rosettes and each one uses eight leaves, arranged as two rust, two mustard gold, two cream and two green. The two greens in each rosette are different shades, forest and sage, which is why the color list splits them three and three rather than six of one green.
The finished Autumn Leaf Crochet Table Runner

