Autumn Leaf Vine Table Runner
Beginner Friendly
Perfect for those just starting their crochet journey, with clear instructions and simple techniques
Single-Day Project
A satisfying project you can complete in a single afternoon or evening.
Handmade Gift
A beautiful keepsake — free forever. Read online or print at home.
About This Autumn Leaf Vine Table Runner
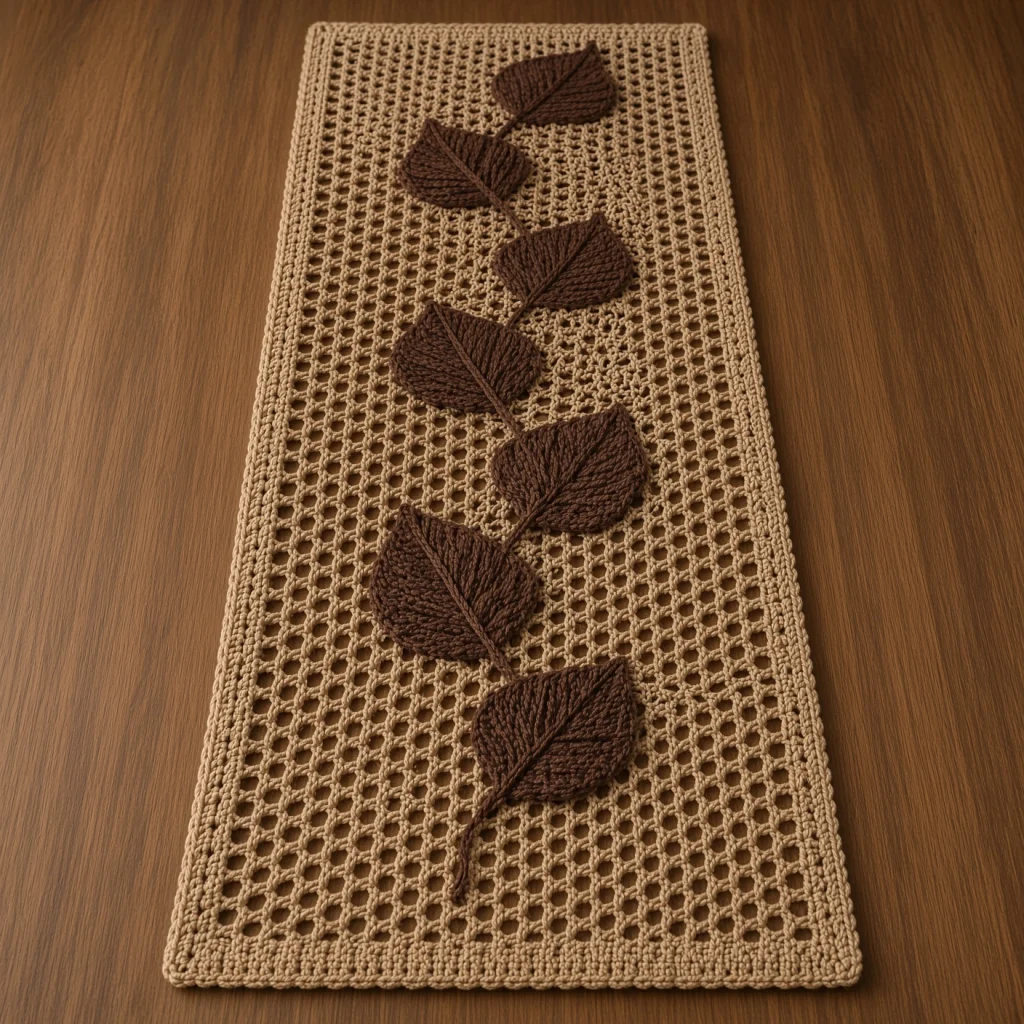
This crochet leaf table runner pattern pairs a plain tan filet mesh panel with seven dark chocolate leaves that climb a curving stem up the middle. The mesh is deliberately quiet — 76 identical rows of dc and ch-1 — because everything interesting happens on top of it. The leaves are worked separately in the round, three rounds deep for the large ones, so they sit proud of the fabric with real thickness rather than lying flat like a patch.
What makes it work is the vein detail. Each leaf keeps its foundation chain visible down the center as a natural spine, and the side veins are added afterward in surface slip stitch, angled out toward the edge the way real veins run. That takes about ten minutes per leaf and it is the difference between a leaf shape and a leaf. The stem is a slip-stitched chain cord sewn on in a gentle S-curve, with the leaves alternating left and right along it.
Plan on four to five hours for the mesh panel and border, another five or six for the seven leaves and their veins, and two or three for the stem and assembly — roughly 12 to 16 hours total. The stitches themselves are ordinary, but the project is advanced because of the shaping in the leaves and because the assembly has to be placed by eye rather than counted. If you have never appliquéd onto mesh before, read the assembly section fully before you thread a needle.
Materials
- Worsted weight cotton in camel or tan approx. 640 m (about 350 g) — main color
- Worsted weight cotton in dark chocolate brown approx. 180 m (about 100 g) — leaves and stem
- 4 mm crochet hook US G-6
- Tapestry needle blunt tip, large enough for worsted cotton
- Stitch markers 8-10; you will use them for leaf placement
- Rustproof pins 20+, for pinning the leaves before sewing
- Blocking mats or a towel-covered board at least 95 x 40 cm
- Measuring tape
- Small sharp scissors
Abbreviations
begbeginningchchaindcdouble crochethdchalf double crochetreprepeatrnd(s)round(s)RSright sidescsingle crochetskskipsl stslip stitchsp(s)space(s)st(s)stitch(es)WSwrong sideGauge and sizing
- Gauge in mesh: 9 mesh units (9 dc and 9 ch-1 sps) and 9 rows = 10 cm x 10 cm, blocked.
- Mesh panel before border: approximately 30.5 cm wide x 84 cm long.
- Finished runner with border: approximately 89 cm long x 35 cm wide.
- Large leaf: approximately 9 cm long x 5 cm wide. Small leaf: approximately 7 cm long x 4 cm wide.
- All instructions use US crochet terminology.
- To lengthen the runner, add rows in any number — every 9 rows adds about 10 cm. Add one leaf for every 11 cm of extra length and lengthen the stem by the same amount.
Mesh panel
- With tan, ch 62 loosely.
- Row 1 (RS): Dc in 4th ch from hook (the skipped ch-3 counts as the first dc), *ch 1, sk next ch, dc in next ch; rep from * across. (31 dc, 30 ch-1 sps)
- Row 2: Ch 4 (counts as dc + ch 1), turn, sk first dc and next ch-1 sp, dc in next dc, *ch 1, sk next ch-1 sp, dc in next dc; rep from * across, working the final dc in the 3rd ch of the turning ch. (31 dc, 30 ch-1 sps)
- Rows 3-76: Rep Row 2. (31 dc, 30 ch-1 sps in each row)
- At the end of Row 76, do not fasten off. The panel should measure about 30.5 cm x 84 cm. Continue directly into the border.
Border
- Rnd 1 (RS): Ch 1, 3 sc in the corner you are standing in. Work 61 sc across the top short edge (1 sc in each dc and 1 sc in each ch-1 sp); 3 sc in corner; work 152 sc down the long edge (2 sc into the end of each row); 3 sc in corner; 61 sc across the bottom short edge (1 sc in each foundation ch and ch-sp); 3 sc in corner; 152 sc up the second long edge; sl st to first sc. (438 sc)
- Rnd 2: Ch 1, sc in each sc around, working 3 sc in the center sc of each corner, sl st to first sc. (446 sc)
- Rnd 3: Rep Rnd 2. (454 sc)
- Rnd 4: Rep Rnd 2. (462 sc)
- Rnd 5: Ch 1, working in back loops only, sc in each sc around, working 3 sc in the center sc of each corner, sl st to first sc. (470 sc)
- Fasten off and weave in ends. The back-loop round leaves a crisp ridge that defines the outer edge.
Large leaf (make 4)
- With dark brown, ch 19.
- Rnd 1: Sc in 2nd ch from hook, sc in next ch, hdc in next 2 ch, dc in next 9 ch, hdc in next 2 ch, sc in next 2 ch (17 sts made along the first side); (sc, ch 2, sc) in the last ch — this is the leaf tip. Now working along the opposite side of the foundation ch: sc in next 2 ch, hdc in next 2 ch, dc in next 9 ch, hdc in next 2 ch, sc in next 2 ch (17 sts along the second side); ch 2, sl st in the first sc — this is the leaf base. (36 sts, plus a ch-2 point at each end)
- Rnd 2: Sl st into the ch-2 base sp, ch 1, (sc, ch 2, sc) in same sp. First side: sc in next 2 sts, hdc in next 2 sts, dc in next 2 sts, 2 dc in next st, dc in next 3 sts, 2 dc in next st, dc in next 2 sts, hdc in next 2 sts, sc in next 2 sts. (19 sts) (sc, ch 2, sc) in the ch-2 tip sp. Second side: rep the same 19-st sequence. Sl st to first sc. (42 sts, plus a ch-2 point at each end)
- Rnd 3: Sl st into the ch-2 base sp, ch 1, (sc, ch 2, sc) in same sp. First side: sc in next 2 sts, hdc in next 2 sts, dc in next 3 sts, 2 dc in next st, dc in next 3 sts, 2 dc in next st, dc in next 3 sts, hdc in next 2 sts, sc in next 2 sts. (21 sts) (sc, ch 2, sc) in the ch-2 tip sp. Second side: rep the same 21-st sequence. Sl st to first sc. (46 sts, plus a ch-2 point at each end)
- Fasten off, leaving a 50 cm tail for sewing. The leaf should measure about 9 cm from base point to tip point.
Small leaf (make 3)
- With dark brown, ch 15.
- Rnd 1: Sc in 2nd ch from hook, sc in next ch, hdc in next 2 ch, dc in next 5 ch, hdc in next 2 ch, sc in next 2 ch (13 sts along the first side); (sc, ch 2, sc) in the last ch. Working along the opposite side of the foundation ch: sc in next 2 ch, hdc in next 2 ch, dc in next 5 ch, hdc in next 2 ch, sc in next 2 ch (13 sts); ch 2, sl st in the first sc. (28 sts, plus a ch-2 point at each end)
- Rnd 2: Sl st into the ch-2 base sp, ch 1, (sc, ch 2, sc) in same sp. First side: sc in next 2 sts, hdc in next 2 sts, dc in next st, 2 dc in next st, dc in next st, 2 dc in next st, dc in next st, hdc in next 2 sts, sc in next 2 sts. (15 sts) (sc, ch 2, sc) in the ch-2 tip sp. Second side: rep the same 15-st sequence. Sl st to first sc. (34 sts, plus a ch-2 point at each end)
- Fasten off, leaving a 40 cm tail for sewing. The leaf should measure about 7 cm from base point to tip point.
Leaf veins
- The foundation chain running down the middle of each leaf is already the center vein. Do not cover it — it should stay visible on the right side.
- Side veins are worked in surface slip stitch with dark brown. Hold a length of yarn behind the leaf, insert the hook from the front through a hole in the fabric, pull a loop through, then move to the next position and pull a new loop through both the fabric and the loop on your hook.
- Large leaves: work 3 side veins on each side, 6 per leaf. Start each one at the center chain and angle it outward and upward toward the tip, stopping 2 sts short of the outer edge. Space them evenly along the center vein, with the lowest one starting about 2 cm above the base point.
- Small leaves: work 2 side veins on each side, 4 per leaf, using the same method.
- Keep the surface slip stitches loose. Pulling them tight puckers the leaf and it will not lie flat against the runner afterward.
- Fasten off each vein on the wrong side and weave the tail into the back of the leaf, not into the runner.
Stem
- With dark brown, ch 156.
- Sl st in the 2nd ch from hook and in each ch across. (155 sl st)
- Fasten off, leaving a 60 cm tail for sewing. The finished cord should measure about 70 cm and will curl slightly — that curl is what gives the vine its movement, so do not block it straight.
Assembly
- Block the mesh panel first, before any appliqué goes on. Pin it square to 89 x 35 cm and let it dry completely. Sewing onto unblocked mesh is the fastest way to end up with a wavy runner.
- Lay the runner flat, right side up, portrait orientation. Find the vertical center line and mark it with pins at 10 cm intervals.
- Lay the stem cord down the center in a gentle S-curve, wandering no more than 4 cm to either side of the center line. Leave about 6 cm of the cord loose below the lowest leaf position so a bare tail of stem shows at the bottom edge. Pin every 5 cm.
- Place the leaves along the stem before sewing anything. Working from the bottom up, alternate large, small, large, small, large, small, large — 7 leaves in total. Alternate sides as you go: leaf 1 to the right of the stem, leaf 2 to the left, and so on. Space the base points about 11 cm apart along the stem.
- Angle each leaf so its base point touches the stem and its tip angles upward and outward at roughly 45 degrees. Pin each leaf at the base point, the tip, and one point midway.
- Step back and look at the whole layout before stitching. Adjust anything that crowds or leaves a gap — this is the part you cannot fix later.
- Sew the stem down first, using its own tail and a whip stitch through every 3rd sl st into the mesh below.
- Sew each leaf using its own tail: stitch through the base point and then up along the outer edge of the side nearest the stem, stopping about two-thirds of the way to the tip. Leave the tip and the outer edge unsewn so the leaf lifts slightly off the fabric.
- Weave all tails into the back of the leaves and stem, not into the mesh, where they would show through.
Finishing
Give the finished runner a light second blocking once everything is sewn on. Mist it with water rather than soaking it — a full soak will make the appliqué and the mesh relax at different rates and you will have to pin far more aggressively to bring it back. Pin the four corners square first, then the long edges, then press the leaves gently flat with your hand without pinning their tips down. You want the leaves settled but still lifting.
Let it dry fully, at least eight hours, before moving it. Check the back once it is dry and trim any tail ends that have worked loose. If a leaf tip curls upward more than you like, pin just that tip and mist it again.
Wash by hand in cool water with mild detergent. Squeeze out in a towel, never wring, and re-block flat while damp. The mesh will stretch lengthwise if you hang it to dry, so always dry it flat.
Tips for Success
- Count 31 dc every tenth row of the mesh. Filet mesh loses or gains a stitch at the turning chain more easily than almost any other stitch pattern, and the error is invisible until the panel is a parallelogram.
- Work the final dc of every row into the 3rd ch of the turning chain, not into the space beside it. This single habit is what keeps the long edges straight.
- Make all seven leaves before you sew any of them. Laying them out together lets you swap positions until the sizes look balanced, and you will almost certainly move at least two.
- Block the panel before appliqué and again after. Skipping the first blocking means the mesh shifts under the leaves and pulls them out of line.
- Keep the leaf tails long — 50 cm for large, 40 cm for small. Joining fresh yarn mid-appliqué leaves a knot that shows through the open mesh.
Common Mistakes to Avoid
- Chaining the foundation too tightly. A tight ch 62 makes Row 1 pull in and the bottom edge of the finished runner will be visibly narrower than the top. If your foundation feels stiff, redo it with a hook one size larger, then switch back for Row 1.
- Working the second side of a leaf into the wrong loop of the foundation chain. You want the remaining free loop along the bottom of the chain, worked stitch for stitch opposite the first side. If your leaf comes out lopsided, this is why — check that both sides have the same stitch count before starting Rnd 2.
- Pulling the surface slip stitch veins tight. Tight veins cup the leaf into a taco shape that no amount of blocking will flatten. The vein should sit on the surface with a little slack, not bite into the fabric.
- Sewing the whole outline of each leaf down. A fully sewn leaf reads as a flat patch. Sewing only the base and the inner edge is what gives the runner its dimension.
- Sewing through the mesh at random. Always pass the needle around a dc post or through a ch-1 space, never splitting a stitch. Split stitches distort the mesh and show as puckers on the right side.
Ways to Customize This Pattern
- Work the leaves in a graded autumn set — rust, burnt orange, gold, and deep brown — instead of one color, keeping the stem in the darkest shade so the vine still reads as a single line.
- Make a matching pair of placemats: work the mesh panel at 31 dc wide by 30 rows, add the same 5-round border, and appliqué two small leaves and a 20 cm stem to one corner.
- Swap the filet mesh for a solid hdc panel worked at 61 hdc across and 76 rows. The runner becomes heavier and more protective for a dining table, and the leaves stand out more against a solid ground.
- Add three small acorns: work a 6-round sphere in tan, a textured cap in brown, and sew them tucked between the lower leaves for a fuller autumn arrangement.
- Run the vine diagonally from corner to corner instead of up the center. Lengthen the stem cord to ch 200 and space the leaves 13 cm apart along the diagonal.
Frequently asked questions
If the difference is under 1 cm, blocking will handle it. Anything more means you are gaining a dc somewhere, almost always by working an extra stitch into the turning chain space at the start of a row. Count your dc on the current row — if you have 32, find the extra one, frog back to it, and carry on. Going forward, place a stitch marker in the 3rd ch of each turning chain so you know exactly where the last dc belongs.
No, but the alternating sizes are what stop the vine looking mechanical. If you want all seven the same, use the large leaf and space the base points 12 cm apart instead of 11 cm, since the larger leaves need slightly more room. You will need about 25 g more brown cotton.
You can, and the leaves will look fine, but the mesh panel will not hold its blocked shape the way cotton does — acrylic relaxes and the runner will gradually stretch lengthwise on the table. If you only have acrylic, work the panel one hook size down to tighten the mesh, and expect the finished length to run a few centimeters longer than stated.
Mark the center line with pins first, then place the stem so it crosses that line at each leaf position and bows out between them. Crossing at the leaves rather than between them keeps the curve symmetrical and puts each leaf base right on the center line, which makes the alternating left-right placement look deliberate.
The tips lift a few millimeters, so a glass set directly on a leaf tip can rock slightly. If the runner is going on a dining table rather than a sideboard, sew an extra 2 cm along each leaf tip to tack it down — you lose a little dimension but the surface becomes stable enough for everyday use.
The finished Autumn Leaf Vine Table Runner

