Beginner Friendly
Perfect for those just starting their crochet journey, with clear instructions and simple techniques
Single-Day Project
A satisfying project you can complete in a single afternoon or evening.
Handmade Gift
A beautiful keepsake — free forever. Read online or print at home.
About This Autumn Leaf Wall Hanging
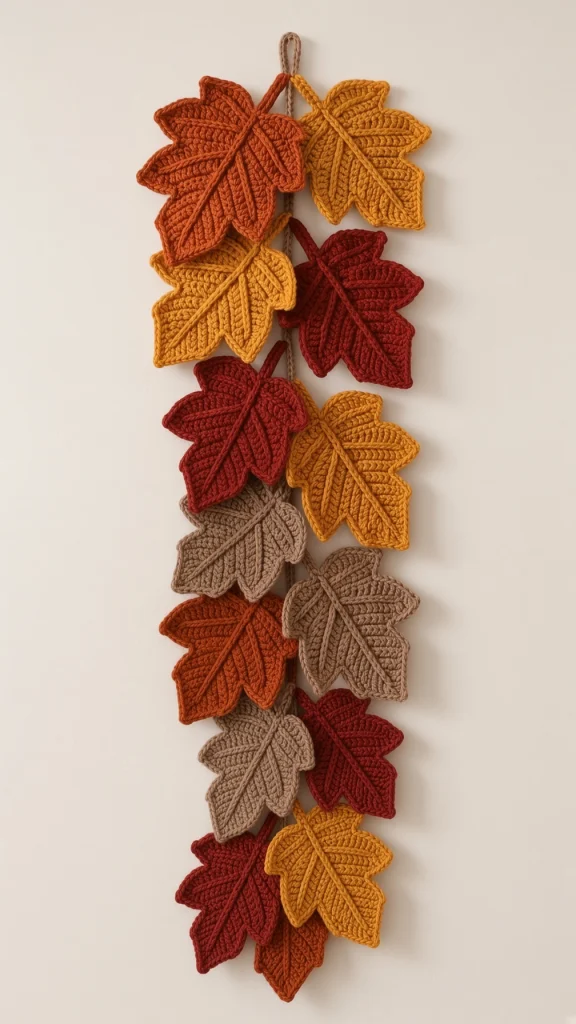
This crochet leaf garland pattern makes a vertical wall hanging from thirteen textured maple leaves in rust, burnt orange, mustard, burgundy and warm taupe, strung down a single twisted cord so they alternate left and right and overlap slightly as they fall. It hangs flat against a wall rather than swagging across a mantel, which makes it a better fit for a narrow space beside a door or in a hallway than a traditional horizontal garland.
The leaf is worked flat from the stem outward into five lobes, with a raised center rib on each one and angled side veins added afterward in surface slip stitch. Each leaf is dense enough to hold its shape unsupported, which matters on a hanging piece where nothing is holding the fabric flat. The stems are worked long and doubled back, so each leaf attaches to the cord by its own stem rather than being sewn on — the leaves can be slid up and down the cord until the spacing looks right, then locked in place.
Plan on about forty-five minutes per leaf including veins, plus an hour for the cord and hanging. That is 10 to 14 hours for the full garland. It is advanced work because five lobes are shaped simultaneously on the same row and because getting the hang to sit flat takes adjustment, not because any stitch is difficult. It also uses small amounts of leftover cotton — about 25 metres per leaf.
Materials
- Worsted weight cotton in rust approx. 75 m — 3 leaves
- Worsted weight cotton in burnt orange approx. 50 m — 2 leaves
- Worsted weight cotton in mustard gold approx. 75 m — 3 leaves
- Worsted weight cotton in deep burgundy approx. 75 m — 3 leaves
- Worsted weight cotton in warm taupe approx. 50 m — 2 leaves, plus the hanging cord
- 3.5 mm crochet hook US E-4 — a size smaller than usual, for a firm fabric that hangs well
- Tapestry needle blunt tip
- Stitch markers 5 minimum, one per lobe — these are not optional
- Rustproof pins about 12 per leaf
- Blocking mat or towel-covered board
- Spray starch recommended; hanging pieces relax faster than flat ones
- Measuring tape and small sharp scissors
Abbreviations
begbeginningchchaindcdouble crochethdchalf double crochetreprepeatrnd(s)round(s)RSright sidescsingle crochetskskipsl stslip stitchsp(s)space(s)st(s)stitch(es)Gauge and sizing
- Gauge: 17 sc and 19 rows = 10 cm x 10 cm, blocked. The smaller hook gives a firmer fabric than usual for worsted cotton, which is deliberate on a hanging piece.
- One finished leaf measures approximately 11 cm across and 12 cm from stem base to top lobe tip.
- Each leaf uses approximately 25 m of cotton.
- Finished garland: approximately 95 cm drop by 24 cm wide, with a 10 cm hanging loop above the top leaf.
- All instructions use US crochet terminology.
- To lengthen, add leaves in pairs — each pair adds about 14 cm of drop. Add 20 cm to the cord per pair.
Leaf (make 13: 3 rust, 2 burnt orange, 3 mustard, 3 burgundy, 2 taupe)
- Row 1 (RS): Ch 7. Sc in 2nd ch from hook and in each ch across. Turn. (6 sc)
- Row 2: Ch 1, sc in first sc, 2 sc in next sc, sc in next 2 sc, 2 sc in next sc, sc in last sc. Turn. (8 sc)
- Row 3 (lobe division): Ch 1, sc in first sc, *ch 2, sk next sc, sc in next sc; rep from * 3 more times, sc in last sc. Turn. (5 sc lobe bases, 4 ch-2 sps) Place a stitch marker in each of the 5 sc now.
- Row 4: Ch 1, 2 sc in the first marked sc, *2 sc in next ch-2 sp, 3 sc in next marked sc; rep from * to the last ch-2 sp, 2 sc in that sp, 2 sc in the last marked sc. Turn. (23 sc) Move each marker into the center sc of its increase group.
- Row 5: Ch 1, *sc in each sc up to the marked st, 3 sc in the marked st, sc in each remaining sc of the lobe, ch 2, sk next sc; rep from * for each of the 5 lobes, omitting the final ch 2. Turn. (33 sc, 4 ch-2 sps) Move all 5 markers up.
- Rows 6-9: Rep Row 5, working ch 2 and skipping 1 sc between lobes each time. Each row adds 10 sc. (Row 6: 43 sc. Row 7: 53 sc. Row 8: 63 sc. Row 9: 73 sc)
- Row 10 (begin the points): Ch 1, *sc in each sc of the lobe to 2 sts before the marker, sk 1 sc, 3 sc in the marked st, sk 1 sc, sc in each remaining sc of the lobe, ch 2, sk next sc; rep from * for each lobe, omitting the final ch 2. Turn. (73 sc)
- Row 11: Rep Row 10. (73 sc) The lobes hold their width while the tips begin to taper.
- Row 12: Ch 1, *sc in each sc of the lobe to 3 sts before the marker, sk 2 sc, 3 sc in the marked st, sk 2 sc, sc in each remaining sc of the lobe, ch 2, sk next sc; rep from * for each lobe, omitting the final ch 2. Turn. (53 sc)
- Do not fasten off. The leaf body should measure about 10 cm across. Continue directly into the edging.
Edging and veins
- Edging Rnd 1: Ch 1, work sc evenly around the entire leaf: sc in each sc along the top edge of each lobe, 3 sc in each lobe point, 2 sc into each ch-2 sp between lobes, 2 sc into the end of each row down both side edges, and 3 sc at each bottom corner. Sl st to first sc. (approximately 132 sc; row-end tension varies and small differences will not show)
- Edging Rnd 2 (sawtooth): Ch 1, sc in first sc, *sc in next sc, (sl st, ch 2, sc) in next sc; rep from * around, working 3 sc into the center st of each lobe point so the point stays sharp, sl st to first sc. Fasten off and weave in.
- Center veins: with the same color, work a line of surface slip stitch up the middle of each lobe, from the leaf base to the lobe point. Insert the hook from the front, pull a loop through, move to the next position and pull a new loop through both fabric and loop. Five center veins per leaf.
- Side veins: work 2 short surface slip stitch lines on each side of the center vein of the three largest lobes only, angling outward and upward and stopping 2 sts short of the edge. That is 12 side veins per leaf.
- Keep every surface slip stitch loose. Tight veins gather the lobe into a ridge, and on a hanging piece that ridge makes the leaf curl forward off the wall.
- Fasten off each vein on the wrong side and weave the tail into the back of the leaf.
Hanging stems
- Each leaf gets a long stem that doubles back on itself to form a loop, so the leaf can be threaded onto the cord and slid into position rather than sewn in place.
- Join the leaf color at the center bottom of the leaf base.
- Ch 16, then sl st back along the chain into the 2nd ch from hook and in each ch across to the leaf base, sl st into the leaf. (15 sl st)
- Fold the stem in half to form a loop about 3 cm long and secure the fold with 3 or 4 small stitches at the leaf base using the tail. The loop must be large enough to slide freely along the cord.
- Weave the tail into the back of the leaf base and trim.
- Make a stem for all 13 leaves. Keep them all the same length — stems that vary make the leaves hang at inconsistent distances from the cord and the garland looks unplanned rather than natural.
Hanging cord
- Cut two lengths of taupe cotton, each 260 cm. Hold them together and knot both ends.
- Secure one knotted end to a door handle or have someone hold it. Twist the free end in one direction until the whole length is tightly twisted and begins to kink when you relax the tension slightly.
- Keeping the tension, fold the twisted length in half and let the two halves wind around each other. Smooth the twist from the folded end down to the knot so it distributes evenly.
- Knot the loose ends together to lock the twist. The finished cord should measure about 120 cm.
- Top loop: fold the top 12 cm of the cord back on itself and bind the fold with a 40 cm length of taupe, wrapping tightly 15 times and threading the end up through the wrap to hide it. This gives a 10 cm hanging loop.
- Tail: leave about 8 cm of cord below the lowest leaf and finish with a small overhand knot, trimming the ends level.
Assembly
- Block all 13 leaves before assembling. Pin each one with the five lobe points pulled gently outward and the two inner notches pinned deep, about twelve pins per leaf. Let them dry completely.
- Lay the cord out straight on a table, top loop at one end. Thread all 13 leaves onto it through their stem loops, in the order you plan to hang them, before adjusting any spacing.
- Order the colors so no two of the same shade sit adjacent or directly opposite each other. With 3 rust, 3 mustard, 3 burgundy, 2 orange and 2 taupe, this takes a few swaps to get right — do it now, on the table.
- Alternate the leaves left and right along the cord, so leaf 1 sits to the left, leaf 2 to the right, and so on. Slide them so that each leaf overlaps the one above it by about 2 cm.
- Space the pairs about 14 cm apart along the cord, starting 10 cm below the top loop and ending 8 cm above the bottom knot.
- Hang the garland on a wall and look at it before fixing anything. Gaps and clumps are obvious vertically and invisible on a table.
- Once the spacing is right, lock each leaf in place with a single stitch through the stem loop and the cord, using a tail of the leaf’s own color so the stitch disappears.
- Weave in every remaining tail into the back of a leaf, never into the cord, where a loose end will slide and show.
Finishing
Hang the finished garland and leave it for a day before deciding it is done. Cotton relaxes under its own weight, and leaves that sat perfectly on the blocking mat will settle slightly once gravity has had a night to work on them. Adjust any leaf that has twisted or drooped before locking it permanently.
The leaves should sit flat against the wall, not curl forward at the tips. If one curls, the veins on that leaf are too tight — undo the worst one and rework it looser. Starch will hold a mild curl flat but will not fix a structural one.
Mist the hung garland with spray starch and let it dry in place for a crisper finish that holds the lobe points. Hanging pieces relax faster than flat ones because they are under constant tension, so expect to re-starch once a season if you leave it up year round.
To store, lay the garland flat in a long box rather than coiling it — a coiled cord holds its curve and the leaves crease where they fold. Hand wash only, in cool water, and dry flat with the leaves pinned out.
Tips for Success
- Use all five stitch markers and move every one on every row. Five simultaneous increase points is more than anyone tracks by eye, and the error only becomes visible several rows later.
- Count 73 sc at the end of Row 9 on every leaf. That is the widest point, and a leaf that lands at 71 or 75 will hang visibly larger or smaller than its neighbors.
- Work with the 3.5 mm hook rather than the 4 mm you would normally use for worsted cotton. The firmer fabric is what stops the leaves flopping once they are hanging under their own weight.
- Make all 13 leaves before blocking any. Blocking them together on one mat is the only way to guarantee they come out matched.
- Thread every leaf onto the cord before fixing any of them. The stem loops let you slide leaves up and down, and you will move most of them at least once before the spacing looks right.
Common Mistakes to Avoid
- Skipping the decreases in Rows 10 to 12. Without them the lobes keep widening and end up blunt. The taper in those three rows is what creates the maple point.
- Stem loops that are too tight to slide. If the loop grips the cord you cannot adjust spacing, and you will end up cutting leaves off and reattaching them. Fold the stem so the loop is a full 3 cm before securing it.
- Sewing the leaves to the cord before hanging it. Spacing that looks even on a table looks clumped on a wall, because you see a vertical piece all at once rather than scanning along it. Hang first, fix second.
- Pulling the surface slip stitch veins tight. On a flat coaster a tight vein is a minor flaw; on a hanging leaf it curls the lobe forward off the wall and there is no fixing it with blocking.
- A cord that is too soft. If you skip the twisting step and use a single strand, the cord stretches under the weight of thirteen leaves and the garland grows several centimeters over a month. The twist is structural, not decorative.
Ways to Customize This Pattern
- Work all 13 leaves in a single color with the veins one shade darker. The garland becomes a study in texture rather than color and suits a neutral room far better than the full autumn palette.
- Make a horizontal mantel garland instead: use a 180 cm cord, hang the leaves all facing the same direction, and add a loop at each end for pinning.
- Add small stuffed acorns between the leaves — a 6-round sphere in taupe with a textured brown cap — threaded onto the cord on their own short loops.
- Swap the autumn shades for fresh greens and cream for a spring version, and work the veins in a contrasting sage.
- Add 6 more leaves and 40 cm of cord for a 135 cm drop, which suits a tall stairwell wall or a window frame.
Frequently asked questions
The ch-2 spaces between lobes are not stacking directly above one another. Each row’s ch-2 must sit in the valley made by the previous row’s ch-2, and working it one or two stitches off closes the gap. Count the stitches on both sides of every ch-2 before you work it — they should match.
Acrylic works, but it has no stiffness, so the leaves will droop and curl once hanging and starch does not hold on synthetic fiber the way it does on cotton. If acrylic is what you have, go down another hook size to 3 mm and expect to accept a softer look. Cotton or a cotton-linen blend is what makes the leaves hold their points on a wall.
A single hanging point lets the whole cord rotate. Either pin the bottom knot to the wall with a small clear tack, or hang the top loop over two hooks spaced 4 cm apart rather than one. The second option is invisible and stops rotation completely.
Not strictly, but a garland with all the leaves on one side of the cord hangs off balance and the cord itself twists to compensate. Alternating distributes the weight and gives the overlapping, falling look. If you want them all facing one way, add a second cord behind to counterweight it.
About 25 m per leaf, so 325 m in total plus roughly 12 m for the cord. A 50 g ball of worsted cotton holds around 85 m, so one ball makes three leaves with a little spare. If you are working from a scrap bag, count in balls rather than weighing and you will know quickly whether you have enough.
The finished Autumn Leaf Wall Hanging

