Autumn Leaves and Acorns Table Runner Crochet Pattern
Advanced
For experienced crocheters who enjoy complex shaping, fine detail, and ambitious construction
Single-Day Project
A satisfying project you can complete in a single afternoon or evening.
Handmade Gift
A beautiful keepsake — free forever. Read online or print at home.
About This Autumn Leaves and Acorns Table Runner Crochet Pattern
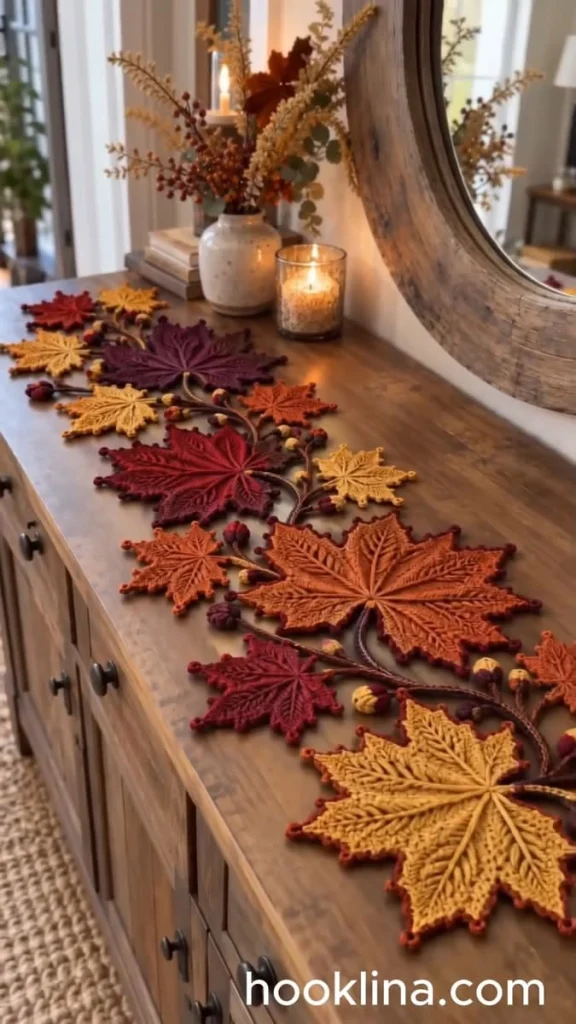
This autumn leaf table runner crochet pattern creates a winding arrangement of maple leaves in mustard gold, burnt orange, cranberry, and deep plum. Raised embroidered veins spread across pointed lobes, while a brown branching vine and small dimensional acorns connect the separate motifs. The open arrangement lets the wood of your table show between the leaves, just as it does in the reference.
Allow approximately 25–35 hours for crocheting, embroidery, blocking, and assembly. This advanced decorative project suits crocheters who enjoy shaping separate components and arranging them into a finished textile. Each leaf has seven individually shaped lobes, a concealed joining disc, contrasting serrated edges, and embroidered veins. Only the acorns are stuffed; the leaves and stems stay flat.
Materials
- Worsted weight cotton Approximately 300 m total: 110 m mustard gold, 110 m burnt orange, and 80 m cranberry for three large leaves
- DK cotton Approximately 230 m total: 85 m cranberry, 85 m plum, and 60 m mustard gold for three medium leaves
- Sport weight cotton Approximately 170 m total: 60 m mustard gold, 60 m burnt orange, and 50 m cranberry for three small leaves
- Dark cranberry cotton for leaf edging Approximately 120 m, divided among weights matching the leaves
- DK cotton for veins Approximately 80 m in gold, rust, cranberry, and plum, choosing a slightly lighter shade than each leaf
- Dark brown DK cotton Approximately 100 m for the doubled main vine, branches, and acorn caps
- Gold and burgundy DK cotton Approximately 20 m combined for 12 acorn bodies
- Crochet hooks 3.5 mm for large leaves; 3.0 mm for medium leaves and acorns; 2.5 mm for small leaves; 4.0 mm for the doubled vine
- Polyester stuffing A small pinch for each acorn
- Tapestry needle, stitch markers, scissors, rustproof pins, and blocking mats A measuring tape and washable fabric marker are also useful
Abbreviations
chchainscsingle crochet, US terminologysl stslip stitchinc2 sc in the same stitchdecsingle crochet the next 2 stitches togetherMRmagic ringRSright sideWSwrong sidepicotCh 3, then sl st in the first of those 3 chainsGauge, Dimensions, and Construction Plan
- Use US terminology. Work leaf lobes in turned rows. Ch 1 and turn after every row except the final row; this turning chain never counts as a stitch. Counts in parentheses exclude turning chains, picots, and joining slip stitches.
- Large-leaf gauge: 20 sc and 24 rows = 10 cm with worsted cotton and a 3.5 mm hook, measured after wet blocking. Medium-leaf gauge: 24 sc and 28 rows = 10 cm with DK cotton and a 3.0 mm hook. Small-leaf gauge: 28 sc and 32 rows = 10 cm with sport cotton and a 2.5 mm hook. Adjust hooks to obtain these gauges.
- For a gauge sample, ch 25. Row 1: sc in the second ch from the hook and each remaining ch, giving 24 sc. Rows 2–28: sc across, giving 24 sc per row. Block and measure the central stitches and rows.
- Each leaf uses one central lobe, two inner lobes, two outer lobes, two basal lobes, and one joining disc. Use the same stitch instructions for every size; yarn weight and gauge produce the size changes.
- Target blocked dimensions, including edging but excluding the stem: large approximately 18 cm wide × 16 cm long; medium approximately 15 cm × 14 cm; small approximately 13 cm × 12 cm. These are assembly targets rather than guaranteed measurements.
- Make nine leaves: large gold, large orange, large cranberry; medium cranberry, medium plum, medium gold; small gold, small orange, small cranberry. Make 12 acorns, nine leaf branches, and one main vine.
- The runner is approximately 130 cm long × 30 cm wide. Its narrow vine meanders between leaves rather than forming a solid fabric backing. Assembly is carried out with the RS facing upward unless stated otherwise.
Central Lobe — Make One per Leaf
- With the chosen leaf color and size-specific hook, ch 4. Row 1: sc in the second ch from the hook and in the next 2 ch. (3)
- Row 2: inc, sc 1, inc. (5)
- Row 3: inc, sc 3, inc. (7)
- Row 4: inc, sc 5, inc. (9)
- Row 5: inc, sc 7, inc. (11)
- Rows 6–20: sc in each stitch across. (11 per row; 15 rows)
- Row 21: dec, sc 7, dec. (9)
- Row 22: dec, sc 5, dec. (7)
- Row 23: dec, sc 3, dec. (5)
- Row 24: dec, sc 1, dec. (3)
- Row 25: sc all 3 stitches together: insert the hook into each stitch in turn, drawing up a loop each time, then yarn over and draw through all 4 loops. (1) Fasten off.
Inner Lobes — Make Two per Leaf
- Ch 4. Row 1: sc in the second ch from the hook and in the next 2 ch. (3)
- Row 2: inc, sc 1, inc. (5)
- Row 3: inc, sc 3, inc. (7)
- Row 4: inc, sc 5, inc. (9)
- Rows 5–16: sc in each stitch across. (9 per row; 12 rows)
- Row 17: dec, sc 5, dec. (7)
- Row 18: dec, sc 3, dec. (5)
- Row 19: dec, sc 1, dec. (3)
- Row 20: sc all 3 stitches together as described for the central lobe. (1) Fasten off.
Outer Lobes — Make Two per Leaf
- Ch 4. Row 1: sc in the second ch from the hook and in the next 2 ch. (3)
- Row 2: inc, sc 1, inc. (5)
- Row 3: inc, sc 3, inc. (7)
- Rows 4–10: sc in each stitch across. (7 per row; 7 rows)
- Row 11: dec, sc 3, dec. (5)
- Row 12: dec, sc 1, dec. (3)
- Row 13: sc all 3 stitches together. (1) Fasten off.
Basal Lobes — Make Two per Leaf
- Ch 4. Row 1: sc in the second ch from the hook and in the next 2 ch. (3)
- Row 2: inc, sc 1, inc. (5)
- Rows 3–6: sc in each stitch across. (5 per row; 4 rows)
- Row 7: dec, sc 1, dec. (3)
- Row 8: sc all 3 stitches together. (1) Fasten off.
Serrated Lobe Edging
- Edge every lobe separately before assembly. Use dark cranberry yarn in the same weight as its leaf and the same hook. Identify the foundation as the base and the final single stitch as the tip.
- With RS facing, join at the right-hand base corner. Work up the right side toward the tip, placing exactly 1 sc in each row end. Add a picot immediately after every fourth side sc. Side counts are 25 sc for a central lobe, 20 for an inner lobe, 13 for an outer lobe, and 8 for a basal lobe.
- At the tip, work 1 picot and no additional sc into the final-row stitch. Continue down the left side, placing exactly 1 sc in each row end. Restart the side count at 1 and add a picot after every fourth sc on this side too.
- Across the base, work 1 sc into each of the 3 unused foundation-chain loops. Join to the first edging sc with a sl st and fasten off, leaving a 35 cm sewing tail. Total edging counts: central 53 sc; inner 43 sc; outer 29 sc; basal 19 sc.
- Total picots, including the tip: central 13; inner 11; outer 7; basal 5. Keep picots loose enough to open during blocking. The edging around the lower part of each lobe will be concealed by overlap.
Joining Disc and Leaf Assembly
- Make one disc per leaf in its main color using its size-specific hook. Round 1: 6 sc in MR. (6) Work in a continuous spiral, marking the first stitch.
- Round 2: inc in each stitch around. (12)
- Round 3: repeat (sc 1, inc) 6 times. (18) Sl st in the next stitch and fasten off with a 50 cm tail. Do not stuff.
- Place the central lobe vertically with its tip pointing upward. Arrange the inner lobes approximately 35 degrees to either side, the outer lobes approximately 70 degrees to either side, and the basal lobes approximately 110 degrees to either side. All seven foundation edges meet at one hub.
- Overlap each neighboring pair along their lower side edges. Begin with approximately the bottom 4 rows overlapping; adjust the fan slightly until the target leaf width is reached. Keep the central lobe uppermost, the inner lobes beneath it, the outer lobes beneath those, and the basal lobes lowest.
- Using the edging tails, sew each of the six neighboring overlaps with small stitches through both layers. Continue each seam from the hub to the point where the two edges separate. Secure any loose picots inside the overlap so they do not protrude through the leaf surface.
- Turn the leaf over. Center the disc over the seven foundation edges and sew its entire perimeter to the backs of the lobes. Catch all seven bases with several additional stitches across the disc. Keep these stitches on the WS.
- Weave in all tails. The disc reinforces the hub; it should not pull the leaf into a bowl. Lay the leaf flat before embroidering.
Raised Main Veins and Branch Veins
- Use a slightly lighter shade of DK cotton for large and medium leaves. For small leaves, use matching sport cotton or split the DK yarn only if its construction permits clean separation. Cut manageable lengths of approximately 60 cm.
- Embroider one main vein from the hub to each of the seven lobe tips using chain stitch. Bring the needle up at the hub, insert it beside that exit point, bring it out 4–5 mm farther along the vein, and hold the working yarn beneath the needle to form a loop. Repeat, then anchor the final loop with a tiny straight stitch.
- Work the central vein first, then alternate left and right lobes. Follow the center of each lobe and stop just beneath its tip picot. Let the seven veins meet at the hub without stacking bulky knots.
- Add paired slanting branch veins with straight stitches, pointing toward the lobe tip. Add 7 pairs on the central lobe, 5 pairs on each inner lobe, 3 pairs on each outer lobe, and 2 pairs on each basal lobe: 47 pairs per leaf.
- Space pairs evenly along the exposed portion of each lobe. End each branch approximately 2 stitches inside the edging. Carry yarn loosely on the WS and secure it every few stitches; tight floats will curl the leaf.
Main Vine and Nine Leaf Branches
- For the main vine, hold 2 strands of dark brown DK cotton together and use a 4.0 mm hook. Target gauge in the completed slip-stitch cord is 20 stitches = 10 cm, measured relaxed. Make a short sample first and adjust the hook if necessary.
- Ch 261 loosely. Starting in the second ch from the hook, sl st into the back bump of every chain. (260 sl st) Fasten off and secure the ends. The relaxed cord should measure approximately 130 cm.
- For each leaf branch, use 1 strand of brown DK cotton and a 3.0 mm hook. Ch 21. Starting in the second ch from the hook, sl st into the back bump of every chain. (20 sl st) Make 9, leaving a 30 cm tail at each end. Target length is approximately 8–10 cm per branch.
- Do not stretch the cords while measuring. Wet-block the main vine into a shallow winding line whose endpoints are approximately 130 cm apart; allow the bends to draw the ends slightly closer if needed. Block branches into gentle curves.
Acorn Bodies — Make Twelve
- Use DK cotton, a 3.0 mm hook, and continuous rounds. Make 7 bodies in mustard gold and 5 in burgundy. Round 1: 6 sc in MR. (6)
- Round 2: inc in each stitch around. (12)
- Rounds 3–4: sc in each stitch around. (12 per round)
- Round 5: dec 6 times. (6) Add a small pinch of stuffing, keeping the body softly rounded.
- Fasten off with a 20 cm tail. Thread the tail through the front loops of the remaining 6 stitches, draw closed, and secure. The closed end will sit beneath the cap. Each body is approximately 1.5–2 cm long at this gauge.
Acorn Caps and Attachment Stems — Make Twelve
- With brown DK cotton and a 3.0 mm hook, work in continuous rounds. Round 1: 6 sc in MR. (6) Leave a 25 cm starting tail outside the cap for the stem.
- Round 2: inc in each stitch around. (12)
- Round 3: sc in each stitch around. (12) Sl st in the next stitch and fasten off with a 30 cm sewing tail.
- Fit the cap over the closed end of a body. Sew its 12-stitch rim to the body around the boundary between body Rounds 4 and 5, catching one body stitch for each cap stitch. Keep the opposite rounded end exposed.
- At the cap center, bring the starting tail and a new brown working strand together. With the hook, pull up a loop through the cap center and ch 7 using the working strand. Sl st in the second ch from the hook and the next 5 ch. (6 sl st) Fasten off with a 25 cm tail.
- Secure the starting tail inside the cap. Use the new stem tail to attach the acorn to a branch during assembly. Do not add eyes or other facial features; these are botanical accents.
Blocking and Runner Layout
- Soak the leaves in cool water according to the yarn label. Press out water in a towel without wringing. Pin each hub flat, spread the seven lobes, and open the picots. Aim for the size targets given above without stretching individual stitches harshly. Let everything dry completely.
- Lay the main vine on a flat surface with a measuring tape beside it. Mark nine positions measured along the cord from its starting end: 8, 22, 36, 50, 64, 78, 92, 106, and 120 cm.
- Place leaves in this order: small gold, medium plum, small orange, large cranberry, medium gold, large orange, small cranberry, medium cranberry, large gold. Alternate their hubs between opposite sides of the vine.
- Set each hub approximately 3–5 cm from the vine, using a curved branch to bridge the gap. Turn the leaf tips outward and slightly toward the next motif. Keep the complete arrangement within approximately 30 cm in width.
- Let selected neighboring leaves overlap by 1–2 cm. Leave small openings elsewhere so the vine remains visible. Pin the complete arrangement before sewing; the leaf sequence and cord marks provide the placement plan, while small rotations accommodate your blocked motifs.
Finishing
Sew one end of each leaf branch securely to the back of its leaf hub, catching the joining disc and the lobe bases. Lay the remaining branch length along its planned curve and sew its other end to the marked point on the main vine. Stitch each junction for approximately 1 cm so it cannot swivel freely. Conceal the tails inside the cord stitches.
At each place where neighboring leaves overlap, add two small hidden tacks through the backs of both motifs, spaced approximately 1 cm apart. Connect every leaf to at least one neighboring leaf in this way. These extra attachments help the whole runner lift as one piece and keep individual leaves from turning over. Keep the stitches slack enough for the arrangement to lie flat.
Attach the 12 acorns beside the vine at approximately 13, 19, 32, 43, 57, 62, 75, 84, 96, 103, 115, and 124 cm from its starting end. Alternate sides. Sew each acorn stem to the main vine, then add a small concealed tack from its cap to the nearest branch or leaf edge to stop it rolling. Check every join, trim the secured ends, and give the runner a final light blocking on a flat surface. Place it on a console or table where the open leaf arrangement has room to spread.
Tips for Success
- Label the seven pieces of each leaf before edging. The inner and outer lobes look similar in a pile, but swapping them changes the silhouette.
- Use the bottom four rows as your initial overlap guide, then adjust the angles before sewing. The joining disc should sit over a compact hub rather than span open gaps.
- Embroider veins with the leaf lying on the table. Check it after every main vein and loosen any stitches that lift the edges.
- Pin the entire runner before making permanent joins. Slightly rotating a large leaf often creates a better fit than stretching a branch.
- Keep acorn stuffing light so the caps sit closely against the bodies and the accents do not weigh down the open vine.
Common Mistakes to Avoid
- Counting the turning chain as a stitch creates uneven lobe edges. Mark the first actual sc and verify the count before turning.
- Working two edging stitches into every row end makes a ruffle. Use exactly one sc per row end, and form the serrations with picots instead.
- Leaving the seven lobe bases apart produces a starburst. Bring all foundation edges to one hub and overlap adjacent lower edges before attaching the disc.
- Pulling vein embroidery tight makes the leaf cup. Remove the tight section and restitch with the leaf flat and the yarn relaxed.
- Joining leaves only to the thin vine lets them spin. Add the specified hidden tacks between overlapping leaves and reinforce each branch junction.
Ways to Customize This Pattern
- Use gold veins on cranberry leaves and rust veins on gold leaves for stronger contrast while keeping the reference palette.
- Make a shorter console arrangement with five leaves. Work a 160-stitch main cord by chaining 161, then place the hubs approximately 14 cm apart.
- Create a quieter woodland version with olive, ochre, chestnut, and burgundy leaves, keeping dark brown for the vine and caps.
- Make all nine leaves at the medium gauge for a more regular outline; retain the same lobe construction and rearrange the overlaps before sewing.
Frequently asked questions
The separate pieces create deep valleys, sharp points, and a layered surface. Overlapping and sewing their lower edges turns the seven narrow pieces into one connected leaf. The embroidered veins visually unite the sections.
Yes. Using one weight and one leaf hook produces nine similarly sized leaves. The three-weight version creates the large, medium, and small motifs seen in the reference. If you use one weight, block a finished leaf first and adjust the layout to fit your table.
Reinforce every vine-to-branch junction and add the hidden joins between overlapping leaves. Lift the finished runner with both hands supporting several leaves, or slide it onto a clean tray for moving.
A stable vase can sit on a broad, flat leaf section, but keep it clear of the raised acorns. Use battery-operated candles for this arrangement. Keep yarn away from flames and hot candle vessels.
Follow the cotton yarn labels and hand-wash gently in cool water if permitted. Support the wet runner, press it between towels, and reshape it flat to dry. Avoid hanging it while wet because the connecting cords can stretch.
The finished Autumn Leaves and Acorns Table Runner Crochet Pattern

