Autumn Leaves Bedspread and Pillow Shams Crochet Pattern
Beginner Friendly
Perfect for those just starting their crochet journey, with clear instructions and simple techniques
Single-Day Project
A satisfying project you can complete in a single afternoon or evening.
Handmade Gift
A beautiful keepsake — free forever. Read online or print at home.
About This Autumn Leaves Bedspread and Pillow Shams Crochet Pattern
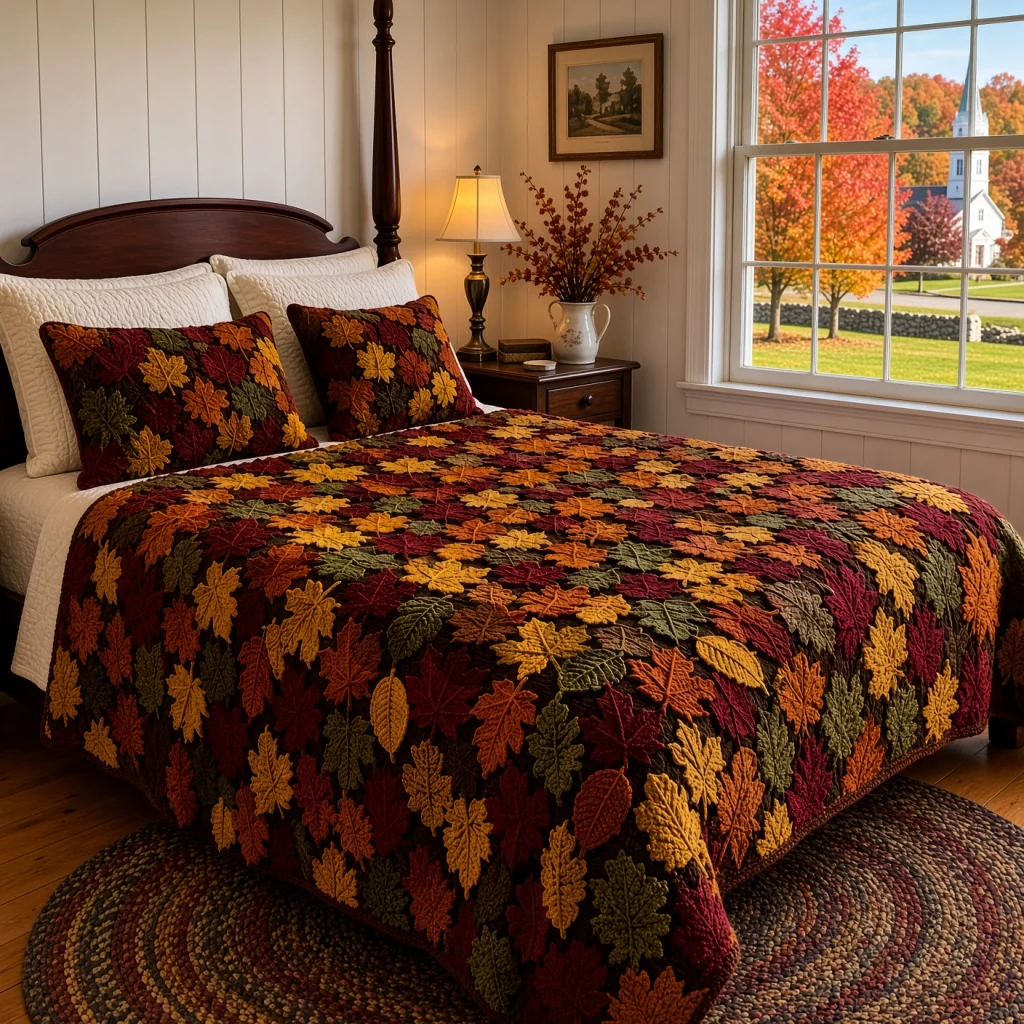
This autumn leaves crochet bedspread looks like a forest floor in October: hundreds of maple and oval leaves in burgundy, rust, mustard and olive, layered over each other on a dark brown base. Each leaf has its own embroidered veins, and they overlap like fallen leaves, so the bedspread has rich texture and depth. Two pillow shams are covered in the same leaves.
There are two leaf shapes. The maple leaf is made in just two rounds: a small ring of double crochet, then five pointed lobes of graded tall stitches with a short stem. The oval leaf is worked around a foundation chain. The base is linen stitch in dark brown, which shows between the leaves like shadowed earth and holds the whole bedspread together.
This is a very long project, around 300 to 350 hours, with about 480 leaves in all. Each leaf only takes about 15 minutes, though, so it’s an ideal project to pick up through the fall and winter. It suits a crocheter who enjoys making many small pieces and is happy with a lot of sewing.
Materials
- Worsted weight yarn, dark brown about 6,300 m (32 skeins of 100 g / 200 m), for the base, shams and veins
- Worsted weight yarn, burgundy about 500 m (3 skeins)
- Worsted weight yarn, rust orange about 500 m (3 skeins)
- Worsted weight yarn, mustard about 500 m (3 skeins)
- Worsted weight yarn, olive green about 500 m (3 skeins)
- 5 mm crochet hook
- Glass-head pins a large box, for placing leaves
- Tapestry needle and scissors
- Two pillows 50 x 75 cm, for the shams
Abbreviations
MRmagic ringchchainscsingle crochethdchalf double crochetdcdouble crochettrtreble crochetdtrdouble treble crochetsl stslip stitchsurf sl stsurface slip stitch: yarn held behind the work, insert hook from the front, pull up a loop and draw it through the loop on hookrev screverse single crochet (crab stitch), worked left to rightskskipst(s)stitch(es)rndroundreprepeatRS / WSright side / wrong sideLinen Stitch Panels (make 3)
- With dark brown, ch 118.
- Row 1 (RS): sc in 2nd ch from hook, *ch 1, sk next ch, sc in next ch; rep from * across. (117 sts: 59 sc, 58 ch-1 sps)
- Row 2: ch 1, turn, sc in first sc, sc in next ch-1 sp, *ch 1, sk next sc, sc in next ch-1 sp; rep from * to last sc, sc in last sc. (117 sts: 60 sc, 57 ch-1 sps)
- Row 3: ch 1, turn, sc in first sc, *ch 1, sk next sc, sc in next ch-1 sp; rep from * to last 2 sc, ch 1, sk next sc, sc in last sc. (117 sts: 59 sc, 58 ch-1 sps)
- Rows 4-500: rep Rows 2 and 3 alternately, ending with a Row 2. (117 sts in every row)
- Fasten off. Each panel measures about 73 x 250 cm.
Joining the Panels
- Lay the panels side by side, RS up, with all foundation edges at the same end. This end is the foot of the bedspread.
- Hold two panels RS together and, with dark brown, sl st through both layers in each row end. (500 sl st)
- Join the third panel the same way. The base is now 351 sts wide and 500 rows long, about 219 x 250 cm.
Maple Leaves (make 310)
- Make about 78 in each of the four leaf colors.
- Rnd 1: MR, ch 3 (counts as dc), 11 dc in ring, join with sl st to top of ch 3. Pull the ring tight. (12 sts)
- Rnd 2, small lobe: ch 1, (hdc, dc, tr) in next st, ch 3, sl st in 3rd ch from hook, (tr, dc, hdc) in next st.
- Medium lobe: (dc, tr, tr) in next st, ch 3, sl st in 3rd ch from hook, (tr, tr, dc) in next st.
- Large lobe: (tr, dtr, dtr) in next st, ch 3, sl st in 3rd ch from hook, (dtr, dtr, tr) in next st.
- Medium lobe: work as above over the next 2 sts.
- Small lobe: work as above over the next 2 sts.
- Stem: sc in next st, ch 10, sl st in 2nd ch from hook and in next 8 ch, sc in last st, join with sl st to first hdc. Fasten off leaving a 50 cm tail. (5 lobes and a stem)
- The leaf is about 13 cm across, with the large lobe at the top, a medium lobe on each side and a small lobe on each side of the stem.
Oval Leaves (make 170)
- Make about 42 in each of the four leaf colors.
- Ch 16.
- Side 1: sl st in 2nd ch from hook, sc in next ch, hdc in next ch, dc in next 2 ch, tr in next 5 ch, dc in next 2 ch, hdc in next ch, sc in next ch, sc in last ch.
- Stem: ch 6, sl st in 2nd ch from hook and in next 4 ch, 2 sc in the same last ch of the foundation. (5 sl st stem)
- Side 2: working in the free loops on the other side of the chain, sc in next ch, hdc in next ch, dc in next 2 ch, tr in next 5 ch, dc in next 2 ch, hdc in next ch, sc in next ch, sl st in next ch. (14 sts)
- Tip: ch 3, sl st in the first sl st of Side 1. Fasten off leaving a 40 cm tail. The leaf is about 10 cm long.
Veins
- Maple leaves: with dark brown, RS facing, work surf sl st from the center of the ring to the point of each lobe. (5 veins)
- Oval leaves: with dark brown, work surf sl st along the center chain from the stem to the tip. Then work 4 short veins on each side, angled up from the center vein toward the edge.
- Keep the veins relaxed so they don’t pucker the leaves. Weave the ends into the back of the leaf.
Placing and Sewing the Leaves
- Work in rows across the bedspread, starting at the foot and moving toward the head. Each row of leaves is about 12 cm higher than the one before.
- Row 1: pin about 21 leaves along the foot, overlapping the edge by 2 cm and each other by about a third. Mix maple and oval leaves and the four colors at random, and tilt each leaf a different way, up to 45 degrees.
- Sew each leaf down around its whole outer edge with its own tail, using small stitches through the base. Tack the lobe points and the stem.
- Rows 2-20: pin the next row so each leaf covers the top third of the leaves below, then sew. (about 420 leaves on the bedspread)
- Step back every few rows and check that no color clumps together and that the brown base shows only in small gaps.
Edging
- Rnd 1: with dark brown, RS facing, join in a foot corner. 3 sc in corner st, sc in next 349 sts, 3 sc in corner st; 398 sc evenly along the side (about 4 sc for every 5 rows); 3 sc in corner st, sc in next 349 sts, 3 sc in corner st; 398 sc evenly along the other side. Join. Fasten off brown. (1,506 sts)
- Rnd 2: join burgundy, ch 1, rev sc in each st around. Join and fasten off. (1,506 sts)
- Fold any leaves hanging past the edge back over the bedspread, or let a few hang over for a natural look.
Pillow Sham Fronts (make 2)
- With dark brown, ch 122.
- Rows 1-100: work in linen stitch as for the panels, ending with a Row 2. Fasten off. (121 sts, about 76 x 50 cm)
- Cover each front with 20 maple and 10 oval leaves, placed and sewn in rows as for the bedspread. Keep the leaves 2 cm in from the edges so the seam stays clear.
Pillow Sham Backs (make 2 sets)
- Upper back: with dark brown, ch 122. Work Rows 1-60 in linen stitch, ending with a Row 2. (121 sts)
- Edge row: ch 1, turn, sc in each sc and ch-1 sp across. Fasten off. (121 sc)
- Lower back: with dark brown, ch 122. Work Rows 1-54 in linen stitch, ending with a Row 2. (121 sts)
- Edge row: ch 1, turn, sc in each sc and ch-1 sp across. Fasten off. (121 sc)
- The sc rows are the open edges of the envelope, overlapping by about 7 cm.
Sham Assembly
- Lay a sham front WS up. Place the lower back on top, RS up, with its foundation edge along the bottom. Place the upper back on top, RS up, with its foundation edge along the top, overlapping the lower back. Pin all edges.
- Rnd 1: turn so the front faces you. With dark brown, join in a corner through all layers. 3 sc in corner st, sc in next 119 sts, 3 sc in corner st; 78 sc evenly along the side; 3 sc in corner st, sc in next 119 sts, 3 sc in corner st; 78 sc evenly along the other side. Join. Fasten off. (406 sts)
- Rnd 2: join burgundy, ch 1, rev sc in each st around. Join and fasten off. (406 sts)
- Sew down any leaves that cross the edge so they don’t catch.
- Rep with the second sham.
Finishing
Weave in all ends on the WS of the base, running them under the backs of the sewing stitches. Make sure every leaf is sewn around its whole edge and that no lobe points are left loose, since loose points catch on rings and buttons.
Lay the bedspread flat and steam it lightly from above to settle the leaves and relax the base. Smooth each leaf flat with your hand while it’s warm. Steam the shams the same way and put the pillows in through the back opening.
Tips for Success
- Make the leaves in batches while you work the base panels. With about 480 leaves, starting early keeps the project moving.
- Keep a bag for each color and pull leaves at random when placing them. It’s the easiest way to avoid accidental stripes or clumps.
- Pin a whole row before sewing it, then step back and look. Moving a leaf is easy before it’s sewn and slow after.
- Use a firm, smooth yarn for the leaves. Fuzzy yarn blurs the lobes and the veins.
- Keep the leaf tails long. Sewing each leaf down with its own tail means you’ll have very few extra ends to weave in.
Common Mistakes to Avoid
- Lobes that come out different sizes on each side. Each lobe is worked over exactly 2 sts of Rnd 1. If one side ends early, count the 12 sts again before starting the stem.
- Leaves that cup. Tall stitches worked into one st can cup if the ring is too tight. Loosen the magic ring slightly before Rnd 1, or steam the leaves flat before sewing.
- Rows of leaves that look like stripes. Placing leaves at the same angle makes neat rows that look stiff. Tilt every leaf differently.
- A base that puckers. Pulling the sewing stitches tight draws the linen stitch in. Keep the stitches small and relaxed.
- Working sc into sc in the base. This turns linen stitch into plain sc and one panel grows longer. Each sc goes into a ch-1 sp, except the first and last of Rows 2 and 3.
Ways to Customize This Pattern
- Cover only the top of the bed with leaves and leave the drop plain brown. This cuts the number of leaves by about half.
- Make a throw: one panel of 117 sts and 250 rows, covered with about 140 leaves.
- Add a few golden yellow and dusty red leaves, or use a self-striping yarn for leaves that change color from tip to stem.
- Use a green base and summer greens for the leaves for a fresh, spring version.
- Add a few acorns: a small brown sc ball with a textured cap, sewn in clusters of two or three among the leaves.
Frequently asked questions
The base holds the leaves in place and stops the bedspread from having holes between leaves. Leaves sewn only to each other would pull apart with use. The dark brown base also shows through the gaps like shaded earth.
With the base and about 420 leaves, expect around 4.5 kg in acrylic. If that’s too heavy, use the option of covering only the top of the bed.
No. Machine stitching would flatten the crochet and is very hard to guide through thick yarn. Hand sewing with the leaf tails keeps the stitches hidden and the leaves raised.
Wash it on a gentle cold cycle inside a large laundry bag, or by hand, and dry it flat. Smooth the leaves with your hands while it’s still damp. Wash a test leaf of each color first, since burgundy and rust can bleed.
The finished Autumn Leaves Bedspread and Pillow Shams Crochet Pattern

