Autumn Leaves Crochet Table Runner Pattern
Advanced
For experienced crocheters who enjoy complex shaping, fine detail, and ambitious construction
Single-Day Project
A satisfying project you can complete in a single afternoon or evening.
Handmade Gift
A beautiful keepsake — free forever. Read online or print at home.
About This Autumn Leaves Crochet Table Runner Pattern
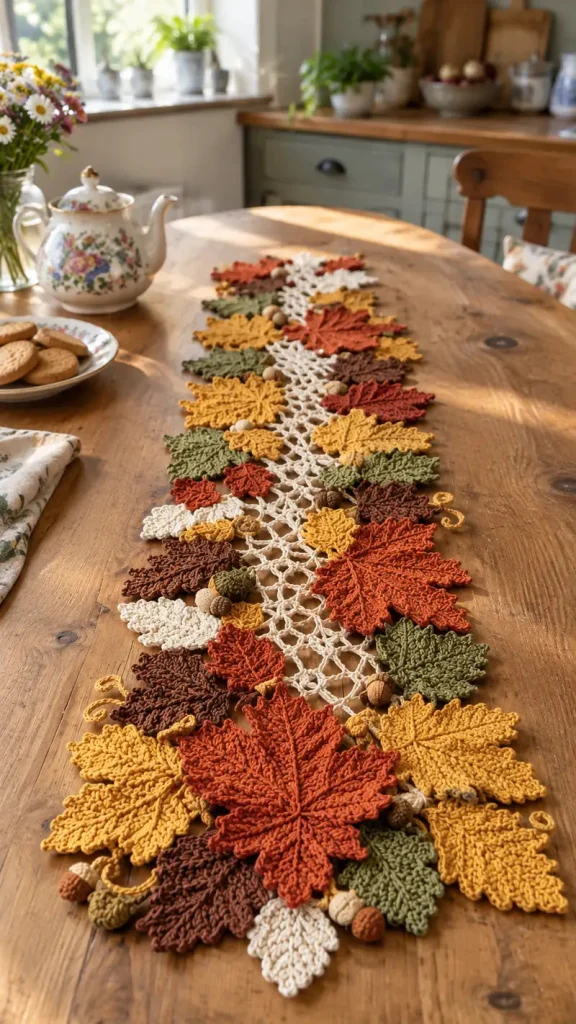
This autumn leaves crochet table runner brings a narrow cream lace center together with overlapping leaves in rust, mustard, olive, chocolate brown, and ivory. Small dimensional acorns and loose golden tendrils sit among the foliage, echoing the layered woodland arrangement in the reference photograph.
The runner is assembled from a rectangular mesh foundation, individually shaped leaf lobes, embroidered veins, and separately crocheted acorns. Allow approximately 35–45 hours for crocheting, blocking, and careful assembly. This advanced project suits makers who enjoy detailed finishing and arranging individual motifs into a balanced, organic border.
Materials
- Smooth sport-weight cotton, approximately 250 m per 100 g Ivory 150 g; rust 100 g; mustard 100 g; olive 75 g; chocolate 75 g; tan 25 g. Quantities include a working allowance.
- Crochet hook 3.0 mm, or size needed for gauge
- Washable stuffing A small amount for 10 acorns
- Tapestry needle and fine sewing needle For joining motifs and embroidering veins
- Matching strong sewing thread For discreet reinforcement beneath overlapping leaves
- Stitch markers, scissors, ruler, blocking mat, and rustproof pins A paper rectangle measuring 110 × 32 cm is useful for assembly
Abbreviations
chchainsl stslip stitchscsingle crochetdcdouble crochetinc2 sc in the same stitchdecsingle crochet 2 stitches togetherMRmagic ringBLOback loop onlyst / stsstitch / stitchespicotch 3, sl st in the third chain from the hook; this decoration adds no working-edge stitchGauge, Dimensions, and Construction
- Blocked sc gauge: 24 sts and 26 rows = 10 × 10 cm. Measure a flat sc swatch without stretching.
- Blocked mesh gauge: 8 mesh spaces = 11 cm wide; 8 rows = 12 cm long. Make the foundation below through Row 8 as your mesh swatch. Adjust hook size or blocking tension until both measurements are close.
- The mesh foundation measures approximately 11 × 96 cm before its border. A finished large leaf measures approximately 12–14 cm across and 8–9 cm from stem to central tip; a small leaf measures approximately 8–9 cm across and 6–7 cm long. These leaf dimensions depend on the fan arrangement.
- The final arrangement occupies approximately 110 × 32 cm. Leaves extend beyond both ends and overlap the mesh edges. Keep the finished outline within your paper template during assembly.
- Work flat pieces in turned rows. Work acorn bodies and caps in continuous rounds, marking the first stitch. Stitch counts in parentheses exclude turning chains and decorative picots.
Cream Lace Foundation
- Row 1: With ivory, ch 28. Dc in the fourth ch from the hook; the 3 skipped chains count as the first dc. Repeat (ch 2, skip 2 chains, dc in the next chain) 8 times. Turn. (10 dc, 8 ch-2 spaces; the first two dc form a narrow solid starting edge.)
- Row 2: Ch 3, counting as the first dc. Repeat (ch 2, dc in the next dc) 8 times, working across the 8 mesh spaces; dc in the top of the starting ch-3. Turn. (10 dc, 8 ch-2 spaces; the paired edge stitches are now at the opposite end.)
- Row 3: Ch 3, counting as the first dc; dc in the next dc. Repeat (ch 2, dc in the next dc) 8 times, placing the final dc in the top of the turning ch-3. Turn. (10 dc, 8 ch-2 spaces.)
- Rows 4–64: Repeat Rows 2 and 3 alternately, ending with a Row 2 repeat. Each row has 10 dc and 8 ch-2 spaces. Do not fasten off after Row 64.
- Border round: Ch 1. Across the top, work 1 sc in each of the 10 dc and 2 sc in each of the 8 spaces, then ch 2 for the corner. Along the first long side, work 2 sc around each of the 64 row ends; ch 2. Across the foundation edge, work 26 sc evenly, corresponding to the 10 dc positions and 16 chains beneath the mesh spaces; ch 2. Work 2 sc around each of the 64 row ends on the remaining side; ch 2 and sl st in the first sc. (308 sc and 4 ch-2 corner spaces.)
- Fasten off and weave in ends. Wet-block the panel to approximately 11 × 96 cm, easing the border flat and keeping the mesh spaces open.
Leaf Inventory and Color Placement
- Make 18 large five-lobed leaves: 5 rust, 5 mustard, 4 olive, 3 chocolate, and 1 ivory. Each requires 1 long lobe, 2 medium lobes, and 2 short lobes in the same color.
- Make 10 small three-lobed leaves: 2 each in rust, mustard, olive, chocolate, and ivory. Each requires 1 medium lobe and 2 short lobes in the same color.
- Total lobe inventory: 18 long, 46 medium, and 56 short lobes. Keep the pieces for each leaf together before edging and assembly.
- Use the leaf color for its edging and raised veins. Work selected secondary veins in a neighboring shade if desired, such as chocolate on rust or tan on mustard.
Long Leaf Lobe — Make 18
- Row 1: Ch 3; sc in the second ch from the hook and in the next ch. Turn. (2)
- Row 2: Ch 1, inc in both sts. Turn. (4)
- Row 3: Ch 1, inc, sc 2, inc. Turn. (6)
- Row 4: Ch 1, inc, sc 4, inc. Turn. (8)
- Rows 5–7: Ch 1, sc 8. Turn after each row. (8)
- Row 8: Ch 1, dec, sc 4, dec. Turn. (6)
- Row 9: Ch 1, dec, sc 2, dec. Turn. (4)
- Row 10: Ch 1, dec twice. Turn. (2)
- Row 11: Ch 1, dec. (1) Fasten off. The foundation is the narrow base, and Row 11 is the pointed end.
Medium Leaf Lobe — Make 46
- Row 1: Ch 3; sc in the second ch from the hook and in the next ch. Turn. (2)
- Row 2: Ch 1, inc in both sts. Turn. (4)
- Row 3: Ch 1, inc, sc 2, inc. Turn. (6)
- Rows 4–6: Ch 1, sc 6. Turn after each row. (6)
- Row 7: Ch 1, dec, sc 2, dec. Turn. (4)
- Row 8: Ch 1, dec twice. Turn. (2)
- Row 9: Ch 1, dec. (1) Fasten off.
Short Leaf Lobe — Make 56
- Row 1: Ch 3; sc in the second ch from the hook and in the next ch. Turn. (2)
- Row 2: Ch 1, inc in both sts. Turn. (4)
- Rows 3–5: Ch 1, sc 4. Turn after each row. (4)
- Row 6: Ch 1, dec twice. Turn. (2)
- Row 7: Ch 1, dec. (1) Fasten off.
Serrated Lobe Edging
- With the intended front facing, join matching yarn at one foundation corner. Work up the first side, placing 1 sc in each row end except the final pointed row. A long lobe has 10 side stitches, a medium lobe 8, and a short lobe 6.
- After every second side sc, make a picot. Keep picots outside the lobe so they form small teeth rather than folding over its surface.
- At the point, work (sc, picot, 2 sc) into the single stitch of the final row. This produces 3 sc at the tip.
- Work down the other side, making the same number of side sc and adding a picot after every second sc. Work 1 sc into the underside of each of the 2 foundation stitches. Sl st in the first edging sc and fasten off. Edging totals: long 25 sc and 11 picots; medium 21 sc and 9 picots; short 17 sc and 7 picots.
- Block the lobes flat, opening the points without stretching the foundation bases. Leave assembly tails accessible.
Assemble and Embroider the Leaves
- For each large leaf, place a long lobe vertically with its tip upward. Place one medium lobe on each side, angled approximately 35 degrees away from the center. Place a short lobe outside each medium lobe, angled approximately 65 degrees from the center.
- Bring the five foundation bases together in a shallow fan. Overlap neighboring inner edges by approximately 5 mm through the lower third of their lengths. Sew these overlaps securely from the back, catching edging loops and the underlying fabric. Leave the upper sections separate to form deep leaf sinuses.
- For each small leaf, use a medium central lobe with a short lobe on either side, angled approximately 45 degrees from the center. Join their lower thirds in the same way.
- Embroider a raised central vein along each lobe using chain stitch, starting at the shared base and ending just below its tip. On long lobes, add 3 slanting straight-stitch veins on each side; on medium lobes add 2 per side; on short lobes add 1 per side. Catch only the leaf fabric.
- For each leaf stem, join matching yarn through the shared base, ch 9, then sl st in the second ch from the hook and in the remaining 7 chains. Sl st back into the leaf base. Fasten off with a 25 cm sewing tail. Each stem has 8 sl sts.
- Block completed leaves again. Shape the central points outward and flatten the joined bases. Do not pull the lower lobes into a tight circular rosette.
Acorn Bodies — Make 10
- Use tan for 6 bodies and chocolate for 4 bodies. Round 1: Work 6 sc in MR. (6)
- Round 2: Inc in each st. (12)
- Round 3: Repeat (sc, inc) 6 times. (18)
- Rounds 4–5: Sc in each st. (18)
- Round 6: Repeat (sc, dec) 6 times. (12) Add a small amount of stuffing.
- Round 7: Dec 6 times. (6) Fasten off, thread the tail through the remaining front loops, and draw closed. The closed end will sit beneath the cap; the MR end is the visible acorn tip.
Acorn Caps and Stalks — Make 10
- Use chocolate for 6 caps and olive for 4 caps. Round 1: Work 6 sc in MR. (6)
- Round 2: Inc in each st. (12)
- Round 3: Repeat (sc, inc) 6 times. (18)
- Round 4: Working in BLO, sc in each st. (18)
- Round 5: Sc in each st through both loops. (18) Sl st in the next st and fasten off with a 30 cm sewing tail.
- For the stalk, join cap-colored yarn at the center of the cap, ch 4, then sl st in the second ch from the hook and in the remaining 2 chains. Sl st into the cap center and secure the ends inside.
- Fit the cap over the closed end of a body. Sew all 18 cap-edge stitches to the body at the level of Body Round 5, distributing the stitches evenly. The finished acorn should measure approximately 2–2.5 cm long, excluding its stalk.
Curling Tendrils — Make 8
- With mustard, ch 19.
- Row 1: Work 2 sc in the second ch from the hook and 2 sc in each remaining chain. (36)
- Fasten off with a 25 cm sewing tail. Wind the strip around a pencil, release it, and arrange it as a loose curl. If it twists too tightly, dampen and pin it into a wider curve.
Arrange and Join the Runner
- Place the blocked foundation lengthwise on the paper template. Mark positions 4, 15, 26, 37, 48, 59, 70, 81, and 92 cm from one short end along each long edge. These are the starting positions for the 18 large leaves.
- Place 9 large leaves along each long side, setting their shared bases just inside the mesh border and turning their central tips outward. Rotate the two leaves nearest each end diagonally toward that end so the foliage extends approximately 7 cm beyond the foundation.
- Along the left side, arrange large leaves in this order: rust, mustard, olive, chocolate, mustard, rust, olive, mustard, rust. Along the right side use: mustard, chocolate, rust, olive, ivory, mustard, chocolate, rust, olive.
- Place 5 small leaves along each side at approximately 10, 29, 48, 67, and 86 cm from the same end. On the left use ivory, rust, mustard, olive, chocolate; on the right use olive, mustard, chocolate, ivory, rust. Slide them into gaps and over neighboring bases without covering the whole lace center.
- Adjust the leaf angles to fit the 110 × 32 cm template. Aim to leave an irregular cream opening approximately 4–6 cm wide down most of the runner. Let a few inward-facing leaf tips interrupt that opening.
- Pin every leaf at its base and at two places where its lower lobes cross the mesh border. Sew each attachment over a span of at least 1 cm, catching actual sc or dc stitches rather than pulling against a single chain space. Keep the central and outer tips free.
- At each neighboring leaf overlap, add two small hidden thread tacks approximately 1 cm apart. These tacks help the border move as one piece without making the foliage rigid.
- Distribute 5 acorns along each side near leaf bases, staggering their positions. Sew each cap and the adjoining side of its body to a leaf with at least 4 secure passes. Avoid placing acorns in the open central strip.
- Sew the 8 tendrils among the mustard and chocolate leaves, attaching the straight base and one intermediate point while leaving the final curl free. Weave in all remaining ends on the underside.
Finishing
Lay the assembled runner flat and check that the leaves overlap gently without lifting the lace foundation. Add a discreet tack wherever a lower lobe catches or flips. The raised veins should remain visible, and the outer points should form an uneven leafy outline.
Lightly damp-block the flat sections, supporting the acorns so they keep their shape. Let the runner dry completely before placing it on wood. Hand-wash in cool water, press out moisture in a towel, and dry flat. Set cups, candles, and serving dishes on a stable tray or a separate flat area of the table, since the acorns create raised spots.
Tips for Success
- Make and block one complete five-lobed leaf first. Its width determines how far the foliage will extend beyond the 11 cm lace foundation.
- Use separate short sewing passes for the lobe overlaps. A single tight seam across all five bases can cup the leaf.
- Keep embroidered veins slightly relaxed. If a central vein shortens the lobe, remove the last few stitches and work them again with less tension.
- Photograph the pinned arrangement before sewing. It gives you a placement guide when you lift individual leaves to reach their undersides.
- Place acorns over supported leaf bases, where several layers can carry their weight without distorting the mesh.
Common Mistakes to Avoid
- Skipping the paired dc at the solid mesh edge changes the foundation width. Every row must retain 10 dc and 8 spaces; alternate Rows 2 and 3 carefully.
- Putting edging stitches into the pointed row ends as well as its top stitch crowds the lobe tip. Exclude that final row from both side counts and work the 3 tip sc only into its single stitch.
- Stacking all five lobe bases directly on top of one another creates a thick knob. Spread them in a shallow fan and overlap neighboring edges only.
- Sewing only through mesh chains can stretch the openings. Anchor leaves into the solid border and nearby dc posts, spreading each attachment across several stitches.
- Attaching every leaf point makes the border stiff and hides its layered shape. Secure the lower portions and neighboring overlaps while leaving the pointed ends loose.
Ways to Customize This Pattern
- For a shorter centerpiece, work 40 foundation rows instead of 64 and use 12 large leaves, 6 small leaves, and 6 acorns. Re-space the foliage before sewing.
- Make a quieter woodland palette by replacing rust with deep copper and mustard with ochre while retaining the ivory mesh and olive foliage.
- For a flatter runner, omit the stuffed acorns and add extra small leaves at their planned positions.
- Embroider a fine tan line beside the matching central veins on selected rust and chocolate leaves for more visible vein detail.
Frequently asked questions
Separate lobes make the deep gaps and pointed silhouette easy to control. Joining their lower thirds creates a continuous leaf base while allowing the upper points to spread naturally.
Yes. Add foundation chains in multiples of 3; each additional group creates one extra ch-2 mesh space and one dc. For example, ch 34 gives 12 dc and 10 spaces. Work 10 mesh repeats instead of 8 in subsequent rows and 32 sc across each short border edge. The leaves will need a wider assembly template.
Block the leaves before assembly, attach each lower lobe to the foundation, and add the two small tacks at neighboring overlaps. If one outer lobe still twists, tack its lower half to the leaf beneath it while keeping its tip free.
Yes, but the given dimensions and quantities will change. Make the mesh swatch and one complete leaf with your chosen yarn, then calculate the foundation length from your measured row gauge. Arrange all motifs before sewing rather than relying on the listed centimeter positions.
The finished Autumn Leaves Crochet Table Runner Pattern

