Autumn Leaves Crochet Table Runner Pattern
Advanced
For experienced crocheters who enjoy complex shaping, fine detail, and ambitious construction
Single-Day Project
A satisfying project you can complete in a single afternoon or evening.
Handmade Gift
A beautiful keepsake — free forever. Read online or print at home.
About This Autumn Leaves Crochet Table Runner Pattern
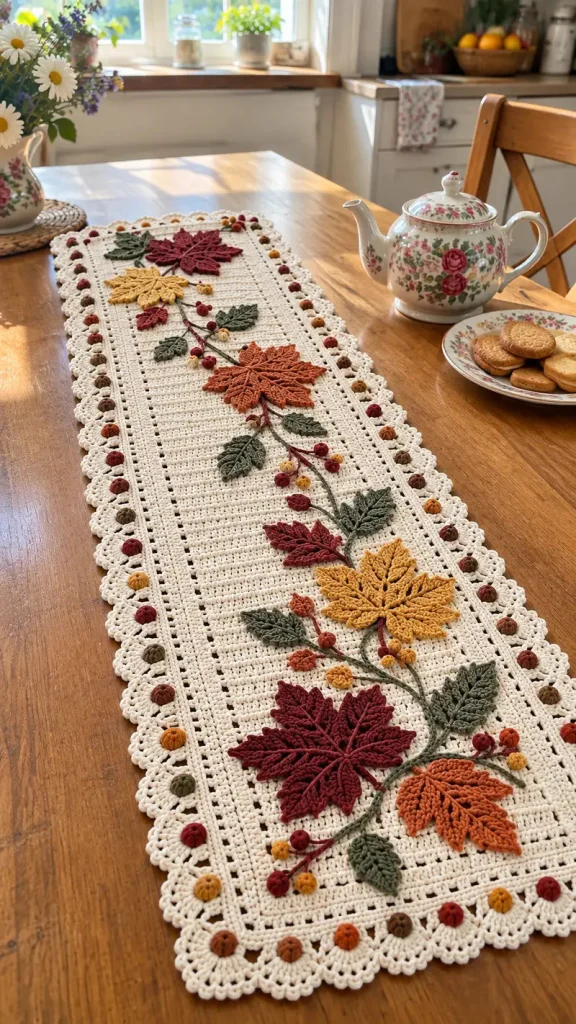
This autumn leaves crochet table runner pattern combines a cream foundation with raised burgundy, mustard, and rust leaves, olive foliage, and small rounded berries. An openwork frame and scalloped edge give it the delicate outline of the photographed runner, while embroidered veins bring definition to each separate leaf.
Allow about 30–40 hours for the foundation, individual motifs, and careful sewing. This advanced project suits crocheters comfortable with short rows, shaping, surface crochet, and assembling appliqués. The instructions create an original interpretation of the reference: a decorative table runner with dimensional foliage and no stuffed toy components.
Materials
- Sport-weight mercerized cotton Approximately 1,450 m total: cream 850 m, olive 180 m, burgundy 160 m, mustard 120 m, rust 110 m, brown 30 m; includes a working allowance
- Crochet hooks 3.0 mm for foundation and border; 2.5 mm for motifs
- Tapestry and embroidery needles For appliqué seams, berry shaping, and veins
- Stitch markers At least 12, including four contrasting corner markers
- Blocking equipment Mat, rustproof pins, measuring tape, and towels
- Scissors and removable fabric markers For finishing and marking the vine route
Abbreviations
chchainsl stslip stitchscsingle crochethdchalf double crochetdcdouble crochetinc2 sc in the same stitchdecsingle crochet 2 stitches togethersc3togsingle crochet 3 stitches togetherMRmagic ringRSright sideUS terminology. Counts exclude turning chains, joining slip stitches, and corner chains unless stated. A turning ch 1 never counts as a stitch. Work the foundation in turned rows, the border in joined rounds, and berry rounds continuously.
Cream Foundation
- With cream and the 3.0 mm hook, ch 50.
- Row 1: Sc in the second chain from the hook and each remaining chain. Turn. 49 sc.
- Rows 2–216: Ch 1, sc in all 49 stitches, turn. 49 sc in every row.
- After Row 216, do not fasten off. Mark the current face as the RS. The panel has 49 stitches across each short end and 216 row ends along each long side.
Eyelet Frame and Scalloped Border
- Round 1: With RS facing, ch 1 and sc across all 49 stitches of the last row. Ch 2 for the corner. Work 217 sc down the long edge: 1 into each row end, with 1 extra sc into the row end at Row 108. Ch 2. Work 49 sc across the unused foundation loops. Ch 2. Work 217 sc up the remaining long edge in the same way. Ch 2; join to the first sc. 532 sc and four ch-2 corner spaces. Mark the corner spaces.
- Round 2: Ch 1. Across each short side, sc in the first stitch, then repeat (ch 1, skip 1 stitch, sc in the next stitch) 24 times. Across each long side, sc in the first stitch, then repeat the same sequence 108 times. At each corner, ch 2 without working into the old corner space. Join to the first sc. Each short side has 25 sc and 24 ch-1 spaces; each long side has 109 sc and 108 ch-1 spaces.
- Round 3 setup: Fasten off and rejoin cream in any corner space. Ch 1 and work (sc, ch 2, sc) in that space. The first sc belongs to the preceding side; the second belongs to the following side.
- Round 3 sides: Treat each sc and each ch-1 space from Round 2 as one position. On each short side, work 1 sc in every position, except work 2 sc in positions 12, 25, and 38. On each long side, work 1 sc in every position, except work 2 sc in positions 54, 109, and 164. Work (sc, ch 2, sc) in each remaining corner. Join to the first sc. Between successive new corner spaces there are exactly 54 sc on each short side and 222 sc on each long side; 552 sc total.
- Round 4 setup: Fasten off and rejoin in a corner space. Ch 1, work 7 dc in that corner space.
- Round 4 sides: Across each side repeat (sl st in the next stitch, skip 2 stitches, 7 dc in the next stitch, skip 2 stitches). Each repeat consumes 6 stitches. Work 9 repeats on each short side and 37 on each long side. Work 7 dc in each remaining corner space. Join to the first dc and fasten off. There are 92 side scallops and 4 corner scallops, each containing 7 dc.
- Block the foundation and border before adding motifs. Pin the scallops into gentle fans without stretching the eyelets into long slots.
Large Five-Lobed Autumn Leaves — Make 6
- Use the 2.5 mm hook. Make 2 burgundy, 2 mustard, and 2 rust leaves. Each leaf has a circular palm, five separately worked lobes, and a short stem. Expected finished size is approximately 10–12 cm across.
- Palm Round 1: Work 6 sc in MR. 6 sc.
- Palm Round 2: Inc in every stitch. 12 sc.
- Palm Round 3: Repeat (sc, inc) 6 times. 18 sc.
- Palm Round 4: Repeat (2 sc, inc) 6 times. 24 sc.
- Palm Round 5: Repeat (3 sc, inc) 6 times. 30 sc. Join and fasten off. Number these stitches 1–30 clockwise with RS facing.
- Divide stitches 1–25 into five consecutive groups of 5. These form the lobes. Stitches 26–30 remain free at the base. Work each lobe separately, joining with RS facing in its first stitch.
- Lobe Row 1: Ch 1, sc in each of the 5 stitches in its group. Turn. 5 sc.
- Lobe Row 2: Ch 1, inc, 3 sc, inc. Turn. 7 sc.
- Lobe Row 3: Ch 1, sc across. Turn. 7 sc.
- Length adjustment: For lobes 1 and 5, proceed directly to the next instruction. For lobes 2 and 4, repeat Row 3 twice more. For central lobe 3, repeat Row 3 four more times. These extra rows create the stepped maple silhouette.
- First taper row: Ch 1, dec, 3 sc, dec. Turn. 5 sc.
- Second taper row: Ch 1, dec, sc, dec. Turn. 3 sc.
- Tip row: Ch 1, sc3tog. 1 stitch. Ch 2, sl st into the top of that stitch to form a small point. Fasten off. Complete all five lobes.
- Outline: With RS facing, join matching yarn in palm stitch 26. Sc in stitches 26–30. Continue around the entire exposed leaf outline, working 1 sc into each row end, 1 sc into each exposed stitch top, and (sc, ch 2, sc) into each lobe tip space. At each valley, sl st once into the junction between adjacent lobes. Join and fasten off. This contour edging is worked to the actual row ends rather than a fixed perimeter count.
- Stem: Join matching yarn in palm stitch 28, ch 9, sl st in the second chain from the hook and each remaining chain. Sl st back into stitch 28. Fasten off with a sewing tail. The stem has 8 slip stitches.
- Veins: Using a darker shade of the leaf color, embroider a central line from the stem base to the central tip in short backstitches. Add one main branch to each other lobe and two short diagonal branches along each main vein. Keep the embroidery relaxed so the leaf remains flat.
Small Pointed Leaves — Make 12
- Make 10 olive and 2 burgundy leaves with the 2.5 mm hook. Ch 11.
- Round 1: Sc in the second chain from the hook, hdc in the next 2 chains, dc in the next 6 chains, and 3 sc in the last chain. Rotate to work along the opposite side of the chain: dc in the next 6 foundation chains, hdc in the next 2, and 2 sc in the same foundation chain that holds the first sc. Join to the first sc. 22 stitches.
- Round 2: Ch 1, sc in each of the first 10 stitches. In stitch 11, the middle stitch of the far-end 3-sc group, work (sc, ch 2, sc). Sc in each of the remaining 11 stitches. Join and fasten off with a long sewing tail. 23 sc and one ch-2 tip space.
- Embroider a central vein from the rounded base to the pointed tip in olive or a darker matching shade. Add three short diagonal veins on each side. Expected size is approximately 5–6 × 2.5–3 cm.
Rounded Berries and Border Buttons — Make 52
- Make 18 burgundy, 12 mustard, 12 rust, and 10 brown pieces using the 2.5 mm hook. Set aside 24 for the outer border and 28 for the central vine.
- Round 1: Work 6 sc in MR. 6 sc.
- Round 2: Inc in every stitch. 12 sc.
- Round 3: Sc in every stitch. 12 sc.
- Round 4: Dec 6 times. 6 sc. Do not stuff; the shallow hollow creates the raised button shape.
- Fasten off, leaving a 25 cm tail. Thread through the front loops of the final 6 stitches and draw closed. Flatten the closed underside gently against the table.
- For a lobed berry, take the tail up through the center, over the outside, and back through the underside three times at evenly spaced positions. Tighten only enough to create shallow grooves. Leave the remaining tail for attachment. Expected diameter is approximately 1–1.3 cm.
Winding Vine and Motif Placement
- Place the blocked runner RS up. Measure all coordinates on the cream foundation only, excluding the border. Let x run across its 24.5 cm width from left to right, and y run along its 90 cm length from the near short end.
- Mark a flowing main vine through these points in order: (8, 4), (16, 16), (10, 29), (16, 43), (9, 57), (15, 71), and (11, 86), all in centimeters. Draw smooth curves between the marks.
- With olive yarn held beneath the fabric and the 2.5 mm hook above it, surface slip stitch along the marked curve. Insert the hook between stitches, draw up a loop, then draw each following loop through the loop already on the hook. Use approximately one surface stitch per 4–5 mm of curve, keeping the stitches loose. Fasten off on the underside.
- Position the large leaf centers at approximately (9, 12) burgundy, (16, 24) rust, (10, 38) mustard, (15, 52) rust, (10, 67) mustard, and (15, 81) burgundy. Rotate their stems toward the vine and their central tips outward. Shift a center by up to 2 cm if required to keep every tip inside the eyelet frame.
- Arrange the 10 olive leaves in five pairs around y = 7, 30, 45, 61, and 76 cm, alternating sides of the vine. Place the 2 small burgundy leaves near y = 35 and 59 cm. Pin everything before sewing.
- Surface slip stitch short olive branches from the main vine to any leaf stem that does not reach it. Add another short branch for each central berry, generally 1–3 cm long. These branches follow the pinned layout and have no fixed stitch count.
- Distribute the 28 vine berries in loose groups of 2–4 between the leaves. Keep each group outside the leaf tips so the colors remain distinct.
- Place the 24 border buttons over the bases of selected scallops: 8 evenly spaced along each long side and 4 along each short side. Keep corner scallops clear. Alternate burgundy, mustard, rust, and brown rather than placing identical colors together.
Finishing
Sew each large leaf to the foundation with matching yarn, catching the underside of its outer stitches and taking small stitches into the cream fabric beneath. Secure the palm and all five lobe tips, then add discreet stitches along the lobe edges so they cannot fold over. Keep the raised veins on the surface. Attach the small leaves in the same way, and stitch each stem to its olive branch.
Sew each berry through its closed underside with at least four attachment passes. Border buttons should sit at the scallop bases without pulling the outer fans inward. Weave every end through several stitches on the underside, reverse direction once, and trim. Lightly damp-block the assembled runner face up, shaping the border with your fingers and leaving the berries uncompressed. Dry completely before placing it on wood. The finished size should be approximately 33 × 99 cm at the stated gauge.
Tips for Success
- Mark the three increase positions on each border side before Round 3; count 54 or 222 stitches between corner spaces before starting scallops.
- Block the six large leaves separately before arranging them. Their five lobes are easier to position when the palm and tips have relaxed.
- Pin the entire composition before sewing the first leaf. Check the arrangement from both short ends of the table.
- Keep one finger beneath each surface crochet loop while tightening it; the main vine should lie on the fabric without shortening the panel.
- Use split lengths of the same cotton yarn for finer veins if full-thickness embroidery overwhelms the small leaves.
Common Mistakes to Avoid
- Picking up only 216 stitches on a long edge changes the later border count. Add the specified extra stitch at Row 108 on both sides.
- Counting corner chains as side stitches disrupts the scallop repeat. Count only sc between the marked ch-2 corner spaces.
- Working the same number of straight rows on every maple lobe produces a fan-shaped leaf. Give the center four extra rows and its neighbors two extra rows.
- Pulling embroidery tight cups the leaf. Undo the tight section and restitch with the leaf resting flat on the table.
- Sewing buttons onto the scallop tips makes the border droop. Attach them at the dense bases of the fans.
Ways to Customize This Pattern
- Use oatmeal instead of cream while retaining the burgundy, rust, mustard, and olive foliage for a softer contrast.
- Make a longer runner by adding 24 foundation rows for each additional 10 cm. Pick up the same number of extra stitches on each long border side; because 24 is divisible by 6, the scallop repeat still fits.
- Create a flatter dining version by omitting berry Round 3 and skipping the shaping wraps. Retain the 6, 12, 6 stitch progression.
- Embroider veins in matching yarn for subtle texture or use dark burgundy and deep olive for stronger definition.
Frequently asked questions
The separate lobes create deep valleys and a longer central point, giving the raised leaves their recognizable outline. Sew the palm and tips securely so the pieces remain stable during use.
The raised motifs make an uneven resting surface. Set dishes on a flat section or use a separate stable trivet. This decorative runner is not designed or tested as heat protection.
First check the side counts and confirm that each shell repeat consumes six stitches. If the counts are correct but the fans still ripple after blocking, remake Round 4 with a smaller hook while keeping the written stitch counts.
Check the cotton label and test the dark shades for color bleeding before assembly. Gently hand-wash the finished runner in cool water, support its full length when lifting, press between towels, and reshape flat to dry.
The finished Autumn Leaves Crochet Table Runner Pattern

