Autumn Maple Leaf Coasters
Beginner Friendly
Perfect for those just starting their crochet journey, with clear instructions and simple techniques
Single-Day Project
A satisfying project you can complete in a single afternoon or evening.
Handmade Gift
A beautiful keepsake — free forever. Read online or print at home.
About This Autumn Maple Leaf Coasters
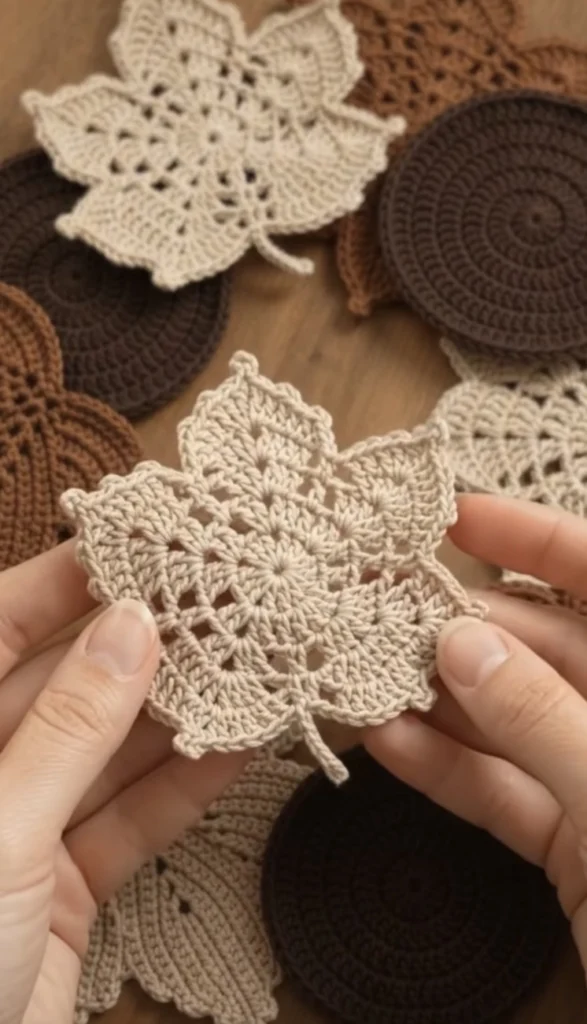
This crochet maple leaf coaster pattern gives you a proper five-lobed leaf with an open lace centre, a sharp point on every lobe and a slim chain stem — not a chunky solid leaf with a few bumps around the edge. The whole thing radiates out from a single magic ring at the base of the stem, so the stitches fan the way real leaf veins do, and the four deep notches between the lobes are built into the very first row rather than cut in later. It works up in DK cotton on a 3.5 mm hook and finishes at roughly 13 cm across, which is the right size for a mug without the leaf disappearing underneath it.
Expect around an hour and a half to two hours per leaf once you have the rhythm. Most of that is the lobe shaping, which is worked on each group of stitches separately: you finish one lobe to a point, fasten off, rejoin to the next group and repeat. It sounds fiddly and the first lobe is, but by the third one you stop reading. The centre lobe and the two upper side lobes are worked a row longer than the two lower ones, which is the small detail that makes the finished piece read as a maple leaf rather than a five-pointed star.
This is a good project for someone comfortable with double crochet who wants a first taste of lace and separate-section shaping. The mesh row, the fan row and the picot edging are all easy stitches — the skill is in keeping the counts and blocking the result properly. Made in a cream, caramel and chocolate brown set alongside plain round spiral coasters, it makes an autumn table set that looks far more involved than the stitch list actually is.
Materials
- DK / light worsted 100% cotton in ecru or cream about 25 g per leaf
- Same yarn in caramel and chocolate brown optional, for a mixed set
- 3.5 mm crochet hook go down to 3.0 mm if you crochet loosely
- Tapestry needle for weaving in and the surface veins
- Rustproof pins and a blocking mat not optional for lace
- Spray bottle of water or light spray starch starch gives a stiffer coaster
- Stitch markers 2-3, to mark the five lobe groups
- Small sharp scissors
Abbreviations
MRmagic ringchchainsl stslip stitchscsingle crochetsc2togsingle crochet 2 stitches together (decrease)dcdouble crochetdc2togdouble crochet 2 stitches together (decrease)skskipspspacest / stsstitch / stitchesreprepeatpicotch 3, sl st in the last stitch madeRS / WSright side / wrong sideUS termsall instructions use US crochet terminologyLeaf Base (Rows 1-5)
- Row 1 (RS): Make a magic ring. Ch 3 (counts as first dc), 2 dc in ring, [ch 2, 3 dc in ring] 4 times. Pull the ring closed firmly. Turn. — 15 dc in 5 groups of 3, with 4 ch-2 spaces. Each group is one lobe; mark them if it helps.
- Row 2 (WS): Ch 3 (counts as dc), dc in same st, dc in next st, 2 dc in next st, *ch 2 (this replaces the ch-2 sp below, do not work into it), 2 dc in next st, dc in next st, 2 dc in next st*, rep from * 3 more times. Turn. — 25 dc, 5 dc per group.
- Row 3 (RS): Ch 3 (counts as dc), dc in same st, dc in next 3 sts, 2 dc in next st, *ch 2, 2 dc in next st, dc in next 3 sts, 2 dc in next st*, rep from * 3 more times. Turn. — 35 dc, 7 dc per group.
- Row 4 (WS, mesh row): Ch 4 (counts as dc plus ch 1), sk next st, dc in next st, ch 1, sk next st, dc in next st, ch 1, sk next st, dc in next st, *ch 2, dc in next st, [ch 1, sk next st, dc in next st] 3 times*, rep from * 3 more times. Turn. — 4 dc and 3 ch-1 spaces per group; 20 dc total. This is the open lace layer at the heart of the leaf.
- Row 5 (RS, fan row): Ch 3 (counts as dc), [2 dc in next ch-1 sp, dc in next dc] 3 times, *ch 2, dc in next dc, [2 dc in next ch-1 sp, dc in next dc] 3 times*, rep from * 3 more times. Turn. — 50 dc, 10 dc per group. The base is finished; each group of 10 now becomes a lobe.
Shaping the Five Lobes
- Number the groups 1 to 5 across the row. Groups 2, 3 and 4 are the long lobes; groups 1 and 5 are the shorter lower lobes. Each lobe is worked on its own 10 sts, then fastened off before you rejoin for the next.
- Long lobes (groups 2, 3 and 4) – Lobe Row 1: Ch 2 (does not count as a st), dc2tog over next 2 sts, dc in next 6 sts, dc2tog over last 2 sts. Turn. — 8 sts.
- Lobe Row 2: Ch 2, dc2tog over next 2 sts, dc in next 4 sts, dc2tog over last 2 sts. Turn. — 6 sts.
- Lobe Row 3: Ch 2, dc2tog over next 2 sts, dc in next 2 sts, dc2tog over last 2 sts. Turn. — 4 sts.
- Lobe Row 4: Ch 1, sc2tog over next 2 sts, sc2tog over last 2 sts. Turn. — 2 sts.
- Lobe Row 5: Ch 1, sc2tog over the 2 sts, ch 3, sl st in the sc just made (tip picot). Fasten off, leaving a 15 cm tail.
- Short lobes (groups 1 and 5): Work Lobe Rows 1, 2 and 3 as above. — 4 sts. Then: Ch 1, sc2tog over next 2 sts, sc2tog over last 2 sts, ch 3, sl st in the sc just made. Fasten off, leaving a 15 cm tail. These lobes finish one row shorter, which gives the leaf its true maple silhouette.
- Rejoining: With RS facing, join yarn with a sl st to the first st of the next group of 10 and work that lobe from its Row 1. Repeat until all five lobes are complete. Do not work into the ch-2 spaces between groups at any point – they stay open as the notches.
Centre Veins (Surface Detail)
- Cut a 60 cm length of the same yarn (or one shade darker for a visible vein). Hold it behind the work with RS facing.
- Starting at the magic ring, work a line of surface slip stitches straight up the middle of the centre lobe: insert the hook front to back between two stitches, pull up a loop, insert into the next gap, pull through the work and the loop on the hook. Keep the tension slack or the leaf will pucker.
- Work the main vein all the way to the tip of the centre lobe, then fasten off through the back and leave the tail.
- Repeat with two shorter veins running from the magic ring out into lobes 2 and 4, stopping about two rows short of each tip. Leave lobes 1 and 5 plain — real maple leaves taper their veining the same way.
Edging
- With RS facing, join yarn with a sl st at the base of the leaf, at the right-hand edge of group 1.
- Ch 1, then sc evenly around the entire outline of the leaf: work 2 sc into the side of each dc row-end, 1 sc into each st along the tops of the lobes, and 3 sc into each remaining ch-2 space along the base row.
- At the bottom of each notch between two lobes, work sc2tog across the two row-ends that meet there. This pulls the V in sharply instead of letting it round off.
- At each lobe tip, work sc into the picot loop, then ch 3 and sl st in that sc to set the point, then continue.
- Along the outer edge of every lobe, work a picot [ch 3, sl st in the last sc made] after every 3rd sc. Don’t count these obsessively — even spacing matters more than exact numbers on a shaped edge.
- Finish the round along the flat base of the leaf with plain sc and no picots, then join with a sl st to the first sc. Fasten off and weave in the end.
Stem
- With RS facing, join yarn with a sl st into the centre of the magic ring at the base of the leaf.
- Ch 9.
- Sl st in the 2nd ch from hook and in each remaining ch back down to the leaf. — 8 sl st. Slip stitching back down the chain gives a firm stem that holds its shape instead of flopping.
- Sl st once more into the magic ring to anchor. Fasten off and pull the tail through to the back.
Finishing
Weave in every tail on the wrong side, running each one along a row of dc rather than across the lace so it stays invisible. The leaf will look small, curled and disappointing at this stage — that is normal for lace and blocking fixes all of it.
Soak the leaf in cool water, squeeze out the excess in a towel, then pin it out on a blocking mat. Pin each of the five lobe tips first, pulling them well out from the centre, then pin the four notches down toward the base so the Vs stay deep. Adjust until the outline reads as a maple leaf, then leave it to dry completely — usually overnight. For a coaster that sits flat under a mug, spray lightly with starch while it is still pinned and let it dry a second time. Repeat for as many leaves as you want in the set.
Tips for Success
- Mark the five groups of Row 1 with stitch markers and move them up each row. Once the mesh row is in, the groups are much harder to tell apart at a glance, and losing count there means unpicking the whole row.
- Work Row 4’s ch-1 spaces at the same tension as the dc. Tight ch-1s close the lace up and the leaf ends up looking solid rather than airy.
- When you fasten off each lobe, leave a 15 cm tail rather than a short one. Those tails are useful for tugging the tips into shape during blocking, and you trim them afterwards.
- Rejoin each new lobe with the RS facing so all five lobes have their first row on the same side. Rejoining on the wrong side once will make one lobe sit visibly differently.
- If you are making a set, work all five leaves through Row 5 first, then do all the lobe shaping. Batching it makes the fiddly part go much faster.
Common Mistakes to Avoid
- Working into the ch-2 spaces. On Rows 2, 3, 4 and 5 you chain 2 to bridge each notch and then skip straight to the next group’s stitches. Working a dc into that space fills in the notch and you lose the leaf shape entirely.
- Ruffled, wavy lobes. This means too many stitches went into the base rows — usually an extra increase in Row 2 or 3. Check that each group has exactly 5 sts after Row 2 and 7 after Row 3 before you go on.
- Blunt lobe tips. If the tips come out rounded, the last decreases were worked too loosely. Pull the yarn firmly through both loops on each sc2tog, and make sure the tip picot is anchored into the sc itself, not into the chain.
- A puckered centre vein. Surface slip stitches worked tightly will gather the leaf into a bowl. Keep the working yarn slack behind the fabric and check the leaf lies flat every few stitches.
- Skipping the block. An unblocked lace leaf curls at the edges and will never sit still under a mug. Wet block it properly — it is the single step that makes the difference between a homemade look and a finished one.
Ways to Customize This Pattern
- Make a full autumn set. Work leaves in ecru, caramel and chocolate brown, and pair them with plain spiral sc rounds in the same shades for a mixed set of leaf and round coasters.
- Scale it up to a trivet. Add a sixth row to the base — repeat Row 5’s fan row once more, working 2 dc into the top of each fan — then shape the lobes over 7 rows instead of 5. In worsted cotton on a 4.5 mm hook this gives roughly a 20 cm trivet.
- Turn it into a garland. Skip the stem, and instead of fastening off after the edging, ch 30 and join to the next leaf. Alternate long and short chains for a natural drape.
- Add a contrast vein. Work the leaf in cream and the surface veins in rust or deep brown. The vein reads much more clearly and it costs you almost no extra yarn.
- Make an oak version. Round the lobe shaping instead of pointing it: replace Lobe Rows 4 and 5 with a single row of sc across the 4 remaining sts, and drop the tip picot from the edging.
Frequently asked questions
You can, but cotton is the better choice here for two reasons. Acrylic doesn’t absorb condensation from a cold glass, so moisture sits on top and transfers to the table anyway, and acrylic won’t hold a block — the lace will relax back into its curled shape within a day. Acrylic is fine if you are making these as garland leaves or appliqués rather than working coasters.
Almost always because all five lobes were worked the same length. Groups 1 and 5 are meant to stop one row earlier than the other three, which drops the lower lobes and creates the maple outline. The second cause is shallow notches: make sure you worked sc2tog at the bottom of each V during the edging, and pin those points inward during blocking.
About 25 g of DK cotton, including the edging and stem — so a standard 50 g ball gives you two leaves with a little left over. A set of six leaves plus six matching round coasters works out at roughly three 50 g balls spread across your chosen colours.
Yes, and it is worth it. The lobes are worked outward to a point, so there is no way to travel from the tip of one lobe to the base of the next without either cutting the yarn or carrying a strand across the open notch — and a carried strand shows badly through the lace. Fasten off, weave the tail in at the end, and keep the notches clean.
The finished Autumn Maple Leaf Coasters

