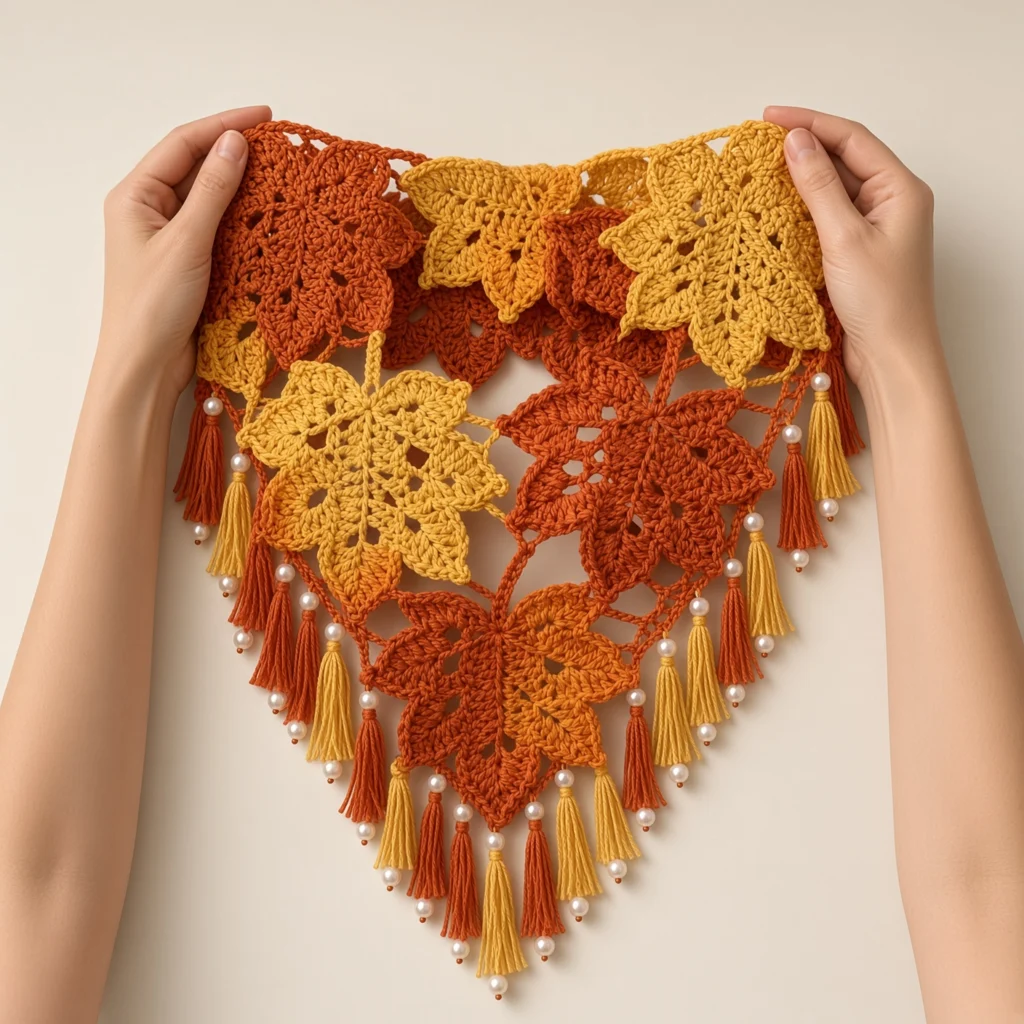
Autumn Maple Leaf Crochet Shawl with Beaded Tassels
Beginner Friendly
Perfect for those just starting their crochet journey, with clear instructions and simple techniques
Single-Day Project
A satisfying project you can complete in a single afternoon or evening.
Handmade Gift
A beautiful keepsake — free forever. Read online or print at home.
About This Autumn Maple Leaf Crochet Shawl with Beaded Tassels
This crochet maple leaf shawl pattern is built from twenty-five separate leaf motifs joined as you work, not sewn and not backed by any solid fabric. Fifteen large five-lobed maple leaves sit in staggered rows of five, four, three, two and one to form the triangle, and ten smaller three-lobed leaves fill the diamond gaps where the rows meet. Every leaf is worked outward from a small central ring, five lobes at a time, each lobe shaped through eight rows from a fan of double crochet to a picot point.
Expect 20 to 25 hours. A large leaf takes roughly forty minutes because each of its five lobes is a small piece of shaping in its own right, and that is genuinely the bulk of the project. The joining is fast by comparison, done at the lobe tips during the final outline round of each leaf, and the tassels take an evening. The difficulty here is not any single stitch but the sustained attention: fifteen leaves at five lobes each means seventy-five short shaped units, and consistency across all of them is what makes the finished triangle look deliberate.
Three colours carry the autumn shift, rust, burnt orange and golden yellow, scattered so no two touching leaves match. Each leaf is worked in one colour only, which is what keeps the outlines legible against each other. DK cotton with a firm hand is the right choice, because the lace is entirely dependent on the openings staying open, and a soft or hairy yarn will close them. Written in US terms throughout.
Materials
- DK / light worsted cotton in rust approx. 80 g
- DK / light worsted cotton in burnt orange approx. 70 g
- DK / light worsted cotton in golden yellow approx. 70 g
- 3.0 mm crochet hook one size down from the ball band for crisp lobes
- 21 glass or resin pearl beads, 8 mm holes must be at least 2 mm, see the FAQ
- Fine wire beading needle or a folded wire threader essential for getting DK cotton through a pearl
- Tapestry needle blunt, large eye
- Stitch markers at least 5, one per lobe in progress
- Piece of stiff card, 8 cm deep for winding tassels
- Rust-proof pins and blocking mats around 60 pins
- Spray bottle and a steam iron with a pressing cloth
- Sharp scissors and a tape measure
Abbreviations
chchainscsingle crochethdchalf double crochetdcdouble crochetsl stslip stitchsc2togsingle crochet 2 stitches togethersc3togsingle crochet 3 stitches togetherdc2togdouble crochet 2 stitches togetherspspacest / stsstitch / stitchesreprepeatRSright sideFOfasten offGauge and Working Notes
- Gauge: one finished large leaf measures about 11 cm across and 12 cm from stem to top lobe tip. A small filler leaf measures about 7 cm.
- Each lobe is worked in rows, back and forth, turning at the end of every row. The centre and the outline round are worked in the round with the RS facing.
- Turning chains count as a stitch throughout: ch 3 counts as a dc, ch 4 counts as a dc plus ch 1. The ch 1 at the start of an sc row does not count as a stitch.
- The ch-1 spaces in Row 2 of each lobe are the openwork. Do not tighten them or the leaf turns solid and loses the lace character the whole design rests on.
- Work all five lobes of a leaf before starting the outline round. The outline is what pulls the separate lobes into one shape.
- Do not fasten off at the end of the outline round on any leaf that still needs joining on a second side. Leave the loop live and pin it.
- Leave a 15 cm tail on every piece. There are around 100 ends in this project, so weave them in as you finish each leaf rather than saving them up.
Large Maple Leaf, Centre (make 15)
- With your chosen colour, ch 4 and sl st into the first ch to form a ring.
- Round 1: ch 3 (counts as first dc), 14 dc into the ring, sl st into the top of the ch-3 (15 dc).
- Round 2: ch 1, sc in the same st as the join, ch 5, skip next 2 dc, *sc in next dc, ch 5, skip next 2 dc*; rep from * 3 more times, sl st into the first sc.
- You now have 5 ch-5 loops, using all 15 dc of Round 1 (5 sc plus 10 skipped). FO.
- These five loops are the bases of the five lobes. Mark one of them as the top lobe and work clockwise from there, so every leaf in the shawl ends up with its stem in the same relative position.
Large Maple Leaf, Lobe (work 5 times per leaf)
- Row 1: join yarn in the next ch-5 loop, ch 3 (counts as first dc), 6 dc into the same loop, turn (7 dc).
- Row 2: ch 4 (counts as dc plus ch 1), skip next dc, dc in next dc, ch 1, skip next dc, dc in next dc, ch 1, skip next dc, dc in the top of the ch-3, turn (4 dc and 3 ch-1 sps).
- Row 3: ch 3 (counts as first dc), *2 dc in the next ch-1 sp, dc in the next dc*; rep from * 2 more times, turn (10 dc).
- Row 4: ch 3, dc2tog over the next 2 sts, dc in the next 4 sts, dc2tog over the next 2 sts, dc in the last st, turn (8 dc).
- Row 5: ch 1, sc in the first st, sc2tog, sc in the next 2 sts, sc2tog, sc in the last st, turn (6 sc).
- Row 6: ch 1, sc2tog 3 times, turn (3 sc).
- Row 7: ch 1, sc3tog over the remaining 3 sts (1 st).
- Row 8 (tip picot): ch 3, sl st into the 3rd ch from hook. FO, leaving a 15 cm tail.
- Repeat all eight rows in each of the remaining 4 ch-5 loops, for 5 lobes in total. The lobes will look separate and slightly floppy at this stage. The outline round fixes that.
Large Maple Leaf, Outline Round and Stem
- Join yarn in the gap between the two lowest lobes, which becomes the base of the leaf.
- Stem: ch 9, sl st into the 2nd ch from hook and into each remaining ch (8 sl sts), then work 1 sc into the base gap.
- Lobe outline, worked the same way on every lobe: 2 sc into the row-end of each of Rows 1 to 4, then 1 sc into the row-end of each of Rows 5 and 6 (10 sc up the side); 3 sc into the tip picot; then 10 sc back down the other side, mirroring the first (23 sc per lobe).
- Work 1 sc into each valley between two lobes as you pass it (4 valleys).
- Sl st into the first sc to close (120 sc plus the stem: 5 lobes at 23 sc, 4 valley sc and 1 base sc).
- FO and weave in every end on this leaf now. Do not leave them. The outline round is the last chance to work on a leaf while it is still flat and easy to handle.
- Make 15 large leaves in total: 5 rust, 5 burnt orange, 5 golden yellow.
Small Filler Leaf (make 10)
- Ch 4 and sl st into the first ch to form a ring.
- Round 1: ch 3 (counts as first dc), 8 dc into the ring, sl st into the top of the ch-3 (9 dc).
- Round 2: ch 1, sc in the same st as the join, ch 5, skip next 2 dc, *sc in next dc, ch 5, skip next 2 dc*; rep from * once more, sl st into the first sc (3 ch-5 loops, using all 9 dc). FO.
- Lobe Row 1: join yarn in a ch-5 loop, ch 3, 6 dc into the same loop, turn (7 dc).
- Lobe Row 2: ch 4, skip next dc, dc in next dc, ch 1, skip next dc, dc in next dc, ch 1, skip next dc, dc in the top of the ch-3, turn (4 dc and 3 ch-1 sps).
- Lobe Row 3: ch 1, sc in the first dc, (sc in the next ch-1 sp, sc in the next dc) 3 times, turn (7 sc).
- Lobe Row 4: ch 1, sc in the first st, sc2tog, sc in the next st, sc2tog, sc in the last st, turn (5 sc).
- Lobe Row 5: ch 1, sc2tog, sc in the next st, sc2tog, turn (3 sc).
- Lobe Row 6: ch 1, sc3tog (1 st), then ch 3 and sl st into the 3rd ch from hook for the tip picot. FO.
- Repeat the six lobe rows in the remaining 2 loops, for 3 lobes in total.
- Outline round: join in the base gap, ch 7, sl st into the 2nd ch from hook and each remaining ch (6 sl sts for the stem), 1 sc into the base gap. Then on each lobe work 2 sc into the row-end of Rows 1 and 2, 1 sc into the row-end of Rows 3, 4 and 5 (7 sc per side), 3 sc into the tip picot, and 7 sc down the other side (17 sc per lobe), with 1 sc into each of the 2 valleys. Sl st into the first sc (54 sc plus the stem). FO.
- Make 10: 3 rust, 4 burnt orange, 3 golden yellow.
Colour Placement and Layout
- Lay the 15 large leaves out on a blocking mat in staggered rows, point down: Row 1 (the top edge) has 5 leaves, Row 2 has 4, Row 3 has 3, Row 4 has 2, and Row 5 is a single leaf at the bottom point.
- Offset each row by half a leaf so that the two lower lobes of a leaf sit above the gap between the two leaves below it. This offset is what makes the outline a clean triangle rather than a staircase.
- Arrange the colours so no two touching leaves are the same. A workable sequence for Row 1 is rust, gold, orange, gold, rust; Row 2 orange, rust, gold, orange; Row 3 gold, orange, rust; Row 4 rust, gold; Row 5 orange.
- Every leaf points upward, stem down, including the single leaf at the bottom point. Turning a leaf to fit a gap is tempting and always shows, because the two lower lobes of a maple leaf are narrower than the three upper ones.
- Photograph the layout from directly above before you join anything. You will move leaves during joining and it is the only reliable way back to an arrangement you liked.
- Pin every leaf to the mat through its centre ring. Nothing should be free to shift once joining begins.
Joining the Leaves
- All joining is done during the outline round, which is why the outline is worked last on every leaf. Work the leaves in reading order: Row 1 left to right, then Row 2, and so on.
- To make a join: when you reach the centre sc of a 3-sc tip group that touches a neighbouring leaf, drop your loop, insert the hook into the corresponding centre tip sc of the neighbour, pick the loop back up and draw it through, then continue the outline round as written. The count of 120 sc is unchanged.
- Within a row, join each leaf to the one on its left at two points: the upper side lobe tip and the lower side lobe tip.
- Between rows, join each leaf to the two leaves above it, one join per leaf, at the tip of whichever lobe reaches closest.
- Where two tips are close but not touching, do not stretch the leaf to reach. Bridge the gap instead with a separate ch-5 bar, sl st into each tip, worked once the whole triangle is joined.
- Add the small filler leaves last, one into each diamond gap between the rows: 4 between Rows 1 and 2, 3 between Rows 2 and 3, 2 between Rows 3 and 4, and 1 between Rows 4 and 5, for 10 in total. Join each one at all three lobe tips during its outline round so it sits taut in the gap rather than hanging in it.
Top Edge
- Row 1: with rust, join at the top right corner. *3 sc into the tip picot of the next upward-facing lobe, ch 4*; rep across all 10 upward-facing tips of Row 1, ending with 3 sc in the final tip and no ch-4 (30 sc and 9 ch-4 sps). Turn.
- Row 2: ch 3 (counts as first dc), dc in each sc across and 3 dc into each ch-4 sp (57 dc). Turn.
- Row 3: ch 1, sc in each dc across, working (ch 3, sl st into the 3rd ch from hook) after every 4th sc, so a picot falls after sts 4, 8, 12 and so on through st 56 (57 sc with 14 picots). FO.
- Check the top edge lies straight before blocking. If it bows outward, Row 2 has too many stitches for the width, so redo it with 2 dc rather than 3 in each ch-4 sp.
Beaded Tassels (make 21)
- Wind yarn 12 times around the 8 cm card and cut along one edge, giving 12 strands of about 16 cm.
- Thread a pearl onto a separate 20 cm strand using the wire beading needle, slide it to the middle, and tie an overhand knot directly beneath it so the pearl cannot travel.
- Lay the 12 strands together, place the beaded strand alongside with the pearl hanging about 2 cm below the cut ends, and tie the whole bundle tightly at the fold with a 20 cm tying strand.
- Wrap a second strand 5 or 6 times around the bundle about 1 cm below the fold to form the tassel head, knot it, and thread both ends down inside the skirt with the tapestry needle.
- Trim the skirt level at about 8 cm, leaving the pearl hanging free below it.
- Make 21 tassels, matching each one to the colour of the leaf it will hang from: roughly 8 rust, 7 orange and 6 gold.
- Attach one tassel to each downward-facing lobe tip along the two diagonal edges, 10 per side, plus one at the bottom point. Pass the folded head through the tip picot and pull the tassel through its own loop.
Finishing
Weave in every remaining end along the outline round of the nearest leaf, following the line of the stitches for at least 3 cm and splitting the yarn once along the way. Check the back for any join that was worked tight, which shows as a small pucker pulling two lobe tips toward each other. Undo and redo those now, because blocking will not release them.
Block the shawl in one piece with the tassels off, or with them tied up in a bundle so they cannot get pinned into the fabric. Soak it in cool water, roll it in a towel, then lay it on the mats. Pin the two top corners first to set the 58 cm top edge, then pin the bottom point to set the 38 cm depth, then work around the two diagonals pinning every single lobe tip. Every tip needs a pin. This is the part that turns a bundle of soft leaves into open lace, and skipping tips is immediately visible as a wavy edge.
Let it dry completely, which takes most of a day, then unpin and attach the tassels. Fitting the tassels after blocking rather than before means the weight of the beads hangs on a fabric that has already been set to size, so the diagonal edges stay straight. Give the finished piece a light steam from 15 cm away if any lobe still lifts, never letting the iron touch the work. Worn, it sits as a neckerchief with the point at the front, or folded along the top edge as a hair scarf.
Tips for Success
- Work all seventy-five lobes in batches by colour rather than completing one leaf at a time. Your Row 2 tension settles after about ten lobes, and leaves made before and after that point do not match.
- Keep the ch-1 spaces in Row 2 deliberately loose. They are only three stitches per lobe but they are the entire openwork of the design, and a tight Row 2 gives you a solid petal shape instead of a maple leaf.
- Count the row-end stitches on your first outline round out loud: 2, 2, 2, 2, then 1, 1. Ten per side is what makes all five lobes the same length, and getting nine on one side and eleven on another skews the whole leaf.
- Pin every leaf to the mat through its centre before joining. A leaf that shifts by even a centimetre mid-round puts the join in the wrong place and you will not notice until the next row will not sit flat.
- Make one tassel and hang it on a finished leaf before making the other twenty. The 8 cm length and the 2 cm pearl drop are proportions worth confirming against your own leaf size, not mine.
Common Mistakes to Avoid
- Rounded lobe tips instead of points. The last three rows of the lobe are doing all the shaping, and skipping Row 7 or working sc3tog as three separate sc will round it off. If the tips are blunt, that is where to look.
- Lobes that cup or curl forward. Row 3 has 10 dc growing out of 4 dc and 3 ch-1 spaces, and if the 2 dc in each ch-1 space are worked tight the lobe cannot lie flat. Loosen Row 3 rather than trying to block it out.
- Joining at the wrong point of the tip. The join belongs in the centre sc of the 3-sc tip group, not in the picot itself. Joining into the picot pulls it out of shape and leaves a visible knot on the front.
- Turning a leaf upside down to fill an awkward gap. The three upper lobes are wider than the two lower ones, so an inverted leaf reads as a mistake even to someone who cannot say why. Use a small filler leaf instead.
- Attaching the tassels before blocking. Twenty-one beaded tassels weigh enough to drag the diagonal edges out of line while the piece is wet, and the stretch does not come back.
- Weaving ends in short. With around 100 ends in an open lace fabric there is nothing to bury them in, so a 2 cm tail works loose within a few wearings. Go 3 cm minimum and split the yarn.
Ways to Customize This Pattern
- Change the season with the palette while keeping the same leaf: fresh greens and lime for spring, or a single colour throughout for a formal version where the lobe shaping does all the work.
- Make it a full shawl by adding rows of 6 and 7 leaves above the current Row 1, which brings the top edge to about 82 cm and needs 13 more large leaves and 6 more fillers.
- Skip the tassels and work a picot edging all the way round the two diagonals instead, matching the top edge. It makes a lighter piece that works better under a coat collar.
- Turn a single large leaf into a coaster, a bookmark charm or a bag pendant. One leaf with a longer 20 chain stem and a small loop takes about forty minutes and uses less than 10 g.
- Use six leaves in a straight strip instead of a triangle for a scarf-style neckpiece, joined tip to tip with the ch-5 bars and a tassel at each end.
- Swap the pearls for small wooden beads or brass bells, or leave the beads off entirely and use a heavier tassel of 20 strands for a more rustic finish.
Frequently asked questions
Most 8 mm glass pearls have a hole around 1 mm, which DK cotton will not pass through even doubled. You have three options: buy beads sold as large-hole or European style with a 2 mm or wider channel, split your yarn down to a single ply for the beaded strand only, or thread the pearl onto strong beading thread and tie that into the tassel head instead. Do not force a bead onto yarn with a needle, because the glass edge saws through cotton over time and the pearl will drop off months later.
You can, but the piece will not hold its shape as well. Joining during the outline round locks the tips together within the fabric, while a sewn join sits on top and lets the leaves pivot against each other, so the triangle gradually distorts as it is worn. If you do sew, use the same two join points per leaf and add the ch-5 bridge bars everywhere the tips do not touch.
The difference between this looking like lace and looking like a pile of soft leaves. Unblocked, the lobes sit rounded and the ch-1 openings close to about half their size. Pinned at every tip, the lobes pull to points and the whole triangle opens up. Budget a full drying day and enough pins to do every tip, roughly 60.
It is a decorative neckerchief rather than a warm shawl. Open lace in cotton does not trap air, so it works as a layer over a collar, as a hair scarf folded along the top edge, or pinned at the shoulder. If you want warmth, work it in a DK wool at the same gauge and add the extra rows described in the customisation section.
Hand wash in cool water, supporting the whole piece rather than lifting it by one corner, since wet tassels and beads put a surprising amount of strain on the lobe tips they hang from. Press the water out against the basin, lay it flat, and re-pin the top corners and bottom point at least. Comb the tassels straight with your fingers while damp and let them dry hanging over the edge of the mat so they do not dry with a kink.
The finished Autumn Maple Leaf Crochet Shawl with Beaded Tassels

