Autumn Maple Leaf Crochet Table Runner Pattern
Advanced
For experienced crocheters who enjoy complex shaping, fine detail, and ambitious construction
Single-Day Project
A satisfying project you can complete in a single afternoon or evening.
Handmade Gift
A beautiful keepsake — free forever. Read online or print at home.
About This Autumn Maple Leaf Crochet Table Runner Pattern
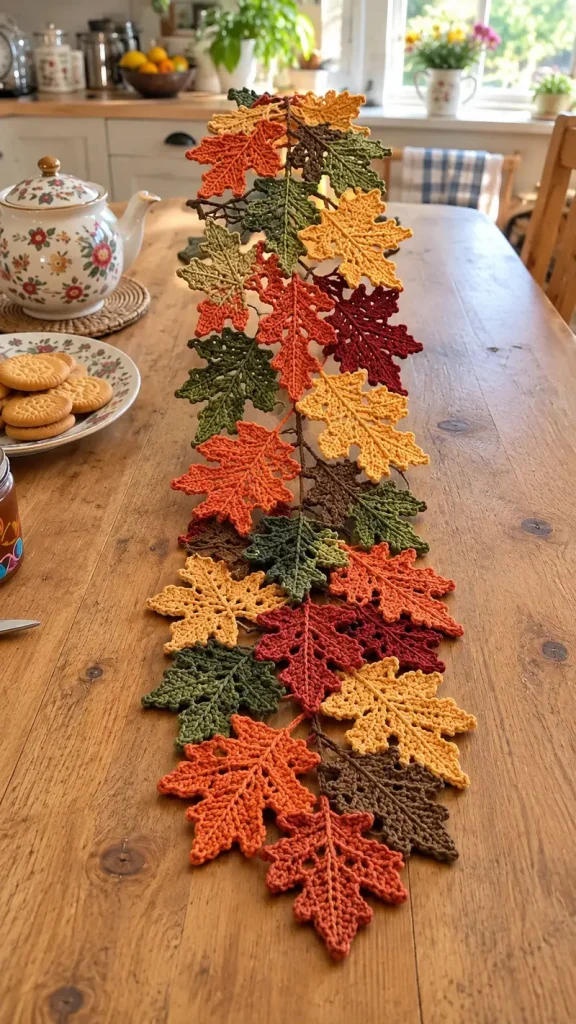
This maple leaf crochet table runner pattern brings the reference photograph’s layered autumn foliage to your table: pointed leaves in mustard, pumpkin, rust, burgundy, olive, forest green, and earthy brown, connected by a slender branching stem. Raised veins and small pointed edges give each leaf definition while overlapping motifs create the long, irregular silhouette.
This advanced project combines shaped flat crochet, individually assembled lobes, surface stitching, and carefully secured overlapping joins. Allow approximately 24–32 hours for the complete runner. It suits crocheters who enjoy detailed motif work and arranging separate pieces into a flowing composition. The runner is unstuffed and designed to lie flat; its leaves and branching framework provide all the structure.
Materials
- Worsted-weight cotton yarn Approximately 700–850 m total; choose colors from the same yarn range.
- Mustard, pumpkin, rust, burgundy, olive, and forest green yarn Approximately 90–110 m of each color.
- Earth brown yarn Approximately 160–190 m for three leaves, the spine, and branch connections.
- 3.5 mm crochet hook Adjust as needed to obtain the blocked gauge.
- Tapestry needle and scissors Use a blunt needle for assembly and raised veins.
- Locking stitch markers For lobe bases, leaf positions, and spine stations.
- Blocking mat, rustproof pins, and measuring tape A full-length paper layout is helpful for assembly.
Abbreviations
chchainscsingle crochet, US terminologysl stslip stitchinc2 sc in the same stitchsc2togsingle crochet the next 2 stitches togetherst / stsstitch / stitchesRSright sideGauge, Dimensions, and Construction
- Gauge: 16 sc and 18 rows = 10 × 10 cm in flat sc after washing and drying flat. Make a swatch with ch 21, then work 20 sc per row for 22 rows. Measure the central 10 cm.
- Turning ch 1 never counts as a stitch. Work every lobe in turned rows, starting at its narrow base and ending at its pointed tip. The foundation chain is not a numbered row.
- Each leaf contains one central lobe, two middle lobes, and two lower lobes. Make 21 leaves: three each in mustard, pumpkin, rust, burgundy, olive, forest green, and earth brown.
- A blocked leaf should measure approximately 11–12 cm from its outer lower edges to its central tip, including the stem, and 13–15 cm across. Individual lobe lengths before edging are approximately 6.1 cm, 5 cm, and 3.9 cm.
- The 210-stitch spine measures approximately 131 cm before the terminal leaf extends its end. Arrange the leaves for a finished runner approximately 145 × 32 cm. These are target dimensions; the assembled sample leaf determines your actual spread.
- For all lobe edging, a picot means ch 3, then sl st into the third chain from the hook. Picots are decorative projections and do not count as base edging stitches.
Central Lobe — Make 21
- With the chosen leaf color, ch 3. Row 1: sc in the second ch from the hook and in the next ch. Turn. (2 sts)
- Row 2: ch 1, inc in both sts. Turn. (4 sts)
- Row 3: ch 1, inc, sc in next 2 sts, inc. Turn. (6 sts)
- Row 4: ch 1, inc, sc in next 4 sts, inc. Turn. (8 sts)
- Row 5: ch 1, inc, sc in next 6 sts, inc. Turn. (10 sts)
- Row 6: ch 1, sc in each st. Turn. (10 sts)
- Row 7: ch 1, sc2tog, sc in next 6 sts, sc2tog. Turn. (8 sts)
- Row 8: ch 1, sc2tog, sc in next 4 sts, sc2tog. Turn. (6 sts)
- Row 9: ch 1, sc2tog, sc in next 2 sts, sc2tog. Turn. (4 sts)
- Row 10: ch 1, sc2tog twice. Turn. (2 sts)
- Row 11: ch 1, sc2tog. (1 st) Fasten off. Mark the two foundation stitches as the base.
Middle Lobes — Make 42
- Make two in the matching color for each leaf. Ch 3. Row 1: sc in the second ch from the hook and in the next ch. Turn. (2 sts)
- Row 2: ch 1, inc in both sts. Turn. (4 sts)
- Row 3: ch 1, inc, sc in next 2 sts, inc. Turn. (6 sts)
- Row 4: ch 1, inc, sc in next 4 sts, inc. Turn. (8 sts)
- Row 5: ch 1, sc in each st. Turn. (8 sts)
- Row 6: ch 1, sc2tog, sc in next 4 sts, sc2tog. Turn. (6 sts)
- Row 7: ch 1, sc2tog, sc in next 2 sts, sc2tog. Turn. (4 sts)
- Row 8: ch 1, sc2tog twice. Turn. (2 sts)
- Row 9: ch 1, sc2tog. (1 st) Fasten off and mark the base.
Lower Lobes — Make 42
- Make two in the matching color for each leaf. Ch 3. Row 1: sc in the second ch from the hook and in the next ch. Turn. (2 sts)
- Row 2: ch 1, inc in both sts. Turn. (4 sts)
- Row 3: ch 1, inc, sc in next 2 sts, inc. Turn. (6 sts)
- Row 4: ch 1, sc in each st. Turn. (6 sts)
- Row 5: ch 1, sc2tog, sc in next 2 sts, sc2tog. Turn. (4 sts)
- Row 6: ch 1, sc2tog twice. Turn. (2 sts)
- Row 7: ch 1, sc2tog. (1 st) Fasten off and mark the base.
Pointed Lobe Edging
- Place a lobe RS up with its base toward you. Join matching yarn at the right-hand foundation stitch. Work up the right edge, across the tip, down the left edge, and finally across the underside of the foundation.
- Central lobe: work 1 sc into each of its 11 row ends up the right side, making a picot after the sc at rows 4, 7, and 9. Work 1 sc into the top stitch, make a picot, then work 1 sc into each of the 11 row ends down the left side, making picots at rows 9, 7, and 4. Work 1 sc into each of the 2 foundation stitches. Sl st to the first edging sc. (25 base sc; 7 picots)
- Middle lobe: follow the same route, working 9 sc up the first side, 1 sc in the tip, 9 sc down the second side, and 2 sc across the foundation. Make side picots at rows 3, 5, and 7 on each side, plus one at the tip. Sl st to the first edging sc. (21 base sc; 7 picots)
- Lower lobe: work 7 sc up the first side, 1 sc in the tip, 7 sc down the second side, and 2 sc across the foundation. Make side picots at rows 3 and 5 on each side, plus one at the tip. Sl st to the first edging sc. (17 base sc; 5 picots)
- Keep the tip stitch separate from the adjacent row-end stitches. Do not add extra corner stitches. Fasten off each lobe, leaving a 35 cm assembly tail at its base.
Assemble the Five-Lobed Leaves
- Arrange one central lobe vertically, RS up. Its foundation midpoint is the leaf hub, and its tip points straight upward. All five lobe bases will meet at this hub.
- Place the two middle lobes beside it, their center lines approximately 45 degrees to the left and right of the central lobe. Overlap their inner lower edges beneath the central lobe by approximately 5 mm.
- Place the lower lobes approximately 85 degrees to the left and right of the central lobe. Their bases also meet the hub. Slip their inner edges beneath the adjacent middle lobes by approximately 5 mm.
- Using matching tails, whipstitch the inner edge of each middle lobe to the central lobe for 2 cm outward from the hub. Catch the underside of the edging so the seam stays discreet. Leave the upper edges free to form deep notches.
- Whipstitch each lower lobe to its neighboring middle lobe for 1.5 cm outward from the hub. Take four additional small stitches through all the overlapping bases at the hub, spreading them over a 1 cm area instead of pulling them into a knot.
- Weave in assembly tails on the underside. Repeat for all 21 leaves. The lobes should fan outward in one plane, with distinct gaps between their pointed upper portions.
Raised Veins and Leaf Stems
- Use matching yarn for most veins. For subtle contrast, use mustard on olive leaves, olive on forest leaves, and rust on burgundy leaves. Cut a 120 cm length for each leaf and secure it on the underside at the hub.
- With a tapestry needle, work a line of small chain embroidery stitches from the hub along the center of the central lobe, ending 5 mm below its tip. Make each stitch approximately 4 mm long and keep the fabric flat.
- Return the yarn invisibly along the underside. Embroider one central vein from the hub into each of the four side lobes, again stopping 5 mm below the tip.
- Add three short paired diagonal veins to the central lobe, two pairs to each middle lobe, and one pair to each lower lobe. Use straight stitches running from the raised vein toward the side picots, ending 3–4 mm inside the edging. Secure and weave in the yarn.
- For each leaf stem, leave a 20 cm starting tail and ch 7 in its leaf color. Sl st in the second ch from the hook and in each remaining ch. (6 sl sts) Fasten off with a 25 cm tail.
- Sew the foundation end of the stem to the underside of the leaf hub with four small stitches. Leave the narrow end free for joining to the brown spine. Make and attach 21 stems.
Brown Spine and Branch Connectors
- With earth brown, ch 211. Row 1: sc in the second ch from the hook and in every remaining ch. Turn. (210 sts)
- Row 2: ch 1, sc in each st. (210 sts) Fasten off. This makes a narrow, flat spine approximately 131 cm long at the stated gauge.
- Number the stitches along row 2 from the starting end. Mark stitches 10, 30, 50, 70, 90, 110, 130, 150, 170, and 190. These are the ten paired-leaf stations. Mark stitch 210 for the terminal leaf.
- Make 20 branch connectors. For each, leave a 25 cm starting tail, ch 9, then sl st in the second ch from the hook and in every remaining ch. (8 sl sts) Fasten off with a 25 cm tail.
- At each paired station, sew one connector to each side of the spine. Spread each join across three adjacent spine stitches centered on the marker. Let each connector extend outward toward its leaf; do not tighten the join enough to twist the spine.
Arrange and Join the Runner
- Block the completed leaves individually before joining. Lay the damp motifs RS up, open the five lobes, and pin the main tips. Aim for 13–15 cm width without stretching the stitches open. Dry completely.
- Lay the spine along the center of a 145 × 32 cm working area, allowing a shallow side-to-side curve. Arrange one leaf on each side of every paired station, with its stem toward the spine and its central tip pointing outward and slightly toward the starting end.
- Use these color pairs from station 10 through station 190, listing left then right: mustard/pumpkin; forest/burgundy; rust/olive; brown/mustard; pumpkin/forest; burgundy/rust; olive/brown; mustard/pumpkin; forest/burgundy; rust/olive. Use the remaining brown leaf at the terminal end.
- Sew each free leaf-stem end to its branch connector with an overlap of 1 cm. Stitch along both edges of that overlap. Sew the terminal brown leaf stem directly over the last 1 cm of the spine, with its central point extending beyond the spine end.
- Fan the leaves to fill the runner width. Let neighboring leaves overlap by approximately 1–2 cm where possible, rotating their lobes to avoid a rigid repeated outline. Keep the central brown line visible in small gaps.
- Secure each overlap at two separate contact points approximately 1 cm apart. At each point, take three small stitches through underside loops using yarn matching the upper leaf. Leave exposed picot tips free. If two adjacent leaves do not touch naturally, adjust their angle before stitching instead of stretching them together.
- At each end of the runner, secure the nearest leaf underside to the spine at an additional point 2 cm from its stem join. These extra anchors help the narrow framework stay aligned when the runner is moved.
Finishing
Check every stem, branch, and overlap from the underside, then weave the remaining tails through several stitches in two directions. Lay the runner flat and ease any lifted leaf edges into place. Mist lightly, pin only the areas that need adjustment, and let everything dry completely before lifting it.
Lift the finished runner with both hands supporting several leaves at once. Wash gently according to the yarn label and reshape flat after washing. Use it as a decorative textile, with a suitable protective mat beneath hot serving dishes.
Tips for Success
- Mark the foundation edge of every lobe immediately; its pointed tip can otherwise make the base difficult to identify in a pile of pieces.
- Keep the four side-lobe bases centered on the same hub. Offset bases create a split-looking leaf and make the stem join bulky.
- Work embroidery with the leaf resting on the table. Pull each stitch only until it touches the surface so the veins do not cup the lobes.
- Photograph the complete dry layout before sewing the overlapping leaves. It gives you a reliable guide if pieces shift during assembly.
Common Mistakes to Avoid
- Counting picot chains as edging stitches changes the perimeter. Count only the base sc: 25 for central lobes, 21 for middle lobes, and 17 for lower lobes.
- Sewing too far toward the lobe tips closes the characteristic notches. Limit the inner seams to 2 cm and 1.5 cm as specified.
- Pulling all five bases tightly into one point makes a hard lump. Spread the reinforcing stitches over the 1 cm hub area.
- Joining leaves before blocking can leave the spine rippled. Block the separate leaves first, then arrange and attach them without tension.
- Attaching every leaf only by its stem leaves the runner unstable. Add the specified overlap tacks and end anchors before moving it.
Ways to Customize This Pattern
- For a shorter runner, make 13 leaves and a 130-stitch spine: ch 131, then work two rows of 130 sc. Place six pairs at stitches 10, 30, 50, 70, 90, and 110, with one terminal leaf at stitch 130.
- Use mustard embroidery on selected rust leaves to suggest autumn leaves retaining golden veins.
- Make an earthy version with olive, forest, brown, and mustard while preserving the five-lobed construction and brown framework.
- For a finer runner, use sport-weight cotton and a smaller hook. Keep all stitch counts, then measure the blocked leaf and spine to establish the smaller finished dimensions.
Frequently asked questions
Separate lobes allow deep notches, pointed edges, and raised individual veins. Their overlapping bases also create the layered texture visible in the reference. The short inner seams turn the separate pieces into one stable leaf.
Yes. This pattern uses cotton, firm crochet, blocking, and small overlap joins for structure. No wire or stiffener is required for a runner that rests on a table.
Block the two-row strip flat before assembly, attach paired branches without tightening their seams, and secure the neighboring leaf overlaps. The completed leaf network helps hold the spine flat.
Check the washed sc gauge first. Use a larger hook if you have more than 16 sc per 10 cm, then remake the sample. If you prefer your smaller leaf, retain the stitch counts and shorten the physical spacing by using your actual blocked spine gauge; expect a narrower, shorter runner.
The finished Autumn Maple Leaf Crochet Table Runner Pattern

