Autumn Maple Leaf Table Runner Crochet Pattern
Beginner Friendly
Perfect for those just starting their crochet journey, with clear instructions and simple techniques
Single-Day Project
A satisfying project you can complete in a single afternoon or evening.
Handmade Gift
A beautiful keepsake — free forever. Read online or print at home.
About This Autumn Maple Leaf Table Runner Crochet Pattern
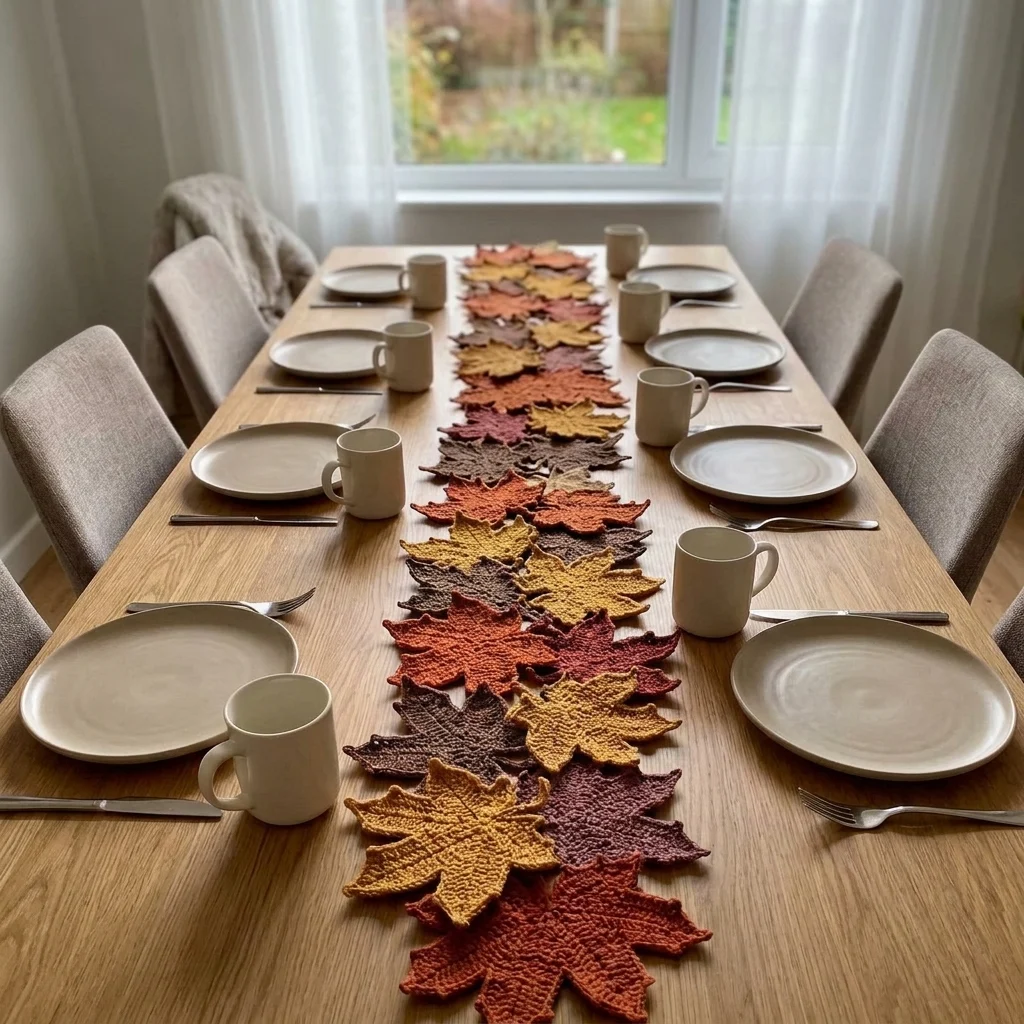
This crochet maple leaf table runner pattern turns a handful of five-pointed leaf motifs into a striking centerpiece for any fall table. Instead of one big project, you build 27 small, portable leaf pieces in rust orange, mustard gold, burgundy wine, and taupe brown, then join them into rows and finally into one long, flowing strip. It’s the kind of project you can carry in a bag and work a leaf or two at a time between other things.
What makes this design distinctive is the graduated stitch construction inside each leaf: slip stitches and single crochet at the narrow tips, building up through half doubles and doubles, to tall trebles at the base of the longest point. That height change is what gives each leaf its sharp, realistic maple silhouette instead of a rounded, generic leaf shape. Expect to spend 10-14 hours total across the leaves, joining, and blocking.
This is an advanced pattern, best suited to someone comfortable with basic stitches who wants to practice graduated shaping, color placement, and hand-sewing joins, rather than someone looking for their first crochet project.
Materials
- DK weight yarn, rust orange ~40g
- DK weight yarn, mustard gold ~40g
- DK weight yarn, burgundy wine ~40g
- DK weight yarn, taupe brown ~40g
- Crochet hook 4 mm (US G/6)
- Tapestry/yarn needle
- Removable stitch marker optional
- Fabric stiffener spray or diluted white glue optional
- Steam iron and pressing cloth, or blocking mat and pins
- Sharp scissors
Abbreviations
chchainsl stslip stitchscsingle crochethdchalf double crochetdcdouble crochettrtreble/triple crochetst(s)stitch(es)reprepeatFOfasten offThe Maple Leaf Motif (make 27: mix of all four colors)
- Ch 4, sl st in first ch to form a small foundation ring. This ring is the center where all 5 points meet.
- Point 1, top (longest): ch 12. Starting in 2nd ch from hook: sl st in next ch, sc in next 2 ch, hdc in next 3 ch, dc in next 3 ch, tr in last 2 ch (11 sts along the point). Sl st into ring.
- Point 2, upper right (medium): ch 9. Starting in 2nd ch from hook: sl st in next ch, sc in next 2 ch, hdc in next 3 ch, dc in last 2 ch (8 sts along the point). Sl st into ring.
- Point 3, lower right (shortest): ch 6. Starting in 2nd ch from hook: sl st in next ch, sc in next 3 ch, hdc in last ch (5 sts along the point). Sl st into ring.
- Point 4, lower left (shortest, mirrors Point 3): repeat Point 3 instructions exactly. Sl st into ring.
- Point 5, upper left (medium, mirrors Point 2): repeat Point 2 instructions exactly. Sl st into ring.
- Sl st into the base of Point 1 to close the round. FO, leaving a 20-25 cm tail for embroidery and joining.
- Weave in the shorter starting tail at the center ring only.
Embroidering the Center Vein
- Thread the long fastening-off tail onto a tapestry needle.
- Using a straight stitch or backstitch, work one line from the center ring straight up the middle of the top point to its tip. This is the main vein.
- Work one shorter straight stitch from the center ring out toward the tip of each of the remaining 4 points, fanning them slightly outward to mimic real leaf veins.
- Weave in the tail securely on the wrong side once all 5 veins are stitched.
Blocking Each Leaf
- Lightly steam or mist each finished leaf with water and pin it right-side up on a towel or blocking mat.
- Gently pull and pin each of the 5 points straight and flat before the piece dries.
- Optional: apply a light coat of fabric stiffener at this stage if you want the leaves to hold a flatter, crisper shape on the table.
- Let dry completely, then repeat for all 27 leaves before you begin joining.
Joining Leaves into Rows
- Lay out your blocked leaves in your chosen color order, making sure no two touching leaves share a color, matching the mixed rust, mustard, burgundy, and taupe layout in the photo.
- Group leaves into rows of 3, turning each leaf 10-20 degrees so the points overlap naturally rather than lining up in a strict grid.
- With a tapestry needle and a matching or neutral strand, whipstitch overlapping points together, catching just 2-3 stitches per point so the join stays flexible rather than stiff.
- Continue joining leaves side to side until each row of 3 is complete. Repeat until you have 9 rows.
Assembling the Runner
- With a leftover tail or fresh strand, whipstitch the bottom of one row to the top of the next, overlapping point tips by about 2 cm so the transition between rows looks continuous.
- Repeat until all 9 rows are joined into one continuous strip of 27 leaves.
- Turn the runner over and check the wrong side for any missed joins; trim and weave in remaining tails.
- Give the whole runner a final light steam to help it lie flat along its full length.
Finishing
Lay the finished runner flat down the center of your table and let it acclimate for a few hours before your event; the joins settle and relax slightly after handling. If any single leaf point looks flatter than the rest, re-steam just that spot rather than the whole runner. For everyday use, a light spot-clean with a damp cloth is enough; avoid machine washing, since blocking and any stiffener will wash out.
Tips for Success
- Block every leaf before joining, not after; it’s far easier to shape points on a single flat motif than on a floppy chain of them.
- Keep tension even on the tr stitches at the base of the top point; these are the tallest stitches on the whole leaf and uneven tension shows immediately.
- Lay all 27 leaves out on the floor in your final layout before stitching a single join, and shuffle until no two same shades touch in either direction.
- Use a removable stitch marker on Point 1’s tip while working Points 2-5, so you always know which point is “up” when the piece is face-down in your lap.
- Cut yarn tails long at 20-25 cm; you’ll reuse most of them for joining and vein embroidery rather than weaving in right away.
Common Mistakes to Avoid
- Working every point in plain sc produces a rounded, floppy shape instead of sharp maple points. Fix: follow the sl st/sc/hdc/dc/tr progression exactly as written.
- Making all 5 points the same chain length loses the maple silhouette. Fix: keep chain lengths at 12/9/9/6/6 as given, not all equal.
- Joining leaves in a strict grid looks stiff rather than organic. Fix: rotate alternating leaves slightly before whipstitching each row.
- Skipping blocking before joining leaves the tips curled from working in the round on a tiny base. Fix: steam-block every motif flat before assembly.
- Repeating the same color on adjacent leaves flattens the visual pattern. Fix: check your layout in both directions, across and down, before you start sewing.
Ways to Customize This Pattern
- Swap the four-color autumn palette for spring greens and pinks and rework it as a spring leaf runner.
- Join leaves point-to-point in a single long chain instead of rows of three to make a hanging garland instead of a flat runner.
- Shorten each chain length by 2-3 sts per point to make smaller leaves for coasters or place-card toppers.
- Make a single leaf and stitch it to a fabric or crocheted band for a matching napkin ring.
- Work the whole runner in one solid, understated color like oatmeal or rust for a quieter, more neutral tablescape.
Frequently asked questions
This runner uses 27 leaves in 9 rows of 3, sized for a standard 6-8 seat table at around 180 cm long. Add or remove full rows of 3 to lengthen or shorten the runner by roughly 20 cm per row.
Yes. Each leaf will come out about 15-20% larger and use more yardage. Switch to a 4.5-5 mm hook and expect a wider, slightly shorter runner for the same leaf count.
No, the whipstitched joins hold it together on their own. A lightweight cotton backing is optional but will hide the joins from underneath and help the runner drape flatter on the table.
This is almost always a blocking issue, not a stitch issue. Steam each leaf, pin the points flat while it’s still damp, and let it dry fully before handling. That alone corrects most curling.
The finished Autumn Maple Leaf Table Runner Crochet Pattern

