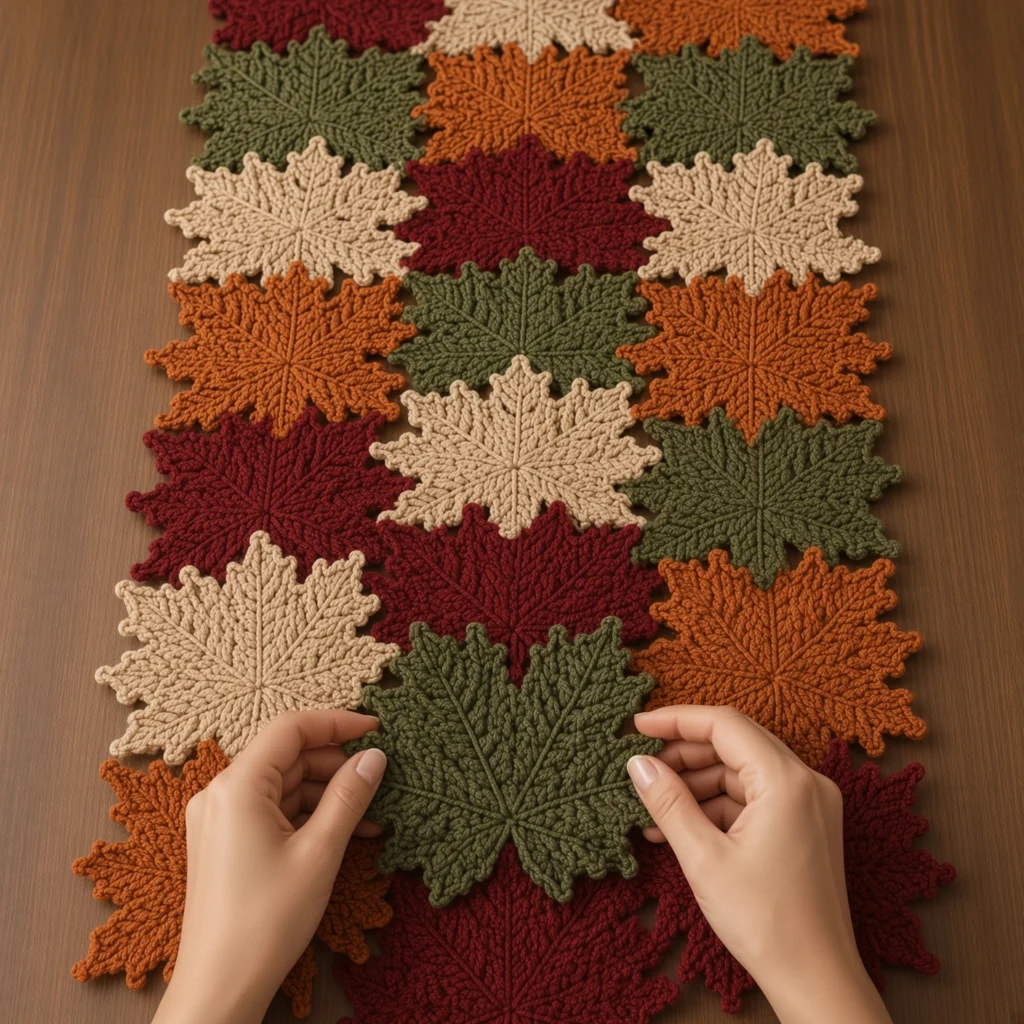
Autumn Maple Leaf Table Runner
Beginner Friendly
Perfect for those just starting their crochet journey, with clear instructions and simple techniques
Single-Day Project
A satisfying project you can complete in a single afternoon or evening.
Handmade Gift
A beautiful keepsake — free forever. Read online or print at home.
About This Autumn Maple Leaf Table Runner
This maple leaf table runner crochet pattern builds a full-length runner from twenty-four separate leaf motifs, each one a flat eight-point disc with raised surface veins radiating from a magic ring center. There is no backing fabric and no rectangle to work into. The leaves themselves are the runner, joined to each other at their picot tips in a staggered three-across layout so the finished edge is jagged and organic rather than straight.
What sets this apart from most crochet leaf projects is the construction order. The disc is increased by eight stitches per round instead of the usual six, which divides it into eight equal wedges and gives each lobe a clean sector to grow out of. Two shaping rounds then convert those wedges into pointed lobes with serrated picot edges, and a final pass of surface slip stitch lays a raised vein down the middle of every lobe. That vein round is what makes the motif read as a leaf rather than a snowflake, and it is the step most people skip.
Expect 10 to 14 hours in total, or roughly 25 to 35 minutes per leaf once you have made three or four and stopped counting sectors. It suits a confident intermediate or advanced crocheter who is comfortable working in joined rounds, reading a repeat across a sector, and joining motifs at the picot. It is an excellent evening project because each leaf is a self-contained unit, so you can put it down after any single motif without losing your place.
Materials
- DK / light worsted cotton in burnt orange 1 x 100 g ball (approx. 60 g used)
- DK / light worsted cotton in olive green 1 x 100 g ball (approx. 60 g used)
- DK / light worsted cotton in cream / natural 1 x 100 g ball (approx. 60 g used)
- DK / light worsted cotton in deep burgundy 1 x 100 g ball (approx. 60 g used)
- 3.5 mm crochet hook go down to 3.25 mm if your discs cup
- Tapestry needle blunt tip, for weaving and picot joins
- Stitch markers at least 8, to mark the increase columns
- Blocking mats and rustproof pins a large surface, the runner is 86 cm long
- Spray bottle or steam iron for wet or steam blocking the finished runner
- Spray starch optional, if you want the points to stay crisp
Abbreviations
MRmagic ringchchainsl stslip stitchscsingle crochethdchalf double crochetdcdouble crochetst / stsstitch / stitchesspspacereprepeatpicotch 3, sl st in 3rd ch from hooksurface sl stslip stitch worked on the surface of finished fabricFOfasten offGauge and Sizing
- Gauge is measured on the flat disc, not on a swatch. Rounds 1 to 6 of the large leaf should measure approximately 9 cm across.
- Finished large leaf: approximately 11.5 cm point to point.
- Finished small leaf: approximately 9 cm point to point.
- Finished runner: approximately 86 cm long x 32 cm wide, using 24 leaves in 8 staggered rows of 3.
- Make one large leaf first, block it, and measure. If it comes out under 10.5 cm, go up a hook size. If it comes out over 12.5 cm, go down. Adjust before making the other 23.
- All leaves are worked in joined rounds with US terminology. Turn nothing; the right side always faces you.
Large Leaf Motif (make 16)
- Rnd 1: 8 sc in MR. Sl st to first sc. Pull the tail tight. (8 sts)
- Rnd 2: Ch 1, 2 sc in each st around. Sl st to first sc. Mark the second sc of each pair; these 8 markers are your increase columns. (16 sts)
- Rnd 3: Ch 1, *sc in next st, 2 sc in next st (marked st); rep from * 7 more times. Sl st to first sc. Move markers up to the new second sc of each pair. (24 sts)
- Rnd 4: Ch 1, *sc in each of next 2 sts, 2 sc in next st; rep from * 7 more times. Sl st to first sc. Move markers up. (32 sts)
- Rnd 5: Ch 1, *sc in each of next 3 sts, 2 sc in next st; rep from * 7 more times. Sl st to first sc. Move markers up. (40 sts)
- Rnd 6: Ch 1, *sc in each of next 4 sts, 2 sc in next st; rep from * 7 more times. Sl st to first sc. Move markers up. (48 sts, 8 sectors of 6 sts)
- Check before continuing: the disc must lie flat. If it ruffles, your tension loosened; if it cups, it tightened. Fix it here rather than after the lobes.
- Rnd 7 (lobe shaping): Ch 1, *sl st in next st, sc in next st, hdc in next st, (2 dc, ch 2, 2 dc) in next st, hdc in next st, sc in next st; rep from * 7 more times. Sl st to first sl st. Each repeat consumes exactly 6 sts. (64 sts, 8 ch-2 points, 8 sl sts)
- Rnd 8 (serrated edge): Ch 1, *sl st in sl st, sc in sc, hdc in hdc, sc in next dc, picot, sc in next dc, (sc, picot, sc) in ch-2 sp, sc in next dc, picot, sc in next dc, hdc in hdc, sc in sc; rep from * 7 more times. Sl st to first sl st. (80 sts, 24 picots, 3 picots per lobe)
- FO leaving a 20 cm tail if this leaf will be joined later, or work the joining picots directly on Rnd 8 as described in the Joining section.
Small Leaf Motif (make 8)
- Rnd 1: 8 sc in MR. Sl st to first sc. Pull the tail tight. (8 sts)
- Rnd 2: Ch 1, 2 sc in each st around. Sl st to first sc. Mark the 8 increase sts. (16 sts)
- Rnd 3: Ch 1, *sc in next st, 2 sc in next st; rep from * 7 more times. Sl st to first sc. (24 sts)
- Rnd 4: Ch 1, *sc in each of next 2 sts, 2 sc in next st; rep from * 7 more times. Sl st to first sc. (32 sts)
- Rnd 5: Ch 1, *sc in each of next 3 sts, 2 sc in next st; rep from * 7 more times. Sl st to first sc. (40 sts, 8 sectors of 5 sts)
- Rnd 6 (lobe shaping): Ch 1, *sl st in next st, sc in next st, (2 dc, ch 2, 2 dc) in next st, sc in next st, sl st in next st; rep from * 7 more times. Sl st to first sl st. Each repeat consumes exactly 5 sts, so the valleys between lobes are 2 sl sts deep. (48 sts, 8 ch-2 points, 16 sl sts)
- Rnd 7 (serrated edge): Ch 1, *sl st in each of next 2 sl sts, sc in sc, sc in next dc, picot, sc in next dc, (sc, picot, sc) in ch-2 sp, sc in next dc, picot, sc in next dc, sc in sc; rep from * 7 more times. Sl st to first sl st. (64 sts, 24 picots, 3 picots per lobe)
- FO leaving a 20 cm tail, or join as you go on this round.
Raised Veins (every leaf)
- Cut a working length of the same color as the leaf, about 90 cm for a large leaf and 70 cm for a small one, and load it onto your hook as a surface slip stitch strand held behind the work.
- Insert the hook from the front of the leaf through to the back, one stitch out from the magic ring center, in line with one of your marked increase columns. Draw up a loop to the front.
- Work surface sl st outward along that column, one sl st per round, until you reach the base of the lobe tip: 6 sl sts on a large leaf, 5 on a small leaf. Keep the tension light so the leaf does not pucker along the line.
- At the tip, draw the yarn through to the back and carry it loosely behind the disc to the next column. Do not cut between veins; the carried strands sit on the wrong side.
- Repeat for all 8 columns, then FO on the wrong side and weave the tail under the carried strands.
- Optional depth: on 4 of the 8 veins per leaf, work the surface sl sts through the back loop only. This makes alternating veins sit slightly higher and mimics the primary and secondary veining of a real leaf.
Layout and Color Placement
- The runner is 8 rows of 3 leaves. Every second row is offset horizontally by half a leaf width, so lobes nest into the gaps of the row above instead of lining up.
- Row 1: orange large, green small, cream large.
- Row 2: burgundy large, cream large, orange small.
- Row 3: green large, orange large, burgundy small.
- Row 4: cream large, burgundy large, green small.
- Row 5: orange small, green large, cream large.
- Row 6: burgundy small, cream large, orange large.
- Row 7: green large, orange small, burgundy large.
- Row 8: cream large, burgundy small, green large.
- This uses 16 large and 8 small leaves, 6 leaves of each color, with no two touching leaves sharing a color.
- Lay the full layout out on your blocking mats and pin it before joining a single stitch. Photograph it. You will need the reference once leaves start moving.
Joining the Leaves
- Leaves are joined at their picots on the final round. Work the first leaf of Row 1 complete and unjoined, then join every subsequent leaf to its already-placed neighbors as you reach the matching picot.
- Joining picot: instead of ch 3, sl st in 3rd ch from hook, work ch 1, sl st into the corresponding picot of the neighboring leaf, ch 1, then continue into the next stitch of the round.
- Each leaf joins to a neighbor at 2 picots per contact point: one on each side of a shared lobe tip. Two contact points per side neighbor, and two per row neighbor above.
- A leaf in the middle of the runner will have between 4 and 8 joining picots in total. A leaf on the outer edge will have 2 to 4. Every picot that does not touch another leaf stays a normal free picot.
- Work row by row, left to right, finishing each row completely before starting the next. Do not join a leaf to a neighbor that is not yet made.
- If a joining picot pulls the leaves too tight and the runner buckles, undo that join and use ch 2 instead of ch 1 on each side of the sl st to add ease.
- Alternative method: make all 24 leaves separately with plain picots, block them, lay out the full arrangement, then sew each contact pair together with 3 or 4 whip stitches through the picot loops using a tapestry needle. This is slower but far easier to correct.
Finishing
Weave in every tail on the wrong side, running each one under the carried vein strands rather than through the visible disc stitches. There are a lot of ends on this project, roughly 72 of them, so weave them in as you complete each leaf instead of leaving them all to the end.
Block the runner as one piece. Wet block cotton by soaking the finished runner in cool water, rolling it in a towel to remove excess moisture, then pinning it flat on mats. Pin every single lobe tip, all the way around the outer edge, and pull each one outward until the picot is fully extended. This is what turns a soft ruffled edge into the crisp jagged silhouette. Let it dry completely, at least 24 hours for a piece this size.
Once dry, check that the runner lies flat on a table. Any localized buckling almost always comes from a joining picot worked too tightly; snip that join, redo it with a chain of ease on each side, and re-block just that section with a steam iron held above the fabric rather than on it. If you want the points to hold their shape through repeated use, a light pass of spray starch on the wrong side before the final dry will stiffen the edge without making the runner feel papery.
Tips for Success
- Make and block one large leaf before committing to the yarn. The whole runner scales from that single measurement, and a 1 cm difference per leaf compounds to 8 cm over the length.
- Keep the 8 increase markers in place through Round 6 on every leaf. It feels excessive by the tenth leaf, but the lobe rounds only work if the sectors are exactly 6 stitches on a large leaf and 5 on a small one.
- Work all 16 large leaves first, then all 8 small ones. Batching keeps the round count in your head and stops you from working a small leaf’s Round 6 shaping onto a large leaf’s 48-stitch disc.
- Carry the vein yarn loosely behind the disc. If you pull it taut between columns, the leaf curls into a bowl and no amount of blocking will flatten it.
- Number your rows with a scrap of yarn tied to the first leaf of each. Once 15 leaves are joined, the offset makes it genuinely hard to tell which row you are on.
Common Mistakes to Avoid
- Starting with 6 sc in the magic ring out of habit. This pattern needs 8, because the leaf has 8 lobes. A 6-stitch start gives you 6 sectors and the entire lobe repeat will not fit. Recount Round 1 before Round 2.
- Working the ch 2 of Round 7 as a turning chain. It is a point space, not a turning chain. Nothing is ever worked into it as a chain; on the next round you work (sc, picot, sc) into the space it creates.
- Letting the disc ruffle through Rounds 4 to 6 and hoping the lobes will fix it. They will not. Ruffling means your increases are outpacing your tension. Rip back to Round 3 and go down a hook size.
- Joining leaves before checking the layout. Because the rows are offset, a leaf placed one position too far left in Row 3 will not become obvious until Row 5, and by then you are unpicking three rows of picot joins.
- Blocking the leaves individually and then joining them. The join itself shifts the geometry, so the runner needs a final block as a whole piece regardless. Block once, at the end.
Ways to Customize This Pattern
- Change the length by adding or removing rows of 3. Each additional row adds roughly 10.5 cm. A 12-row version at about 128 cm suits a long dining table; a 4-row version makes a square centerpiece for a side table.
- Work the veins in a contrasting shade rather than matching yarn. Cream veins on burgundy and olive leaves gives a folk-art look; a single metallic gold thread held with the vein yarn makes a holiday version.
- Swap the autumn palette for spring by using four greens from pale lime to deep forest, keeping the identical construction. The eight-point motif reads as a fresh leaf just as easily as a fallen one.
- Make individual coasters instead of a runner. Stop after the serrated edge round, skip all joining, and block each leaf separately. Six large leaves make a set.
- Add a third size. Stop the increases at Round 4 (32 sts, 8 sectors of 4) and work the small leaf’s shaping round with sl st, sc, (2 dc, ch 2, 2 dc), sc as the 4-stitch repeat. These tiny leaves fill the outer gaps of the runner edge for a more scattered, wind-blown look.
Frequently asked questions
Because the motif has 8 lobes. Every round increases by 8, which keeps the disc divided into 8 identical wedges all the way out. On Round 6 each wedge is exactly 6 stitches, which is precisely what the lobe shaping repeat consumes. A 6-stitch magic ring would give you 6 wedges and the repeat would not divide evenly into the round.
Your stitches are getting taller or looser than the increase rate can absorb. Cotton is unforgiving here because it has no give to hide the problem. Rip back to Round 3, go down to a 3.25 mm hook, and keep the yarn tension consistent by not putting the project down mid-round. A flat disc at Round 6 is non-negotiable; the lobe rounds add fabric at the edge and will amplify any existing ruffle.
You can, but the motif will read as an eight-point star or a snowflake rather than a leaf. The veins are what give the piece its botanical shape, and they take about 4 minutes per leaf. If you want the look with less work, do only the 8 primary veins and skip the optional back-loop-only variation.
Buckling comes from joining picots worked too tightly, not from the leaves themselves. Lay the runner flat and find the spot where it lifts. Snip the two joining picots at that contact point, rework them using ch 2 on each side of the joining slip stitch instead of ch 1, and re-block. One over-tight join can pull an entire row out of true.
Yes, if you use 100 percent cotton and wash it gently. Hand wash in cool water or use a machine’s delicate cycle inside a mesh bag, then reshape and pin it flat to dry exactly as you did for the original blocking. Do not tumble dry; the picot points will curl and you will have to block it again. If you starched it, expect to re-starch after each wash.
The finished Autumn Maple Leaf Table Runner

