Autumn Maple Leaves Crochet Table Runner Pattern
Advanced
For experienced crocheters who enjoy complex shaping, fine detail, and ambitious construction
Single-Day Project
A satisfying project you can complete in a single afternoon or evening.
Handmade Gift
A beautiful keepsake — free forever. Read online or print at home.
About This Autumn Maple Leaves Crochet Table Runner Pattern
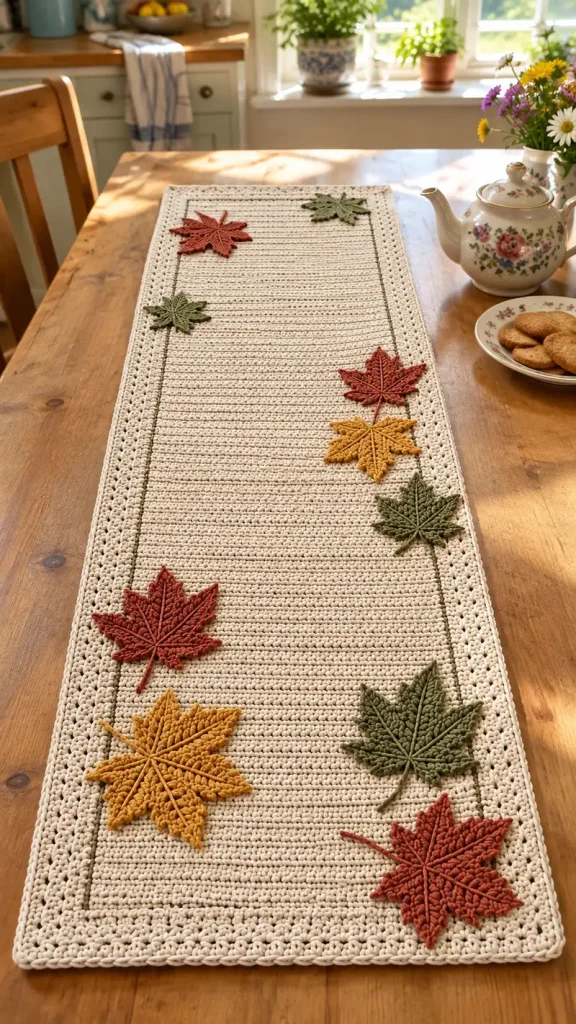
This maple leaf crochet table runner pattern pairs a long cream rectangle with rust, mustard, and olive maple leaves. A narrow olive outline frames the dense center, while a textured cream border and raised embroidered veins echo the details in the reference photograph.
Allow approximately 25–35 hours for the runner, ten individually assembled leaves, embroidery, and finishing. This advanced project suits crocheters who enjoy precise flat shaping and careful appliqué work. The leaves use separate tapered lobes joined into five-point silhouettes; the runner stays flat and unstuffed, with no eyes or facial details.
Materials
- DK cotton in warm cream Approximately 1,100 m; buy about 550–600 g at 200 m per 100 g
- DK cotton in brick rust Approximately 130 m
- DK cotton in muted olive Approximately 160 m, including the outline
- DK cotton in golden mustard Approximately 85 m
- Matching cotton for raised veins Reserve approximately 3 m for each large leaf and 2 m for each small leaf
- 3.5 mm crochet hook Or size required for gauge
- Tapestry needle, scissors, locking markers, measuring tape, and rustproof blocking pins A blocking mat is useful for the long rectangle
Abbreviations
chchainsl stslip stitchscsingle crochethdchalf double crochetincwork 2 sc in one stitchsc2togsingle crochet 2 stitches togetherBLOback loop onlyRSright sideWSwrong sidest / stsstitch / stitchesInstructions use US terminology. Turning ch 1 never counts as a stitch. Work through both loops unless instructed otherwise. Counts in parentheses exclude chains and joining slip stitches.
Gauge, Dimensions, and Construction
- Gauge after washing and blocking: 18 sc and 22 rows = 10 cm. For a swatch, ch 27, sc in the second chain and each remaining chain for 26 sc; work 32 rows total. Measure the central 10 cm.
- The center contains 61 stitches and 264 rows, measuring approximately 34 × 120 cm. Six border rounds add approximately 3 cm on each edge, giving a finished size near 40 × 126 cm.
- Make five small leaves and five large leaves. Small leaves measure approximately 11–13 cm across; large leaves approximately 16–18 cm across after assembly and blocking.
- Small leaves: make two rust, two olive, and one mustard. Large leaves: make two rust, two olive, and one mustard. Each leaf contains one center lobe, two side lobes, and two lower lobes.
- All lobes are worked from their narrow base to their pointed tip. Leave a 25 cm starting tail and a 15 cm finishing tail on each piece.
Cream Runner Center
- Foundation: with cream, ch 62.
- Row 1: sc in the second chain from the hook and in each remaining chain. (61)
- Rows 2–264: ch 1, turn, sc in every stitch. (61 each row)
- After Row 264, fasten off. Mark this face as the RS. Mark every 22nd row along both long sides to help distribute the border evenly.
Textured Cream Border
- Round 1: with RS facing, join cream at the beginning of the top short edge. Ch 1, sc across all 61 top stitches, ch 2; work 264 sc down the long edge, one into each row end, ch 2; work 61 sc across the unused foundation loops, ch 2; work 264 sc up the other long edge, ch 2. Join to the first sc. (650 sc; four ch-2 corner spaces)
- For Rounds 2–5, begin each round with ch 1 and work into every stitch. At each corner space work the specified corner group. Join to the first stitch. Do not turn. A corner group adds one stitch to each adjacent side.
- Round 2: sc in every stitch; work (sc, ch 2, sc) in each corner space. (658 sc; short sides 63 each, long sides 266 each)
- Round 3: hdc in BLO of every stitch; work (hdc, ch 2, hdc) in each corner space. (666 hdc; short sides 65 each, long sides 268 each)
- Round 4: sc in every stitch; work (sc, ch 2, sc) in each corner space. (674 sc; short sides 67 each, long sides 270 each)
- Round 5: hdc in BLO of every stitch; work (hdc, ch 2, hdc) in each corner space. (682 hdc; short sides 69 each, long sides 272 each)
- Round 6: ch 1. Work reverse sc around the entire perimeter, inserting the hook into the next stitch to the right rather than the left. Work one reverse sc in each stitch and 2 reverse sc in each corner space. Join and fasten off. (690 reverse sc)
- The beginning of a joined round can fall within a side after the first corner expansion. Count each side between corner spaces, including the corner stitches belonging to that side.
Olive Inset Outline
- With RS facing and olive yarn held behind the fabric, pull up a loop at the inner boundary of Border Round 1.
- Surface sl st around the rectangle between the center and the border. Use approximately one slip stitch per center stitch along short edges and one per row along long edges.
- At each corner, place one additional loose surface slip stitch diagonally across the turn. Keep the working loop generous so the outline does not draw in the cream fabric.
- Cut the yarn, pull the tail through, and use a needle to imitate the first chain link for an unobtrusive join. Weave in both ends on the WS.
Small Leaf Center Lobes — Make Five
- Make two rust, two olive, and one mustard. Ch 4.
- Row 1: sc in the second chain and remaining chains. (3)
- Row 2: ch 1, turn; inc, sc 1, inc. (5)
- Row 3: ch 1, turn; inc, sc 3, inc. (7)
- Row 4: ch 1, turn; inc, sc 5, inc. (9)
- Rows 5–7: ch 1, turn; sc across. (9 each row)
- Row 8: ch 1, turn; sc2tog, sc 5, sc2tog. (7)
- Row 9: ch 1, turn; sc2tog, sc 3, sc2tog. (5)
- Row 10: ch 1, turn; sc2tog, sc 1, sc2tog. (3)
- Row 11: ch 1, turn; sc 1, sc2tog. (2)
- Row 12: ch 1, turn; sc2tog. (1) Fasten off.
Small Leaf Side Lobes — Make Ten
- Make four rust, four olive, and two mustard. Ch 4.
- Row 1: sc in the second chain and remaining chains. (3)
- Row 2: ch 1, turn; inc, sc 1, inc. (5)
- Row 3: ch 1, turn; inc, sc 3, inc. (7)
- Rows 4–5: ch 1, turn; sc across. (7 each row)
- Row 6: ch 1, turn; sc2tog, sc 3, sc2tog. (5)
- Row 7: ch 1, turn; sc2tog, sc 1, sc2tog. (3)
- Row 8: ch 1, turn; sc 1, sc2tog. (2)
- Row 9: ch 1, turn; sc2tog. (1) Fasten off.
Small Leaf Lower Lobes — Make Ten
- Make four rust, four olive, and two mustard. Ch 4.
- Row 1: sc in the second chain and remaining chains. (3)
- Row 2: ch 1, turn; inc, sc 1, inc. (5)
- Rows 3–4: ch 1, turn; sc across. (5 each row)
- Row 5: ch 1, turn; sc2tog, sc 1, sc2tog. (3)
- Row 6: ch 1, turn; sc 1, sc2tog. (2)
- Row 7: ch 1, turn; sc2tog. (1) Fasten off.
Large Leaf Center Lobes — Make Five
- Make two rust, two olive, and one mustard. Ch 4.
- Row 1: sc in the second chain and remaining chains. (3)
- Row 2: ch 1, turn; inc, sc 1, inc. (5)
- Row 3: ch 1, turn; inc, sc 3, inc. (7)
- Row 4: ch 1, turn; inc, sc 5, inc. (9)
- Row 5: ch 1, turn; inc, sc 7, inc. (11)
- Row 6: ch 1, turn; inc, sc 9, inc. (13)
- Rows 7–10: ch 1, turn; sc across. (13 each row)
- Row 11: ch 1, turn; sc2tog, sc 9, sc2tog. (11)
- Row 12: ch 1, turn; sc2tog, sc 7, sc2tog. (9)
- Row 13: ch 1, turn; sc2tog, sc 5, sc2tog. (7)
- Row 14: ch 1, turn; sc2tog, sc 3, sc2tog. (5)
- Row 15: ch 1, turn; sc2tog, sc 1, sc2tog. (3)
- Row 16: ch 1, turn; sc 1, sc2tog. (2)
- Row 17: ch 1, turn; sc2tog. (1) Fasten off.
Large Leaf Side Lobes — Make Ten
- Make four rust, four olive, and two mustard. Ch 4.
- Row 1: sc in the second chain and remaining chains. (3)
- Row 2: ch 1, turn; inc, sc 1, inc. (5)
- Row 3: ch 1, turn; inc, sc 3, inc. (7)
- Row 4: ch 1, turn; inc, sc 5, inc. (9)
- Rows 5–7: ch 1, turn; sc across. (9 each row)
- Row 8: ch 1, turn; sc2tog, sc 5, sc2tog. (7)
- Row 9: ch 1, turn; sc2tog, sc 3, sc2tog. (5)
- Row 10: ch 1, turn; sc2tog, sc 1, sc2tog. (3)
- Row 11: ch 1, turn; sc 1, sc2tog. (2)
- Row 12: ch 1, turn; sc2tog. (1) Fasten off.
Large Leaf Lower Lobes — Make Ten
- Make four rust, four olive, and two mustard. Ch 4.
- Row 1: sc in the second chain and remaining chains. (3)
- Row 2: ch 1, turn; inc, sc 1, inc. (5)
- Row 3: ch 1, turn; inc, sc 3, inc. (7)
- Rows 4–5: ch 1, turn; sc across. (7 each row)
- Row 6: ch 1, turn; sc2tog, sc 3, sc2tog. (5)
- Row 7: ch 1, turn; sc2tog, sc 1, sc2tog. (3)
- Row 8: ch 1, turn; sc 1, sc2tog. (2)
- Row 9: ch 1, turn; sc2tog. (1) Fasten off.
Assemble the Five-Point Maple Leaves
- For each leaf, gather one center lobe, two side lobes, and two lower lobes in the same color. Place the center lobe upright, with its foundation edge at the bottom.
- Place the side lobes over the lower sides of the center lobe, rotated approximately 45 degrees outward. Align the midpoints of all three foundation edges at one common junction. Overlap the lower 3 rows for a small leaf or 4 rows for a large leaf.
- Add the lower lobes at approximately 85 degrees to either side of the upright center lobe. Their foundation midpoints meet the same junction, and their lower 2 rows overlap the side lobes. Keep all five tips visible.
- Use the starting tails to sew through both layers across every overlapped foundation edge. Then sew each overlap’s inner side edge for 2 cm on a small leaf or 3 cm on a large leaf. Keep the outer edges free.
- For a smoother back, pass the needle through the thickness of the crochet rather than taking long exposed stitches. Secure the central junction firmly, but do not gather it.
- At the finished central junction, join matching yarn and ch 9 for a small stem or ch 13 for a large stem. Sl st in the second chain and every remaining chain. (8 or 12 sl sts) Sl st into the junction and fasten off.
Leaf Edges and Raised Veins
- Join matching yarn at the stem base. Work a loose sl st edging around the exposed leaf silhouette: one sl st into each exposed row end, one into each exposed foundation stitch, and (sl st, ch 2, sl st) into each of the five tips. At each valley, work one sl st through both adjoining lobe edges to reinforce their meeting point. Join at the stem base and fasten off. The perimeter count varies with the overlap; do not stretch the edging to a fixed count.
- With a tapestry needle and doubled matching yarn, couch a main vein from the stem junction to the center tip. Lay the doubled yarn on the surface, then secure it with small stitches of matching single yarn every 5–7 mm.
- Couch one main branch from the junction to each of the other four tips. These lines also conceal the central assembly seams.
- Add three pairs of short diagonal veins along the center lobe and two pairs along each side and lower lobe. Stop each secondary vein one stitch inside the edging.
- Take all tails to the back, secure them within the seam allowances, and trim only after weaving through several stitches in two directions.
Blocking and Leaf Placement
- Wet-block the runner and leaves separately. Pin the runner square, keeping its long edges parallel. Shape the leaves with five distinct points and shallow valleys; leave the embroidered veins raised. Allow everything to dry completely.
- Lay the runner vertically. Measure coordinates from its upper-left outside corner: x runs across the width and y runs down the length. Coordinates below locate each leaf’s stem junction. For a differently sized blocked runner, multiply x by your width divided by 40 and y by your length divided by 126.
- Place the small upper rust leaf at x 9 cm, y 12 cm, and the small upper olive leaf at x 29 cm, y 8 cm. Point their center lobes generally upward.
- Place the remaining small olive leaf at x 6 cm, y 28 cm; the small rust leaf at x 31 cm, y 39 cm; and the small mustard leaf at x 30 cm, y 51 cm. Rotate each slightly toward the open center.
- Place a large olive leaf at x 33 cm, y 65 cm, a large rust leaf at x 9 cm, y 79 cm, and the large mustard leaf at x 10 cm, y 101 cm.
- Place the remaining large olive leaf at x 30 cm, y 96 cm and the remaining large rust leaf at x 30 cm, y 116 cm. Turn the bottom rust leaf so its center tip points toward the lower-right corner. Adjust the rotation enough to keep every point within the outer border.
- Pin all ten leaves before sewing. Let some points cross the olive outline and rest on the cream border, while keeping the broad middle of the runner open.
Finishing
With matching single yarn, sew each leaf to the runner along its five main vein lines, catching only the upper portion of the cream stitches where possible. Add a small securing stitch beneath every lobe tip and at each valley. Stitch the stem down at its base, middle, and end so it cannot snag.
Remove the pins and lay the runner flat to check for puckering. If a leaf pulls the cream fabric inward, undo that attachment and sew it again with a little more slack. Weave in the remaining ends and give the runner a final gentle blocking. Wash cool by hand and dry flat; avoid pressing the raised veins with an iron.
Tips for Success
- Count the runner every 20–30 rows. Maintaining 61 stitches prevents a slow taper that becomes obvious beside the inset outline.
- Mark each border corner space immediately. Corner stitches belong to the adjacent sides, so count between spaces when checking the border.
- Assemble one complete small leaf before making the remaining lobes. Use it as a placement guide so all five small leaves have comparable proportions.
- Keep the surface outline and leaf edging looser than ordinary slip stitches. Both can shorten an otherwise correctly sized piece.
- Work embroidery before attaching leaves. You can hide the vein ends inside the overlaps without carrying dark yarn through the cream base.
Common Mistakes to Avoid
- A ruffled border usually means extra stitches along the row ends. Check that Round 1 has exactly 264 stitches on each long side before continuing.
- A bowl-shaped border can result from tight tension or missed corner stitches. Verify each corner group, then loosen the hook grip or move up half a hook size for the border.
- Leaves can look like five separate petals if the bases barely touch. Overlap the specified lower rows and sew the inner edges before adding the veins.
- Heavy embroidery can curl the lobes. Lay the vein yarn on the surface without pulling, and use small couching stitches to hold it in place.
- Dark attachment stitches may show on the cream underside. Catch shallow cream loops and avoid carrying leaf-colored yarn between separate attachment points.
Ways to Customize This Pattern
- For a shorter runner, work 198 center rows for a center approximately 90 cm long. Use 198 stitches on each long side of Border Round 1; each later corner round still adds two stitches per side.
- Use burgundy, copper, and deep gold for a richer autumn palette while keeping the cream base and olive outline.
- Make the veins one shade lighter than each leaf for stronger definition, using the same couching method.
- For a less raised serving area, place all ten leaves along the outer thirds and sew the entire leaf perimeter down with small matching stitches.
Frequently asked questions
Use a separate heat-rated trivet under hot cookware. The raised leaves and veins create an uneven surface, so keep cups and teapots on the clear center or on a stable tray.
Separate lobes allow controlled points, overlapping lower sections, and raised vein lines like those visible in the reference. The sewn overlaps give the leaves their layered surface.
The outline is already worked as surface crochet: the yarn stays behind the runner while slip stitches form a chain on top. Work loosely and block afterward to keep the rectangle flat.
Secure every tip with a small attachment stitch, then reshape the damp leaves while the runner dries flat. Avoid hanging the runner to dry, which can stretch the base and pull against the appliqués.
The finished Autumn Maple Leaves Crochet Table Runner Pattern

