Autumn Meadow Flower Crochet Blanket Pattern
Advanced
For experienced crocheters who enjoy complex shaping, fine detail, and ambitious construction
Single-Day Project
A satisfying project you can complete in a single afternoon or evening.
Handmade Gift
A beautiful keepsake — free forever. Read online or print at home.
About This Autumn Meadow Flower Crochet Blanket Pattern
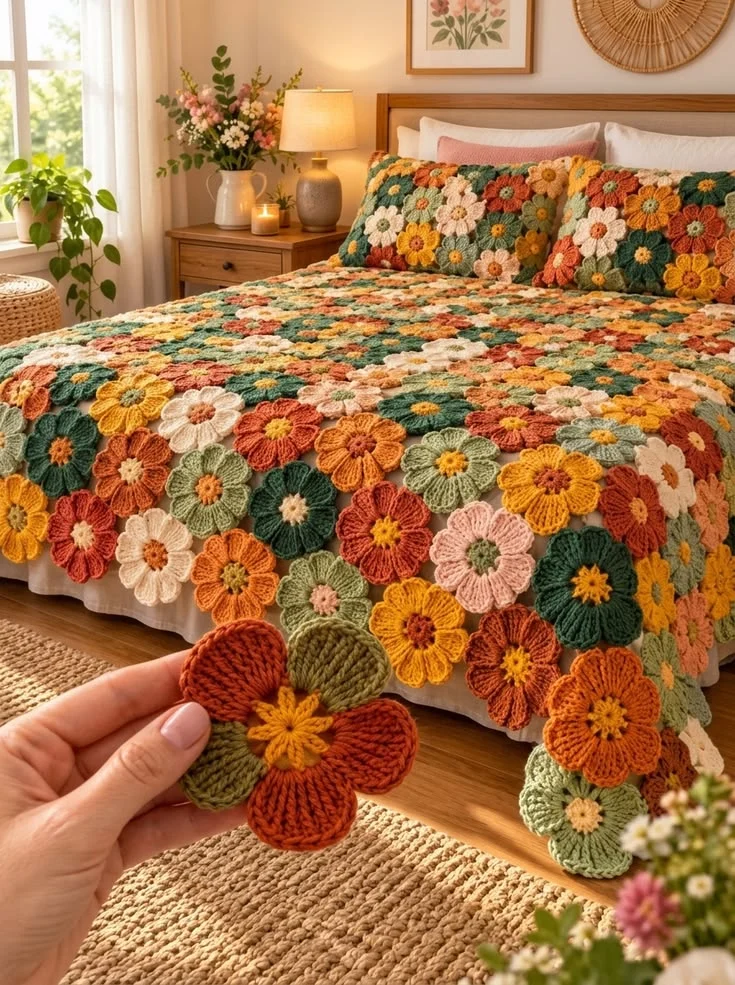
This flower crochet blanket pattern recreates the warm, layered feeling of the reference with individually shaped blooms in rust, terracotta, mustard, cream, blush, sage, olive, and deep forest green. Rounded petals, contrasting centers, and smaller flowers between the large motifs create a richly textured bed cover with a naturally scalloped outline.
The blanket is assembled from 120 large flowers and 99 small filler flowers. Each large flower has eight separately worked petals, a continuous finishing edge, and embroidered center details. Allow approximately 140–190 hours for this advanced project, including blocking and assembly. It suits crocheters who enjoy shaping, careful color planning, and substantial hand finishing.
Materials
- DK yarn in eight coordinating colors Choose one yarn range, approximately 220 m per 100 g; budget 3,200 g / 7,040 m total, including swatching and a generous finishing allowance.
- Suggested color quantities Forest green 600 g; sage 500 g; rust 500 g; terracotta 400 g; mustard 400 g; cream 400 g; blush 200 g; olive 200 g. These quantities assume the color plan below.
- Crochet hook 3.5 mm, or size required for motif gauge.
- Tapestry needles and scissors A blunt needle for seams and a sharp embroidery needle if preferred for surface details.
- Locking markers At least eight for marking petal tips and additional markers for assembly.
- Blocking equipment Mats, rustproof pins, measuring tape, and a washable fabric surface for arranging the blanket.
- Smooth contrasting waste yarn For temporary placement lines and basting.
Abbreviations
chchainMRmagic ringscsingle crochetsl stslip stitchtrtreble crochet: yarn over twice, insert hook, draw up a loop, then draw through two loops three timesincwork 2 sc in one stitchsc2togsingle crochet two stitches togetherst / stsstitch / stitchesRS / WSright side / wrong sideGauge, Dimensions, and Construction
- Use US crochet terminology. Work flat petal rows through both loops. Turning ch 1 never counts as a stitch; turn after each petal row except the last.
- Target blocked fabric gauge: 18 sc and 20 rows = 10 × 10 cm. The finished motif measurement takes priority because edging and individual tension affect its diameter.
- Target large flower: approximately 14 cm across opposite petal tips. Target filler: approximately 6 cm across. All measurements are after washing and gentle blocking.
- Arrange 10 large flowers across and 12 down, with their centers approximately 14 cm apart. The nominal finished size is 140 × 168 cm, including the outer petals. Small variations follow the scalloped outline.
- Each large flower has an eight-stitch center surrounded by 16 stitches. Divide those 16 stitches into eight consecutive pairs, one pair per petal. Petals are worked separately, then edged together.
- Make 20 large flowers each with forest, sage, rust, terracotta, mustard, and cream petals: 120 flowers total. Use contrasting centers, distributing blush and olive throughout. Make the 99 fillers in a mixture of the same colors, using leftovers where possible.
Large Flower Centers — Make 120
- Round 1: With center color, work 8 sc in an MR. Tighten the ring. Join with a sl st to the first sc. (8 sts)
- Round 2: Ch 1, inc in each st around. Join with a sl st to the first sc. Fasten off and secure the ring tail. (16 sts)
- With the RS facing, number the stitches clockwise from 1 to 16. Mark the pairs 1–2, 3–4, 5–6, 7–8, 9–10, 11–12, 13–14, and 15–16. Joining stitches and chains do not count toward these pairs.
Shaped Large Petals — Make Eight per Flower
- Row 1: With RS of center facing, join petal color with a sl st in the first center stitch of an unused pair. Ch 1, work 2 sc in that same stitch and 2 sc in the second stitch of the pair. (4 sts)
- Row 2: Ch 1, turn, inc, sc in next 2 sts, inc. (6 sts)
- Row 3: Ch 1, turn, inc, sc in next 4 sts, inc. (8 sts)
- Row 4: Ch 1, turn, sc in each st. (8 sts)
- Row 5: Ch 1, turn, sc in each st. (8 sts)
- Row 6: Ch 1, turn, sc in each st. (8 sts)
- Row 7: Ch 1, turn, sc in each st. (8 sts)
- Row 8: Ch 1, turn, sc2tog, sc in next 4 sts, sc2tog. (6 sts)
- Row 9: Ch 1, turn, sc2tog, sc in next 2 sts, sc2tog. (4 sts)
- Row 10: Ch 1, turn, sc2tog twice. (2 sts)
- Row 11: Ch 1, turn, sc2tog. Fasten off. (1 st)
- Repeat Rows 1–11 in each remaining center pair, always starting with the center RS facing. Make eight petals in total. Each petal uses exactly two center stitches; all 16 center stitches are used once.
Continuous Petal Edging — Each Large Flower
- With RS facing, join matching petal yarn at the lower side of any petal. Work toward its tip, placing 1 sc into each row end of Rows 1–10. (10 sc)
- Work 3 sc into the single stitch of Row 11. Mark the middle of these three stitches as the petal tip. (3 sc)
- Work 1 sc into each row end of Rows 10–1 down the opposite side. (10 sc)
- Sl st into the gap between this petal and the next, catching a secure strand of the center fabric. This anchors the valley and is not included in the sc count.
- Repeat the same edging around all eight petals. Join to the first edging sc and fasten off. Total: 184 sc and eight valley sl sts. Each petal has 23 edging sc.
- Secure the petal tails on the WS, weaving them along their own color areas. Leave the eight tip markers in place until assembly.
Embroidered Center Details
- Thread a 50 cm length of contrasting yarn onto a tapestry needle. Bring it through from the WS close to the center ring, leaving a tail to secure later.
- Make eight short straight stitches radiating outward, one toward the base of each petal. Each stitch should run from close to the ring to the outer edge of the center, approximately 8–12 mm long.
- Keep the stitches relaxed so the center remains flat. Secure both ends on the WS. Use mustard on green or rust centers, cream on olive centers, and rust on mustard centers.
Small Filler Flowers — Make 99
- Round 1: With center color, work 8 sc in an MR. Tighten and join with a sl st to the first sc. (8 sts)
- Round 2: Ch 1, inc in each st around. Join to the first sc. Fasten off. (16 sts)
- Round 3: Join petal color in any stitch. In that same stitch work ch 3, 3 tr, ch 3, sl st; sl st in the next stitch; sl st in the following stitch to reach the next petal base. Repeat this sequence eight times, with the final travel sl st landing at the original petal base. Fasten off. (8 petals, 24 tr, 16 ch-3 sections)
- The petal bases occupy alternate center stitches, and the intervening stitches each receive one anchoring sl st. Keep the chains loose enough for the petals to spread into rounded fans.
- Weave in ends and block to approximately 6 cm across opposite petal tips. If the filler is too small for the four-flower swatch, remake it with a hook 0.5 mm larger; if it buckles in the opening, use a hook 0.5 mm smaller. Keep the written stitch counts unchanged.
Blocking and Layout
- Wash the sample motifs according to the yarn label. Press out water in a towel, then pin each large flower to approximately 14 cm across opposite tips. Spread the petals evenly without pulling them taut.
- Orient every large flower with a petal pointing upward. Number its petals clockwise: 1 north, 2 northeast, 3 east, 4 southeast, 5 south, 6 southwest, 7 west, and 8 northwest.
- Lay out 12 rows of 10 large flowers. Label rows 1–12 from top to bottom and columns 1–10 from left to right. Avoid placing the same dominant petal color directly beside itself where possible.
- For a balanced distribution, begin with repeating groups of the six main petal colors and shift the starting color by two positions on each following row. Adjust the final layout until all 20 flowers of each main color are used.
- Position one filler in every opening between four large flowers. There are 9 openings across and 11 down: 99 fillers total. Photograph the arrangement before moving any pieces.
Join the Large Flowers
- Use matching yarn and a flat ladder seam through both loops of the edging stitches. Hold neighboring motifs RS upward and side by side. Do not overlap their petals.
- For each horizontal join, match petal 3 of the left flower to petal 7 of the right flower. Center the seam on the marked tips and sew five edging stitches from each petal together: the tip stitch plus two stitches on either side. Work from one end of this five-stitch span to the other.
- Join all neighbors in each row. Each row has nine joins; 12 rows require 108 horizontal joins.
- Join adjacent rows by matching petal 5 of the upper flower to petal 1 of the lower flower, using the same five-stitch seam. Ten joins between each pair of rows give 110 vertical joins.
- After each group of seams, lay the work flat. A seam should bring the petal ends together without making a ridge or pulling the flower centers closer than the blocked layout allows. Secure and weave in each seam tail.
Attach the Filler Flowers
- Place a filler RS upward in the opening between four large flowers. Its four alternate petals should point toward the four surrounding large-flower centers.
- For each opening, the attachment petals on the large flowers are: petal 4 of the upper-left flower, petal 6 of the upper-right flower, petal 2 of the lower-left flower, and petal 8 of the lower-right flower.
- On each of those large petals, identify the marked tip and the edging stitch immediately beside it on either side. These three stitches form its attachment span.
- Match that span to the tops of the three tr stitches in the corresponding filler petal. Sew the three pairs together with a flat ladder seam. Attach all four alternate filler petals in this way, leaving the other four filler petals free to fill the spaces between the seams.
- Repeat for all 99 openings, making four attachment seams per filler: 396 filler seams total. Check that each filler rests flat before securing its final tail.
Finishing
Spread the blanket on a flat surface and inspect every center, petal base, and joining seam. Reinforce any loose ring closures and weave all remaining tails through several stitches on the wrong side, reversing direction once. Trim only after the ends hold securely.
Wash according to the yarn label and support the wet blanket fully when moving it. Dry flat, gently arranging the flowers into their original spacing. The outer petals form the finished border; leave their scallops free. This size works as a generous throw or a decorative bed layer, while the matching floral cushions in the reference are separate projects.
Tips for Success
- Complete and measure the edged flower before making a batch. The continuous edging changes both its diameter and the shape of its tips.
- Keep the middle stitch of every three-stitch tip marked. Those markers make the five-stitch joining spans easy to center.
- Make petals in batches of eight and attach them to their own centers immediately. This prevents unfinished flowers and loose pieces from becoming mixed.
- Use a yarn shade close to the darker of the two joined petals, and keep seams loose enough to preserve the scalloped edges.
- Carry the blanket on a sheet or large towel during wet finishing so its own weight does not stretch the joins.
Common Mistakes to Avoid
- Starting a petal in a joining sl st adds an unintended center position. Count only the 16 sc of center Round 2 and mark all eight pairs before beginning.
- Adding edging stitches at row corners makes the petals ruffle. Work exactly ten side stitches, three tip stitches, and ten side stitches per petal.
- Pulling seams tight produces a cupped blanket. Undo the tight seam and resew with the motifs lying flat at their blocked spacing.
- Attaching every filler petal creates unnecessary tension. Attach only four alternate petals, with three stitches in each attachment seam.
- Forcing an undersized filler into its opening distorts the diagonal petals. Adjust its hook size using the four-flower sample before making all 99.
Ways to Customize This Pattern
- For a smaller throw, arrange eight flowers across and ten down: make 80 large flowers and 63 fillers for approximately 112 × 140 cm.
- For a larger bed cover, arrange 14 flowers across and 16 down: make 224 large flowers and 195 fillers for approximately 196 × 224 cm. Increase the yarn budget in proportion to motif quantities.
- Echo the multicolored foreground bloom by working four petals in rust and four in olive on selected flowers. Keep all eight petals the same size.
- Create cream daisies with mustard centers, then distribute them among the darker flowers to brighten the surface.
- Use sage or forest green for most filler flowers to create a leafy background between the warmer blooms.
Frequently asked questions
This pattern has no backing. Large flowers join at their cardinal petals, and small flowers bridge the central openings. Small decorative gaps remain between some petals.
Separate rows allow each petal to widen, hold its width, and taper before the continuous edging rounds its tip. This produces the distinct, substantial petals seen in the reference.
Yes. Use the same cotton yarn range throughout and make the full joining sample first. A blanket this size can be heavy in cotton, and its weight may change the drape and stretch of the seams.
Subtract one from the number of columns and one from the number of rows, then multiply those results. A layout of ten columns and twelve rows needs 9 × 11 = 99 fillers.
The free outer petals are the intended border. A straight border would require additional infill motifs and a new edge design, so finish this version with its natural floral scallops.
The finished Autumn Meadow Flower Crochet Blanket Pattern

