Autumn Ombre Maple Leaf Table Runner Crochet Pattern
Beginner Friendly
Perfect for those just starting their crochet journey, with clear instructions and simple techniques
Single-Day Project
A satisfying project you can complete in a single afternoon or evening.
Handmade Gift
A beautiful keepsake — free forever. Read online or print at home.
About This Autumn Ombre Maple Leaf Table Runner Crochet Pattern
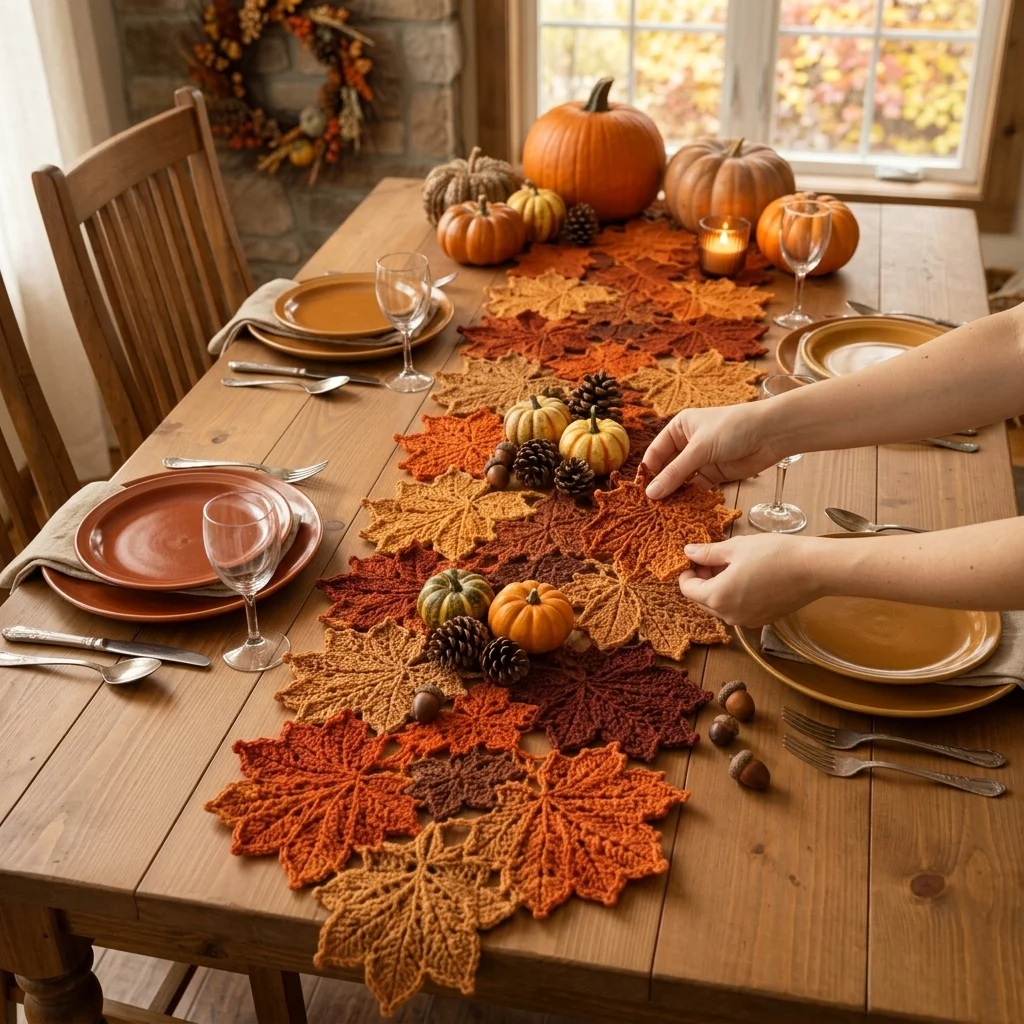
This crochet maple leaf table runner pattern joins more than 20 deeply-lobed maple leaves directly edge to edge, with no gaps or connector chains between them, in five ombre shades running from pale gold through rust, burnt orange, and deep burgundy to near-black brown. The leaves vary in size and rotate at different angles, so the finished piece looks like a drift of fallen leaves rather than a uniform strip.
What makes this design distinctive is the leaf shape itself: each motif has five full lobes with deep clefts between them, worked with a mix of chains, picots, and taller stitches to get the sharp, pointed classic-maple silhouette, plus visible vein lines worked as surface slip stitches down each lobe. Because leaves are joined directly along their touching edges rather than sewn onto a backing, the runner has real texture and slight movement rather than lying perfectly flat. Expect to spend 14-18 hours total, split between making individual leaves and hand-joining them into the final shape.
This is an advanced pattern, best suited to someone comfortable with picot stitches, surface slip stitch embroidery, and improvisational whip-stitch joining, rather than someone who wants a rigid, predictable grid layout.
Materials
- Worsted weight yarn, pale gold ~50g
- Worsted weight yarn, amber orange ~50g
- Worsted weight yarn, rust orange ~50g
- Worsted weight yarn, burgundy wine ~50g
- Worsted weight yarn, dark chocolate brown ~50g
- Crochet hook 4.5 mm (US 7)
- Tapestry/yarn needle
- Steam iron and pressing cloth, or blocking mat and pins
- Sharp scissors
Abbreviations
chchainsl stslip stitchscsingle crochethdchalf double crochetdcdouble crochettrtreble/triple crochetpicotch 2, sl st in first ch of the 2st(s)stitch(es)reprepeatFOfasten offLarge Maple Leaf Motif (make 8, mixed colors)
- Ch 4, sl st in first ch to form a small foundation ring.
- Lobe 1, top center (longest): ch 14. Starting in 2nd ch from hook: sl st, sc 2, hdc 3, dc 4, tr 3 (12 sts along the lobe). Sl st into ring.
- Lobe 2, upper right: ch 11. Starting in 2nd ch from hook: sl st, sc 2, hdc 3, dc 4 (9 sts along the lobe). Sl st into ring.
- Lobe 3, lower right (shortest): ch 8. Starting in 2nd ch from hook: sl st, sc 3, hdc 3 (6 sts along the lobe). Sl st into ring.
- Lobe 4, lower left: repeat Lobe 3 exactly. Sl st into ring.
- Lobe 5, upper left: repeat Lobe 2 exactly. Sl st into ring.
- Working around the outer edge of all 5 lobes now, add picots at the tip of each lobe: when you reach a lobe tip on the return pass, work ch 2, sl st in same st before continuing, to create the small jagged points visible along each edge.
- Sl st into base of Lobe 1 to close. FO leaving a 20-25 cm tail for joining and veining.
Medium Maple Leaf Motif (make 8, mixed colors)
- Ch 4, sl st in first ch to form a small foundation ring.
- Lobe 1, top center: ch 11. Starting in 2nd ch from hook: sl st, sc 2, hdc 3, dc 3 (9 sts). Sl st into ring.
- Lobe 2, upper right: ch 9. Starting in 2nd ch from hook: sl st, sc 2, hdc 3, dc 2 (8 sts). Sl st into ring.
- Lobe 3, lower right: ch 6. Starting in 2nd ch from hook: sl st, sc 3, hdc 1 (5 sts). Sl st into ring.
- Lobe 4, lower left: repeat Lobe 3 exactly. Sl st into ring.
- Lobe 5, upper left: repeat Lobe 2 exactly. Sl st into ring.
- Add a picot at each lobe tip as in the large leaf. Sl st into base of Lobe 1 to close. FO leaving a 20-25 cm tail.
Small Maple Leaf Motif (make 8, mixed colors)
- Ch 4, sl st in first ch to form a small foundation ring.
- Lobe 1, top center: ch 8. Starting in 2nd ch from hook: sl st, sc 2, hdc 2, dc 2 (6 sts). Sl st into ring.
- Lobe 2, upper right: ch 6. Starting in 2nd ch from hook: sl st, sc 2, hdc 2 (4 sts). Sl st into ring.
- Lobe 3, lower right: ch 4. Starting in 2nd ch from hook: sl st, sc 2 (2 sts). Sl st into ring.
- Lobe 4, lower left: repeat Lobe 3 exactly. Sl st into ring.
- Lobe 5, upper left: repeat Lobe 2 exactly. Sl st into ring.
- Add a picot at each lobe tip. Sl st into base of Lobe 1 to close. FO leaving a 15-20 cm tail.
Embroidering the Veins
- Thread the long fastening-off tail onto a tapestry needle for each leaf.
- Work a straight or backstitch line from the center ring up the middle of the top lobe to its tip. This is the main vein.
- Work a shorter straight stitch from the center ring out toward the tip of each of the 4 remaining lobes, fanning them outward slightly.
- Weave in the tail on the wrong side once all 5 veins are stitched, or leave a short length free if that leaf will be joined at that exact point.
Blocking Each Leaf
- Lightly steam or mist each finished leaf, right-side up, and pin it flat with all 5 lobes spread out and straight.
- Let dry completely before joining. Repeat for all 24 leaves before you begin assembly.
Direct Edge Joining
- Lay out all 24 blocked leaves on a large flat surface, arranging them by color into a gradient running from pale gold at one end through amber, rust, and burgundy to dark brown at the other end, matching the photo’s ombre flow.
- Rotate leaves at varying angles, some upright, some tilted 20-40 degrees, and overlap their lobe tips directly against neighboring leaves so there are no visible gaps or background showing through, mixing large, medium, and small sizes throughout rather than grouping by size.
- Once you’re happy with the layout, join each pair of touching leaves with a few whipstitches directly where their lobes overlap, using a matching or neutral yarn tail and catching just 2-3 stitches per contact point so the join stays flexible.
- Work outward from one end of the runner to the other, joining each new leaf to all of its already-placed neighbors before moving on, to keep the whole piece from drifting out of alignment.
Finishing
Once all leaves are joined, turn the runner over and check the wrong side for any missed connections; a leaf joined at only one point will flop, so add a second join wherever needed. Weave in all remaining tails securely. Give the whole runner a final light steam, laying it flat and gently arranging any leaves that sit slightly proud of their neighbors so the surface reads as one continuous, textured drift rather than a stack of separate pieces.
Tips for Success
- Lay out the full color gradient and leaf-size mix on the floor before joining a single stitch; it’s much easier to rebalance colors and sizes while pieces are only sitting loose.
- Join each leaf at 2-3 points minimum, not just one; a single join point lets leaves flip up or twist out of the flat plane.
- Keep whipstitches loose enough that the joined leaves can still flex slightly; overly tight joins make the whole runner stiff and board-like.
- Vary rotation angle deliberately leaf to leaf; a repeating angle pattern reads as mechanical rather than naturally scattered.
- Block every leaf before joining; unblocked lobes curl at the tips and make it much harder to see true gaps during layout.
Common Mistakes to Avoid
- Grouping all the same-size leaves together in one section instead of mixing sizes throughout flattens the organic, scattered look. Fix: distribute large, medium, and small leaves evenly along the whole runner.
- Working all 5 lobes at the same chain length loses the pointed maple silhouette. Fix: keep lobe lengths graduated as given, longest at top, shortest at the sides.
- Leaving visible gaps between leaves where the table shows through breaks the dense, fallen-leaf effect. Fix: overlap lobe tips generously before joining rather than placing leaves edge to edge with a gap.
- Joining leaves in a strict end-to-end line instead of a scattered, overlapping cluster looks like a chain rather than a drift. Fix: let leaves overlap in multiple directions, not just lengthwise.
- Skipping picots at the lobe tips leaves the edges looking rounded rather than sharply toothed. Fix: add a ch-2 picot at every lobe point as instructed.
Ways to Customize This Pattern
- Swap the five-color autumn ombre for greens and yellows for a spring version of the same construction.
- Reduce to 12-14 leaves total for a shorter table centerpiece mat instead of a full runner.
- Use only 3 colors instead of 5 for a bolder, more graphic look with less gradation.
- Join leaves into a rounder cluster shape instead of an elongated strip for a wreath-style centerpiece.
- Add a few small crocheted acorns tucked between overlapping leaves for extra texture.
Frequently asked questions
Pin leaves to a foam blocking board or thick towel in your final layout before joining anything. This holds the arrangement still so you can join point by point without leaves shifting out of place.
Yes. Add extra leaves at the gradient’s midpoint in whichever color falls there, keeping the overall light-to-dark flow intact, rather than adding length only at one end.
No, direct whipstitch joins at multiple contact points per leaf hold the piece together on their own. A backing isn’t necessary and would flatten the natural texture this design is meant to have.
This usually means the picots were skipped or the lobe chain lengths weren’t graduated. Recheck that each lobe uses its specified chain length and that a ch-2 picot sits at every lobe tip.
The finished Autumn Ombre Maple Leaf Table Runner Crochet Pattern

