Autumn Pumpkin Door Hanger Crochet Pattern
Beginner Friendly
Perfect for those just starting their crochet journey, with clear instructions and simple techniques
Single-Day Project
A satisfying project you can complete in a single afternoon or evening.
Handmade Gift
A beautiful keepsake — free forever. Read online or print at home.
About This Autumn Pumpkin Door Hanger Crochet Pattern
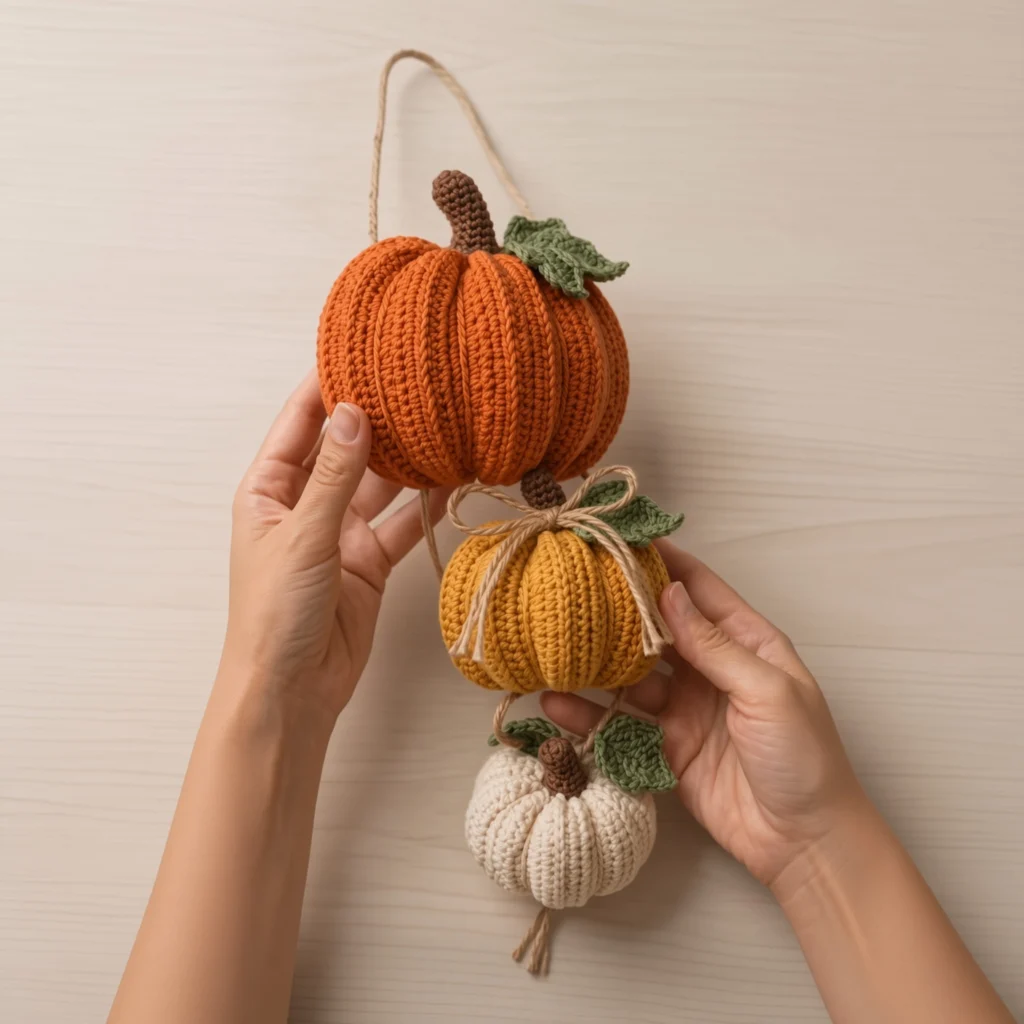
This crochet pumpkin door hanger pattern gives you three ribbed pumpkins in orange, gold and cream, strung one below the other on jute twine with sculpted stems, maple leaves and curly tendrils. The pumpkins are not worked in the round like most amigurumi. Each one starts as a long strip of single crochet worked in the back loop only, which builds a deep corduroy rib along its whole length. The strip is seamed into a tube, gathered at both ends and stuffed, and the ribs fall into place as natural pumpkin segments. It is a completely different construction from a spiral-worked ball, and it is the reason these read as real pumpkins rather than orange spheres.
Plan on seven to nine hours in total, spread over a couple of evenings. The strips themselves are mindless television crochet, but the finishing is where the skill sits: seaming the tube without a twist, gathering the ends tightly enough to disappear under the stem, shaping the tapered stems, and assembling the three pumpkins on twine so they hang straight instead of spinning. There are eighteen separate pieces here once you count the stems, leaves and tendrils.
This one suits a confident crocheter who already knows the basics and wants a project with real assembly in it. If you have only ever worked amigurumi in continuous rounds, the flat ribbed method is worth learning on its own, and the small cream pumpkin makes a quick test run before you commit to the large one.
Materials
- Worsted weight (medium 4) cotton or acrylic in burnt orange approx. 60 g / 110 m
- Worsted weight yarn in golden yellow approx. 45 g / 80 m
- Worsted weight yarn in cream approx. 30 g / 55 m
- Worsted weight yarn in sage green approx. 20 g, for leaves and tendrils
- Worsted weight yarn in warm brown approx. 15 g, for stems
- 4.0 mm crochet hook or size to match gauge
- Polyester fiberfill approx. 100 g
- Jute twine, 2-3 mm thick approx. 2 m
- Blunt yarn needle large eye, for seaming and gathering
- Stitch markers at least 8, for counting rows in tens
- Pale green embroidery floss optional, for leaf veins
- Sharp scissors
Abbreviations
MRmagic ringchchainscsingle crochethdchalf double crochetdcdouble crochetsl stslip stitchincincrease, 2 sc in the same stitchBLOback loop onlyRndroundst(s)stitch(es)reprepeatRSright sideGauge and Construction Notes
- Gauge: 18 sc and 21 rows of BLO ribbing = 10 cm square. Exact gauge is not critical, but work tightly enough that stuffing cannot push through between the ribs.
- All three pumpkin bodies are worked flat in rows, turning at the end of every row. Only the stems are worked in the round.
- The foundation row is worked through the whole chain. Every row after that is worked in the back loop only, on both sides of the fabric, with no exceptions. The ridge that forms on the front of each row is the pumpkin rib.
- The chain edge and the final row edge get seamed to each other, so the strip becomes a tube. The two long edges of the strip stay open and become the top and bottom of the pumpkin.
- Leave a 60 cm tail at the end of each pumpkin strip. You will use it for the seam and the top gather, which saves weaving in two extra ends.
Large Orange Pumpkin
- With orange, leaving a 20 cm starting tail: ch 26.
- Row 1: sc in 2nd ch from hook and in each ch across. (25 sc)
- Row 2: ch 1, turn, sc in BLO of each st across. (25 sc)
- Rows 3-64: rep Row 2. (25 sc in every row, 64 rows total)
- Fasten off, leaving a 60 cm tail. Do not gather yet. Go to Shaping and Closing Each Pumpkin below.
Medium Golden Pumpkin
- With golden yellow, leaving a 20 cm starting tail: ch 21.
- Row 1: sc in 2nd ch from hook and in each ch across. (20 sc)
- Row 2: ch 1, turn, sc in BLO of each st across. (20 sc)
- Rows 3-52: rep Row 2. (20 sc in every row, 52 rows total)
- Fasten off, leaving a 50 cm tail.
Small Cream Pumpkin
- With cream, leaving a 20 cm starting tail: ch 16.
- Row 1: sc in 2nd ch from hook and in each ch across. (15 sc)
- Row 2: ch 1, turn, sc in BLO of each st across. (15 sc)
- Rows 3-40: rep Row 2. (15 sc in every row, 40 rows total)
- Fasten off, leaving a 45 cm tail.
Shaping and Closing Each Pumpkin
- Lay the strip flat with the ribs running vertically. Bring the foundation chain edge and the final row edge together, ribs facing the same way, and check along the whole length that the strip is not twisted before you sew.
- Thread the long tail and whip stitch the two short edges together through both loops, one stitch per row-end, working from one long edge to the other. Do not pull the seam tight enough to pucker. You now have a ribbed tube.
- Turn the tube so the seam sits inside. Thread the tail again and run a running stitch around one open edge, catching every row-end once, about 3 mm in from the edge.
- Pull the running stitch closed as tightly as it will go, then take two small stitches across the hole to lock it. This is the bottom of the pumpkin.
- Stuff firmly through the open top. Fill the sides before the centre so the pumpkin ends up wider than it is tall, then flatten it gently between your palms.
- Run a second running stitch around the remaining open edge, pull it closed the same way, and lock it. Do not cut this tail yet.
- Optional rib deepening, large pumpkin only: thread the tail, pass the needle straight down through the centre of the pumpkin from top to bottom, bring it up the outside along the valley between two ribs, and back through the centre. Repeat around to divide the pumpkin into six segments, pulling each pass only just snug. Fasten off inside.
- Repeat all steps for all three pumpkins. Skip step 7 on the medium and small pumpkins so the trio does not look over-worked.
Large Pumpkin Stem
- Rnd 1: with brown, 6 sc in MR. (6)
- Rnd 2: sc in BLO of each st around. (6)
- Rnds 3-7: sc in each st around. (6)
- Rnd 8: (sc in next st, inc) rep 3 times. (9)
- Rnds 9-10: sc in each st around. (9)
- Rnd 11: (sc in next 2 sts, inc) rep 3 times. (12)
- Rnd 12: sc in each st around. (12)
- Fasten off, leaving a 40 cm tail. Push a small wisp of fiberfill into the tip only, so the stem holds a slight lean without going stiff and straight.
Medium Pumpkin Stem
- Rnd 1: with brown, 6 sc in MR. (6)
- Rnd 2: sc in BLO of each st around. (6)
- Rnds 3-6: sc in each st around. (6)
- Rnd 7: (sc in next st, inc) rep 3 times. (9)
- Rnd 8: sc in each st around. (9)
- Fasten off, leaving a 35 cm tail. Leave unstuffed.
Small Pumpkin Stem
- Rnd 1: with brown, 6 sc in MR. (6)
- Rnd 2: sc in BLO of each st around. (6)
- Rnds 3-5: sc in each st around. (6)
- Rnd 6: (sc in next st, inc) rep 3 times. (9)
- Fasten off, leaving a 30 cm tail. Leave unstuffed.
Maple Leaves (Make 6)
- With sage green, ch 11. This chain is the centre vein. The last chain you made is the leaf tip; the end nearest your hook becomes the stalk.
- Sl st in 2nd ch from hook, sc in next ch, hdc in next ch, dc in next ch.
- First lobe: ch 4, sl st in 2nd ch from hook, sc in next ch, hdc in next ch, then sl st into the same chain that holds your last dc.
- Dc in next ch, hdc in next ch, sc in next ch, sl st in next 2 ch. One chain is left unworked at the end. That is the tip.
- Tip: work (sc, ch 2, sc) all in the last chain, then rotate the piece to work back along the free loops on the underside of the foundation chain.
- Sl st in next 2 ch, sc in next ch, hdc in next ch, dc in next ch.
- Second lobe: ch 4, sl st in 2nd ch from hook, sc in next ch, hdc in next ch, then sl st into the same chain that holds your last dc.
- Dc in next ch, hdc in next ch, sc in next ch, sl st in last ch. Fasten off, leaving a 25 cm tail.
- Optional: backstitch a centre vein down the middle of each leaf in pale green floss, and two short branch lines out to the lobes.
- Press each leaf flat under a damp cloth. Cotton leaves will hold the shape; acrylic will need a cool iron held above the fabric rather than on it.
Curly Tendrils (Make 3)
- With sage green, ch 16.
- Work 3 sc in the 2nd ch from hook and 3 sc in each ch across. (45 sc)
- Fasten off, leaving a 20 cm tail. The strip coils into a spring on its own. Twist it in the direction it wants to go and let it settle.
Finishing
Sew the stems on first. Sit each stem over the gathered hole at the top of its pumpkin, angled very slightly off vertical rather than straight up, and stitch the base edge down all the way around with the stem tail. The stem should hide the gather completely. If a bit of the puckered centre still shows, take two or three stitches from under the stem base out into the nearest rib valley to pull the top surface smooth.
Attach two leaves to each pumpkin at the base of the stem, one pointing forward and one to the side, and stitch only the leaf stalk down so the body of the leaf stays loose and can be bent. Tuck a tendril in beside the leaves on each pumpkin and secure it with two stitches at the base of the coil. Weave in all remaining ends into the stuffed body where nothing shows.
Now assemble the hanger. Cut two 18 cm lengths of jute. Thread one through the bottom gather of the large pumpkin, knot it underneath, then thread the other end through the top of the medium pumpkin just behind the stem and knot it there, leaving roughly 6 cm of twine visible between the two. Join the medium pumpkin to the small one the same way, again with about 6 cm showing. Cut a 45 cm length of jute, fold it in half, pass the fold through the top of the large pumpkin behind the stem and knot the two ends together to make the hanging loop.
Finish with the twine details from the original look: wrap a 50 cm length of jute once around the golden pumpkin from bottom to top, following a rib valley, and tie it into a small bow at the top front. Knot a short 8 cm tassel of three or four jute strands to the bottom gather of the cream pumpkin and trim it straight. Hang the piece and check that all three stems face forward, then adjust the knots until the pumpkins sit square. The whole thing should measure roughly 58 cm from the top of the loop to the bottom of the tassel.
Tips for Success
- Use cotton rather than acrylic if you want crisp ribs. Cotton has less bounce, so the back loop ridges stay sharp and the pumpkin holds its flattened shape instead of springing back into a ball.
- Work the foundation chain loosely. It gets seamed to the last row, and a tight chain edge will make one side of the seam pull in and skew the whole tube.
- Stuff the sides of each pumpkin before the middle. If you fill the centre first, the pumpkin inflates into a sphere and no amount of squashing afterwards will make it look like a pumpkin.
- Count the row-ends before you seam, not the ribs. On the large strip the ribs are easy to miscount in the middle, but the row-ends along the edge are distinct and countable in tens.
- Match the trio by eye at the end of each pumpkin, not at the end of the project. Hold the finished piece against the previous one and add or unpick a few rows on the next strip if the size step between them looks wrong.
Common Mistakes to Avoid
- Slipping into both loops for a row or two. The ridge disappears and leaves a flat band across the pumpkin that shows badly once it is stuffed. There is no fixing it later, so check the loop every time you pick the project back up mid-row.
- Seaming the tube with a twist in it. Lay the strip completely flat and run your hand along both edges before the first stitch. A twisted tube will never gather into a round pumpkin and has to be unpicked entirely.
- Gathering the top and bottom too loosely. A loose gather leaves a visible hole that the stem cannot cover, and the stuffing works its way out over a season on the door. Pull the running stitch until the opening vanishes, then lock it with two crossing stitches.
- Understuffing the pumpkins so the ribs collapse. These bodies need more filling than they look like they need. If you can squeeze a pumpkin flat with one hand, add more.
- Cinching the optional rib segments too hard on the large pumpkin. Pulled tight, the six passes turn a soft pumpkin into a tight beach ball with hard creases. Each pass should only just dent the surface.
Ways to Customize This Pattern
- Swap to a Halloween palette: black, deep purple and bone white pumpkins with charcoal stems, and skip the leaves in favour of longer black tendrils.
- Add a fourth mini pumpkin at the bottom in a rust or sage shade. Work 12 sc across 30 rows and give it the small stem with no leaves.
- Make it a wreath instead of a hanger. Crochet six pumpkins in mixed sizes and sew them around a 30 cm wire wreath form with the leaves and tendrils filling the gaps.
- Slip a small muslin sachet of dried lavender or cinnamon into each pumpkin before you close the top gather, so the hanger scents the entryway.
- Use velvet or chenille yarn for the large pumpkin only. The ribs read softer and blurrier, which gives a nice texture contrast against two crisp cotton pumpkins below it.
Frequently asked questions
Because the ribs are the whole point of the design. Working single crochet in the back loop only, row after row in a flat strip, builds a corduroy ridge that runs the full length of the fabric. When the strip becomes a tube and both ends are gathered, those ridges land exactly where a real pumpkin’s segments go. A pumpkin worked in the round can only get segments by cinching yarn around a smooth ball afterwards, which gives you deep grooves and flat spaces between them rather than continuous ribbing.
Under a covered porch, yes. In direct weather, no. Fiberfill soaks up rain and takes days to dry, and it will hold damp against the yarn long enough to mildew. If your door is exposed, stuff the pumpkins with polyester toy filling rather than natural fibre, use acrylic instead of cotton so the colours hold up better in sun, and bring the hanger inside when heavy rain is forecast. Direct afternoon sun will fade orange faster than any other colour here.
The spin comes from single-strand twine connectors, which twist freely. Use two parallel strands of jute between each pumpkin instead of one, knotted about a centimetre apart at both ends. The pair acts like a flat ladder and locks the rotation. Alternatively, take two stitches with matching yarn through the twine knot and into the pumpkin body to fix it in place once you have the stems aligned.
The two numbers control two different dimensions, so change them separately. The stitch count across the strip sets the height of the pumpkin, and the row count sets the width. Work a 20-row test strip, measure it, and calculate how many rows you need for the circumference you want, then divide that circumference by about two to get a good stitch count. Aim for a strip that is roughly twice as long as it is wide, which is what produces a squat pumpkin rather than a tall one.
The finished Autumn Pumpkin Door Hanger Crochet Pattern

