Autumn Sunflower Medallion Table Runner
Beginner Friendly
Perfect for those just starting their crochet journey, with clear instructions and simple techniques
Single-Day Project
A satisfying project you can complete in a single afternoon or evening.
Handmade Gift
A beautiful keepsake — free forever. Read online or print at home.
About This Autumn Sunflower Medallion Table Runner
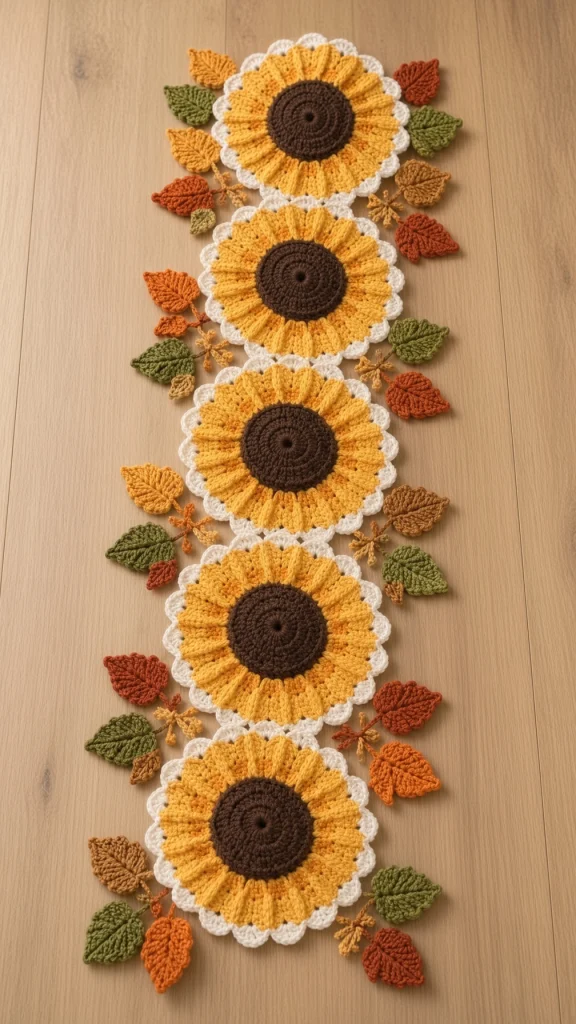
This crochet sunflower table runner pattern joins five golden medallions into an overlapping column, each one ringed with a cream scalloped rim and centered on a deep brown seed head. The flowers are worked as flat rounds rather than appliqués, so the runner is the flowers — there is no mesh panel underneath. Where each pair of circles overlaps, one sits slightly on top of the other, which is what gives the piece its stacked, layered look instead of reading as five separate doilies in a line.
The petals are made with a round of long post-worked ridges in three golds, so the flower head has real texture running outward from the center. The brown center is a raised disc worked separately and sewn on, which means you can make all five centers in one sitting and get them consistent. Around the outside, twenty leaves in rust, burnt orange, olive and golden tan are sewn in alternating clusters, with small five-point tan sprigs tucked between them to fill the gaps.
Expect 18 to 24 hours. Each sunflower round takes about two hours including its center, the twenty leaves take five or six hours between them, and joining and arranging the foliage accounts for the rest. It is an advanced project because of the overlapped joining and because the leaf placement is judged by eye, not counted. It packs away flat and comes out every autumn, which makes the hours worth spending.
Materials
- Worsted weight cotton in golden yellow approx. 200 m (about 110 g) — main petal color
- Worsted weight cotton in deep marigold approx. 120 m — petal ridges and inner rounds
- Worsted weight cotton in pale butter yellow approx. 90 m — petal tips
- Worsted weight cotton in cream approx. 120 m — scalloped rims
- Worsted weight cotton in dark chocolate brown approx. 90 m — flower centers
- Worsted weight cotton in rust approx. 60 m — leaves
- Worsted weight cotton in burnt orange approx. 60 m — leaves
- Worsted weight cotton in olive green approx. 60 m — leaves
- Worsted weight cotton in golden tan approx. 70 m — leaves and star sprigs
- 4 mm crochet hook US G-6
- 3.5 mm hook for the star sprigs
- Tapestry needle blunt tip
- Rustproof pins 40+, for pinning the layout before sewing
- Blocking mats or a towel-covered board at least 90 x 35 cm
- Stitch markers 6-8
- Measuring tape and small sharp scissors
Abbreviations
begbeginningchchaindcdouble crochetFPdcfront post double crochethdchalf double crochetMRmagic ringreprepeatrnd(s)round(s)RSright sidescsingle crochetskskipsl stslip stitchsp(s)space(s)st(s)stitch(es)trtreble crochetGauge and sizing
- Gauge: Rnds 1-4 of the sunflower round measure 9 cm across, blocked.
- One finished sunflower round measures 19 cm across including its cream scalloped rim.
- Brown center disc: approximately 7 cm across. Leaf: approximately 7 cm long. Star sprig: approximately 4 cm across.
- Finished runner: approximately 82 cm long by 26 cm wide measured across the leaves, or 19 cm across the flowers alone.
- All instructions use US crochet terminology.
- To lengthen, add sunflower rounds in multiples of one — each adds about 16 cm of length after the overlap. Add 4 leaves and 1 star sprig per round added.
Sunflower round (make 5)
- Rnd 1: With deep marigold, MR, ch 3 (counts as dc here and throughout), 11 dc in ring, pull ring closed, sl st to top of beg ch-3. (12 dc)
- Rnd 2: Ch 3, dc in same st, 2 dc in each dc around, sl st to top of beg ch-3. (24 dc)
- Rnd 3: Ch 3, dc in same st, dc in next dc, *2 dc in next dc, dc in next dc; rep from * around, sl st to top of beg ch-3. (36 dc)
- Rnd 4: Ch 3, dc in next dc, 2 dc in next dc, *dc in next 2 dc, 2 dc in next dc; rep from * around, sl st to top of beg ch-3. (48 dc) Fasten off marigold. The disc should measure about 9 cm across.
- Rnd 5 (petal ridges): Join golden yellow with a sl st in any dc. Ch 3, *FPdc around the same st just below, dc in next dc, FPdc around that same st; rep from * around, sl st to top of beg ch-3. Work the FPdc loosely — each raised post becomes the spine of a petal. (48 dc, 48 FPdc)
- Rnd 6: Ch 3, dc in each st around, working 2 dc in every 4th st, sl st to top of beg ch-3. (120 dc)
- Rnd 7: Ch 3, dc in next 3 dc, 2 dc in next dc, *dc in next 4 dc, 2 dc in next dc; rep from * around, sl st to top of beg ch-3. (144 dc) Fasten off golden yellow.
- Rnd 8 (petal tips): Join pale butter yellow with a sl st in any dc. Ch 1, *sc in next 2 dc, (hdc, dc, hdc) in next dc, sc in next 2 dc, sl st in next dc; rep from * around, sl st to first sc. (24 petal tips) Fasten off pale butter yellow.
- Rnd 9 (cream rim base): Join cream with a sl st in any sl st between petal tips. Ch 1, sc in each st around, working 1 sc into each st of every petal tip, sl st to first sc. (144 sc)
- Rnd 10 (scalloped rim): Ch 1, sc in first sc, *sk next 2 sc, 5 dc in next sc, sk next 2 sc, sc in next sc; rep from * around, sl st to first sc. (24 scallops) Fasten off, leaving a 20 cm tail.
- The round should measure 19 cm across, blocked. Make 5 identical sunflower rounds.
Flower centers (make 5)
- Rnd 1: With dark brown, MR, ch 1, 8 sc in ring, pull closed, sl st to first sc. (8 sc)
- Rnd 2: Ch 1, 2 sc in each sc around, sl st to first sc. (16 sc)
- Rnd 3: Ch 1, *sc in next sc, 2 sc in next sc; rep from * around, sl st to first sc. (24 sc)
- Rnd 4: Ch 1, *sc in next 2 sc, 2 sc in next sc; rep from * around, sl st to first sc. (32 sc)
- Rnd 5: Ch 1, *sc in next 3 sc, 2 sc in next sc; rep from * around, sl st to first sc. (40 sc)
- Rnd 6: Ch 1, *sc in next 4 sc, 2 sc in next sc; rep from * around, sl st to first sc. (48 sc)
- Rnd 7: Ch 1, working in back loops only, sc in each sc around, sl st to first sc. (48 sc) The back-loop round creates the raised rim that makes the center sit proud of the petals.
- Fasten off, leaving a 50 cm tail for sewing. The disc should measure about 7 cm across.
- Optional coil detail: with brown, work a single line of surface slip stitch spiraling from the outer edge inward to the center, keeping about 8 mm between passes. Two full passes give a subtle seed-head texture.
- Make 5 centers.
Leaves (make 20: 5 rust, 5 burnt orange, 5 olive, 5 golden tan)
- Ch 15.
- Rnd 1: Sc in 2nd ch from hook, sc in next 2 ch, hdc in next 2 ch, dc in next 4 ch, hdc in next 2 ch, sc in next 2 ch (13 sts along the first side); (sc, ch 2, sc) in the last ch — leaf tip made. Working along the opposite side of the foundation ch: sc in next 2 ch, hdc in next 2 ch, dc in next 4 ch, hdc in next 2 ch, sc in next 3 ch (13 sts along the second side); ch 2, sl st to first sc — leaf base made. (28 sts, plus a ch-2 point at each end)
- Rnd 2: Sl st into the ch-2 base sp, ch 1, (sc, ch 2, sc) in same sp. First side: sc in next 3 sts, hdc in next 2 sts, dc in next st, 2 dc in next st, dc in next 2 sts, 2 dc in next st, hdc in next 2 sts, sc in next 2 sts. (15 sts) (sc, ch 2, sc) in the ch-2 tip sp. Second side: rep the same 15-st sequence. Sl st to first sc. (34 sts, plus a ch-2 point at each end)
- Fasten off, leaving a 35 cm tail for sewing. The foundation chain stays visible down the middle as the center vein — do not cover it.
- Side veins: with a matching or slightly darker shade, work 2 short lines of surface slip stitch on each side of the center vein, angled outward toward the tip, 4 per leaf. Keep them loose so the leaf stays flat.
- The leaf should measure about 7 cm long. Make 5 in each of the four autumn colors, 20 in total.
Star sprigs (make 8)
- Rnd 1: With golden tan and the 3.5 mm hook, MR, ch 1, 5 sc in ring, pull closed, sl st to first sc. (5 sc)
- Rnd 2: *Ch 7, sc in 2nd ch from hook, sc in next ch, hdc in next 2 ch, sc in next 2 ch, sl st in next sc of Rnd 1; rep from * 4 more times. (5 spikes of 6 sts)
- Fasten off, leaving a 25 cm tail. The sprig should measure about 4 cm across.
- Make 8. These fill the gaps between leaf clusters, so a slightly irregular shape is an advantage rather than a flaw.
Joining the sunflower rounds
- Block all five sunflower rounds to exactly 19 cm across before joining. Uneven rounds cannot be corrected once they are overlapped.
- Lay the five rounds in a vertical column on your blocking surface, RS up, each one overlapping its neighbor by about 3 cm. Work top to bottom, laying each new round on top of the one above it so the overlaps all face the same way — that consistency is what makes the column look deliberate.
- Pin each overlap in three places: the center of the overlap and one point at each side.
- With cream and a tapestry needle, sew each overlap with small whip stitches, working along the outer edge of the upper round’s cream rim and catching the scallops of the round beneath. Work across a span of about 9 scallops, centered on the overlap.
- Keep the stitching loose enough to lie flat. A tight seam pulls the two rounds into a ridge and the runner will buckle down its length.
- Secure each seam with two small backstitches on the wrong side and weave in. You now have a column measuring about 82 cm.
- Check with a straightedge that all five centers sit on one line before moving on. Adjust any seam that pulls a round off center now, not later.
Assembly
- Sew a brown center onto each sunflower round: position it exactly over the marigold inner disc, then stitch around its outer edge using its own long tail, passing the needle through the back loop of the center’s final round and into the petal fabric beneath.
- Work around the center twice if it feels loose. A center that lifts at one edge is the first thing the eye notices on a finished runner.
- Lay all 20 leaves around the column before stitching anything. Place 4 leaves at each sunflower — two on the left side, two on the right — angled outward from the flower’s edge like foliage growing away from the bloom.
- Alternate the four colors so no two leaves of the same color touch, and vary the angle by 20 or 30 degrees between neighbors. Leaves at identical angles read as a border rather than foliage.
- Tuck the 8 star sprigs into the gaps where two sunflower rounds meet, four on each side of the runner, partly under the leaf bases.
- Step back and look at the whole layout before you stitch. Adjust anything that crowds or leaves a bare patch — this is the part you cannot fix later. Pin everything once you are satisfied.
- Sew the star sprigs first, since they sit underneath the leaves. Attach each through the center of the sprig only.
- Sew each leaf along its center chain only, from the base to about two-thirds of the way to the tip. Leave the tip and the outer edges free so the leaf lifts slightly.
- Attach each leaf to the cream rim of the nearest sunflower at its base, not to the yellow petals, so the join is hidden in the scalloped edge.
- Weave all tails into the backs of the appliqués themselves. Worked through the flower fabric, a rust or olive tail will show from the front.
Finishing
Give the runner a final light block once everything is sewn on. Mist with water rather than soaking, which stops the flowers and the appliqués relaxing at different rates. Pin the column straight down its length first, checking that the five centers still sit on one line, then pin the outer cream scallops so the rim of each round sits round rather than oval.
Do not pin the leaf tips flat. Press them gently with your fingertips so they settle and leave them alone — the small lift at each tip is what stops the foliage looking printed on. The brown centers should sit slightly domed above the petals; if one has flattened, work a few extra stitches under its edge to lift it.
Let it dry fully, at least ten hours, before moving it. Store the runner rolled around a cardboard tube rather than folded, since a crease across a flower center is hard to block out. Hand wash in cool water with a mild detergent, squeeze out in a towel without wringing, and re-block flat while damp. Never hang it to dry, as the seams between rounds will stretch under the weight.
Tips for Success
- Work the FPdc in Rnd 5 loosely. Tight post stitches pull the whole flower into a bowl, and because the round is worked over 48 stitches, the cupping is dramatic and impossible to block out.
- Count 144 dc at the end of Rnd 7 on every flower. Rnd 8 needs exactly 24 repeats of 6 stitches, and a count of 143 or 145 means the last petal tip will be malformed.
- Make all five brown centers in one sitting. Tension drifts between sessions, and five centers that differ by even 3 mm will look uneven sitting side by side down the runner.
- Lay every leaf out before sewing a single one. Twenty leaves is enough that the arrangement matters more than any individual leaf, and you will move at least half of them once you see the whole thing.
- Keep all five overlaps facing the same direction. Alternating which round sits on top makes the column look accidental rather than layered.
Common Mistakes to Avoid
- Ruffling at Rnd 6. If the flower waves rather than lying flat, you have worked too many increases — the round should add exactly 24 stitches across 96 existing ones. Count before continuing, because Rnd 7 will double the problem.
- Sewing the brown center on before blocking the flower. An unblocked round will shift shape when you finally block it, and the center ends up off-center with no way to correct it short of unpicking.
- Overlapping the rounds by too much. Anything over 4 cm hides the cream rim and the flowers start to look crowded. Measure the overlap with a tape rather than eyeballing it, and keep all four overlaps equal.
- Attaching leaves to the yellow petals instead of the cream rim. The join shows as a lump on the petal fabric. Always anchor the leaf base into a cream scallop where the stitching disappears.
- Working the leaf’s second side into the wrong loop of the foundation chain. You want the free loop along the bottom, worked stitch for stitch opposite the first side. Count both sides before starting Rnd 2 — a lopsided leaf is obvious once it is next to nineteen others.
Ways to Customize This Pattern
- Make a single sunflower round with its center and four leaves as a trivet or a set of matching coasters — the round is already the right size and thickness for a hot dish.
- Swap the four autumn leaf colors for a single deep olive and work all 20 leaves the same. The runner becomes quieter and the flowers carry the whole piece.
- Work the scalloped rims in deep marigold instead of cream for a warmer, denser look that suits a dark wood table better than the cream version does.
- Replace the sunflowers with gerbera daisies by working Rnd 8 in coral or magenta and swapping the brown center for a bright gold one, for a summer version of the same construction.
- Add a sixth and seventh round for a 114 cm runner, plus 8 more leaves and 3 more star sprigs. Long dining tables carry the extra length well.
Frequently asked questions
Cupping almost always starts at Rnd 5, where the front post stitches pull the fabric inward. If the flower is still on the hook, rip back to Rnd 5 and work the posts a full hook size looser — go up to 4.5 mm for that round only, then return to 4 mm. If the flower is finished, aggressive wet blocking will flatten a mild cup, but it will slowly return, so redoing the round is the better answer.
Yes. Sew each pair together at their nearest scallops with about 5 whip stitches and the runner will be around 12 cm longer overall. The look changes noticeably — five circles touching in a line rather than a layered column — but it lies flatter and is easier to get straight, which makes it a good choice for a first attempt.
Sew through the back loop of the center’s last round and into the fabric beneath, taking small stitches roughly every 6 mm, and never pull the thread tight. If the petals pucker, your stitches are too far apart and each one is doing too much work — closer, looser stitches spread the tension and the center sits flat.
Two will work, but four is what makes the foliage read as autumn rather than as trim. If you want to simplify, drop the golden tan leaves and keep rust, burnt orange and olive, which gives the most contrast against the yellow flowers. Keep the star sprigs in tan either way, since they need to read as lighter than everything around them.
The flower rounds are dense double crochet and cope well with a warm dish. The leaves and star sprigs are the vulnerable part, since they only attach along one line and can catch on the base of a plate. If it will be used rather than just displayed, add a second line of stitching along each leaf’s outer edge — you lose a little of the lift but the runner becomes far more practical.
The finished Autumn Sunflower Medallion Table Runner

