Baby Cardigan and Pleated Skirt Set Crochet Pattern
Beginner Friendly
Perfect for those just starting their crochet journey, with clear instructions and simple techniques
Single-Day Project
A satisfying project you can complete in a single afternoon or evening.
Handmade Gift
A beautiful keepsake — free forever. Read online or print at home.
About This Baby Cardigan and Pleated Skirt Set Crochet Pattern
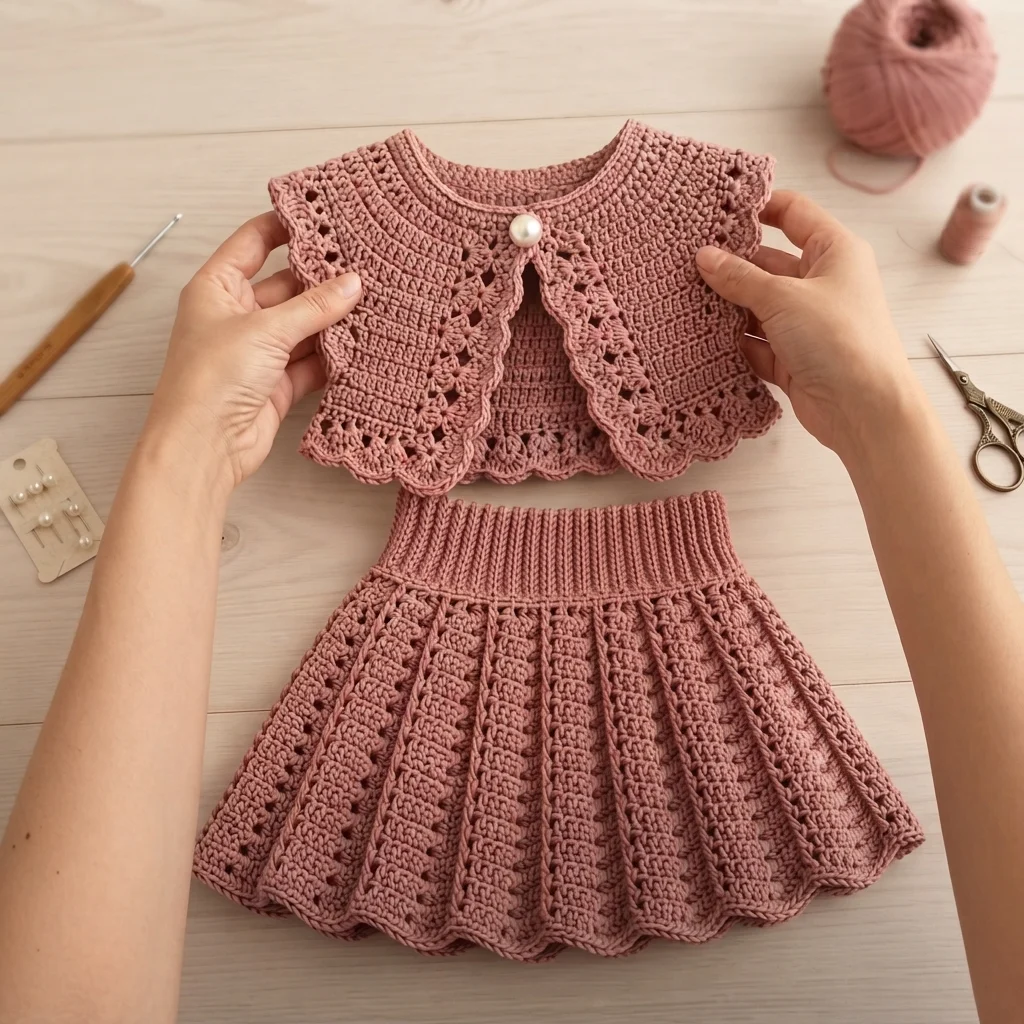
This crochet baby cardigan skirt set pattern pairs a cropped cardigan with cap sleeves, a lace scalloped hem, and a single pearl button, together with a matching pleated skirt built from a fitted ribbed waistband flowing into a full, gently flared pleated body. Both pieces are worked in the same dusty rose yarn for a coordinated set, sized here for 12-18 months but adaptable across sizes with simple gauge adjustments.
What makes this design distinctive is the contrast in construction between the two pieces: the cardigan is worked flat with set-in cap sleeves and a delicate lace border finishing the front edges and hem, while the skirt uses front-post and back-post rib stitches at the waistband for real stretch and fit, transitioning into vertical pleats built from alternating solid and openwork columns down the skirt body. Expect to spend 14-18 hours total between the cardigan and skirt.
This is an advanced pattern, best suited to someone comfortable with garment shaping, including set-in sleeves and a fitted ribbed waistband, and confident working post stitches and open lace details in the same project, rather than someone making their first crochet garment.
Materials
- DK weight cotton yarn, dusty rose ~280g total for both pieces
- Crochet hook 3.5 mm (US E/4)
- 1 pearl button ~1.5 cm diameter
- Tapestry/yarn needle
- Stitch markers
- Steam iron and pressing cloth, or blocking mat and pins
- Sharp scissors
Abbreviations
chchainsl stslip stitchscsingle crochethdchalf double crochetdcdouble crochetFPdcfront post double crochetBPdcback post double crochetincincrease (2 sts in one st)decdecrease (2 sts worked together)ch-spchain spacest(s)stitch(es)reprepeatFOfasten offCardigan Back Panel
- Ch 45. Row 1: dc in 4th ch from hook and in each ch across. 43 sts.
- Rows 2-10: ch 3, turn, dc in each st across, working straight up to the underarm.
- Row 11 (underarm shaping): ch 1, turn, sl st across 4 sts, ch 3, dc across to the last 4 sts, leave remaining sts unworked. 35 sts.
- Rows 12-16: continue straight across the remaining 35 sts to the shoulder line.
- FO leaving a long tail for seaming.
Cardigan Front Panels (make 2, mirrored)
- Ch 25. Row 1: dc in 4th ch from hook and in each ch across. 23 sts.
- Rows 2-10: ch 3, turn, dc in each st across, working straight up to the underarm, keeping the front edge (center front) straight throughout.
- Row 11 (underarm shaping): at the armhole edge only, sl st across 4 sts, ch 3, dc across remaining sts. 19 sts.
- Rows 12-14: continue straight to the shoulder.
- Row 15 (neckline shaping): at the neck edge, dec 2 sts, continue across remaining sts.
- Row 16: continue straight to complete the shoulder. FO leaving a long tail. Repeat mirrored for the second front panel.
Cap Sleeves (make 2)
- Ch 31. Row 1: dc in 4th ch from hook and in each ch across. 29 sts.
- Rows 2-4: ch 3, turn, dc in each st across.
- Row 5 (cap shaping): dec 1 st at each end of the row.
- Rows 6-9: continue decreasing 1 st at each end every row to shape the rounded cap top.
- FO leaving a long tail for seaming. Repeat for 2 sleeves total.
Assembly, Cardigan Body
- Whipstitch the front panels to the back panel at both shoulder seams.
- Set each sleeve into its armhole opening, matching the sleeve cap’s curve to the armhole shaping, and sew in place all the way around.
- Sew the side seams from the underarm down to the hem on both sides.
Lace Scallop Border and Front Edging
- With the same yarn, join at the bottom corner of one front panel. Round 1: sc evenly up the front edge, around the neckline, and down the opposite front edge, then continue along the entire bottom hem, working 3 sc at each corner to keep them flat.
- Round 2 (scallop): *sk 1 st, 3 dc in next st, sk 1 st, sl st in next st; rep from * around the entire hem and both front edges, working extra repeats around the neckline curve to keep it lying flat.
- Join with sl st and FO. Weave in all ends.
Finishing the Cardigan
- Add a small button loop at the top front edge on one side, working a short ch-sp into the border round at that point during Round 1.
- Sew the pearl button to the opposite front edge, aligned with the button loop.
- Weave in all remaining tails and steam-block the finished cardigan lightly, keeping the scalloped edges spread evenly.
Skirt Ribbed Waistband
- Ch 43 (adjust to your gauge to reach the desired waist measurement, joined into a round with a sl st, being careful not to twist).
- Round 1: ch 2 (counts as first hdc), hdc in each ch around. 43 sts.
- Rounds 2-8: alternate *FPdc, BPdc; rep from * around each round to build a stretchy ribbed waistband. 43 sts maintained.
- Do not FO; continue directly into the skirt body.
Pleated Skirt Body
- Round 9 (transition round): *dc 3, inc; rep from * around to begin flaring out from the fitted waistband. (approx. 57 sts)
- Round 10: *dc 4, ch 1, skip 1; rep from * around, establishing the alternating solid-and-openwork columns that will become the pleats.
- Rounds 11-20: continue the same dc-and-ch-1 column pattern, working an increase within the solid dc sections every few rounds to flare the skirt gradually, keeping the open ch-1 columns as consistent visual pleat lines running the full length.
- Continue until the skirt measures approximately 22 cm from the waistband to the hem, or your desired length.
Scalloped Hem
- Final round: *sk 1 st, 3 dc in next st, sk 1 st, sl st in next st; rep from * evenly around the entire hem to finish with a soft scalloped edge.
- Join with sl st and FO. Weave in all ends.
Finishing
Steam-block both pieces lightly, laying the cardigan flat with its scalloped edges spread evenly, and laying the skirt flat with its pleat columns straightened and the hem scallops opened. Try the pieces on if possible before final blocking, and adjust the waistband round count if the fit runs tight or loose, since babies and toddlers vary more in proportion than the chart size alone suggests. Weave in any remaining tails on both pieces.
Tips for Success
- Swatch and check gauge carefully before starting either piece; garment fit depends on this far more than in motif-based projects.
- Try the cardigan on the intended wearer, or against a similarly sized garment, before adding the final border, so any length adjustment is easier to make.
- Keep FPdc and BPdc stitches in the waistband consistently aligned round after round for even, reliable stretch.
- Work the pleat increases in the skirt body evenly across all columns, not concentrated in one section, so the flare stays balanced all the way around.
- Block both pieces before final photos or gifting; blocking makes a noticeable difference in how crisp the scalloped edges look.
Common Mistakes to Avoid
- Skipping the gauge swatch and hoping sizing works out risks a cardigan or skirt that doesn’t fit. Fix: always swatch and measure before starting, adjusting hook size if needed.
- Working underarm and neckline shaping at the wrong edge on a front panel creates a mismatched, non-mirrored pair. Fix: double-check which edge is the armhole and which is center front before shaping each panel.
- Concentrating pleat increases in only a few columns instead of spreading them evenly causes the skirt to flare unevenly. Fix: distribute increases across all columns at each increase round.
- Working the waistband too loosely removes its stretch and fit. Fix: keep FPdc and BPdc stitches snug, and reduce your starting chain slightly if the band feels loose.
- Sewing sleeves in without matching the cap’s curve to the armhole shaping causes puckering at the shoulder. Fix: ease the sleeve cap in gradually, matching curve to curve rather than forcing a straight seam.
Ways to Customize This Pattern
- Adjust the starting chain counts proportionally to size the set up or down for a different age range.
- Swap the pearl button for a wooden or fabric-covered button for a different look.
- Work the skirt without the waistband rib for a simpler, straight elastic-waist version instead.
- Lengthen the skirt body rounds for a longer, more twirly finished length.
- Work the cardigan and skirt in two coordinating colors instead of matching for a mix-and-match set.
Frequently asked questions
Work a gauge swatch first, then adjust the starting chain counts for both the cardigan panels and the skirt waistband proportionally to the target chest and waist measurements, keeping the stitch pattern repeats intact.
This usually means either the starting chain was too long for the FPdc/BPdc rib to grip properly, or the post stitches were worked too loosely. Reduce the starting chain slightly and keep tension snug through the ribbed rounds.
Yes. Extend the sleeve pattern with straight rows before beginning the cap shaping, checking sleeve length against the wearer’s arm as you go, and adjust the armhole depth on the body panels if a fuller sleeve is desired.
Defined pleats depend on consistent ch-1 spacing between solid dc columns throughout the entire skirt body. Recheck that every round maintains the same column pattern, and block firmly, pinning each pleat column straight, to sharpen the look.
The finished Baby Cardigan and Pleated Skirt Set Crochet Pattern

