Basketweave Checkerboard Bedspread Crochet Pattern
Beginner Friendly
Perfect for those just starting their crochet journey, with clear instructions and simple techniques
Single-Day Project
A satisfying project you can complete in a single afternoon or evening.
Handmade Gift
A beautiful keepsake — free forever. Read online or print at home.
About This Basketweave Checkerboard Bedspread Crochet Pattern
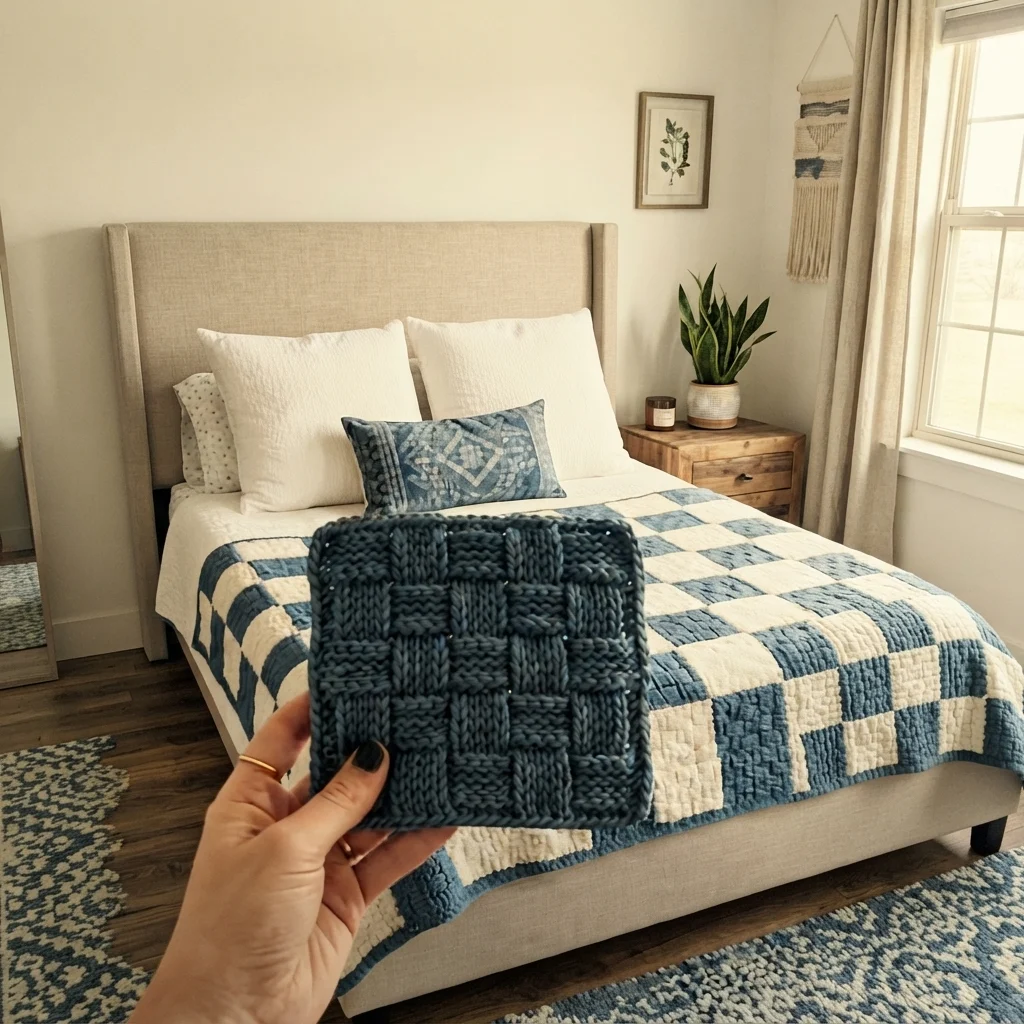
This crochet basketweave bedspread pattern alternates two kinds of square in a classic two-color checkerboard: a navy square worked entirely in a woven basketweave texture, where blocks of front-post and back-post stitches alternate direction to mimic the look of actual woven basket strips, and a plain cream square worked in simple solid stitches. Laid out in strict alternation, the finished piece reads as a bold, graphic checkerboard with real dimensional texture on half the squares.
What makes this design distinctive is the basketweave construction itself: rather than a flat stitch, each navy square is built from alternating blocks of front-post and back-post double crochet, switching orientation every few rows and stitches so the surface reads as literally woven, with visible raised ridges running in alternating horizontal and vertical directions block by block. Maintaining that precise post-stitch block pattern consistently across a very large number of squares, while also managing the strict two-color checkerboard alternation, is what makes this a genuinely demanding project. Expect to spend 40-48 hours total for the full bedspread.
This is an advanced pattern, best suited to someone comfortable with front-post and back-post relief stitches worked in a precise block pattern, and confident maintaining a strict two-color alternating grid at full bedspread scale, rather than someone wanting a flat-stitch or single-texture project.
Materials
- Worsted weight cotton-acrylic blend yarn, navy ~700g, basketweave squares
- Worsted weight yarn, cream ~500g, plain squares and border
- Crochet hook 5 mm (US H/8)
- Tapestry/yarn needle
- Steam iron and pressing cloth, or a large blocking mat and pins
- Sharp scissors
Abbreviations
chchainsl stslip stitchscsingle crochetdcdouble crochetFPdcfront post double crochetBPdcback post double crochetst(s)stitch(es)reprepeatFOfasten offBasketweave Square (make approximately 98, for alternating placement)
- With navy, ch 25 (a multiple of 4 plus 1, to allow clean 4-stitch blocks). Row 1: dc in 4th ch from hook and in each ch across. 23 sts.
- Rows 2-5 (first block set): ch 3, turn, *FPdc around next 4 sts, BPdc around next 4 sts; rep from * across, maintaining this same over/under alternation for all 4 rows so a visible woven block forms.
- Rows 6-9 (second block set): ch 3, turn, *BPdc around next 4 sts, FPdc around next 4 sts; rep from * across, reversing which sts get front-post versus back-post treatment from the previous block, so the weave appears to shift direction.
- Continue alternating 4-row block sets (Rows 2-5 pattern, then Rows 6-9 pattern) until the square is a true square matching your target size.
- FO leaving a long tail for joining. Repeat for approximately 98 basketweave squares total.
Plain Square (make approximately 97, for alternating placement)
- With cream, ch a number matching the basketweave square’s width. Row 1: dc in 4th ch from hook and in each ch across.
- Rows 2 onward: ch 3, turn, dc in each st across, working plain solid rows until the square matches the basketweave square’s finished size exactly.
- FO leaving a long tail for joining. Repeat for approximately 97 plain squares total.
Join-As-You-Go Assembly
- Plan your grid (for example, 13 columns x 15 rows for a queen-size coverlet), alternating navy basketweave and cream plain squares in both directions so the finished piece reads as a true checkerboard, with no two same-type squares ever touching edge to edge.
- Join squares as you complete each one, whipstitching or slip-stitch joining along the edge to the neighboring square already in place.
- Work row by row, double-checking the alternation against both the square beside it and the square above it before each join.
Bedspread Border
- With cream, join at any corner of the assembled bedspread. Round 1: sc evenly around the entire perimeter, working 3 sc at each of the 4 corners to keep them flat.
- Round 2, with navy: dc evenly around for a simple, clean finishing band that frames the checkerboard without competing with it.
- Join with sl st to first st and FO. Weave in all ends.
Finishing
Weave in every square’s starting and ending tail individually across the entire bedspread, since a project this size accumulates a very large number of loose ends. Steam-block the finished bedspread flat, pinning the border evenly and checking that the basketweave squares’ raised texture stays consistent and doesn’t flatten unevenly against the plain squares during blocking.
Tips for Success
- Work both square types to the exact same finished dimensions; any size mismatch is very visible in a bold checkerboard with no busy pattern to distract from it.
- Keep the 4-stitch block alternation in the basketweave squares consistent across every single square, since drifting block placement breaks the woven illusion.
- Keep a written grid chart marking basketweave versus plain placement, so you always know which type goes where as you assemble.
- Work squares in both types in parallel batches rather than finishing all of one type first, so you can track your alternating count accurately.
- Block gently rather than pressing hard on the basketweave squares, so the raised post-stitch texture stays dimensional rather than flattening.
Common Mistakes to Avoid
- Working basketweave and plain squares to slightly different sizes creates a visibly uneven checkerboard grid. Fix: measure both square types against each other before making a full batch of either.
- Losing track of the alternating placement partway through leads to two same-type squares accidentally sitting adjacent. Fix: keep a written grid chart and mark off each position as you join it.
- Shifting the 4-stitch block count within a basketweave square breaks the clean woven look. Fix: count sts carefully at the start of every row to confirm the blocks still land in multiples of 4.
- Pressing an iron directly and firmly onto basketweave squares during blocking flattens the raised post-stitch texture. Fix: steam gently from a slight distance.
- Underestimating how much yarn each color requires given the roughly 50/50 split. Fix: calculate yardage separately for navy and cream from several finished squares before buying all your yarn.
Ways to Customize This Pattern
- Reduce the grid size for a throw blanket instead of a full bedspread.
- Swap the navy and cream palette for a different two-color combination to match your own bedroom decor.
- Work both square types in basketweave but in two different colors, for an all-textured checkerboard with no plain squares.
- Scale the block size up (6 sts instead of 4) for a bolder, chunkier woven look.
- Add a fabric backing to the full bedspread for added warmth and easier care.
Frequently asked questions
Work and block one of each type early on, then measure them against each other precisely. Adjust your starting chain or row count on whichever type runs smaller before committing to a full batch of either.
This usually means the 4-stitch blocks drifted out of alignment at some point, so front-post and back-post stitches aren’t landing consistently over the same stitches from the row below. Count carefully at the start of every row and recheck that blocks stay in multiples of 4.
Yes, though working every square in the more labor-intensive basketweave technique will significantly increase both the time and yarn required. Consider working the squares in two colors of basketweave instead of one plain type, for texture throughout without losing the color alternation.
Pure cotton works well and holds the post-stitch texture crisply, though it can be heavier and less stretchy than a blend. A cotton-acrylic blend gives a nice balance of stitch definition and softness for bedding use.
The finished Basketweave Checkerboard Bedspread Crochet Pattern

