Beige Puff Lattice Square Bedspread and Shams Crochet Pattern
Beginner Friendly
Perfect for those just starting their crochet journey, with clear instructions and simple techniques
Single-Day Project
A satisfying project you can complete in a single afternoon or evening.
Handmade Gift
A beautiful keepsake — free forever. Read online or print at home.
About This Beige Puff Lattice Square Bedspread and Shams Crochet Pattern
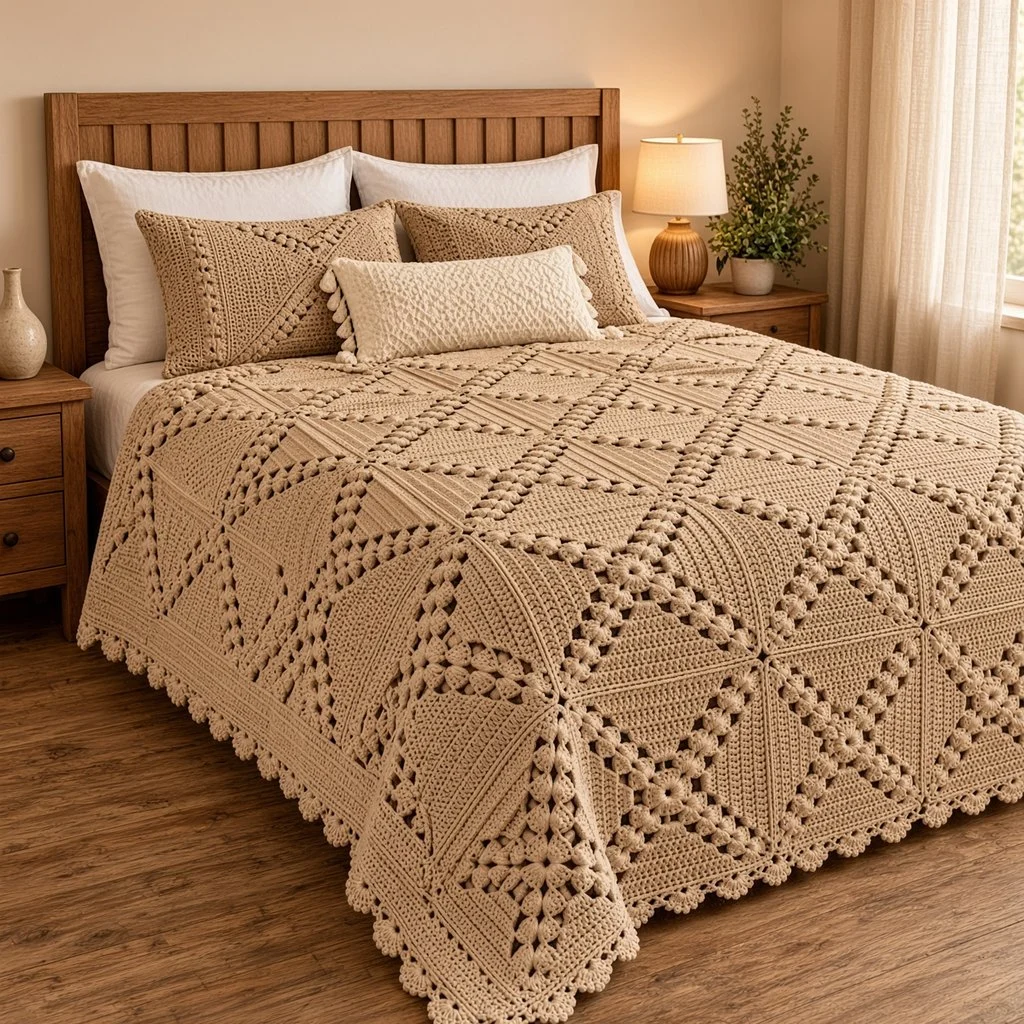
This puff stitch square crochet bedspread is worked in a warm beige that shows off its texture. Each of the 80 squares has a small puff flower at its center, with two lines of puff stitches running diagonally out to every corner and solid double crochet filling the four triangles between them. When the squares are joined, the diagonal puff bands meet at the corners and form a lattice of diamonds across the whole bed, with a cluster of puffs at every crossing. A shell border, two Euro shams and a tasseled lumbar pillow complete the set.
The square is built in rounds from the center. At each corner, two puff stitches and a few open spaces form a narrow lace band, and every round the band moves out to the new corner while the solid triangles grow by four stitches on each side. That keeps the band a constant width all the way from the center to the corners, so the lines of the lattice stay crisp.
The set takes about 150 to 170 hours, with each square taking around an hour and a half. It suits a crocheter who is comfortable with puff stitches and counting stitches round by round.
Materials
- Worsted weight cotton blend, beige about 5,400 m (27 skeins of 100 g / 200 m)
- Worsted weight cotton blend, cream about 200 m (1 skein), for the lumbar pillow
- 5 mm crochet hook
- Stitch markers about 4, for the corners
- Tapestry needle and scissors
- Two 50 cm square cushion forms and one 30 x 50 cm cushion form
Abbreviations
MRmagic ringchchainscsingle crochethdchalf double crochetdcdouble crochetsl stslip stitchpuff(yarn over, insert hook in st or sp, pull up a loop) 3 times, yarn over, pull through all 7 loops, ch 1 to closeBLOback loop onlyrev screverse single crochet (crab stitch), worked left to rightskskipspspacest(s)stitch(es)rndroundreprepeatRS / WSright side / wrong sidePuff Flower Center (Rnds 1-2)
- Rnd 1: MR, ch 2 (does not count as a st), puff in ring, *ch 2, puff in ring; rep from * 6 more times, ch 2, join with sl st to top of first puff. Pull the ring tight. (8 puffs, 8 ch-2 sps)
- Rnd 2: sl st in first ch-2 sp, ch 2, (puff, ch 2, puff) in same sp, ch 1, 3 dc in next ch-2 sp, ch 1, *(puff, ch 2, puff) in next ch-2 sp, ch 1, 3 dc in next ch-2 sp, ch 1; rep from * 2 more times, join to top of first puff. (4 corners; 3 dc along each side)
Diagonal Puff Bands (Rnds 3-9)
- Rnd 3: sl st in corner ch-2 sp, ch 2, (puff, ch 2, puff) in same sp, *ch 1, puff in next ch-1 sp, ch 1, dc in each of next 3 dc, ch 1, puff in next ch-1 sp, ch 1, (puff, ch 2, puff) in next corner sp; rep from * 3 more times, omitting the last corner, join to top of first puff. (3 dc along each side, with 2 puffs at each end)
- Rnd 4: sl st in corner ch-2 sp, ch 2, (puff, ch 2, puff) in same sp, *ch 1, puff in next ch-1 sp, ch 1, dc in next puff, dc in next ch-1 sp, dc in each dc to the next ch-1 sp, dc in that ch-1 sp, dc in next puff, ch 1, puff in next ch-1 sp, ch 1, (puff, ch 2, puff) in next corner sp; rep from * 3 more times, omitting the last corner, join. (7 dc along each side)
- Rnds 5-9: rep Rnd 4. The solid dc section on each side grows by 4 sts every rnd, while the puff band at each corner stays the same width. (Rnd 5: 11 dc per side, Rnd 6: 15, Rnd 7: 19, Rnd 8: 23, Rnd 9: 27 dc per side)
- The puffs form two lines running diagonally from the center to each corner, with solid triangles between them.
Edge Round (Rnd 10)
- Rnd 10: sl st in corner ch-2 sp, ch 1, (sc, ch 2, sc) in same sp, *sc in each puff, each ch-1 sp and each dc to the next corner, (sc, ch 2, sc) in corner sp; rep from * 2 more times, sc in each remaining st and sp, join. Fasten off. (37 sc per side between corner sps, 148 sc)
- Block the square to about 25 cm. You need 80 squares for the bedspread and 8 for the shams.
Joining the Squares
- Lay out 80 squares, 8 across and 10 long. The diagonal bands of neighboring squares meet at every corner.
- Join method: place two squares side by side, RS up. Sl st through the BLO of the matching sts of both squares, starting and ending in the corner ch-2 sps. (39 sl st per side, including both corners)
- Join the squares into rows of 8, then join the rows along their long edges.
- Where four corners meet, work through all four corner sps so no gap is left. The four puff bands meeting there form a puff cluster.
- The joined bedspread measures about 200 x 250 cm.
Shell Border
- Rnd 1: RS facing, join in a corner sp. Work 1 sc in each bedspread corner sp, sc in each st along the edge of every square, and 1 sc in each point where two squares meet. Join. (379 sc along each long side, 303 along each short side and 4 at the corners: 1,368 sts)
- Rnd 2: ch 1, *sc in next st, sk next 2 sts, 5 dc in next st, sk next 2 sts; rep from * around, join. Fasten off. (228 shells)
- The shells ease around the corners on their own. Pin them into shape when blocking.
Euro Shams (make 2)
- Front: join 4 squares in 2 rows of 2. The four bands meet in the middle to form a puff cluster and a large diamond. (about 50 cm square)
- Back pieces (make 2 per sham): ch 72. Row 1: hdc in 3rd ch from hook and in each ch across. (70 hdc) Rows 2-26: ch 2 (does not count as a st), turn, hdc in BLO of each st across. Fasten off. (about 50 x 29 cm, ribbed)
- Lay one back piece over the other, both RS up, so they overlap by about 8 cm and the rectangle measures 50 cm square. Pin the overlap.
- Edging rnd: join in a corner. Working through both layers where they overlap, 3 sc in corner st, sc in next 68 sts, 3 sc in corner st, 70 sc evenly along the side, 3 sc in corner st, sc in next 68 sts, 3 sc in corner st, 70 sc evenly along the other side. Join. Fasten off. (288 sts)
Sham Assembly
- Hold a front and a back WS together, with the front facing you and the corners matched.
- Whipstitch the outer edge of the front to the edging rnd of the back all the way around, easing them together evenly.
- Rep with the second sham, and slip the cushion forms in through the back opening.
Tasseled Lumbar Pillow
- Front and back (make 2): with cream, ch 44. Row 1: hdc in 3rd ch from hook and in each ch across. (42 hdc) Rows 2-45: ch 2, turn, hdc in BLO of each st across. Fasten off. (about 30 x 50 cm)
- Hold the front and back WS together. Rnd 1: join in a corner through both layers, 3 sc in each corner, sc in each st along the short sides and 70 sc evenly along each long side. Insert the cushion form before closing the last side. Join. (236 sts)
- Rnd 2: ch 1, rev sc in each st around. Join and fasten off. (236 sts)
- Make 8 small tassels, 6 cm long, and sew 4 evenly along each short end.
Finishing
Weave in all ends along the solid dc triangles, where they hide completely. Avoid weaving through the puff bands, where the open spaces would show them.
Wet block the bedspread on a large flat surface. Pin each square straight so the bands line up across the seams, and pin out each shell of the border. Let it dry completely before moving it.
Tips for Success
- Pull all the loops of each puff up to the same height before closing it. Even puffs make neat, round bands.
- Don’t forget the ch 1 that closes each puff. It’s part of the puff, not a ch-1 sp, so don’t work into it.
- Count the dc on each side at the end of every rnd. The four sides must always match.
- Move the corner markers up each round. With the puffs at the corners, it’s easy to lose track of where a side begins.
- Block each square before joining so the bands meet exactly at the seams.
Common Mistakes to Avoid
- Working a dc into the ch-1 that closes a puff. That adds an extra st and the side grows unevenly. Work into the top of the puff instead.
- Solid sections that don’t grow. From Rnd 4 on, each side must gain exactly 4 dc. If not, you missed the dc in a puff or ch-1 sp at one end.
- Bands that widen. If the puff band gets wider each round, you added an extra puff. There are always 2 puffs at each end of a side, plus the corner.
- Squares that cup. If the square bowls, your dc are tighter than your puffs. Loosen the dc or go up a hook size.
- A wavy border. Work exactly 1 sc at each point where squares meet in Rnd 1, or the shell count won’t come out even.
Ways to Customize This Pattern
- Work the puff bands in a contrasting color, such as cream on taupe, to make the lattice stand out.
- Change the size: each square adds 25 cm. A throw of 5 by 6 squares is about 125 x 150 cm with the border.
- Make a cushion from a single square with 4 extra rnds, adding 4 dc per side each rnd.
- Use a soft gray or sage for a more modern look.
- Turn the squares on point in a table runner so the bands run straight down the middle.
Frequently asked questions
Each round, the new corner puffs go into the corner space, and the next puff goes into the space right beside it. The puffs of the previous round get covered with dc. So the band moves out to the new corner each round while staying the same width.
Yes, on Rnd 10. Join each new square to its neighbors with a sl st in each matching st. Block the first few squares to make sure your size is right before joining many.
Yes. The solid triangles make it much denser than lace, so it works as a light blanket as well as a bedspread, while the puff bands add texture and a little breathability.
Wash it on a gentle cold cycle inside a large laundry bag, or by hand, and dry it flat. Re-block while damp to straighten the lattice.
The finished Beige Puff Lattice Square Bedspread and Shams Crochet Pattern

