Black and White Geometric Granny Square Blanket Pattern
Beginner Friendly
Perfect for those just starting their crochet journey, with clear instructions and simple techniques
Single-Day Project
A satisfying project you can complete in a single afternoon or evening.
Handmade Gift
A beautiful keepsake — free forever. Read online or print at home.
About This Black and White Geometric Granny Square Blanket Pattern
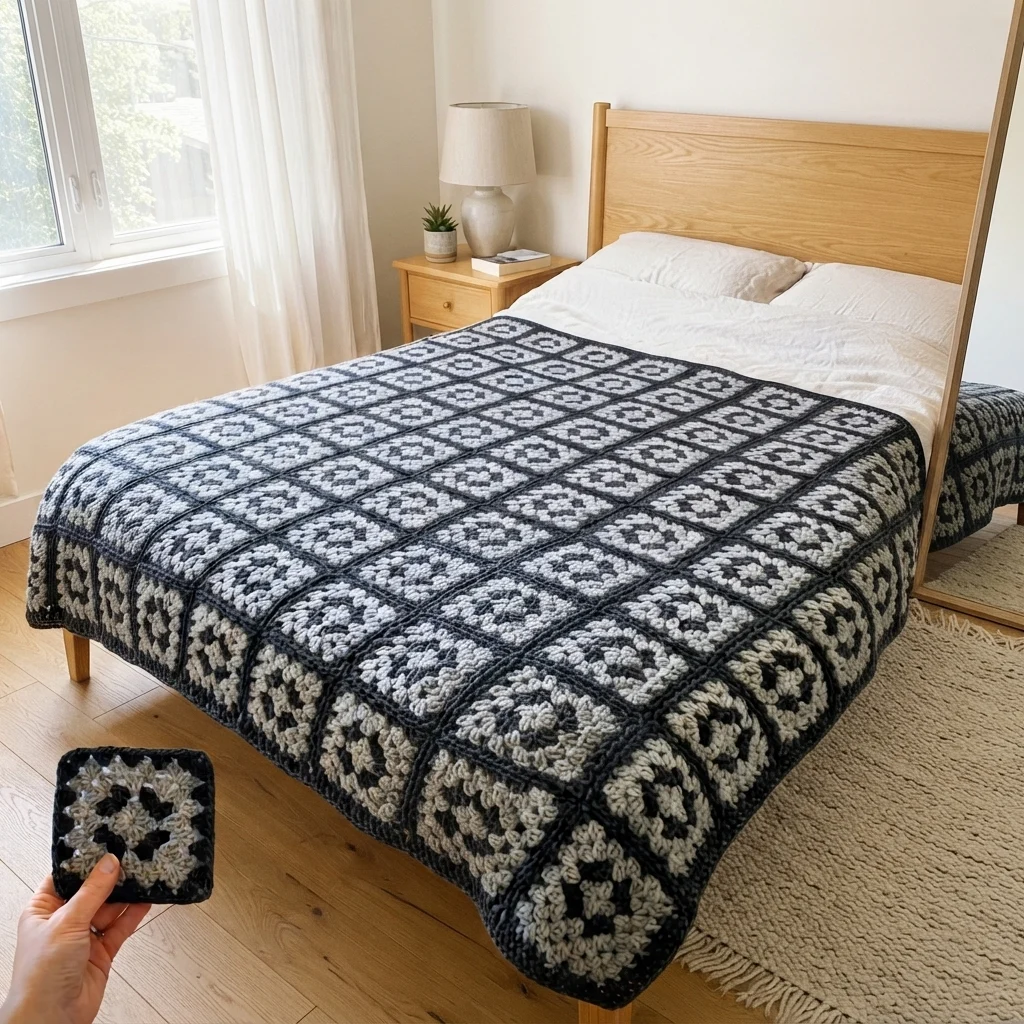
This crochet geometric granny square blanket pattern joins a large grid of identical squares, each with a small geometric center motif in black and light grey, resembling a houndstooth or diamond-style pattern, surrounded by a round of open mesh in light grey and finished with a solid black frame. The result is a graphic, modern-looking blanket, quite different from the typical flower-centered granny square.
What makes this design distinctive is the center motif itself: rather than a flower or circle, the center of every square combines small triangles and diamonds in black and grey over a light background, achieving a compact geometric effect reminiscent of a classic textile print. Keeping that same geometric pattern perfectly consistent across hundreds of squares, plus the solid black frame that borders each one identically, is what makes this project genuinely demanding despite the simple-looking granny square shape. Expect to spend 44-52 hours total for the full blanket.
This is an advanced pattern, best suited to someone already comfortable working multiple colors within a single small square and confident maintaining total consistency in the geometric center motif across hundreds of pieces, rather than someone wanting a traditional flower granny square.
Materials
- Worsted weight yarn, light grey ~500g, centers and mesh
- Worsted weight yarn, black ~600g, center motif and borders
- Crochet hook 4.5 mm (US 7)
- Tapestry/yarn needle
- Steam iron and pressing cloth, or a large blocking mat and pins
- Sharp scissors
Abbreviations
chchainsl stslip stitchscsingle crochetdcdouble crochetMRmagic ringch-spchain spacest(s)stitch(es)reprepeatFOfasten offGeometric Granny Square (make approximately 195 for a full/queen blanket)
- With black, ch 4, sl st in first ch to form a ring. Round 1: 8 dc into the ring. Sl st to join. (8 sts)
- Round 2, with light grey: join at any st. Work small clusters alternating black and grey every 2 sts, forming small triangles and diamonds around the center, following the geometric motif shown in the photo (approximately 4-8 color changes spaced evenly around the round).
- Round 3, with light grey (open mesh): *dc in next st, ch 1, skip 1 st; rep from * around, forming an open mesh that surrounds the center motif and begins shaping the square.
- Round 4, with black: ch 3, (2 dc, ch 2, 3 dc) in a corner st, *ch 1, (3 dc, ch 2, 3 dc) in next corner st; rep from * around, forming the square’s 4 corners. Sl st to join.
- Round 5, with black: repeat Round 4’s structure, adding 1 more ch-1 space between corner groups to widen the square to its final solid black size. Sl st to join, FO leaving a long tail for joining.
- Repeat this entire sequence to make approximately 195 squares total.
Join-As-You-Go Assembly
- Arrange squares into your planned grid (for example, 13 columns x 15 rows for a full/queen blanket, adjusting to your own mattress measurements).
- Join squares as you complete each one’s final round, working a sl st into the corresponding corner or ch-1 sp of the neighboring square already in place, rather than sewing all squares together afterward.
- Work row by row, joining each new square to the one beside it and to the row above as you go, until the entire grid is assembled.
Blanket Border
- With black, join at any corner of the assembled blanket. Round 1: sc evenly around the entire perimeter, working 3 sc at each of the 4 corners to keep them flat.
- Round 2: dc evenly around for a clean, solid finish that frames the grid.
- Join with sl st to first st and FO. Weave in all ends.
Finishing
Weave in every square’s starting and ending tail individually across the entire blanket, since a project this size accumulates a very large number of loose ends. Steam-block the finished blanket flat, pinning the border evenly on all 4 sides and checking that the grid lies flat with no squares puckering at their joins.
Tips for Success
- Keep the geometric center motif’s color placement identical on every single square; even small variations become very visible once dozens of squares sit side by side.
- Join squares at the exact same corner and ch-sp points throughout, so the grid lines up consistently across its full size.
- Twist yarns at every color change within the center motif, even for small sections, to avoid holes forming at the transitions.
- Work in batches, several squares at a time, rather than joining each one immediately after finishing it, so you can periodically check the overall grid lies flat.
- Block the blanket in sections on a large flat surface if you don’t have space to block the whole thing at once, working corner by corner.
Common Mistakes to Avoid
- Varying the geometric motif’s color placement between squares breaks the consistency this design depends on. Fix: keep a written reference of the exact color sequence and check it for every square.
- Skipping the yarn twist at small color changes within the center leaves tiny holes throughout the grid. Fix: twist working yarns at every color change, regardless of how small the section is.
- Joining squares at inconsistent points causes visible misalignment across such a large grid. Fix: always join at the same designated corner and ch-sp points throughout.
- Underestimating how much yarn a project this size requires. Fix: calculate total yardage from a few finished squares before buying all your yarn.
- Skipping intermediate flatness checks on a project this large means catching a drift only after dozens of rows are joined. Fix: lay the growing blanket flat and check it every few rows rather than only at the end.
Ways to Customize This Pattern
- Reduce the grid size for a throw blanket instead of a full bedspread.
- Swap the black and grey palette for a different two-color combination to match your own decor.
- Simplify the center motif to a single solid color for a faster, less complex square.
- Add a third accent color to the center motif for extra visual interest.
- Use a fabric backing on the full blanket for added warmth and easier care.
Frequently asked questions
Block one square first to get its exact finished measurement, then divide your desired blanket width and length by that measurement to calculate columns and rows, adding extra squares for overhang on the sides and foot of the bed.
Strongly recommended. Sewing together 195-plus squares after the fact would add a substantial amount of additional finishing time compared to joining each square as you complete it.
This usually means color changes within Round 2 weren’t placed consistently, or yarns weren’t twisted at each change, leaving gaps. Recheck your color sequence against a written reference and twist yarns carefully at every transition.
Yes. Work Round 2 in a single color instead of alternating black and grey for a simpler, plainer center, keeping the rest of the square’s construction the same.
The finished Black and White Geometric Granny Square Blanket Pattern

