Blossom Fields Pink Flower Granny Square Blanket
Advanced
For experienced crocheters who enjoy complex shaping, fine detail, and ambitious construction
Single-Day Project
A satisfying project you can complete in a single afternoon or evening.
Handmade Gift
A beautiful keepsake — free forever. Read online or print at home.
About This Blossom Fields Pink Flower Granny Square Blanket
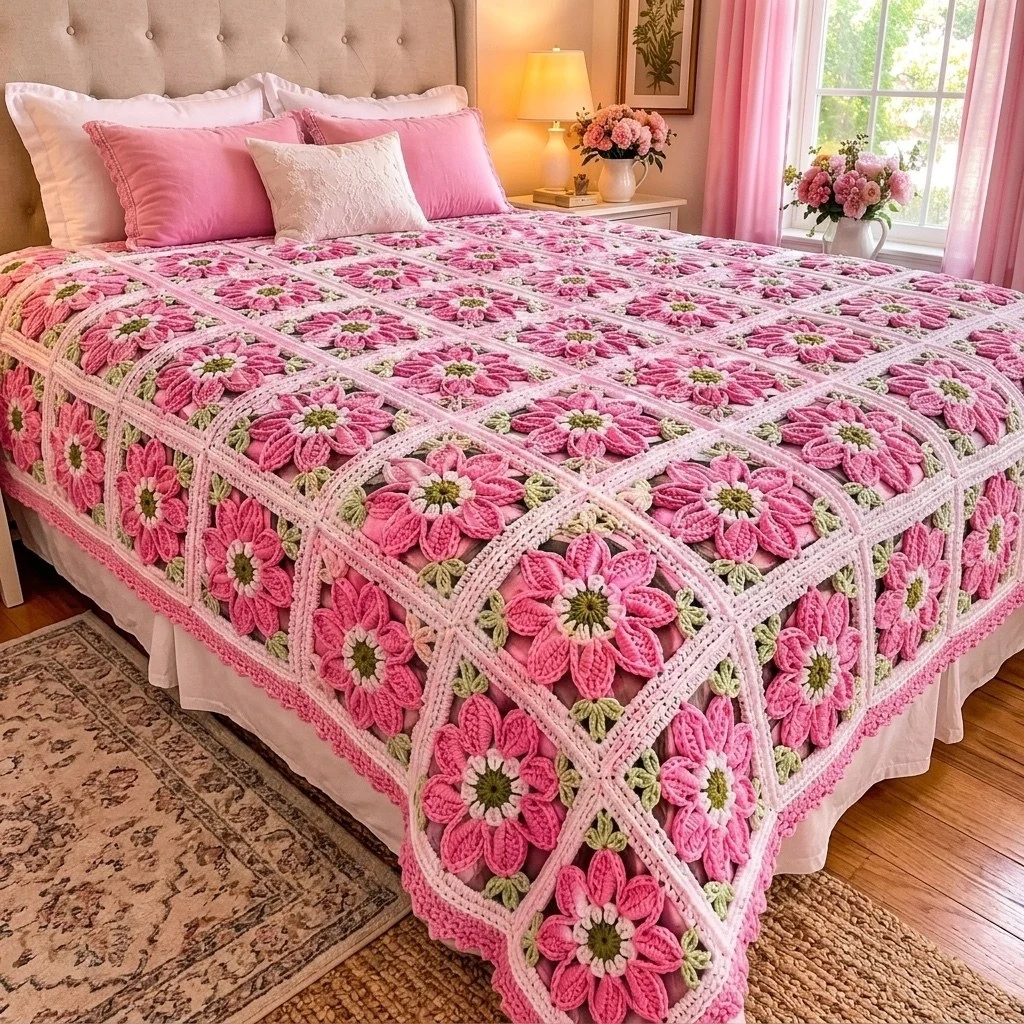
This pink flower granny square blanket pattern builds a full bed throw out of 99 separate squares, each one carrying a raised six-petal flower that stands up off the fabric. The flower is worked first, from an olive centre out through a cream ring, and the petals are made in the front loops only. The pale blush background is then crocheted behind the petals in the free back loops, which is what lets the flower sit proud instead of lying flat. Four small sage leaves are made separately and sewn under the petals so they point toward the corners, the way they do in the photo.
The squares are joined with a slip-stitch seam through back loops, which leaves a raised pale pink ridge on the right side. Those ridges are the lattice you can see running between the blocks — it is not a separate strip, it is the join itself. The blanket is finished with a deep rose edging: a ridge round, a double crochet round, and a continuous scallop round that gives the soft ruffled edge. Expect 35 to 45 hours in total, spread across the squares; a single square takes roughly 20 minutes once you have made three or four of them.
This is an advanced project, not because any one stitch is hard but because of the layering: front-loop petals, back-loop background, separate leaves, a structured join and a shaped border all have to line up. It suits a crocheter who is comfortable working into loops they have already used, who can count a corner round without a chart, and who does not mind repetitive work. If you want something smaller first, the square on its own makes a pillow front at four blocks.
Materials
- Aran / worsted acrylic in blush pink approx. 1100 g — square background and joining
- Aran / worsted acrylic in rose pink approx. 900 g — petals and border
- Aran / worsted acrylic in sage green approx. 150 g — leaves
- Aran / worsted acrylic in cream approx. 120 g — flower ring
- Aran / worsted acrylic in olive green approx. 100 g — flower centre
- 5 mm crochet hook main hook
- 4 mm crochet hook for the leaves, so they stay firm
- Blunt tapestry needle for sewing leaves and ends
- Stitch markers at least 8, for the corner spaces
- Rust-proof pins and a blocking mat or towel for squaring the blocks
- Scissors and a row counter
Abbreviations
MRmagic ringchchainsl stslip stitchscsingle crochethdchalf double crochetdcdouble crochettrtreble crochetinc2 sc in the same stitchst / stsstitch / stitchesspspaceFLOfront loops onlyBLOback loops onlyreprepeatRSright sideFlower Centre and Petals (make 99)
- Rnd 1 (olive): 6 sc in MR, pull the ring closed. (6)
- Rnd 2 (olive): inc in each st around. (12)
- Rnd 3 (cream): change to cream, sc in each st around, sl st to join. (12)
- Fasten off cream. This round stays visible as the pale ring under the petals, so keep the tension even here.
- Rnd 4 (rose, FLO): join rose in the front loop of any st of Rnd 3. Working in FLO only: *ch 3, skip 1 st, sl st in the front loop of the next st*, rep from * 6 times total. (6 ch-3 loops, all 12 front loops used)
- Rnd 5 (rose): in each ch-3 loop work (sc, hdc, 2 dc, tr, 2 dc, hdc, sc), sl st into the first sc at the end. (6 petals of 9 sts each)
- Fasten off rose and weave in the ends on the wrong side. Bend the petals forward and out of the way — the next section is worked behind them.
Square Background (worked behind the petals)
- Rnd 6 (blush): hold the flower with the petals facing you and fold them down. Join blush in any free back loop of Rnd 3, working behind the petals: sc in each of the 12 free back loops, sl st to join. (12)
- Rnd 7 (blush): ch 1, inc in each st around, sl st to join. (24)
- Rnd 8 (blush): ch 2, *(2 dc, ch 2, 2 dc) in next st for the corner, dc in next 5 sts*, rep from * 4 times total, sl st to join. (36 dc and 4 ch-2 corner sps; 9 dc along each side)
- Rnd 9 (blush): ch 2, dc in each dc and (2 dc, ch 2, 2 dc) in each ch-2 corner sp around, sl st to join. (52 dc and 4 corner sps; 13 dc along each side)
- Rnd 10 (blush): ch 1, sc in each dc and (sc, ch 2, sc) in each ch-2 corner sp around, sl st to join. (60 sc and 4 corner sps; 15 sc along each side)
- Fasten off, leaving a 10 cm tail. Every finished square must have exactly 15 sc per side plus a ch-2 corner space — check this before moving on, because the join depends on it.
Leaves (make 4 per square, 396 total)
- With sage and the 4 mm hook, ch 7.
- Working into the back bumps of the chain: sc in 2nd ch from hook, hdc in next ch, dc in next 2 chs, hdc in next ch. (5 sts)
- Work 3 sc in the last ch to turn the point. (3 sts)
- Working back along the free loops of the chain: hdc in next ch, dc in next 2 chs, hdc in next ch, sc in next ch. (5 sts)
- Sl st into the first sc to close. (13 sts total) Fasten off, leaving a 15 cm sewing tail.
- Do not weave in the long tail — it is used to attach the leaf. Make these in batches of 40 while you watch something; they go fast and getting them done early keeps the finishing stage short.
Attaching the Leaves and Blocking
- Lay a finished square flat, right side up, with the flower centred.
- Slide one leaf under a petal so the base of the leaf sits against Rnd 7 and the point aims diagonally at a corner of the square.
- Using the sewing tail and the tapestry needle, stitch the base and the two lower side edges of the leaf down with 5 or 6 small stitches. Leave the point free so it lifts slightly.
- Repeat for the other three corners, spacing the leaves evenly between the petals. Weave the tails into the background on the wrong side.
- Pin each finished square to a blocking mat at exactly 15 cm square, keeping the four corner spaces square and the petals free of the pins.
- Spray with cool water until damp, pat the background flat, lift the petals upright with your fingers, and leave to dry completely. Block in batches of 12 to keep it manageable.
Layout and Joining the Squares
- Lay the blocked squares out 9 across and 11 down, all right sides up, with every flower facing the same way. Take a photo of the layout so you can rebuild it if it gets disturbed.
- Join in rows first. Hold two squares wrong sides together, so the seam ridge will show on the right side.
- With blush and the 5 mm hook, insert the hook through the back loop of the first square and the back loop of the matching stitch on the second square, and sl st through both. Work 1 sl st through each matching pair along the edge: 1 into the corner ch-2 sps, 15 along the side, 1 into the next corner ch-2 sps. (17 sl sts per seam)
- Continue adding squares in the same way until you have a row of 9. Fasten off at the end of each row and weave in the ends as you go.
- Make all 11 rows, then join the rows to each other in the same back-loop slip stitch, working straight across all 9 squares: 1 sl st in each corner sp, 15 sl sts per square side, so each long seam is 9 x 15 plus 20 corner stitches. (155 sl sts per row seam)
- At the points where four squares meet, push the hook through all available loops so no hole forms. Pull each slip stitch slightly loose — a tight seam will cup the blanket.
- The joined panel should measure about 135 x 165 cm before the border.
Border
- Rnd 1 (blush): with RS facing, join blush in any blanket corner ch-2 sp. Ch 1, work (sc, ch 2, sc) in that corner. Work 15 sc along each square edge and 2 sc across each seam point, continuing around the blanket and working (sc, ch 2, sc) in each of the four blanket corners. Sl st to join. (151 sc on each short edge, 185 sc on each long edge, plus 4 corner sps)
- Rnd 2 (rose, BLO): change to rose. Ch 1, working in BLO only, sc in each st around and (sc, ch 2, sc) in each corner sp, sl st to join. This back-loop round makes the raised ridge that frames the lattice. (same counts as Rnd 1)
- Rnd 3 (rose): ch 2, dc in each st around and (2 dc, ch 2, 2 dc) in each corner sp, sl st to join. As you work each side, add or skip 1 or 2 stitches so that every side ends on a multiple of 3 — the scallops depend on it. (aim for 150 dc on each short edge and 186 dc on each long edge)
- Rnd 4 (rose, scallops): ch 1, *skip 2 sts, 5 dc in next st*, rep from * all the way around, working 5 dc in each corner ch-2 sp as you pass it. Sl st into the first dc to close. (50 scallops on each short edge, 62 on each long edge, plus 4 corner scallops)
- Fasten off and weave in the tail along the base of a scallop where it will not show.
Finishing
Turn the blanket over and go through every seam, trimming and weaving any ends you skipped. Ends left loose in a blanket this size work themselves free the first time it is washed, so it is worth the hour. Check each square from the wrong side as well: if any leaf tail was woven through the background too tightly it will pucker the block, and loosening it now takes seconds.
Give the finished blanket a final light blocking. Lay it flat on a bed or a clean floor, square up the four corners, pin the scallop edge so each shell sits evenly, and mist it with cool water. While it is damp, run your fingers under every row of petals and lift them so they stand upright, and do the same with the leaf points. Let it dry fully before moving it — a wet blanket this heavy will stretch out of shape if you pick it up. Wash it on a cool gentle cycle in a large machine and dry flat; never hang it over a line, because the weight will pull the squares into rectangles.
Tips for Success
- Work Rnd 4 strictly in the front loops. If you catch both loops, the back loops of Rnd 3 will not be free for Rnd 6 and the petals will lie flat instead of standing up.
- Make the flower centres for all 99 squares first, then all the petal rounds, then all the backgrounds. Batching by round keeps your tension consistent across the blanket far better than finishing squares one at a time over several weeks.
- Keep the 15-sc-per-side count as a hard rule. Mark both corner spaces of every square with a stitch marker as you finish Rnd 10, and the joining stage becomes mechanical instead of fiddly.
- Use the smaller 4 mm hook for the leaves. At 5 mm they come out floppy and disappear under the petals; the tighter gauge keeps the point lifted.
- Weigh your blush yarn as you go. It is the colour you will run short of first, and dye lots on pale pinks vary noticeably — buy the full amount at the start.
Common Mistakes to Avoid
- Pulling the joining slip stitches tight. The seam then shortens relative to the squares and the blanket ripples. Go up a hook size for the join only, or consciously leave each loop loose enough to see light through.
- Working Rnd 8 corners into the wrong stitch. Each repeat must consume exactly 6 stitches of Rnd 7 (1 corner stitch plus 5 plain). If a side ends with 8 or 10 dc instead of 9, undo the round — an off-count square will not join cleanly to its neighbours.
- Sewing the whole leaf down, point included. It then reads as a flat green blob. Stitch only the base and the lower sides so the tip stays loose and catches the light.
- Skipping the blocking of individual squares. Unblocked granny squares vary by up to a centimetre, and that difference multiplies across nine squares into a wavy edge that no border will fix.
- Changing colour at a random point each round. Always change at the join so the colour steps line up behind the same petal on every square and the fronts look identical.
Ways to Customize This Pattern
- Change the size by the square: 7 across x 9 down gives a 105 x 135 cm lap blanket, 11 x 13 gives a generous 165 x 195 cm cover. The border counts stay the same formula — 15 sc per square side plus 2 per seam.
- Scatter the petal colour. Use rose on two-thirds of the squares and a deeper raspberry or a pale coral on the rest, placed at random, for a meadow effect while keeping the blush background constant.
- Make the petals longer by working (sc, hdc, 2 dc, 2 tr, 2 dc, hdc, sc) into each ch-3 loop, 11 sts per petal, for a wider, more open daisy shape.
- Swap the olive centre for mustard or deep gold and the cream ring for ivory to warm the whole blanket toward an autumn palette without changing any stitch counts.
- Join four squares into a 32 cm panel and add the border rounds for a matching cushion cover, or make a single square into a hot pad with a plain blush back.
Frequently asked questions
Because the square background has to be built behind them. Rnd 4 uses only the front loops of Rnd 3, which leaves the back loops free for Rnd 6. That separation is what makes the flower a true three-dimensional layer sitting on top of the fabric rather than a flat motif. If you work Rnd 4 through both loops, you will have nowhere clean to anchor the background and the petals will spread sideways.
Yes. Replace Rnd 10 with a join-as-you-go version: work 7 sc, then sl st into the matching stitch of the neighbouring square, work the remaining 8 sc, and join at each corner space. The seam will be flatter and will not give you the raised pale lattice visible in the photo, so choose it only if you prefer a smooth surface. Blocking each square before joining is even more important with this method.
They compress under weight but they spring back. Acrylic holds the petal shape well as long as you never machine dry it on heat, which permanently flattens the stitches. Wash cool, dry flat, and run your fingers under the petal rows while the blanket is still damp to lift them. Wool or a wool blend holds the shape even better but adds a lot of weight at this size.
At 99 squares in aran acrylic it comes in around 2.3 kg, which is heavy but still comfortable on a bed. A bulky or blanket-weight yarn with a 6.5 mm hook will give you squares of about 19 cm, so you would only need 7 across x 9 down for the same coverage and the project would take far less time — but the petals lose definition in thick yarn and the olive centre tends to swallow the cream ring. Aran is the best balance of speed and detail here.
The finished Blossom Fields Pink Flower Granny Square Blanket

