Blue Basketweave Filet Crochet Table Runner
Advanced
For experienced crocheters who enjoy complex shaping, fine detail, and ambitious construction
Multi-Day Project
A rewarding 12+ hour journey — perfect for dedicated crafters who love detailed work.
Handmade Gift
A beautiful keepsake — free forever. Read online or print at home.
About This Blue Basketweave Filet Crochet Table Runner
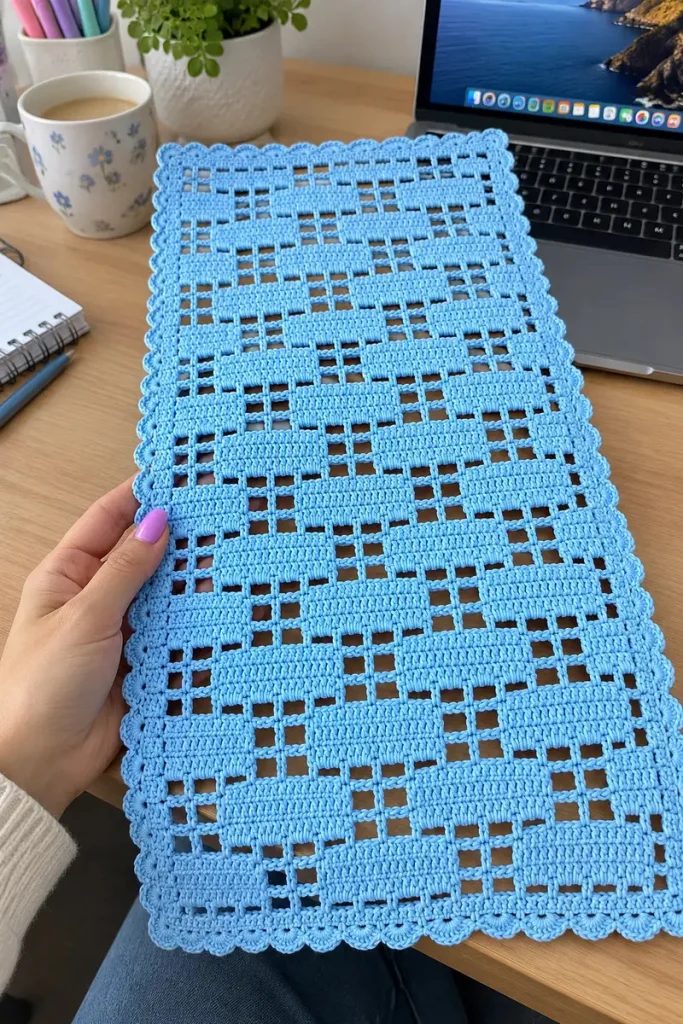
This filet crochet table runner pattern creates a sky-blue rectangle with staggered solid bars, open square windows and a scalloped edge inspired by the reference photograph. The offset blocks suggest woven ribbons, while the open mesh keeps the fabric light enough to show the table underneath.
Allow approximately 12–16 hours for crocheting and finishing, plus drying time. This advanced project suits crocheters comfortable reading filet grids, maintaining chain-space tension and distributing an edging around a rectangular panel. The runner is worked flat in one piece, with two border rounds; its detail comes from the placement of filled cells and the careful finishing of the edges.
Materials
- Sky-blue sport-weight cotton Approximately 250–300 g or 750–900 m; choose a smooth yarn around 300 m per 100 g
- 3.0 mm crochet hook Adjust to achieve the blocked gauge
- Removable stitch markers Four for corners, plus markers for tracking cells
- Tapestry needle and scissors For securing ends
- Blocking mat, rustproof pins and measuring tape For setting the rectangular shape and scallops
Abbreviations
chchainscsingle crochetdcdouble crochetsl stslip stitchst / stsstitch / stitchesOopen filet cell, defined belowFfilled filet cell, defined belowGauge and Finished Measurements
- Target blocked gauge: 20 dc stitch positions and 10 rows measure 10 × 10 cm. One filet cell spans three stitch positions, approximately 1.5 cm.
- Make a mesh swatch: ch 31. Work dc in the fourth ch from the hook, then dc in each remaining ch. The three skipped chains count as the first dc: 29 dc total.
- Correct the swatch width by using this foundation instead: ch 33; dc in the fourth ch from the hook and in each remaining ch, giving 31 dc including the turning chain. Use this 31-stitch swatch for all measurements.
- For swatch Rows 2–12, ch 3, turn, then repeat [ch 2, skip 2 sts, dc in next st] 10 times. On later rows, skip each ch-2 space and work into the next dc. Each row has 10 open cells and 31 stitch positions.
- Wet-block the swatch before measuring. Ten cells should span approximately 15 cm; ten rows should measure 10 cm vertically. Change hook size if necessary.
- The 58-position, 69-row panel measures approximately 29 × 69 cm at gauge. The complete border adds approximately 2 cm on each edge, for an estimated finished size of 33 × 73 cm.
Filet Cells and Row Reading
- At the beginning of every panel row after Row 1, ch 3 and turn. This chain counts as the first dc. Do not work another dc into the stitch directly beneath it.
- Open cell, O: ch 2, skip the next two stitch positions, dc in the next dc. Over a previous open cell, the skipped positions are its ch-2 space.
- Filled cell, F: work dc in each of the next three stitch positions. Over a previous open cell, work 2 dc into its ch-2 space and 1 dc into its ending dc.
- Adjacent cells share their boundary dc. After the initial turning chain, each cell adds exactly three positions. Thus 1 + (19 × 3) = 58 positions per row.
- Sequence A: O, F five times, O three times, F five times, O five times. This gives filled cells 2–6 and 10–14.
- Sequence A-reverse: O five times, F five times, O three times, F five times, O. This is the reverse-side version of Sequence A.
- Sequence B: O five times, F five times, O three times, F five times, O. This gives filled cells 6–10 and 14–18.
- Sequence B-reverse: O, F five times, O three times, F five times, O five times. This is the reverse-side version of Sequence B.
- A mesh row consists of O 19 times. A solid row consists of F 19 times. Work the final dc of every row into the top of the previous turning chain.
Foundation and Lower Mesh
- Row 1: Ch 60. Dc in the fourth ch from the hook and in every remaining ch. The skipped three chains count as the first dc. Total: 58 dc. Mark this as the right side.
- Row 2: Ch 3, turn; work O 19 times. Total: 19 open cells, comprising 20 dc boundaries and 19 ch-2 spaces.
- Row 3: Repeat Row 2. Total: 19 open cells and 58 stitch positions.
Staggered Block Panel
- Rows 4–6: Work Sequence A, Sequence A-reverse, then Sequence A, one sequence per row. Each row has 10 filled cells and 9 open cells: 40 dc including the turning chain, plus 9 ch-2 spaces; 58 positions total.
- Rows 7–9: Work three mesh rows, each with O 19 times.
- Rows 10–12: Work Sequence B, Sequence B-reverse, then Sequence B, one sequence per row. Each row has 10 filled cells and 9 open cells; 58 positions total.
- Rows 13–15: Work three mesh rows, each with O 19 times.
- Rows 16–18: Repeat Rows 4–6.
- Rows 19–21: Work three mesh rows.
- Rows 22–24: Repeat Rows 10–12.
- Rows 25–27: Work three mesh rows.
- Rows 28–30: Repeat Rows 4–6.
- Rows 31–33: Work three mesh rows.
- Rows 34–36: Repeat Rows 10–12.
- Rows 37–39: Work three mesh rows.
- Rows 40–42: Repeat Rows 4–6.
- Rows 43–45: Work three mesh rows.
- Rows 46–48: Repeat Rows 10–12.
- Rows 49–51: Work three mesh rows.
- Rows 52–54: Repeat Rows 4–6.
- Rows 55–57: Work three mesh rows.
- Rows 58–60: Repeat Rows 10–12.
- Rows 61–63: Work three mesh rows.
- Rows 64–66: Repeat Rows 4–6.
- Rows 67–69: Work three mesh rows. Fasten off after Row 69. The completed panel has 11 block bands separated by three mesh rows, with 58 positions in every row.
Counted Foundation Border
- With the right side facing, join yarn at the first stitch of the upper short edge. Ch 1; this chain does not count as a stitch. Work 3 sc into that corner stitch and mark the middle sc.
- Across the upper edge, work 1 sc into each of the 56 positions between the corner stitches, placing 2 sc into every ch-2 space and 1 sc into each intervening dc. Work 3 sc into the final corner stitch and mark the middle sc.
- Down the first long edge, work 2 sc around the end of each of the 69 rows: 138 sc. These are additional to the corner groups; distribute each pair evenly along its row end.
- Work 3 sc into the first foundation-chain corner, marking the middle sc. Across the lower edge, work 1 sc into each of the 56 foundation chains between the corners. Work 3 sc into the last foundation-chain corner and mark the middle sc.
- Up the remaining long edge, work 2 sc around each row end: 138 sc. Sl st into the first sc to join. Total: 400 sc, calculated as 56 + 56 + 138 + 138 + 12 corner stitches.
- Count before continuing. Each marked corner is the center of a three-stitch group; do not add extra corner stitches in the scallop round.
Scalloped Edge
- Do not turn. Ch 1 without counting it as a stitch. Sc in the first border stitch.
- Repeat [skip 1 st, work 5 dc in the next st, skip 1 st, sl st in the next st] 99 times. These repeats use the next 396 border stitches.
- For the last scallop, skip the next st, work 5 dc in the next st, skip the final unworked st, then sl st into the initial sc. This closes the final four-stitch repeat around the starting point.
- Total: 100 scallops. Each scallop contains 5 dc, giving 500 shell dc around the perimeter. Fasten off, leaving a 15 cm tail.
Finishing
Weave the ends through the dense foundation row or the single crochet border, changing direction once to secure each tail. No sewing or separate assembly is needed. Keep the ends out of the open windows so they remain discreet from either side.
Soak the runner according to the yarn label, press out excess water in a towel and lay it flat. Pin the panel into a rectangle approximately 29 × 69 cm, then ease the border outward to approximately 33 × 73 cm overall. Pin the scallops into rounded fans without pulling their tips sharply. Let the runner dry completely before removing the pins.
Tips for Success
- Mark the right side after Row 1. Read each three-row block band from the listed working-direction sequences so its solid bars stack vertically.
- Place markers after cells 5, 10 and 15 while learning the layout. Count cells rather than individual chains when checking a row.
- Keep ch-2 spaces relaxed enough to match the width of two dc. Tight chains pinch the mesh and draw the solid bars inward.
- Work the two dc of a filled cell around the chain space beneath them. This keeps the transition from mesh to solid fabric consistent.
- Check the border flat on a table after each long side. The 138 edge stitches should sit evenly without gathering the panel.
Common Mistakes to Avoid
- Adding a separate starting dc to every cell makes the panel wider. Cells share boundary stitches; each new cell contributes only three positions.
- Working the same sequence on all three rows of a block band shifts the middle row. Use the stated reverse sequence on the second row.
- Missing the turning-chain top removes the final cell boundary. Mark that chain before turning and work the last dc into its top.
- Putting only one sc into each long-edge row end makes the border draw up. Work two per row end, for 138 along each long side.
- Adding extra shells at corners disrupts the counted edging. Continue the four-stitch repeat around the full perimeter and shape the corner fans during blocking.
Ways to Customize This Pattern
- Use pale denim or cornflower cotton for a quieter variation while preserving the blue palette of the reference.
- Lengthen the runner by repeating Rows 4–15 before the final three mesh rows. Each added 12-row repeat adds approximately 12 cm and requires 24 additional sc on each long border edge.
- Shorten the runner by omitting a complete 12-row repeat. Removing 12 rows also removes 24 border sc from each long side; the scallop repeat still fits.
- Use finer cotton for a narrow dresser runner. Keep every stitch count unchanged and calculate the new dimensions from a blocked swatch.
Frequently asked questions
No. The woven effect comes from alternating the positions of filled filet cells. The entire center is crocheted as one flat panel, so there are no loose woven strips to secure.
Turning reverses the direction in which you cross the panel. The reverse sequence keeps each filled cell directly above the filled cell beneath it for all three rows of a solid bar.
The original 69-row version has 400 foundation-border stitches and 100 scallops. Adding one complete 12-row repeat increases the border to 448 stitches and the edging to 112 scallops.
Yes, but the mesh may have less crisp definition and the finished dimensions may differ. Make and measure a swatch, then follow the yarn label for washing and blocking. Keep acrylic runners away from hot cookware.
The finished Blue Basketweave Filet Crochet Table Runner

