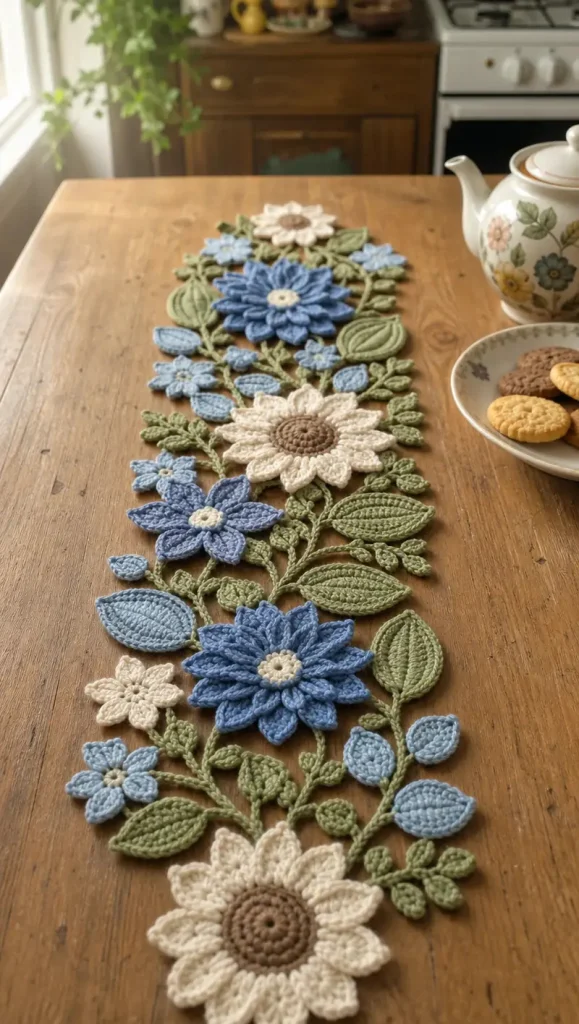
Blue Daisy and Cream Floral Crochet Table Runner
Advanced
For experienced crocheters who enjoy complex shaping, fine detail, and ambitious construction
Single-Day Project
A satisfying project you can complete in a single afternoon or evening.
Handmade Gift
A beautiful keepsake — free forever. Read online or print at home.
About This Blue Daisy and Cream Floral Crochet Table Runner
This floral crochet table runner pattern brings together cream daisies with warm brown centers, layered denim-blue flowers, tiny blue blossoms, and branching sage-green foliage. The open arrangement follows the reference’s long, narrow silhouette, with individual motifs joined into a continuous piece that lets the tabletop show through.
Allow approximately 30–40 hours for the crochet, embroidery, placement, and hand sewing. This advanced project suits makers who enjoy detailed motif work: you will shape separate petals, build overlapping flower layers, embroider leaf veins, and join curved vines into a stable openwork runner. The finished piece measures approximately 110 × 28 cm when worked to the stated gauge.
Materials
- Smooth sport-weight cotton, approximately 125 m per 50 g Sage green: 150 g; denim blue: 100 g; pale dusty blue: 50 g; cream: 100 g; warm brown: 25 g. Quantities include an allowance for joining.
- Crochet hook 2.75 mm, or size needed for gauge
- Tapestry needle and scissors Use a blunt needle for joining and surface embroidery.
- Stitch markers For spiral centers and petal attachment points
- Blocking board, rustproof pins, and measuring tape A surface at least 110 × 28 cm is helpful.
- Paper placement template Draw a 110 × 28 cm rectangle and mark the coordinates given below.
Abbreviations
chchainMRmagic ringscsingle crochethdchalf double crochetdcdouble crochetsl stslip stitchinc2 single crochet in the same stitchsc2togsingle crochet 2 stitches togetherst / stsstitch / stitchesRSright sideGauge, Dimensions, and Working Notes
- Gauge: 24 sc and 26 rows = 10 × 10 cm after gentle wet blocking. Make a swatch with ch 25, sc in the second ch and each remaining ch for 24 sc, then work 29 more rows of 24 sc. Ch 1 and turn between rows; measure the central area.
- Stem gauge: approximately 24 completed chain-and-slip-stitch stitches = 10 cm when laid flat without stretching. Adjust the tension of slip stitches independently so the stems remain flexible.
- Expected blocked dimensions: large center approximately 4.8 cm across; large petal approximately 4.6 × 2.9 cm; assembled large flower approximately 14 cm across; medium flower approximately 10 cm across; small blossom approximately 4 cm across; large leaf approximately 7 × 3.5 cm.
- Use US crochet terminology. Work centers in continuous spirals and move a marker at each round. Turning ch 1 never counts as a stitch. Every turned row begins in the first stitch unless instructed otherwise.
- All pieces remain flat and unstuffed. Fasten off with a 20 cm sewing tail unless another length is specified. Counts in parentheses describe stitches produced, excluding joining slip stitches and turning chains.
- Inventory: 3 cream large flowers, 2 layered denim large flowers, 2 medium denim flowers, 7 pale-blue small blossoms, 14 sage large leaves, 12 pale-blue small leaves, 24 sage leaflets, 2 main vines, and 24 branches.
Large Flower Centers — Make 5
- Use warm brown for 3 cream-flower centers and cream for 2 denim-flower centers. Round 1: 6 sc in MR. Pull the ring closed. (6)
- Round 2: Inc in every st. (12)
- Round 3: Repeat (sc, inc) 6 times. (18)
- Round 4: Repeat (2 sc, inc) 6 times. (24)
- Round 5: Repeat (3 sc, inc) 6 times. (30)
- Round 6: Repeat (4 sc, inc) 6 times. (36)
- Sl st in the next st and fasten off. Keep the disk flat; do not add an even round or a backing. On brown centers, use matching brown yarn to embroider a loose spiral of small backstitches over Rounds 2–5, following the crochet spiral without pulling it inward.
Large Petals — Make 84
- Make 36 cream petals for the 3 cream flowers and 48 denim petals for the 2 double-layer blue flowers. Begin each petal at its narrow attachment end. Ch 2.
- Row 1: Sc in the second ch from hook. Ch 1, turn. (1)
- Row 2: Work 3 sc in the only st. Ch 1, turn. (3)
- Row 3: Inc, sc, inc. Ch 1, turn. (5)
- Row 4: Inc, 3 sc, inc. Ch 1, turn. (7)
- Rows 5–9: Sc in each st. Ch 1, turn after every row. (7 per row; 5 rows)
- Row 10: Sc2tog, 3 sc, sc2tog. Ch 1, turn. (5)
- Row 11: Sc2tog, sc, sc2tog. Ch 1, turn. (3)
- Row 12: Sc2tog, sc. Ch 1, turn. (2)
- Row 13: Sc2tog. Do not turn. (1)
- Edging: Ch 1, work 1 sl st into each of the 12 row ends down the first side, 1 sl st into the foundation ch at the base, and 1 sl st into each of the 12 row ends up the second side. Sl st into the Row 13 stitch. (26 sl sts) Keep the edging loose and fasten off with a 25 cm tail.
- Surface ridge: With matching yarn, embroider a relaxed line of chain stitches from the base to Row 11 along the petal center. Leave the upper tip smooth. Weave in the embroidery ends on the back.
Assemble the Five Large Flowers
- Block the centers and petals separately. On every center, mark outer-round stitches 1, 4, 7, 10, 13, 16, 19, 22, 25, 28, 31, and 34. These establish 12 evenly spaced petal positions.
- Cream flowers: Place 12 cream petals RS up behind a brown center, with their narrow bases tucked approximately 8 mm under its edge. Align each petal axis with a marked stitch. Let adjacent petal sides overlap slightly in the same direction.
- Sew each cream petal base to the underside of the center across its corresponding 3-stitch sector. Add one small tack between adjacent petals approximately 12 mm beyond the center edge. Leave the outer tips free.
- Blue flowers, back layer: Arrange 12 denim petals behind a cream center in the same way, with each axis aligned to a marked stitch. Sew their bases securely beneath the center.
- Blue flowers, front layer: Place another 12 denim petals between the back petals, offset by half a petal spacing. Tuck their bases beneath the center but above the first layer, inserting them approximately 12 mm so this layer sits slightly closer to the center. Sew through the petal bases and center underside.
- Tack each front petal once to the back layer approximately 15 mm from its base. Keep the stitches on the underside and avoid sewing the tips down. Finished blue flowers should spread broadly while retaining a lightly raised second layer.
Medium Flower Centers — Make 2
- With cream, Round 1: 6 sc in MR. (6)
- Round 2: Inc in every st. (12)
- Round 3: Repeat (sc, inc) 6 times. (18)
- Sl st in the next st and fasten off. Each center measures approximately 2.4 cm across.
Medium Denim Petals — Make 12
- Make 6 petals per medium flower. With denim, ch 2. Row 1: Sc in the second ch from hook. Ch 1, turn. (1)
- Row 2: Work 3 sc in the st. Ch 1, turn. (3)
- Row 3: Inc, sc, inc. Ch 1, turn. (5)
- Rows 4–7: Sc in each st. Ch 1, turn after every row. (5 per row; 4 rows)
- Row 8: Sc2tog, sc, sc2tog. Ch 1, turn. (3)
- Row 9: Sc2tog, sc. Ch 1, turn. (2)
- Row 10: Sc2tog. Do not turn. (1)
- Edging: Ch 1, sl st in each of 9 row ends down one side, sl st in the foundation ch, sl st in each of 9 row ends up the other side, then sl st in the Row 10 stitch. (20 sl sts) Fasten off.
- Embroider a matching central chain-stitch ridge on each petal. Arrange 6 petals behind each medium center, placing one base beneath each successive group of 3 outer-round stitches. Overlap each base by approximately 5 mm beneath the center and sew securely. Tack neighboring petals together near their bases.
Small Pale-Blue Blossoms — Make 7
- With cream, Round 1: 5 sc in MR. Pull closed and sl st in the first sc. (5 sc) Fasten off.
- Join pale blue in any center stitch. Round 2: Repeat the following petal sequence once in each of the 5 center stitches: ch 4; sc in the second ch from hook, hdc in the next ch, dc in the last ch; sl st in the same center stitch; sl st in the next center stitch to move to the next petal position. On the fifth repeat, the moving sl st enters the first center stitch. (5 petals, each with 3 return stitches)
- Fasten off. Spread the petals into a five-pointed blossom and flatten the center gently. Leave one pale-blue tail for attaching the flower to a vine or neighboring motif.
Large Sage Leaves — Make 14
- Begin at the stem end with sage. Ch 2. Row 1: Sc in the second ch from hook. Ch 1, turn. (1)
- Row 2: Work 3 sc in the st. Ch 1, turn. (3)
- Row 3: Inc, sc, inc. Ch 1, turn. (5)
- Row 4: Inc, 3 sc, inc. Ch 1, turn. (7)
- Row 5: Inc, 5 sc, inc. Ch 1, turn. (9)
- Rows 6–12: Sc in each st. Ch 1, turn after every row. (9 per row; 7 rows)
- Row 13: Sc2tog, 5 sc, sc2tog. Ch 1, turn. (7)
- Row 14: Sc2tog, 3 sc, sc2tog. Ch 1, turn. (5)
- Row 15: Sc2tog, sc, sc2tog. Ch 1, turn. (3)
- Row 16: Sc2tog, sc. Ch 1, turn. (2)
- Row 17: Sc2tog. Do not turn. (1)
- Edging: Ch 1, sc into each of the 16 row ends down the first side, sc into the foundation ch at the base, sc into each of the 16 row ends up the second side, then work 3 sc into the Row 17 stitch at the tip. Sl st in the first edging sc. (36 sc)
- Fasten off with a 35 cm tail. Embroider a central chain-stitch vein from base to tip. Add 4 slanting straight-stitch veins on each side, ending one stitch inside the edging. Keep the embroidery relaxed so the leaf remains flat.
Small Pale-Blue Leaves — Make 12
- With pale blue, ch 2. Row 1: Sc in the second ch from hook. Ch 1, turn. (1)
- Row 2: Work 3 sc in the st. Ch 1, turn. (3)
- Row 3: Inc, sc, inc. Ch 1, turn. (5)
- Rows 4–6: Sc in each st. Ch 1, turn after every row. (5 per row; 3 rows)
- Row 7: Sc2tog, sc, sc2tog. Ch 1, turn. (3)
- Row 8: Sc2tog, sc. Ch 1, turn. (2)
- Row 9: Sc2tog. Do not turn. (1)
- Edging: Ch 1, sc into each of 8 row ends down the first side, sc into the foundation ch, sc into each of 8 row ends up the other side, then 3 sc into the Row 9 stitch. Sl st in the first edging sc. (20 sc)
- Fasten off. Embroider one central chain-stitch vein in matching pale blue. Each leaf should measure approximately 4 × 2 cm after blocking.
Tiny Sage Leaflets — Make 24
- With sage, ch 6. Work in the second ch from hook and across: sl st, sc, hdc, sc, sl st. (5 sts)
- Fasten off with a 20 cm tail. The starting end is the stem end. Pin the leaflet flat with a slightly pointed tip; expected length is approximately 2 cm.
Main Vines and Branches
- Main vines, make 2 in sage: Ch 227. Sl st in the second ch from hook and in each remaining ch, working into the back bumps. (226 sl sts) Fasten off with 35 cm tails. Each vine should measure approximately 94 cm without stretching.
- Short branches, make 12 in sage: Ch 13. Sl st in the second ch from hook and each remaining ch. (12 sl sts; approximately 5 cm)
- Long branches, make 12 in sage: Ch 20. Sl st in the second ch from hook and each remaining ch. (19 sl sts; approximately 8 cm)
- Leave 25 cm tails on all branches. Wet-block stems into gentle curves. Do not pull them straight under tension; tight slip stitches can shorten a chain significantly.
Placement Template and Structural Joining
- Draw a 28 cm wide × 110 cm long rectangle. Coordinates below are in centimeters: x is measured from the left edge and y from the bottom. Place all motifs RS up. The coordinates locate motif centers unless a base or tip is explicitly named.
- Place the 3 large cream flowers at (14, 8), (14, 55), and (14, 102). Place the 2 layered denim flowers at (15, 31) and (13, 79). Rotate the flowers so neighboring petals fall into the open spaces.
- Place medium denim flowers at (8, 44) and (20, 67). Place the 7 small pale-blue blossoms at (5, 20), (23, 24), (22, 43), (5, 64), (6, 90), (22, 91), and (7, 101).
- Place the 14 large sage leaves at these centers: (6, 16), (21, 17), (6, 27), (22, 36), (17, 43), (6, 51), (22, 52), (6, 59), (22, 60), (6, 72), (22, 83), (6, 84), (20, 96), and (9, 96). Turn each leaf so its base points toward the runner’s middle and its tip angles outward or along the length.
- Place the 12 pale-blue leaves at (23, 11), (5, 25), (23, 29), (6, 37), (23, 47), (6, 57), (23, 63), (5, 69), (22, 73), (5, 87), (23, 88), and (22, 99). Angle them into the nearest open space.
- Lay the two main vines from approximately y = 8 to y = 102, one passing near x = 9 and one near x = 19. Curve them around visible flower centers and under petal bases. Bring each vine into contact with every large flower it passes; keep excess length in shallow curves beneath flowers rather than folds.
- Use the 12 long branches to connect the 12 pale-blue leaf bases to the nearer main vine. Curve any spare length inward, and stitch the branch along the underside of the leaf’s central vein for 1 cm. Each branch must also touch either a flower, sage leaf, or neighboring branch; sew that contact as a second support.
- Use the 12 short branches as cross-links between the two main vines. Place one near each of these y positions: 13, 21, 29, 37, 45, 53, 61, 69, 77, 85, 93, and 99. Bring the vines within 4–5 cm of one another at those positions, using flowers or leaves to conceal the cross-links where practical. Sew both ends of every cross-link firmly.
- Attach the 24 tiny sage leaflets in pairs along the 12 short branches, one on each side of a branch. Angle their tips toward the outer edges. Tack each leaflet base over at least 5 mm of stem.
- Sew each large sage leaf base to the nearest vine or cross-link. Then secure one side of the leaf to a nearby petal, branch, or leaf with 2–3 small stitches. Secure every small blossom at its center and at the underside of one petal to two supporting elements.
- Working from the center outward, sew all remaining flower-to-vine contacts and overlapping motif edges. Use matching yarn and small whipstitches through underside loops. Each large flower needs at least 4 widely spaced attachment points; each medium flower needs 3. All other motifs need at least 2 attachment points so they cannot swing freely.
- Check the full rectangle before removing pins. Keep outermost tips within x = 0–28 and y = 0–110, rotating leaves and shifting their centers by up to 1 cm as needed. Coordinates establish the composition; the blocking boundary establishes the final dimensions.
Finishing
Lift the runner a short distance from the blocking surface and look for loose branches or motifs that twist. Return it to the template and add discreet underside stitches wherever a connection hinges. The runner should move as one piece while the outer petal tips remain soft and lightly raised.
Weave each tail through several stitches on the underside, reverse direction once, and trim. Soak the runner according to the yarn label, press out water in a towel, and pin it to approximately 110 × 28 cm. Spread the leaf tips and flower layers with your fingers, then leave it until completely dry. Keep this decorative cotton piece away from direct contact with hot cookware and open flames.
Tips for Success
- Make petals in batches of 12 and store each batch with its center. This keeps the two blue layers separate from the single-layer cream flowers.
- Pin all petal bases before sewing a center. Equal spacing at the base produces a balanced flower even when the tips overlap unevenly.
- Use loose chain-stitch embroidery for the raised veins. Tight embroidery shortens leaves and makes petal ridges curl.
- Place sewing stitches under the flower layers and along leaf veins. These areas hide joins while giving the openwork runner useful support.
- Photograph the pinned arrangement before joining, so you can return a displaced leaf or branch to its intended position.
Common Mistakes to Avoid
- Pulling the stem slip stitches tight makes the vines too short and stiff. Relax the working loop and check the completed stem gauge before making both main vines.
- Attaching both denim petal layers in the same positions hides the back layer. Offset the front layer by half the distance between neighboring back petals.
- Adding extra edging stitches at every row end ruffles the leaves. Follow the stated one-stitch-per-row-end counts and reserve the 3-stitch group for the tip.
- Joining a leaf only at its base lets it flip over. Add a second attachment along one side to a nearby motif or branch.
- Sewing while the layout is stretched creates puckering when pins come out. Let every vine and branch rest naturally before tightening its joining stitches.
Ways to Customize This Pattern
- Use two neighboring denim shades for the large blue flowers, placing the darker shade in the back layer to emphasize the overlapping petals.
- For a shorter centerpiece, use the central three large flowers and the foliage between them. Make shorter main vines to match the blocked arrangement, retaining cross-links approximately every 8 cm.
- Replace pale-blue leaves with sage leaves worked from the same small-leaf instructions for a more botanical color balance.
- For a lighter surface, omit the embroidered petal ridges while keeping the central leaf veins and all structural joining stitches.
Frequently asked questions
No. The two main vines, twelve cross-links, and multiple attachment points form the supporting structure. A backing would fill the open spaces that give this design its airy appearance.
The reference shows dense, overlapping blue blooms. Two offset layers create that depth, while the cream flowers use a single ring of petals around their larger brown centers.
Check both stitch and row gauge after blocking. A taller row gauge lengthens every petal. Try a smaller hook and remake the sample before producing the full inventory; enlarging all the motifs changes their spacing within the 28 cm width.
Follow the cotton yarn’s care instructions and support the entire runner when lifting it wet. Reshape it flat to dry. Store it flat or roll it loosely around a towel so the layered petals do not develop hard folds.
The finished Blue Daisy and Cream Floral Crochet Table Runner

