Blue Daisy Crochet Bedspread Pattern
Beginner Friendly
Perfect for those just starting their crochet journey, with clear instructions and simple techniques
Single-Day Project
A satisfying project you can complete in a single afternoon or evening.
Handmade Gift
A beautiful keepsake — free forever. Read online or print at home.
About This Blue Daisy Crochet Bedspread Pattern
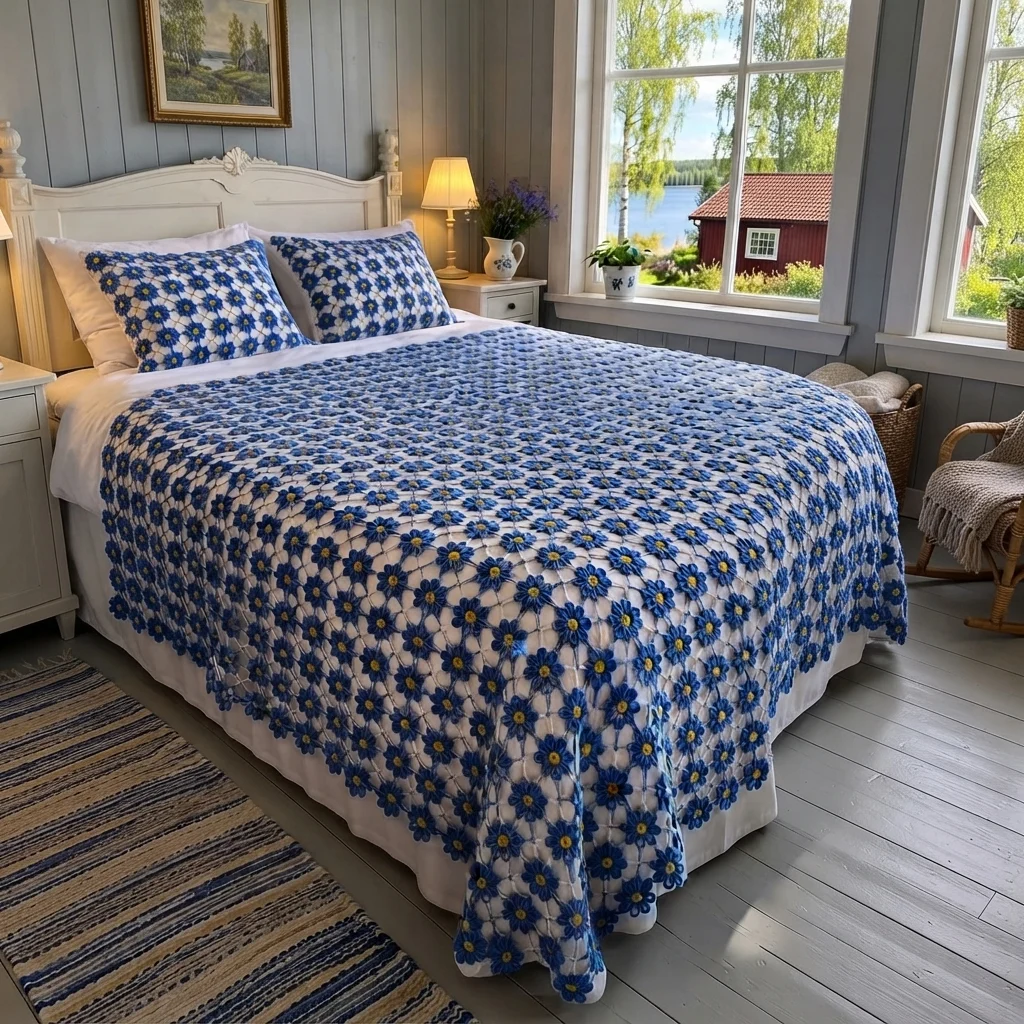
This blue flower crochet bedspread pattern covers a bed in small blue daisies with yellow centers, joined at the petal tips so the white of the bed shows through the gaps in between. The open lattice looks light and airy from across the room, but up close every flower is a tidy little motif.
It is an advanced project because of the volume and the finishing. Each flower is only three short rounds, but you need 284 of them, and every one has to come out the same size or the lattice will not line up. You then sew them into 21 offset rows and join each row to the next. Plan on 80 to 95 hours in total, about 15 minutes per flower plus joining.
It suits crocheters who enjoy small, repetitive motifs and careful sewing, and who want a cottage-style bedspread that works over white or colored linen. The finished cover is about 140 x 183 cm, and it is easy to resize by adding or removing flowers.
Materials
- Chunky cotton-blend yarn, royal blue (B) about 2 kg, estimated
- Chunky cotton-blend yarn, golden yellow (Y) about 200 g, estimated
- Crochet hook 6.0 mm
- Yarn needle
- Stitch markers and pins for the layout
- Flat surface for blocking and layout
Abbreviations
MRmagic ringscsingle crochethdchalf double crochetdcdouble crochetinc2 sc in the same stitchsl stslip stitchst(s)stitch(es)FOfasten offBroyal blue yarnYgolden yellow yarn( )xrepeat the stitches in brackets the number of times givenDaisy Motif (make 284)
- Round 1 (Y): 6 sc in MR (6). Join with a sl st to the first sc, FO and weave in the end.
- Round 2 (B): join B in any st of round 1. Inc x6 (12). Join with a sl st to the first sc. Place a marker in the first stitch.
- Round 3 (petals, B): *in the next st work sc, hdc, 3 dc, hdc, sc (7 sts in one stitch), then sl st in the next st*. Repeat from * to * 6 times in total (6 petals, 42 petal sts and 6 sl sts, 48 sts). Join with a sl st, FO and weave in the end.
- Check your flower: it must have exactly 6 petals, each worked in one of every two stitches of round 2. The 3 dc in the middle of each petal form its tip.
- Press each flower flat with a damp cloth and pin it to the size of your test flower. Let it dry fully.
Bedspread Layout
- Lay out 21 rows of flowers, alternating 14 and 13 per row, starting and ending with a row of 14 (11 rows of 14 and 10 rows of 13, 284 flowers in all).
- Offset each row by half a flower, so each flower sits in the gap between two flowers in the row above, as in the photo.
- Turn every flower the same way, with one petal pointing straight right and one straight left. Each flower then has a petal tip facing each of its 6 neighbors.
- The bedspread should measure about 140 cm wide and 183 cm tall. Check the layout from a few steps back before you start joining.
Joining
- Join the flowers into rows first. Hold two neighboring flowers with right sides together, with their touching petal tips side by side, and whip stitch through the back loops of the 3 dc of each tip, working 3 stitches in B.
- Join the rows to each other in the same way. Each flower joins to 2 flowers in the row above and 2 in the row below, at the diagonal petal tips.
- Leave the gaps between the flowers open. They are part of the look.
- Weave in all ends along the back of the petals.
- Check the joined spread: no petal tip should be left unjoined, except along the outer edge.
Finishing
Block the finished bedspread by laying it flat on towels, pinning the outer petals to shape, and misting it lightly with water. Keep the pins at the outer edges, and let it dry fully before moving it. Blocking opens the gaps evenly and flattens the petals.
The outer edge is scalloped by the petals, so leave it as it is. Drape the bedspread over white or colored linen so the gaps show the color underneath, and it will look like the photo.
Tips for Success
- Make one test flower before you commit to all 284, and write down your hook size and measurements.
- Make the flowers in batches of 14 and keep them in a bag by row, so the layout is easy later.
- Weave in the ends as you go. Doing 284 flowers at the end is slow.
- Block all the flowers to the same size before joining. Small differences add up across 14 flowers in a row.
- Join the rows from the head down so any small differences collect at the foot, where they are easiest to hide.
Common Mistakes to Avoid
- Working all 7 petal stitches into the wrong stitch crowds the petals. Use one stitch for the petal, then sl st in the next, and count 12 stitches in round 2.
- Flowers of different sizes will not join flat. Block every one to the same measurements.
- Turning some flowers differently leaves tips that miss their neighbors. Check that every flower has a petal pointing right.
- Sewing the joins tightly pulls the petals out of shape. Keep your whip stitches loose.
- Joining the rows without checking the offset makes the layout drift. Lay out each row against the one before.
Ways to Customize This Pattern
- Swap royal blue for lavender, coral or sage and keep the yellow centers for a different palette.
- Mix two or three shades of blue across the bedspread for a more natural, flower-bed look.
- Make a baby blanket with 8 rows of alternating 8 and 7 flowers (60 flowers), about 80 x 70 cm.
- Make matching pillow covers by joining 3 rows of alternating 4 and 3 flowers (11 in all) and sewing the panel to a plain back.
- Use a worsted yarn and a 4.0 mm hook for smaller, finer flowers and a lacier bedspread, and recalculate the number of flowers from your test flower.
Frequently asked questions
The amounts above are estimates of about 7 g of blue and under 1 g of yellow per flower, plus extra for joining. Weigh your test flower, multiply by 284, and add about 10 percent.
Add or remove whole flowers. Each extra flower in a row adds about 10 cm of width, and each extra row adds about 8.7 cm of length. Keep the rows alternating between one more and one fewer flower so the offset stays regular.
Yes. On the last petal of each flower, sl st its tip to the matching tip of a finished neighbor instead of working a plain petal edge. This saves sewing time, but you need to plan the order of the flowers first so every join lands in the right place.
With a washable cotton blend, wash it by hand or on a gentle cycle in cool water, press out the water without wringing, and lay it flat to dry. Royal blue can bleed, so wash it with a color catcher the first time.
The finished Blue Daisy Crochet Bedspread Pattern

