Blue Daisy Crochet Toilet Paper Holder Pattern
Advanced
For experienced crocheters who enjoy complex shaping, fine detail, and ambitious construction
Weekend Project
A satisfying weekend make — start Friday, finish Sunday, enjoy forever.
Handmade Gift
A beautiful keepsake — free forever. Read online or print at home.
About This Blue Daisy Crochet Toilet Paper Holder Pattern
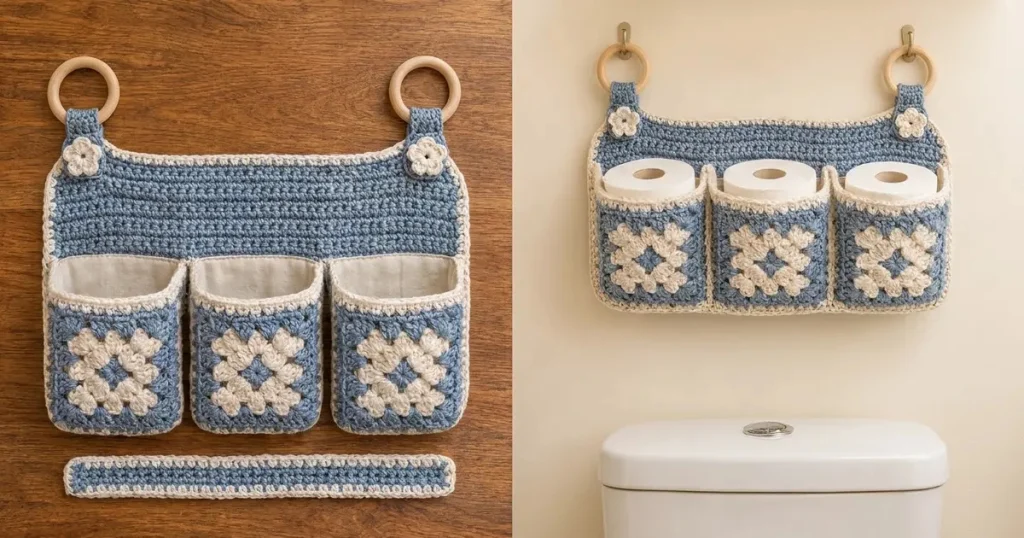
This crochet toilet paper holder pattern creates a dusty blue and cream wall organizer with three floral pockets, a broad crochet backing and two wooden hanging rings. Cream edging outlines each pocket, while small flowers cover the attachment tabs. Fabric lining supports the pockets and keeps the openwork fronts tidy.
Allow approximately 14–18 hours for the crochet, blocking and sewing. This advanced project combines raised floral squares, fitted gussets, reinforced hanging tabs and separately sewn pocket linings. It suits confident crocheters who enjoy precise assembly and useful home accessories.
Materials
- Worsted cotton yarn in dusty blue Approximately 650 m
- Worsted cotton yarn in warm cream Approximately 180 m
- Crochet hook 4 mm, or size needed for gauge
- Solid wooden rings Two, approximately 7 cm outside diameter, with openings at least 4.5 cm wide
- Prewashed cotton lining fabric Approximately 100 × 110 cm
- Cotton webbing Two pieces, 2 cm wide × 16 cm long
- Sewing thread, sewing needle, yarn needle, scissors and stitch markers Use strong thread matching the lining
- Blocking board, pins and measuring tape For accurate square and gusset dimensions
- Two suitable wall hooks Choose fixings appropriate to your wall and the loaded organizer
Abbreviations
chchainscsingle crochetdcdouble crochetsl stslip stitchst / stsstitch / stitchesMRmagic ringRS / WSright side / wrong sidepcpopcorn: work 5 dc in the indicated space, remove hook, insert it through the first dc, catch the dropped loop and pull it throughGauge, Size and Construction
- Use US crochet terminology. Single crochet gauge after washing and blocking: 18 sts and 22 rows = 10 cm. Make a swatch of at least 24 sts and 28 rows and measure its center.
- Each completed floral square must block to 13 × 13 cm, including its cream edging. Use a separate hook size for the squares if needed. The square measurement and single crochet gauge are separate requirements.
- The blue backing measures approximately 45 × 32 cm before edging. Three 13 cm square fronts receive U-shaped gussets about 9 cm deep, then attach to the backing. Each pocket remains open at the top.
- Turning ch 1 never counts as a stitch. For dc rounds, beginning ch 3 counts as one dc. Join each motif round with a sl st to the top of its beginning ch 3 unless directed otherwise. Chain spaces are counted separately from stitches.
- This is an unstuffed household organizer. No stuffing, safety eyes or facial details are used.
Backing Panel
- Foundation: With blue, ch 82.
- Row 1: Sc in the second ch from hook and each remaining ch. Turn. (81 sc)
- Rows 2–70: Ch 1, sc in every st. Turn. (81 sc each row)
- Fasten off. Block to approximately 45 × 32 cm without stretching the fabric open.
- Edging round: With RS facing, join cream at the upper right corner. Ch 1; work 81 sc across the top, ch 1, 70 sc down the side with one in each row end, ch 1, 81 sc across the foundation edge, ch 1, and 70 sc up the other side. Ch 1 and join to the first sc. (302 sc and four ch-1 corner spaces)
- Fasten off. Keep the panel flat while drying; the edging should neither flare nor pull inward.
Raised Floral Pocket Fronts — Make Three
- Round 1, blue: In an MR, ch 3 and work 11 dc. Join and close the ring. (12 dc)
- Round 2, cream: Join between any two dc. Ch 1, pc in that gap, ch 2; repeat pc in the next gap, ch 2 around the remaining 11 gaps. Join to the top of the first pc. Push all popcorns to the RS. (12 pc and 12 ch-2 spaces)
- Round 3, blue: Join in any ch-2 space. Ch 3, 2 dc, ch 2, 3 dc in that same space; work 3 dc in each of the next two spaces. Repeat the following three times: (3 dc, ch 2, 3 dc) in the next space, then 3 dc in each of the next two spaces. Join. (48 dc and four ch-2 corners; 12 dc per side)
- Round 4: Sl st to the next corner space. In that corner work ch 3, 2 dc, ch 2, 3 dc. Work 3 dc in each of the three gaps between dc groups along the next side. Repeat for the other three sides, making (3 dc, ch 2, 3 dc) in each corner. Join. (60 dc and four ch-2 corners; 15 dc per side)
- Round 5: Sl st to the next corner. Repeat Round 4, working into four between-group gaps along each side. Join. (72 dc and four ch-2 corners; 18 dc per side)
- Round 6: Sl st to the next corner. Repeat Round 4, working into five between-group gaps along each side. Join. (84 dc and four ch-2 corners; 21 dc per side)
- Round 7, cream: Join in a corner space. Ch 1, (sc, ch 1, sc) in that corner; sc in each of the next 21 dc. Repeat around the remaining three sides and join to the first sc. (92 sc and four ch-1 corners; 23 sc between adjacent corner spaces)
- Fasten off and weave in ends. Block each square to exactly 13 × 13 cm. Choose one edge as the top and mark its two corners.
Pocket Gussets — Make Three
- Foundation: With blue, ch 17.
- Row 1: Sc in the second ch from hook and across. Turn. (16 sc)
- Rows 2–86: Ch 1, sc in every st. Turn. (16 sc each row)
- Fasten off, leaving a sewing tail. Block each strip to approximately 9 × 39 cm. Along both long edges, place markers after Rows 29 and 57 to divide the strip into lengths of 29, 28 and 29 rows.
- With WS together, pin one long edge around the left, bottom and right edges of a floral square. The first 29-row section follows the left edge, the 28-row section follows the bottom, and the last 29-row section follows the right edge.
- Using cream yarn, whipstitch through both loops of the square edging and the corresponding gusset row ends. Distribute each gusset section evenly over its 23-sc square edge. At each lower corner, pass through the ch-1 space to anchor the fold; do not gather the fabric. The differing row and stitch counts are intentional.
- Leave the opposite long gusset edge free for attachment to the backing. The two short 16-st edges form the sides of the pocket opening.
Backing Lining and Pocket Placement
- Cut one backing lining rectangle 47 × 34 cm. Turn each edge under 1 cm and press, producing a 45 × 32 cm rectangle. Pin to the WS of the crochet panel, keeping the cream edging visible. Sew around all four sides with small stitches.
- On the RS of the panel, measure from the blue panel’s lower left corner, excluding edging. Mark three rectangles: the first from 1 to 14 cm across, the second from 16 to 29 cm, and the third from 31 to 44 cm. Each extends from 1 to 14 cm above the lower edge.
- Pin each free gusset edge along the left, bottom and right sides of its marked rectangle. Match the 29-row, 28-row and 29-row sections to those three 13 cm lines. Keep the top open.
- Backstitch the gusset edge to the backing with matching yarn, catching the crochet securely. Add a second line of small stitches in strong sewing thread through the gusset seam allowance, crochet backing and fabric backing lining. Reinforce the upper 2 cm of each side seam.
- Check that all three front upper edges sit at the same height and each pocket projects about 9 cm from the backing.
Fitted Pocket Linings — Make Three
- For each pocket, cut two fabric rectangles 15 × 15 cm for front and back, plus one strip 11 × 41 cm for the gusset. All following seams use a 1 cm allowance.
- On the strip’s long edges, mark the stitching-line corners 14 cm and 27 cm from one short cut edge. These marks divide the finished seam path into three 13 cm sections, with 1 cm allowance at each end.
- With fabric right sides together, sew one long gusset edge around three edges of a front rectangle, pivoting at its lower corners. Clip the gusset seam allowance carefully at each pivot without cutting the stitching.
- Sew the other long gusset edge around the sides and bottom of the back rectangle. This creates a lining approximately 13 cm wide, 13 cm high and 9 cm deep before hemming the opening.
- Turn the upper raw edge 5 mm to the fabric WS, then another 5 mm, and stitch. The finished lining height is approximately 12 cm, allowing its rim to sit below the crochet rim.
- Keep the lining’s seam allowances facing outward toward the crochet. Insert it so the clean fabric face shows inside the pocket. Slipstitch its hem just below the crochet opening, then tack its two lower front corners and two lower back corners to the adjoining crochet seams.
Cream Pocket Opening Edges
- For each pocket, join cream at the upper back left corner. Ch 1 and work 16 sc across the left gusset’s short edge, 23 sc across the front’s top edge, and 16 sc across the right gusset’s short edge. (55 sc)
- Do not add stitches in the front corner chain spaces; simply pass over each corner space between the adjacent edge stitches. Fasten off at the upper back right corner.
- Secure both ends into the reinforced side seams. Use small matching sewing stitches to attach any lining edge that remains loose beneath this trim.
Reinforced Ring Tabs — Make Two
- Foundation: With blue, ch 8.
- Row 1: Sc in second ch from hook and across. Turn. (7 sc)
- Rows 2–35: Ch 1, sc across. Turn. (7 sc each row)
- Fasten off with a long sewing tail. Each strip measures approximately 3.9 × 16 cm.
- Center one 16 cm webbing piece along the WS of each tab. Fold its ends under slightly to hide the cut edges, then sew down both long sides and across the ends with strong thread.
- Pass each tab through a wooden ring and fold it in half with the webbing enclosed. Place the paired tab ends over the panel’s upper edge: one layer on the front and one on the back, overlapping the panel by 4 cm.
- Position the tab centers 3.5 cm from their respective panel side edges. Sew through both tab layers, the panel and its lining using a rectangle with crossed diagonals. Repeat the stitching for strength. Approximately 4 cm of folded tab remains above the panel.
Small Tab Flowers — Make Two
- Round 1, cream: Work 5 sc in an MR. Join to the first sc and close the ring. (5 sc)
- Round 2: In each sc work (sl st, ch 2, 3 dc, ch 2, sl st). Repeat in all five stitches. (5 petals, each containing 3 dc, two ch-2 arches and two sl sts)
- Fasten off with a sewing tail. Sew one flower over the front attachment area of each tab, catching the flower center and petal bases. Keep the petals free of the wooden ring.
Rear Stabilizing Strip
- The separate narrow strip visible beneath the organizer in the reference is interpreted here as a rear reinforcement. With blue, ch 78.
- Row 1: Sc in second ch from hook and across. Turn. (77 sc)
- Rows 2–4: Ch 1, sc across. Turn. (77 sc each row)
- Edging: Join cream at a corner. Ch 1, work 77 sc along one long edge, ch 1, 4 sc along the short edge, ch 1, 77 sc along the other long edge, ch 1, 4 sc along the remaining short edge, ch 1; join. (162 sc and four ch-1 corners)
- Block flat. Center horizontally on the back of the lined panel, approximately 2 cm above the lower edge. Sew both long edges through the lining and crochet with small matching stitches. Keep this strip flat against the backing.
Finishing
Weave in all remaining yarn ends and remove the placement markers. Smooth each lining into its corners, check the cream seams and make sure no loose threads catch a roll. The flowers should sit flat over the tab stitching, and both rings should hang at the same height.
Mount two hooks at the spacing of the finished rings. Add one roll to each pocket and watch for stretching at the tabs or backing. Reinforce any seam that shifts before regular use. Keep this cotton organizer in a dry position away from splashes; empty it before cleaning or moving it.
Tips for Success
- Finish and block one floral square before making the other two. Its 13 cm measurement controls the gusset seams and pocket placement.
- Mark gusset sections on both long edges before sewing. Matching those marks prevents the pocket bottom from twisting.
- Baste the linings in place and try your rolls before permanently attaching the hems. Adjust the fabric seams if the fit is snug.
- Sew the webbing and tabs through the fabric backing lining. This spreads the load across more than a few crochet loops.
Common Mistakes to Avoid
- Adding granny groups between individual dc makes the square flare. Place groups only in the gaps between existing three-dc groups.
- Matching every gusset row to one square stitch creates a ruffle. Ease the marked 29, 28 and 29 row sections evenly over their corresponding 23-sc edges.
- Sewing the pocket back across its top closes the opening. Attach only the two sides and bottom of the free gusset edge.
- Leaving the lining seam allowances inside the usable pocket creates rough corners. Face those allowances toward the crochet shell.
- Using the decorative flowers as tab anchors weakens the hanger. Complete the structural tab stitching before adding flowers.
Ways to Customize This Pattern
- Use sage green for blue and oatmeal for cream while retaining the same floral contrast.
- For larger rolls, increase gusset width by adding foundation chains and matching sc to every row; widen the lining strip by the same measured amount. Keep gusset length unchanged.
- Make a two-pocket version with a 54-sc backing and the same 70 rows. Position pocket rectangles at 1–14 cm and 16–29 cm across its approximately 30 cm width; shorten the rear strip to 50 sc.
- Use washable cotton canvas for the linings when storing small bathroom accessories instead of rolls. Keep heavy bottles out of the hanging pockets.
Frequently asked questions
Not necessarily. The lined footprint is approximately 13 × 9 cm, and lining thickness reduces usable space slightly. Make a paper mock-up with those dimensions and try your roll first. A wider gusset increases pocket depth without changing the floral front.
The lining is part of this design’s support system. It limits stretching behind the floral fronts and helps distribute the tab load. For the intended three-roll organizer, include both the pocket linings and backing lining.
Single crochet rows are shorter than stitches are wide at the stated gauge. The gusset therefore needs about 86 rows to travel around three 13 cm edges. The marked sections let you distribute that length evenly.
Follow the yarn and fabric care instructions, spot-cleaning when possible. Avoid soaking the wooden rings. Reshape the empty pockets and dry the crochet flat, supporting the rings outside the wet fabric.
The finished Blue Daisy Crochet Toilet Paper Holder Pattern

