Blue Flower Granny Square Bedspread Crochet Pattern
Beginner Friendly
Perfect for those just starting their crochet journey, with clear instructions and simple techniques
Single-Day Project
A satisfying project you can complete in a single afternoon or evening.
Handmade Gift
A beautiful keepsake — free forever. Read online or print at home.
About This Blue Flower Granny Square Bedspread Crochet Pattern
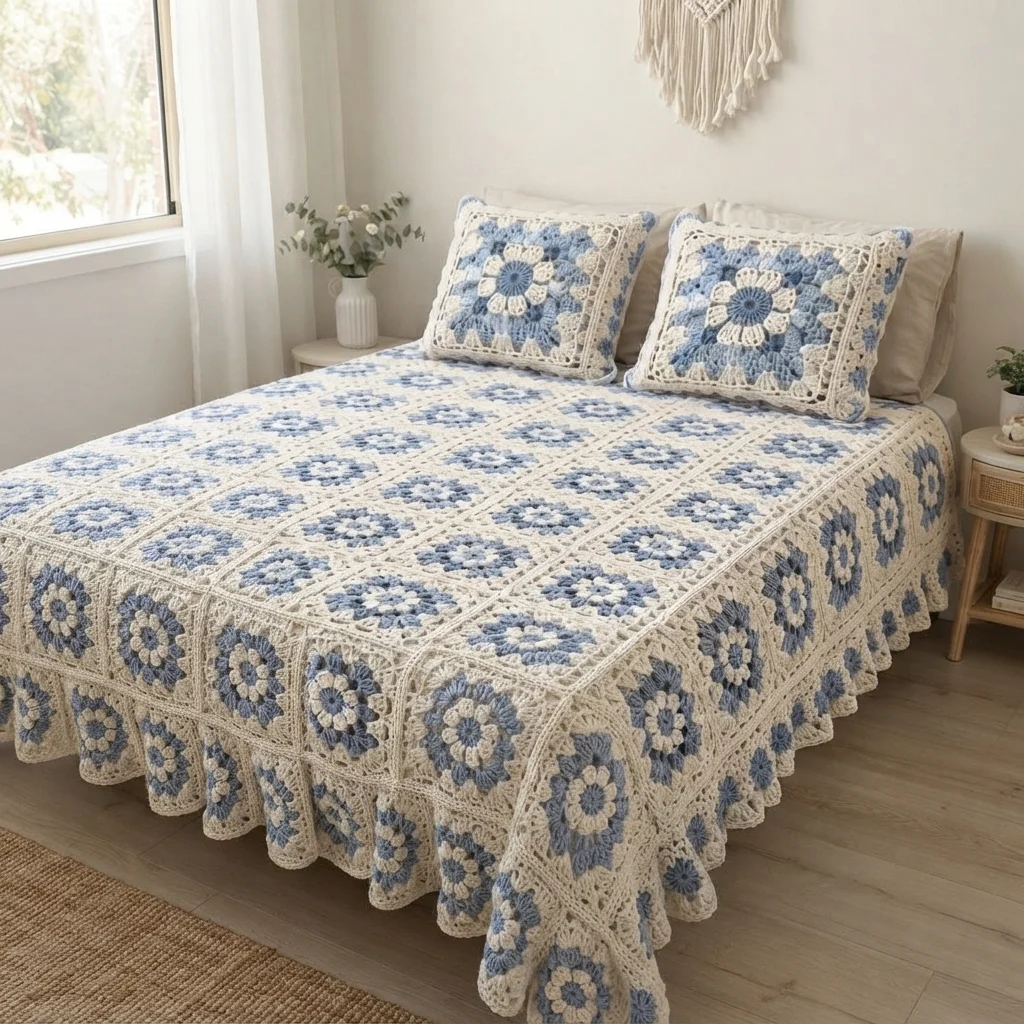
This crochet granny square bedspread pattern joins dozens of flower-centered granny squares, worked in dusty blue and cream, into a full coverlet finished with a scalloped border, and pairs it with two matching pillow shams using the same square motif framed by a matching border and backing. Every square shares the same center flower and color sequence, so the whole set reads as one cohesive design rather than a mixed scrap-yarn project.
What makes this design distinctive is the sheer scale combined with total color consistency: unlike a typical scrap-yarn granny square blanket, every single square here follows an identical color and round sequence, so the finished bedspread reads as a repeating tile pattern rather than a patchwork. That consistency, at bedspread scale, is what makes this a genuinely demanding project even though any single square is straightforward on its own. Expect to spend 50-60 hours total across the full bedspread and both pillow shams.
This is an advanced pattern, best suited to someone comfortable maintaining exact color and round consistency across a very large number of repeated squares and confident with join-as-you-go assembly at full bedspread scale, rather than someone wanting a quick or scrap-based project.
Materials
- Worsted weight cotton yarn, cream ~900g, squares and border
- Worsted weight yarn, dusty blue ~500g, squares
- Worsted weight yarn, mid blue ~300g, squares
- Crochet hook 4.5 mm (US 7)
- Tapestry/yarn needle
- Pillow forms or inserts, 2 ~45 x 30 cm each
- Fabric for pillow backing (optional) ~1 m, if not crocheting a full backing
- Steam iron and pressing cloth, or a large blocking mat and pins
- Sharp scissors
Abbreviations
chchainsl stslip stitchscsingle crochethdchalf double crochetdcdouble crochetch-spchain spacest(s)stitch(es)reprepeatFOfasten offFlower Granny Square (make approximately 195 for a full/queen bedspread, plus 24 more for 2 pillow shams)
- With mid blue, ch 4, sl st in first ch to form a ring. Round 1: ch 3 (counts as first dc), 15 dc into the ring. Sl st to join. (16 sts)
- Round 2, with dusty blue: join in any st. *ch 2, skip 1 st, sl st in next st; rep from * around to form 8 ch-2 loops.
- Round 3 (petals), with dusty blue: in each ch-2 loop, work (sc, hdc, 2 dc, hdc, sc) to form 8 rounded petals. Sl st to join, FO.
- Round 4, with cream: join behind the petals, working into the base sts between petals. Ch 3, (2 dc, ch 2, 3 dc) in same base st, *ch 1, (3 dc, ch 2, 3 dc) in next base st; rep from * around, forming the first square corners around the flower. Sl st to join, FO.
- Round 5, with cream: join at any corner ch-2 sp. Ch 3, (2 dc, ch 2, 3 dc) in same sp, *ch 1, 3 dc in next ch-1 sp, ch 1, (3 dc, ch 2, 3 dc) in next corner sp; rep from * around. Sl st to join, FO leaving a long tail for joining.
- Repeat this entire sequence to make approximately 195 squares for the bedspread and 24 more for the two pillow shams (12 per sham: 6 front, 6 back, or adjust based on your chosen backing method).
Join-As-You-Go Assembly, Bedspread
- Arrange squares into your planned grid (for example, 13 columns x 15 rows for a queen-size coverlet, adjusting to your own mattress measurements).
- Join squares as you complete each one’s final round, working a sl st into the corresponding corner or ch-1 sp of the neighboring square already in place, rather than sewing all squares together afterward.
- Work row by row, joining each new square to the one beside it and to the row above as you go, until the entire grid is assembled.
Bedspread Border
- With cream, join at any corner of the assembled bedspread. Round 1: sc evenly around the entire perimeter, working 3 sc at each of the 4 corners to keep them flat.
- Round 2 (scallop round): *sk 2 sts, 5 dc in next st, sk 2 sts, sl st in next st; rep from * evenly around all 4 sides, working extra repeats at each corner so scallops stay even in size.
- Join with sl st to first st and FO. Weave in all ends.
Pillow Sham Front (make 2, using a 2×3 grid of 6 squares each)
- Join 6 flower squares into a 2×3 grid using the same join-as-you-go method as the bedspread, to form each pillow front panel.
- Work the same scalloped border (Rounds 1-2 above) around the joined 2×3 panel to finish each pillow front.
Pillow Sham Back and Closure
- Option A, crocheted back: join 6 more squares into a matching 2×3 grid for each pillow back, working the same border, then whipstitch front and back together around 3 sides, leaving one side open to insert the pillow form, and add a few crocheted ties or a row of buttons to close the opening.
- Option B, fabric back: cut a piece of coordinating fabric to match the front panel’s dimensions plus a seam allowance, and sew it to the crocheted front panel around 3 sides, leaving an opening for the pillow form with a simple envelope closure or buttons.
Finishing
Weave in every square’s starting and ending tail individually across the entire bedspread and both pillow shams, since a project this size accumulates a very large number of loose ends. Steam-block the finished bedspread flat, pinning the scalloped border open evenly on all 4 sides, and block both pillow fronts the same way before assembling the shams. Insert the pillow forms once both shams are fully sewn and closed.
Tips for Success
- Keep your color and round sequence identical on every single square; even small variations become very visible once dozens of squares sit side by side.
- Join squares at the exact same corner and ch-sp points throughout the whole bedspread, so the grid lines up consistently across its full size.
- Work in batches, several squares at a time, rather than joining each one immediately after finishing it, so you can periodically check the overall grid lies flat.
- Block the bedspread in sections on a large flat surface if you don’t have space to block the whole thing at once, working corner by corner.
- Make the pillow squares from the same dye lots as the bedspread if possible, so the set reads as truly matching rather than subtly different.
Common Mistakes to Avoid
- Varying the color sequence between squares, even slightly, breaks the tile-like consistency this design depends on. Fix: keep a written reference of the exact round-by-round color sequence and check it for every square.
- Joining squares at inconsistent points causes visible misalignment across such a large grid. Fix: always join at the same designated corner and ch-sp points throughout.
- Underestimating how much yarn a project this size requires. Fix: calculate total yardage from a few finished squares before buying all your yarn, and buy a bit extra to account for tension variation.
- Skipping intermediate flatness checks on a project this large means catching a drift only after dozens of rows are joined. Fix: lay the growing bedspread flat and check it every few rows rather than only at the end.
- Making the pillow squares in a different yarn batch without checking color match. Fix: compare pillow yarn against bedspread yarn in natural light before starting the shams.
Ways to Customize This Pattern
- Reduce the grid size for a throw blanket instead of a full bedspread.
- Swap the blue and cream palette for a different two-color combination to match your own bedroom decor.
- Skip the pillow shams and make only the bedspread, or make additional shams for more pillows.
- Add a third accent color to the flower center for extra visual interest.
- Use a fabric backing on the full bedspread as well as the pillows for added warmth and easier care.
Frequently asked questions
Block one square first to get its exact finished measurement, then divide your desired bedspread width and length by that measurement to calculate columns and rows, adding extra squares for overhang on the sides and foot of the bed.
Strongly recommended. Sewing together 195-plus squares after the fact would add a substantial amount of additional finishing time compared to joining each square as you complete it.
Yes, though using the same flower square and color sequence is what makes the set read as coordinated. A different but complementary color combination on the pillows can still look intentional if planned well.
This usually means join tension varied across the piece, tighter in some areas and looser in others. Recheck your join stitches for consistency, and a thorough, firm block will correct much of the remaining unevenness.
The finished Blue Flower Granny Square Bedspread Crochet Pattern

