Blue Layered Flower Hexagon Bedspread and Cushion Crochet Pattern
Beginner Friendly
Perfect for those just starting their crochet journey, with clear instructions and simple techniques
Single-Day Project
A satisfying project you can complete in a single afternoon or evening.
Handmade Gift
A beautiful keepsake — free forever. Read online or print at home.
About This Blue Layered Flower Hexagon Bedspread and Cushion Crochet Pattern
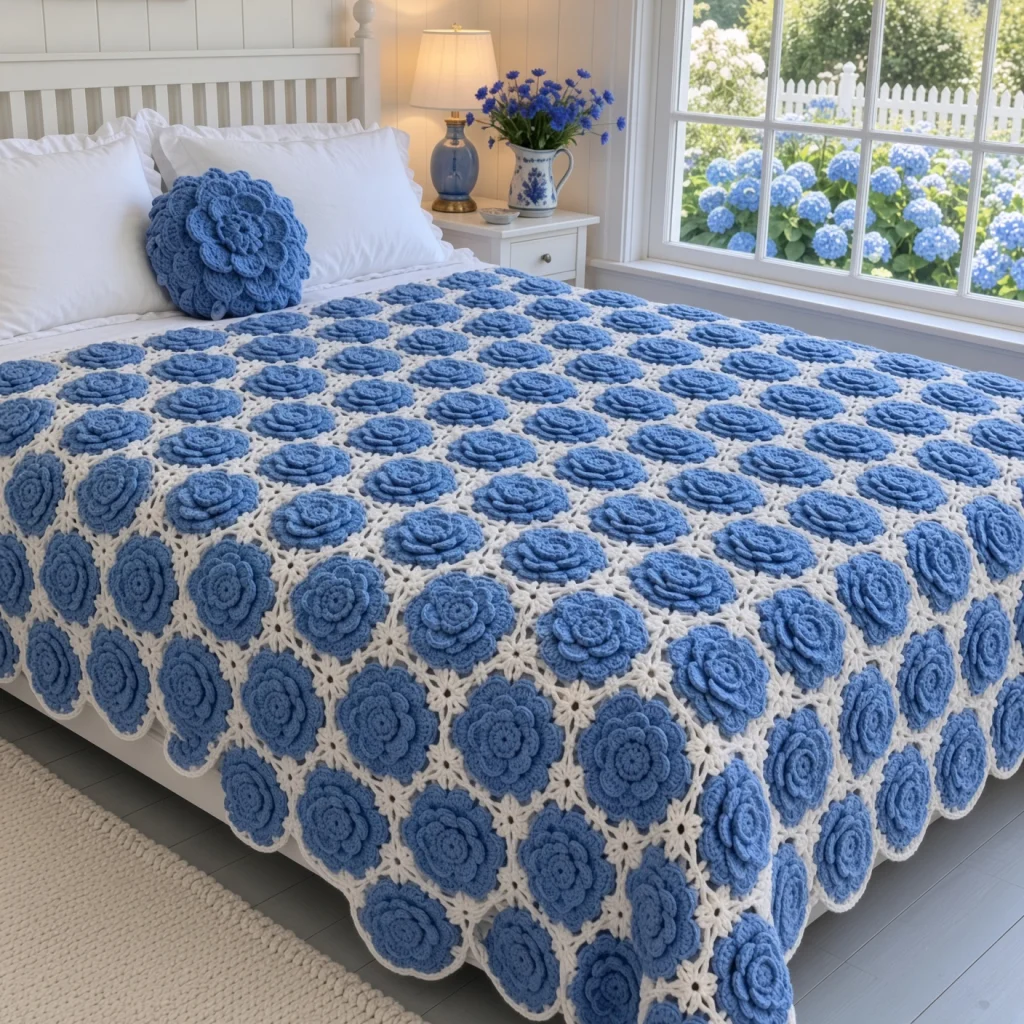
This layered flower hexagon bedspread is covered in 124 cornflower blue blooms, each with four tiers of rounded petals that rise from a lacy center. Every flower sits in a white hexagon, and where three hexagons meet, the lacy edges come together in a little white star. A large round flower cushion repeats the bloom in a bigger size, perfect for the head of the bed.
Each hexagon is made in one piece, with no sewing. The flower is built like a classic Irish rose: each new layer of petals starts with chain loops anchored behind the layer before, so the petals stack up in tiers. The white rounds then grow from behind the last petal layer and turn the circle into a hexagon, which is joined to its neighbors in the final lacy round.
The bedspread takes around 100 to 120 hours, with each hexagon taking about 50 minutes. It suits a crocheter who is comfortable working around the back of stitches and joining motifs as they go.
Materials
- Worsted weight cotton blend, cornflower blue about 1,800 m (9 skeins of 100 g / 200 m)
- Worsted weight cotton blend, white about 2,600 m (13 skeins)
- 5 mm crochet hook
- Polyester fiberfill about 300 g, for the round cushion
- Stitch markers a few
- Tapestry needle and scissors
Abbreviations
MRmagic ringchchainscsingle crochethdchalf double crochetdcdouble crochetsl stslip stitchskskipspspacest(s)stitch(es)rndroundreprepeatJAYGjoin as you goRSright sideFlower Center and First Petals (Rnds 1-2)
- Rnd 1: with blue, MR, ch 5 (counts as dc and ch 2), *dc in ring, ch 2; rep from * 4 more times, join to 3rd ch of ch 5. Pull the ring tight. (6 dc, 6 ch-2 sps)
- Rnd 2: sl st in first ch-2 sp, *(sc, hdc, 3 dc, hdc, sc) in sp; rep from * in each of the remaining 5 sps, join. (6 petals)
- The 6 ch-2 sps of Rnd 1 leave small eyelets around the center of the flower.
Petal Layers 2-4 (Rnds 3-8)
- Rnd 3: working behind the petals, *ch 4, sc around the back of the next dc of Rnd 1; rep from * 5 more times, ending in the first st. (6 ch-4 loops)
- Rnd 4: sl st in first ch-4 loop, *(sc, hdc, 5 dc, hdc, sc) in loop; rep from * in each of the remaining 5 loops, join. (6 petals)
- Rnd 5: working behind the petals, *ch 6, sc around the back of the next sc of Rnd 3; rep from * 5 more times. (6 ch-6 loops)
- Rnd 6: sl st in first ch-6 loop, *(sc, hdc, 7 dc, hdc, sc) in loop; rep from * in each of the remaining 5 loops, join. (6 petals)
- Rnd 7: working behind the petals, *ch 8, sc around the back of the next sc of Rnd 5; rep from * 5 more times. (6 ch-8 loops)
- Rnd 8: sl st in first ch-8 loop, *(sc, hdc, 9 dc, hdc, sc) in loop; rep from * in each of the remaining 5 loops, join. Fasten off blue. (6 petals)
- The flower has four tiers of 6 petals and measures about 17 cm across.
White Hexagon (Rnds 9-12)
- Rnd 9: working behind the petals, join white with sc around the back of any sc of Rnd 7, *ch 10, sc around the back of the next sc of Rnd 7; rep from * 4 more times, ch 10, join to first sc. (6 ch-10 loops)
- Rnd 10: sl st in first ch-10 loop, ch 3 (counts as dc here and throughout), (4 dc, ch 3, 5 dc) in same loop, *(5 dc, ch 3, 5 dc) in next loop; rep from * 4 more times, join. (10 dc per side, 60 dc, 6 corner ch-3 sps)
- Rnd 11: ch 3, dc in each st to the next corner, (2 dc, ch 3, 2 dc) in corner sp, *dc in each st to next corner, (2 dc, ch 3, 2 dc) in corner sp; rep from * 4 more times, dc in each remaining st, join. (14 dc per side, 84 dc)
- Rnd 12: rep Rnd 11. (18 dc per side, 108 dc)
Lace Edge (Rnd 13, first hexagon only)
- Rnd 13: sl st to the next corner sp, ch 3, (ch 4, dc) in same sp, *[ch 2, sk next 2 sts, dc in next st] 6 times, ch 2, (dc, ch 4, dc) in next corner sp; rep from * 4 more times, [ch 2, sk next 2 sts, dc in next st] 6 times, ch 2, join to top of ch 3. Fasten off. (7 ch-2 sps per side, 6 corner ch-4 sps)
- The hexagon measures about 21 cm between flat sides.
- Orientation: turn the hexagon so one corner points straight up. The sides are then: left, right, upper left, upper right, lower left and lower right.
Joining As You Go (Rnd 13 for all other hexagons)
- Work Rnds 1-12 as usual, then work Rnd 13, joining along each side that touches a hexagon already in place.
- Side join: replace each ch 2 with: ch 1, sl st in the matching ch-2 sp of the neighbor, ch 1. (7 joins per side)
- Corner join: replace the ch 4 with: ch 2, sl st in the neighbor’s corner ch-4 sp, ch 2. Where a corner meets two hexagons that are already joined, sl st into the point where they meet, so all three corners join in one spot. This forms the little white star.
- Work plain sps on any side with no neighbor yet.
Bedspread Layout
- The hexagons are set in offset rows with a corner pointing up: 13 rows, alternating 10 and 9 hexagons. (124 hexagons)
- Row 1 (10 hexagons): the first hexagon is worked plain. Hexagons 2-10 join their left side to the right side of the hexagon before.
- Row 2 (9 hexagons): each hexagon sits between two hexagons of Row 1. It joins its lower left side to the upper right side of the Row 1 hexagon below left, and its lower right side to the upper left side of the Row 1 hexagon below right. Hexagons 2-9 also join their left side to the hexagon before.
- Row 3 (10 hexagons): hexagon 1 joins only its lower right side, to Row 2 hexagon 1. Hexagons 2-9 join left, lower left and lower right. Hexagon 10 joins its left side and its lower left side, to Row 2 hexagon 9.
- Rows 4-13: rep Rows 2 and 3 alternately, ending with a Row 3.
- The joined bedspread measures about 210 x 242 cm, with zigzag sides and a gently scalloped foot and head.
Edging
- Rnd 1: with white, RS facing, join in any outer corner sp. Work 2 sc in each ch-2 sp, 3 sc in each outer corner sp and 1 sc in each joining point along the edge, all the way around. Join.
- Rnd 2: ch 1, *sc in next 2 sts, ch 3, sl st in 3rd ch from hook (picot); rep from * around, working 1 or 2 sc at the end if needed to finish evenly. Join and fasten off.
- The edging follows the zigzag of the hexagons, giving the bedspread a soft, lacy outline.
Round Flower Cushion
- Front: with blue, work Rnds 1-8 of the hexagon.
- Rnd 9: working behind the petals, *ch 10, sc around the back of the next sc of Rnd 7; rep from * 5 more times. (6 ch-10 loops)
- Rnd 10: in each ch-10 loop, (sc, hdc, 11 dc, hdc, sc). (6 petals)
- Rnd 11: working behind, *ch 12, sc around the back of the next sc of Rnd 9; rep from * 5 more times. (6 ch-12 loops)
- Rnd 12: in each ch-12 loop, (sc, hdc, 13 dc, hdc, sc). Fasten off leaving a long tail. (6 petals; the flower is about 30 cm across)
- Back: with blue, MR, ch 3, 11 dc in ring, join. (12 sts) Each following rnd, increase 12 sts evenly, with one more dc between increases each rnd, until you have 12 rnds. (144 sts, about 26 cm across)
- Place the back behind the front, WS together, and sew it to the ch-12 loops of Rnd 11 all around, stuffing firmly before closing. The outer petals frame the cushion.
Finishing
Weave in all ends on the back of each hexagon. Hide the blue tails behind the petals and the white tails inside the dc rounds, where they won’t show through the lace edge.
Lay the bedspread flat and steam it lightly, holding the iron above the flowers so the petals keep their shape. Pin the edges into straight lines where the hexagons meet. Once dry, lift each layer of petals with your fingers so the flowers look full and open.
Tips for Success
- Make the blue flowers for many hexagons first, then work all the white rounds. Fewer color changes means faster, more even work.
- Keep the loop chains in Rnds 3, 5, 7 and 9 snug. Loose loops make the petals droop and push the hexagon out of shape.
- Always fold the previous petals forward before working behind them, so you don’t catch one by accident.
- Count the dc per side after Rnds 10, 11 and 12. Each side must match, or the hexagons won’t join neatly.
- Use a cotton blend so the petals stay crisp and the lacy edge holds its shape.
Common Mistakes to Avoid
- Anchoring a loop round to the wrong stitches. Each loop round anchors around the sc of the previous loop round (or the dc of Rnd 1). If you skip ahead, the petal layers won’t sit behind each other.
- A hexagon that cups. If the white rounds pull in around the flower, the ch-10 loops in Rnd 9 are too short. Make them ch 11.
- Wavy sides. Too many sts on one side makes it ruffle. Each side should have exactly 10, 14 and 18 dc after Rnds 10, 11 and 12.
- Gaps at the stars. When three corners meet, all three must join in one spot. If the third corner joins to only one neighbor, a hole appears.
- Joining the wrong sides. Always turn the hexagon with a corner pointing up before joining, so the left and lower sides are in the right places.
Ways to Customize This Pattern
- Make each tier of petals a different shade of blue, from navy in the center to sky blue outside, for a shaded flower.
- Use pink, lilac or yellow flowers for a different color story, or mix all of them for a garden bedspread.
- Change the size: each extra hexagon in a row adds 21 cm in width, and each extra row adds about 18 cm in length.
- Make a round table topper from 7 hexagons: one in the center and six around it.
- Fill the zigzag sides with half hexagons for straight edges.
Frequently asked questions
Each new layer starts with chain loops anchored around the back of stitches from the layer before. The new petals are worked into those loops, so they grow from behind the previous petals and peek out around them.
Yes. Work Rnd 13 plain on every hexagon, lay them out and sew the matching sps together. Joining as you go is faster and gives the neat little stars where three corners meet.
Cotton blend petals hold their shape well and spring back after being pressed. If they flatten, steam them lightly and lift each layer with your fingers.
Wash it on a gentle cold cycle inside a large laundry bag, or by hand, and dry it flat. Wash a test hexagon first, since blue can bleed onto white.
The finished Blue Layered Flower Hexagon Bedspread and Cushion Crochet Pattern

