Blue Rose Medallion Bedspread and Shams Crochet Pattern
Beginner Friendly
Perfect for those just starting their crochet journey, with clear instructions and simple techniques
Single-Day Project
A satisfying project you can complete in a single afternoon or evening.
Handmade Gift
A beautiful keepsake — free forever. Read online or print at home.
About This Blue Rose Medallion Bedspread and Shams Crochet Pattern
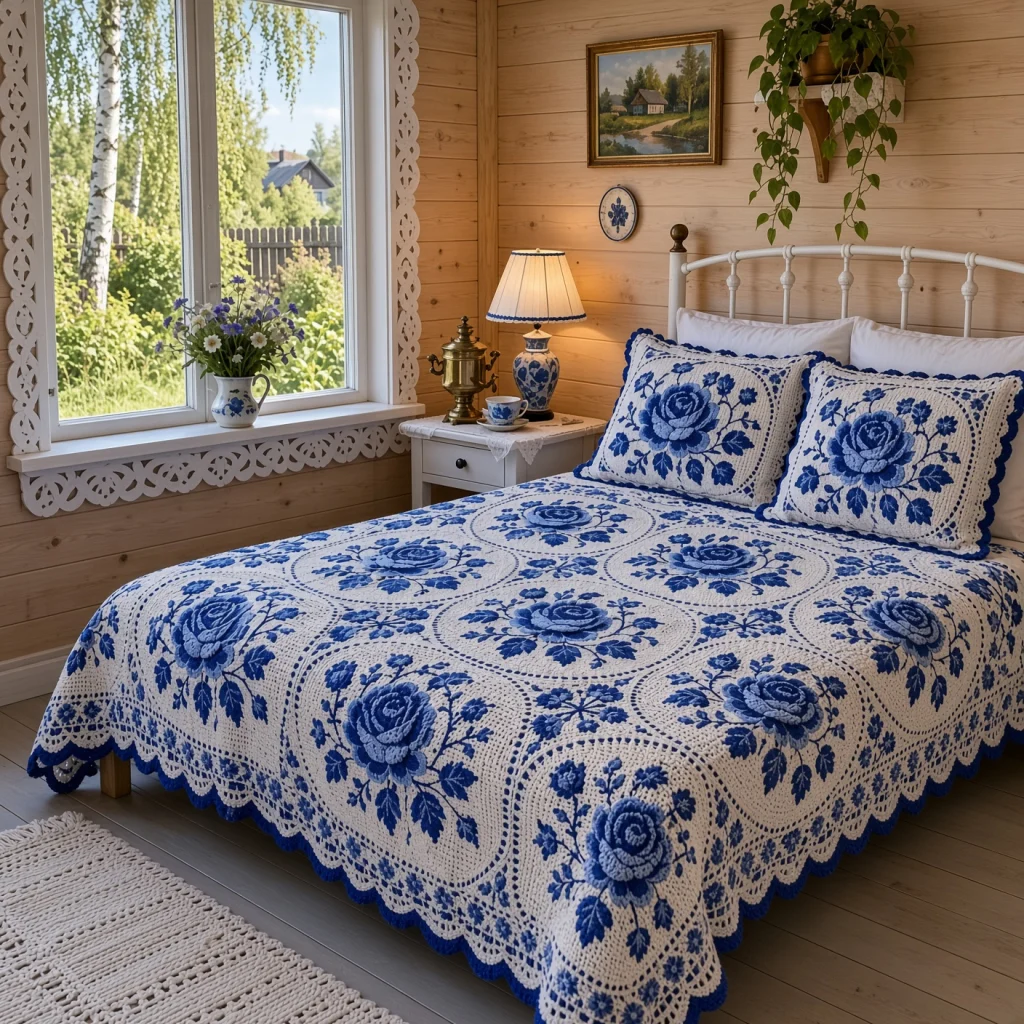
This blue rose crochet bedspread is inspired by Gzhel porcelain, the white and cobalt pottery of Russian folk art. Each of the 56 white squares holds a round medallion framed by a ring of eyelets, with a large two-tone blue rose in the middle, two deep blue leaves and sprays of small embroidered leaves. Where four squares meet, little blue florets cluster together between the circles, and a lacy border with a blue scalloped edge frames the bed.
Each square starts as a circle worked in rounds of double crochet, finished with an eyelet ring, and is then squared off with graded stitches that grow taller toward the corners. The roses are made as a single strip of shells in light blue, edged in royal blue and rolled up, so each petal shades from pale to deep blue like a hand-painted stroke. The leaves, florets and embroidered sprigs add the finishing brushwork.
The bedspread takes about 150 to 180 hours. Each square and its rose take around two and a half hours together, and the work is easy to carry around. It suits a crocheter who is comfortable with circle-to-square construction, simple embroidery and careful finishing.
Materials
- Worsted weight cotton blend, white about 4,000 m (20 skeins of 100 g / 200 m)
- Worsted weight cotton blend, light blue about 500 m (3 skeins)
- Worsted weight cotton blend, royal blue about 700 m (4 skeins)
- Worsted weight cotton blend, navy about 400 m (2 skeins)
- 5 mm crochet hook for the squares, joining and border
- 4 mm crochet hook for the roses, leaves and florets
- Two 45 cm square cushion forms
- Tapestry needle, stitch markers and scissors
Abbreviations
MRmagic ringchchainscsingle crochethdchalf double crochetdcdouble crochettrtreble crochetsl stslip stitchsurf sl stsurface slip stitch: yarn held behind the work, insert hook from the front, pull up a loop and draw it through the loop on hooklazy daisyembroidered leaf: bring the needle up, go back down in the same hole leaving a loop, come up at the tip inside the loop and make a tiny stitch over itskskipspspacest(s)stitch(es)rndroundreprepeatRS / WSright side / wrong sideCircle (Rnds 1-10)
- Rnd 1: with white and 5 mm hook, MR, ch 3 (counts as dc here and throughout), 11 dc in ring, join with sl st to top of ch 3. Pull the ring tight. (12 sts)
- Rnd 2: ch 3, dc in same st, 2 dc in each st around, join. (24 sts)
- Rnd 3: ch 3, 2 dc in next st, *dc in next st, 2 dc in next st; rep from * 10 more times, join. (36 sts)
- Rnd 4: ch 3, dc in next st, 2 dc in next st, *dc in next 2 sts, 2 dc in next st; rep from * 10 more times, join. (48 sts)
- Rnds 5-8: work as Rnd 4, with one more dc between increases each rnd. (Rnd 5: 60 sts, Rnd 6: 72, Rnd 7: 84, Rnd 8: 96 sts)
- Rnd 9 (eyelets): ch 4 (counts as dc and ch 1), sk next st, *dc in next st, ch 1, sk next st; rep from * 46 more times, join to 3rd ch of ch 4. (48 dc, 48 ch-1 sps)
- Rnd 10: ch 1, sc in each dc and each ch-1 sp around, join. (96 sc)
- The circle measures about 22 cm across.
Squaring Up (Rnds 11-14)
- Rnd 11: ch 1, sc in same st and next 3 sts, hdc in next 3 sts, dc in next 3 sts, tr in next 2 sts, (2 tr, ch 2, 2 tr) in next st, *tr in next 2 sts, dc in next 3 sts, hdc in next 3 sts, sc in next 7 sts, hdc in next 3 sts, dc in next 3 sts, tr in next 2 sts, (2 tr, ch 2, 2 tr) in next st; rep from * 2 more times, tr in next 2 sts, dc in next 3 sts, hdc in next 3 sts, sc in last 3 sts, join. (27 sts per side, 108 sts, 4 corner ch-2 sps)
- Rnd 12: ch 3, dc in each st to the next corner, (2 dc, ch 2, 2 dc) in corner sp, *dc in each st to next corner, (2 dc, ch 2, 2 dc) in corner sp; rep from * 2 more times, dc in each remaining st, join. (31 sts per side, 124 sts)
- Rnd 13: rep Rnd 12. (35 sts per side, 140 sts)
- Rnd 14: ch 1, sc in each st around, working (sc, ch 2, sc) in each corner sp, join. Fasten off. (37 sc per side, 148 sc)
- The square measures about 30 cm. Make 56.
Two-Tone Roses (make 56)
- With light blue and 4 mm hook, ch 42.
- Row 1: dc in 6th ch from hook, *ch 1, sk next ch, dc in next ch; rep from * across. (19 dc, 19 ch-1 sps, counting the skipped chains at the start as one sp)
- Row 2: ch 1, turn, 5 dc in each ch-1 sp across. Fasten off light blue. (19 shells)
- Row 3: join royal blue in the first dc, ch 1, sc in each dc of the first shell, *sl st between shells, sc in each dc of the next shell; rep from * across. Fasten off leaving a 50 cm tail. (19 petals edged in royal blue)
- Starting at the end where you began the chain, roll the strip into a spiral, tight at the center and looser toward the outside, with the shells facing up. Sew through all layers at the base to hold the rose together.
- The rose is about 10 cm across.
Leaves (make 112)
- With navy and 4 mm hook, ch 12.
- Side 1: sl st in 2nd ch from hook, sc in next ch, hdc in next ch, dc in next 2 ch, tr in next 2 ch, dc in next ch, hdc in next ch, sc in next ch, 3 sc in last ch.
- Side 2: working in the free loops on the other side of the chain, sc in next ch, hdc in next ch, dc in next ch, tr in next 2 ch, dc in next 2 ch, hdc in next ch, sc in next ch, sl st in next ch. (10 sts per side)
- Tip: ch 2, sl st in the first sl st of Side 1. Fasten off leaving a 30 cm tail.
- Vein: with light blue, work surf sl st along the center chain from the base to the tip. The leaf is about 6 cm long. You need 2 for each square.
Corner Florets (make 224)
- With royal blue and 4 mm hook, MR, ch 1, 5 sc in ring, join with sl st to first sc. Pull the ring tight. (5 sts)
- *(sl st, ch 2, 2 dc, ch 2, sl st) in next st; rep from * 4 more times. (5 petals)
- Fasten off leaving a 20 cm tail. Make a small French knot in white in the center. You need 4 for each square.
Assembling Each Medallion
- Stems: with navy, RS facing, work four curved lines of surf sl st, each about 6 cm long, starting just outside the center of the circle and sweeping out toward the upper left, upper right, lower left and lower right. Stop inside the eyelet ring.
- Small leaves: with royal blue, embroider 3 lazy daisy leaves along each stem, alternating sides.
- Large leaves: sew 2 navy leaves under the center of the circle, pointing down and out at about 45 degrees.
- Rose: sew the rose to the center of the circle, slightly above center, covering the start of the stems and the bases of the leaves. Sew through the base all around.
- Corner florets: sew a floret in each corner of the square, outside the eyelet ring, about 3 cm in from each edge. Embroider 2 small navy lazy daisy leaves beside each floret.
Joining the Squares
- Lay out 56 squares, 7 across and 8 long. Where four squares meet, the four corner florets form a small cluster between the circles.
- Join method: place two squares side by side, RS up. With white and 5 mm hook, sl st through the BLO of the matching sts of both squares, starting and ending in the corner ch-2 sps. (39 sl st per side, including both corners)
- Join the squares into rows of 7, then join the rows along their long edges.
- Where four corners meet, work through all four corner sps so no gap is left.
- The joined bedspread measures about 210 x 240 cm.
Lace Border
- Rnd 1: with white, RS facing, join in a corner sp. Work 3 sc in each bedspread corner sp, sc in each st along the edge of every square, and 1 sc in each point where two squares meet; on the long sides only, work 2 sc in the first and last joining points. Join. (305 sc along each long side, 265 along each short side and 12 at the corners: 1,152 sts)
- Rnd 2 (mesh): sl st to the center st of the nearest corner. Ch 6 (counts as dc and ch 3), dc in same st, *[ch 1, sk next st, dc in next st] across the side until you reach the center st of the next corner, ch 3, dc in same st; rep from * around, ending with ch 1 and join to 3rd ch of ch 6. (154 ch-1 sps along each long side, 134 along each short side, and 4 corner ch-3 sps)
- Rnd 3 (mesh): sl st in corner ch-3 sp, ch 6, dc in same sp, *[ch 1, dc in next dc] across the side to the next corner, ch 1, (dc, ch 3, dc) in corner sp; rep from * around, ending with ch 1 and join. (156 ch-1 sps along each long side, 136 along each short side)
- Rnd 4 (shells): sl st in corner sp, ch 3, (2 dc, ch 2, 3 dc) in same sp, *[5 dc in next ch-1 sp, sc in next ch-1 sp] across the side, (3 dc, ch 2, 3 dc) in corner sp; rep from * around, omitting the last corner, join. Fasten off white. (78 shells along each long side, 68 along each short side)
- Rnd 5: join royal blue in any sc, *sl st in sc, [sc in next dc, ch 1] 4 times, sc in next dc; rep from * around, working [sc, ch 1] in each st of the corner groups, join. Fasten off.
- The border is about 9 cm deep, with a blue scalloped edge.
Large Cushion Medallions (make 4)
- Work Rnds 1-8 of the circle. (96 sts)
- Rnds 9-14: continue increasing as for Rnds 5-8, with one more dc between increases each rnd. (Rnd 9: 108 sts, and so on to Rnd 14: 168 sts)
- Rnd 15 (eyelets): work as Rnd 9 of the circle. (84 dc, 84 ch-1 sps)
- Rnd 16: ch 1, sc in each dc and each ch-1 sp around, join. (168 sc)
- Rnd 17: ch 1, sc in same st and next 5 sts, hdc in next 6 sts, dc in next 6 sts, tr in next 3 sts, (2 tr, ch 2, 2 tr) in next st, *tr in next 3 sts, dc in next 6 sts, hdc in next 6 sts, sc in next 11 sts, hdc in next 6 sts, dc in next 6 sts, tr in next 3 sts, (2 tr, ch 2, 2 tr) in next st; rep from * 2 more times, tr in next 3 sts, dc in next 6 sts, hdc in next 6 sts, sc in last 5 sts, join. (45 sts per side, 180 sts)
- Rnd 18: work as Rnd 12 of the square. (49 sts per side, 196 sts)
- Rnd 19: work as Rnd 14 of the square. Fasten off. (51 sc per side, 204 sc)
- Each large medallion measures about 43 cm. Make 2 fronts and 2 backs.
Large Rose and Cushion Fronts
- Large rose (make 2): with light blue, ch 62. Row 1: dc in 6th ch from hook, *ch 1, sk next ch, dc in next ch; rep from * across. (29 dc, 29 ch-1 sps) Row 2: ch 1, turn, 5 dc in each ch-1 sp across. (29 shells) Row 3: with royal blue, edge as for the small rose. Roll and sew. The rose is about 14 cm across.
- Decorate each front medallion as for the bedspread squares, using the large rose, 3 navy leaves, six stems with 4 lazy daisy leaves each, and 4 corner florets.
- Leave the back medallions plain.
Cushion Assembly
- Hold a front and a back WS together, with the front facing you and the corners matched.
- Rnd 1: with white, join in a corner sp through both layers. Working through both layers, 3 sc in each corner sp and sc in each st along the sides. Insert the cushion form before closing the last side. Join. Fasten off white. (216 sts: 54 per side including corners)
- Rnd 2: join royal blue, ch 1, *sc in next st, sk next st, 5 dc in next st, sk next st; rep from * around, join. Fasten off. (54 shells)
- Rep with the second cushion.
Finishing
Weave in all ends on the WS. Run the blue and navy tails under the rose and leaves so nothing dark shows through the white, especially near the eyelet rings where the fabric is open.
Wet block the bedspread on a large flat surface. Pin the eyelet rings round, the squares straight and every scallop of the border. Let it dry completely, then fluff each rose with your fingers so the petals stand up again.
Tips for Success
- Stagger the increases in the circle so they don’t line up into points. Starting each rnd at a different spot keeps the circle round.
- Make the roses, leaves and florets in batches while you work the squares. With 56 medallions, it keeps the project moving.
- Roll the roses tightly at the center. A loose center makes the rose flat and the light blue inner petals won’t show.
- Use a colorfast cotton blend and wash a test swatch with white and royal blue together before you start.
- Decorate each square before joining, while the back is still easy to reach.
Common Mistakes to Avoid
- A wavy or cupped circle. If the circle ruffles, go down a hook size for Rnds 5-8; if it cups, go up a size.
- Rounded corners after Rnd 11. If the square still looks round, the tr corner groups were worked too tightly. Keep them loose so they stand tall.
- Losing count in Rnd 11. Mark each corner st before starting the rnd. There must be exactly 24 sts between corner markers.
- A rose that unrolls. Sew through every layer at the base, not just the outer edge.
- An uneven border. If the mesh or shells don’t fit the corners, recount Rnd 1. The extra sts on the long sides are what make the mesh even.
Ways to Customize This Pattern
- Use red roses with green leaves on white for a classic rose bedspread, or pink and green on cream for a softer cottage look.
- Change the size: each square adds 30 cm. A throw of 4 by 5 squares is about 138 x 168 cm with the border.
- Add small blue florets to the solid band of the border, every 15 cm, to echo the corner clusters.
- Make a single medallion as a cushion, tablecloth center or wall hanging.
- Leave the roses flat by not rolling the strip; sew it in a spiral directly onto the circle for a quicker, embroidered-looking rose.
Frequently asked questions
The shells are worked in light blue and then edged in royal blue. When the strip is rolled, each petal has a pale center and a deep blue edge, which looks like the brushstrokes on Gzhel porcelain.
Yes, on Rnd 14. Decorate each square first, though, because the roses and leaves are much easier to sew on before the square is part of the bedspread.
Cotton blend roses hold their shape well. If they flatten over time, steam them lightly and fluff the petals with your fingers.
Wash it on a gentle cold cycle inside a large laundry bag, or by hand, and dry it flat. Use a color catcher for the first few washes so the blues don’t stain the white.
The finished Blue Rose Medallion Bedspread and Shams Crochet Pattern

